2015 FORD F250 SUPER DUTY instrument panel
[x] Cancel search: instrument panelPage 306 of 470
VEHICLE IDENTIFICATION
NUMBER
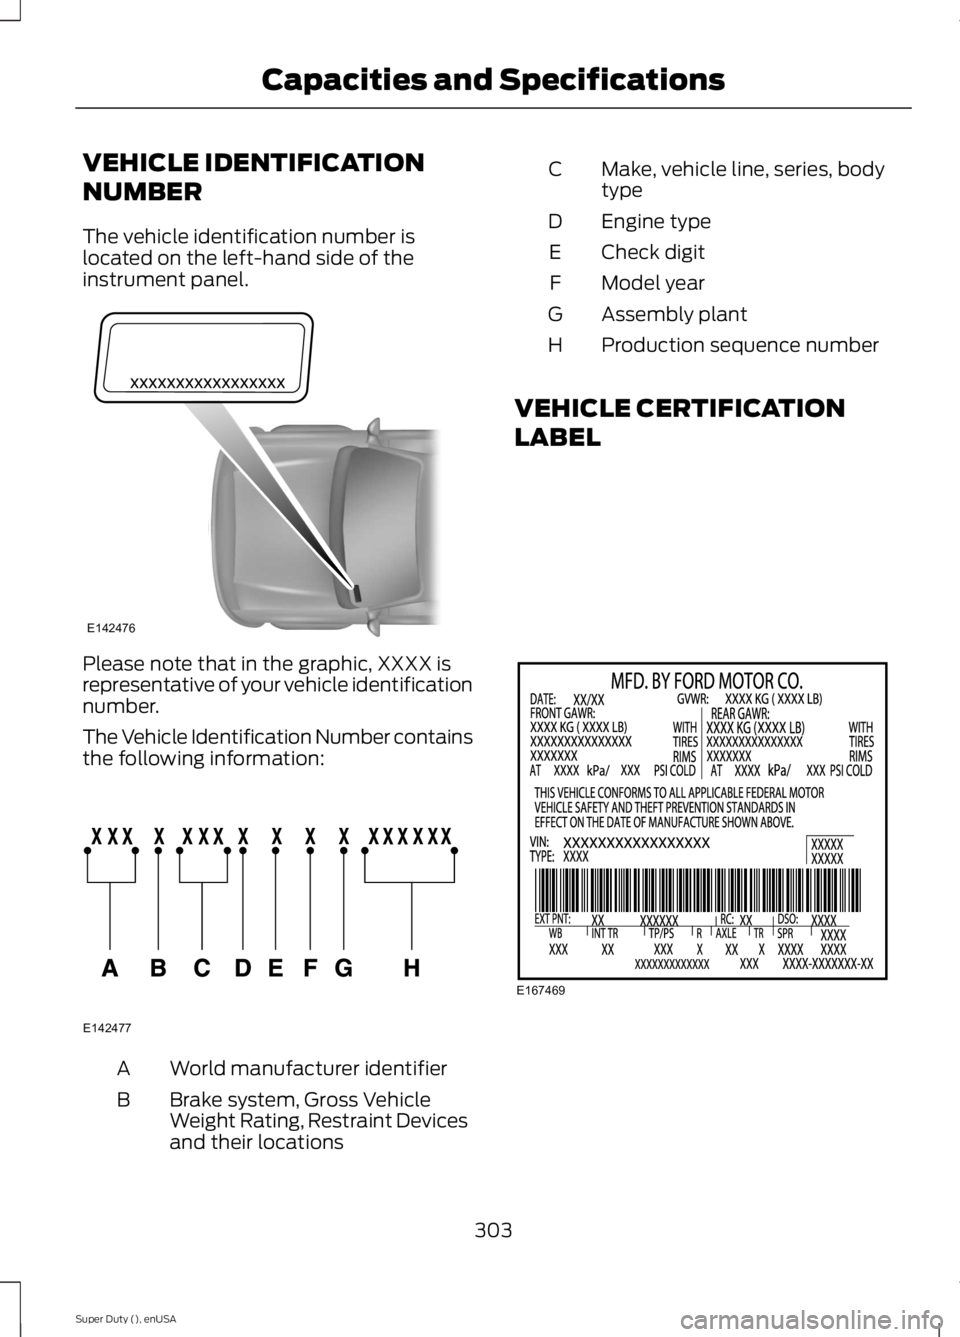
The vehicle identification number islocated on the left-hand side of theinstrument panel.
Please note that in the graphic, XXXX isrepresentative of your vehicle identificationnumber.
The Vehicle Identification Number containsthe following information:
World manufacturer identifierA
Brake system, Gross VehicleWeight Rating, Restraint Devicesand their locations
B
Make, vehicle line, series, bodytypeC
Engine typeD
Check digitE
Model yearF
Assembly plantG
Production sequence numberH
VEHICLE CERTIFICATION
LABEL
303
Super Duty (), enUSA
Capacities and SpecificationsE142476 E142477 E167469
Page 325 of 470
The USB port allows you to plug in mediaplaying devices, memory sticks and chargedevices (if supported). See SYNC™ (page323).
MEDIA HUB (IF EQUIPPED)
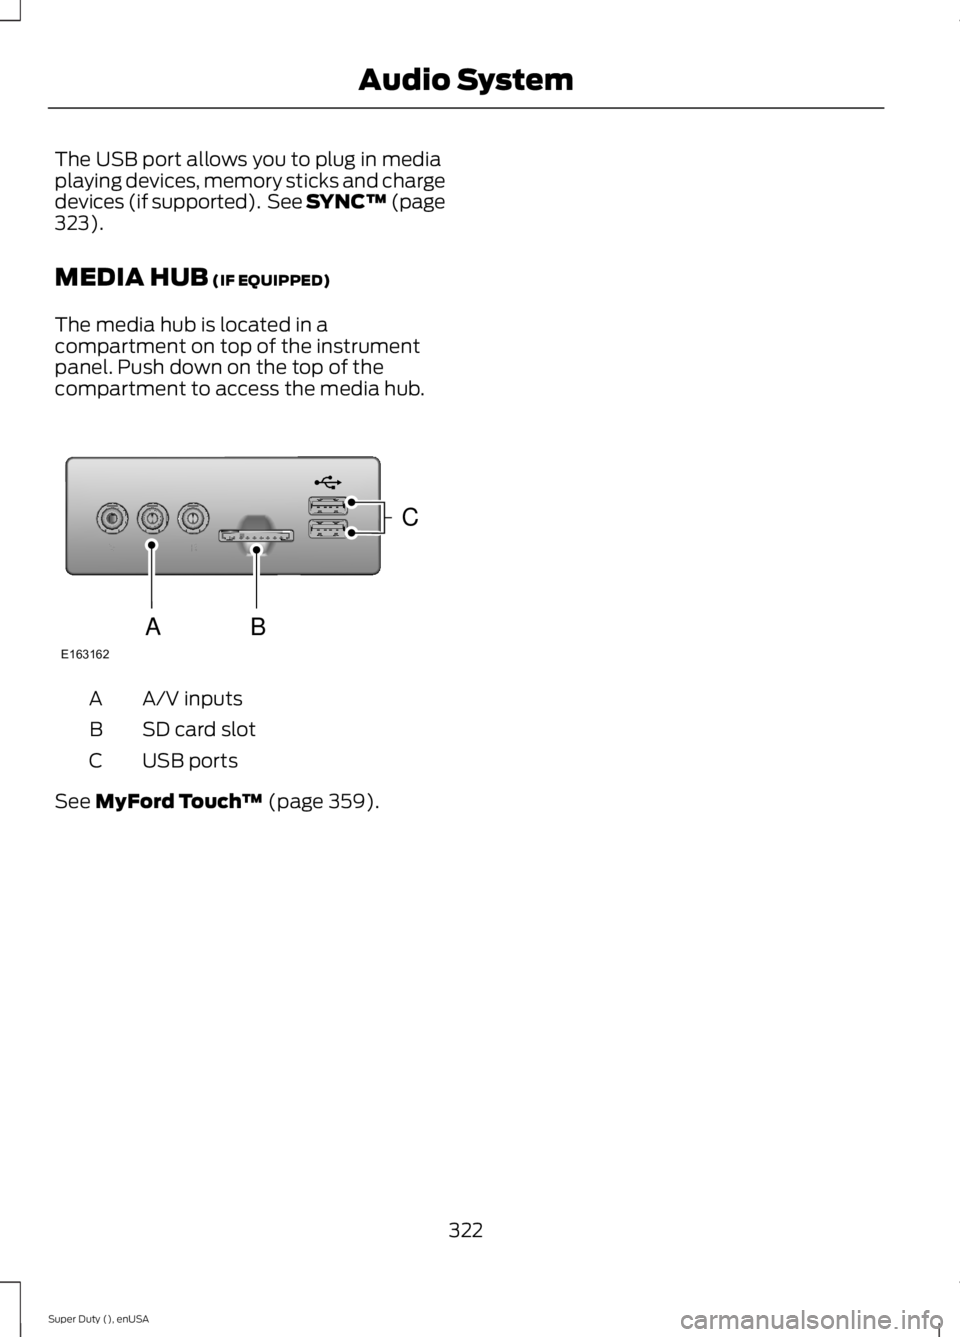
The media hub is located in acompartment on top of the instrumentpanel. Push down on the top of thecompartment to access the media hub.
A/V inputsA
SD card slotB
USB portsC
See MyFord Touch™ (page 359).
322
Super Duty (), enUSA
Audio SystemE163162
C
BA
Page 370 of 470
Under this menu, you can setyour clock, access and adjust thedisplay, sound and vehiclesettings as well as access settings forspecific modes or the help feature.
Clock
Note:You cannot manually set the date.Your vehicle’s GPS does this for you.
Note:If the battery has been disconnected,your vehicle needs to acquire a GPS signalto update the clock. Once your vehicleacquires the signal, it may take a fewminutes for the update to display the correcttime.
1. Press the Settings icon > Clock.
2. Press + and - to adjust the time.
From this screen, you can also make otheradjustments such as 12-hour or 24-hourmode, activate GPS time synchronizationand have the system automatically updatenew time zones.
You can also turn the outside airtemperature display off and on. It appearsat the top center of the touchscreen, nextto the time and date.
The system automatically saves anyupdates you make to the settings.
Display
You can adjust the touchscreen displaythrough the touchscreen or by pressing thevoice button on your steering wheelcontrols and when prompted, say, "Displaysettings".
Press the Settings icon >Display, to access and makeadjustments using thetouchscreen.
•Brightness allows you to make thescreen display brighter or dimmer.
•Auto DIM, when set to On, lets you usethe Auto Dim Manual Offset feature.When set to Off, screen brightnessdoes not change.
•Mode allows you to set the screen toa certain brightness or have the systemautomatically change based on theoutside light level, or turn the displayoff.
•If you select AUTO or NIGHT, youhave the options of turning thedisplay's Auto Dim feature on or offand changing the Auto Dim ManualOffset feature.
•Auto Dim Manual Offset allows youto adjust screen dimming as theoutside lighting conditions change fromday to night. This feature also allowsyou to adjust screen brightness usingthe instrument panel dimming control.
•Edit Wallpaper
•You can have your touchscreendisplay the default photo or uploadyour own.
Uploading Photos for Your HomeScreen Wallpaper
Note:You cannot load photos directly fromyour camera. You must access the photoseither from your USB mass storage deviceor from an SD card.
Note:Photographs with extremely largedimensions (such as 2048 x 1536) may notbe compatible and appear as a blank(black) image on the display.
Your system allows you to upload and viewup to 32 photos.
To access, press the Settingsicon > Display > EditWallpaper, and then follow thesystem prompts to upload yourphotographs.
367
Super Duty (), enUSA
MyFord Touch™ (If Equipped)E142607 E142607 E142607 E142607
Page 391 of 470

"CD"
"Pause"
"Play"
"Play next track"
"Play previous track"
"Play track <1-512>"
"Repeat"
"Repeat folder"*
"Repeat off"
"Repeat track"
"Shuffle"
"Shuffle CD"*
"Shuffle folder"*
"Shuffle off"
"Help"
*This applies to WMA or MP3 files only.
SD Card Slot and USB Port
SD Card
Note:Your SD card slot is spring-loaded.To remove the SD card, press the card inand the system ejects it. Do not attempt topull the card to remove it as this could causedamage.
Note:The navigation system also uses thiscard slot. See Navigation (page 411).
The SD card slot is located either in thecenter console or behind a small accessdoor in the instrument panel. To accessand play music from your device, press thelower left corner of the touchscreen.
SD logo is a trademark of SD-3C, LLC.
USB Port
The USB ports are located either in thecenter console or behind a small accessdoor in the instrument panel. To accessand play music from your device, press thelower left corner of the touchscreen.
388
Super Duty (), enUSA
MyFord Touch™ (If Equipped)E142619 E142620 E142621
Page 395 of 470
To access, press the lower leftcorner on the touchscreen, thenselect the BT Stereo tab.
Bluetooth Audio Voice Commands
If you are listening to a Bluetoothaudio device, press the voicebutton on the steering wheelcontrol. When prompted, say "Next song","Pause", "Play" or "Previous song".
If you are not listening to a Bluetooth audiodevice, press the voice button and, afterthe tone, say "Next song", "Pause", "Play"or "Previous song".
A/V Inputs
WARNINGS
Driving while distracted can result inloss of vehicle control, crash andinjury. We strongly recommend thatyou use extreme caution when using anydevice that may take your focus off theroad. Your primary responsibility is the safeoperation of your vehicle. We recommendagainst the use of any handheld devicewhile driving and encourage the use ofvoice-operated systems when possible.Make sure you are aware of all applicablelocal laws that may affect the use ofelectronic devices while driving.
For safety reasons, do not connector adjust the settings on yourportable music player while yourvehicle is moving.
Store the portable music player in asecure location, such as the centerconsole or the glove box, when yourvehicle is moving. Hard objects maybecome projectiles in a crash or suddenstop, which may increase the risk of seriousinjury. The audio extension cable must belong enough to allow the portable musicplayer to be safely stored while yourvehicle is moving.
Your A/V inputs allow you to connect anauxiliary audio/video source (such as agaming systems or a personal camcorder)by connecting RCA cords (not included)to these input jacks. The jacks are yellow,red and white and are located eitherbehind a small access door on theinstrument panel or in your center console.
You can also use the A/V inputs as anauxiliary input jack to play music from yourportable music player over your vehicle'sspeakers. Plug in your 1/8 inch (3.5millimeter) RCA adapter into the two leftA/V input jacks (red and white).
Press the lower left corner of thetouchscreen, and then select A/V In.
To use the auxiliary input jack feature,make sure that your portable music playeris designed for use with headphones andthat it is fully charged. You also need anaudio extension cable with stereo male1/8-inch (3.5 millimeter) connectors at oneend and a RCA jack at the other.
1. Switch off the engine, radio andportable music player. Set the parkingbrake and put the transmission inposition P.
2.Attach one end of the audio extensioncable to the headphone output of yourplayer and the other end into theadapter in one of the two left A/V inputjacks (white or red) inside the centerconsole.
392
Super Duty (), enUSA
MyFord Touch™ (If Equipped)E142611 E142599 E142622
Page 412 of 470
Touch DUAL to turn separate passenger side temperature controls off and on.When you turn off DUAL, the passenger side temperature changes to matchthe driver side temperature.
Note: The passenger side temperature and the DUAL indicator automaticallyturn on when the passenger is adjusting their temperature control.
Fan speed: Touch + or - to increase or decrease the volume of air circulatedin your vehicle.C
Recirculated air: Touch the button to switch between outside air andrecirculated air. When you select recirculated air, the air currently in thepassenger compartment recirculates. This may reduce the time needed to coolthe interior (when used with A/C) and may reduce unwanted odors fromentering your vehicle.
D
Note: Recirculated air may turn off automatically (or be prevented from turningon) in all airflow modes except MAX A/C to reduce risk of fogging.
MAX A/C: Touch the button to maximize cooling. Recirculated air flows throughthe instrument panel vents, air conditioning automatically turns on, and the fanautomatically adjusts to the highest speed.
E
A/C: Touch the button to turn air conditioning compressor on or off. Use airconditioning with recirculated air to improve cooling performance and efficiency.F
Note: In certain conditions, the air conditioning compressor may continue tooperate even after you switch off the air conditioning with the A/C button.
AUTO: Touch the button to turn on automatic operation. Select the desiredtemperature using the temperature control. The system adjusts fan speed, airdistribution, air conditioning operation, and selects outside air or recirculatedair to heat or cool the vehicle in order to maintain the desired temperature. Youcan also use the AUTO button to turn off dual zone operation by touching andholding the button for more than two seconds.
G
Heated rear window: Turns the heated rear window on and off. See HeatedWindows and Mirrors (page 108).H
Defrost: Press the button to distribute air to the windshield vents and de-mister.Air distribution to instrument panel and footwell vents turn off. You can usethis setting to defog and clear the windshield of a thin covering of ice.
I
Air distribution control: Touch these buttons to turn airflow from thewindshield, instrument panel, or footwell vents on or off. The system candistribute air through any combination of these vents.
J
Driver settings:K
Touch the + or – to increase or decrease the air temperature on the passengerside of the vehicle.
Touch the heated seat icon to turn the heated seat off and on (if equipped).
409
Super Duty (), enUSA
MyFord Touch™ (If Equipped)
Page 461 of 470
Center Console...............................................131Removable Front Cupholders.........................131Changing a Bulb..........................................250Lamp Assembly Condensation....................250Replacing Brake/Tail/Turn/Reverse LampBulbs...................................................................251Replacing Cargo Lamp and High-mountBrake Lamp Bulbs.........................................251Replacing Fog Lamp Bulbs (IfEquipped...........................................................251Replacing Front Clearance andIdentification Lamp Bulbs (IfEquipped).......................................................250Replacing the License Plate LampBulb....................................................................252Changing a Fuse............................................231Fuses........................................................................231Changing a Road Wheel...........................288Dissimilar Spare Wheel and Tire AssemblyInformation.....................................................288Location of the Spare Tire and Tools.........289Removing the Spare Tire (With Spare TireCarrier Only)...................................................290Tire Change Procedure.....................................291Changing the 12V Battery.........................244Battery Management System (IfEquipped)........................................................245Changing the Engine Air Filter................254Changing the Wiper Blades.....................246Checking MyKey System Status...............52Checking the Wiper Blades.....................246Child Restraint and Safety BeltMaintenance.................................................35Child Safety.......................................................15General Information.............................................15Child Safety Locks..........................................27Child Seat Positioning..................................26Cleaning Leather Seats.............................259WITHOUT THE KING RANCHEDITION............................................................259WITH THE KING RANCH EDITION.............260Cleaning Products.......................................256Cleaning the Alloy Wheels........................261Cleaning the Engine....................................257
Cleaning the Exterior..................................256Cleaning Plastic Exterior Parts......................257Exterior Chrome.................................................256Stripes or Graphics (if equipped)................256Underbody............................................................257Cleaning the Instrument Panel andInstrument Cluster Lens........................258Cleaning the Interior...................................258Cleaning the Windows and WiperBlades...........................................................258Clearing All MyKeys.......................................52Climate...........................................................408Climate Control Voice Commands..............410Climate Control.............................................103Climate Controlled Seats...........................118Cooled Seats.........................................................118Heated Seats.........................................................118Coolant CheckSee: Engine Coolant Check............................236Crash Sensors and Airbag Indicator.......44Creating a MyKey...........................................50Programming/Changing ConfigurableSettings................................................................51Cruise Control...................................................61Principle of Operation.......................................176Cruise controlSee: Using Cruise Control................................176Customer Assistance...................................217
D
Data Recording..................................................9Event Data Recording..........................................10Service Data Recording........................................9Daytime Running Lamps............................66Digital Radio...................................................316HD Radio Reception and StationTroubleshooting..............................................317Direction Indicators........................................67Lane Change..........................................................67Driver and Passenger Airbags....................37Children and Airbags...........................................42Passenger Airbag On and Off Switch ..........37Proper Driver and Front Passenger SeatingAdjustment.........................................................41Driving Aids......................................................177Driving Hints..................................................208Driving Through Water..............................209
458
Super Duty (), enUSA
Index