2015 FORD F250 SUPER DUTY ABS
[x] Cancel search: ABSPage 80 of 470
Variations:
Distance-to-emptyFuel gauge positionDriving type (fuel economyconditions)
35 miles to 80 miles (56 kmto 129 km)1/16thHighway driving
35 miles (56km)1/16thSevere duty driving (trailertowing, extended idle)
Information Display
Odometer
Located in the bottom of the informationdisplay Registers the accumulateddistance your vehicle has traveled.
Trip Computer
See General Information (page 81).
Vehicle Settings and Personalization
See General Information (page 81).
WARNING LAMPS AND
INDICATORS
The following warning lamps andindicators will alert you to a vehiclecondition that may become serious. Somelamps will illuminate when you start yourvehicle to make sure they work. If anylamps remain on after starting your vehicle,refer to the respective system warninglamp for further information.
Note:Some warning indicators appear inthe information display and function thesame as a warning lamp but do not displaywhen you start your vehicle.
Anti-Lock Braking System
If it illuminates when you aredriving, this indicates amalfunction. You will continueto have the normal braking system(without ABS) unless the brake systemwarning lamp is also illuminated. Have thesystem checked by your authorized dealer.
Battery
If it illuminates while driving, itindicates a malfunction. Switchoff all unnecessary electricalequipment and have the system checkedby your authorized dealer immediately.
Brake System
Illuminates when you engage theparking brake with the ignitionon.
If it illuminates when you are driving, checkthat the parking brake is not engaged. Ifthe parking brake is not engaged, thisindicates low brake fluid level or a brakesystem malfunction. Have the systemchecked immediately by your authorizeddealer.
77
Super Duty (), enUSA
Instrument Cluster E144522
Page 114 of 470

WARNINGS
Install the head restraint properly tohelp minimize the risk of neck injuryin the event of a crash.
Note:Adjust the seat back to an uprightdriving position before adjusting the headrestraint. Adjust the head restraint so thatthe top of it is level with the top of your headand as far forward as possible. Make surethat you remain comfortable. If you areextremely tall, adjust the head restraint toits highest position.
Front Seat Head Restraint
The head restraints consist of:
An energy absorbing headrestraint.A
Two steel stems.B
Guide sleeve adjust and releasebutton.C
Guide sleeve unlock and removebutton.D
Adjusting the Head Restraint
Raising the Head Restraint
Pull the head restraint up.
Lowering the Head Restraint
1. Press and hold button C.
2. Push the head restraint down.
Removing the Head Restraint
1. Press and hold buttons C and D.
2. Pull the head restraint up.
Installing the Head Restraint
Align the steel stems into the guide sleevesand push the head restraint down until itlocks.
Front Row Center, Outboard (CrewCab), and Rear Seat Center (Crew Cab)Head Restraints
Note:The SuperCab has rear outboardhead restraints that are not removable andare bolted to the back wall.
Your vehicle may be equipped with headrestraints that are non-adjustable. Thenon-adjustable head restraints consist of:
An energy absorbing headrestraint.A
Two steel stems.B
Guide sleeve unlock and removebutton.C
111
Super Duty (), enUSA
SeatsE138642 E162872
A
C
B
Page 122 of 470
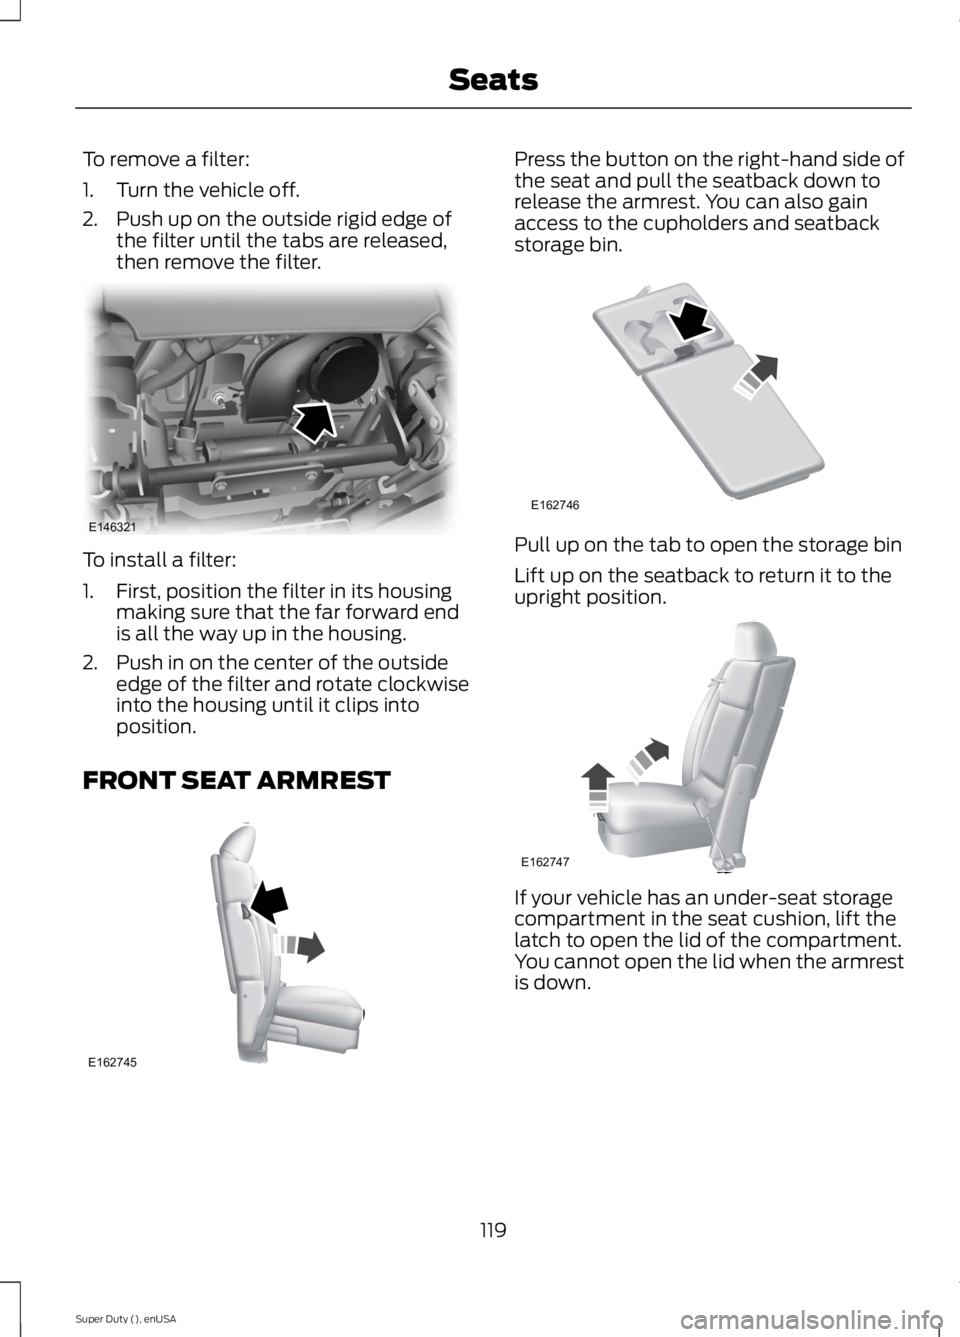
To remove a filter:
1. Turn the vehicle off.
2. Push up on the outside rigid edge ofthe filter until the tabs are released,then remove the filter.
To install a filter:
1. First, position the filter in its housingmaking sure that the far forward endis all the way up in the housing.
2. Push in on the center of the outsideedge of the filter and rotate clockwiseinto the housing until it clips intoposition.
FRONT SEAT ARMREST
Press the button on the right-hand side ofthe seat and pull the seatback down torelease the armrest. You can also gainaccess to the cupholders and seatbackstorage bin.
Pull up on the tab to open the storage bin
Lift up on the seatback to return it to theupright position.
If your vehicle has an under-seat storagecompartment in the seat cushion, lift thelatch to open the lid of the compartment.You cannot open the lid when the armrestis down.
119
Super Duty (), enUSA
SeatsE146321 E162745 E162746 E162747
Page 139 of 470
SAFETY PRECAUTIONS
WARNINGS
Do not overfill the fuel tank. Thepressure in an overfilled tank maycause leakage and lead to fuel sprayand fire.
The fuel system may be underpressure. If you hear a hissing soundnear the fuel filler door, do not refueluntil the sound stops. Otherwise, fuel mayspray out, which could cause seriouspersonal injury.
Automotive fuels can cause seriousinjury or death if you misuse ormishandle them.
Fuel ethanol and gasoline maycontain benzene, which is acancer-causing agent.
When refueling always shut theengine off and never allow sparks oropen flames near the filler neck.Never smoke or use a cell phone whilerefueling. Fuel vapor is extremelyhazardous under certain conditions. Avoidinhaling excess fumes.
The flow of fuel through a fuel pumpnozzle can produce static electricity,which can cause a fire if you pumpfuel into an ungrounded fuel container.
Observe the following guidelines whenhandling automotive fuel:
•Extinguish all smoking materials andany open flames before refueling yourvehicle.
•Automotive fuels can be harmful orfatal if swallowed. Fuel such asgasoline is highly toxic and ifswallowed can cause death orpermanent injury. If swallowed, call aphysician immediately, even if nosymptoms are immediately apparent.The toxic effects of fuel may not bevisible for hours.
•Avoid inhaling fuel vapors. Inhaling toomuch fuel vapor of any kind can leadto eye and respiratory tract irritation.In severe cases, excessive or prolongedbreathing of fuel vapor can causeserious illness and permanent injury.
•Avoid getting fuel liquid in your eyes. Ifyou splash fuel in your eyes, removecontact lenses (if worn), flush withwater for 15 minutes and seek medicalattention. Failure to seek propermedical attention could lead topermanent injury.
•Fuels can also be harmful if absorbedthrough the skin. If you splash fuel onyour skin, clothing or both, promptlyremove contaminated clothing andwash your skin thoroughly with soapand water. Repeated or prolonged skincontact with fuel liquid or vapor causesskin irritation.
•Be particularly careful if you are taking“Antabuse” or other forms of disulfiramfor the treatment of alcoholism.Breathing gasoline vapors, or skincontact could cause an adversereaction. In sensitive individuals, seriouspersonal injury or sickness may result.If you splash fuel on your skin, promptlywash your skin thoroughly with soapand water. Consult a physicianimmediately if you experience anadverse reaction.
136
Super Duty (), enUSA
Fuel and Refueling
Page 142 of 470
WARNINGS
Keep sparks, flames and smokingmaterials away from fuel.
Stay outside your vehicle and do notleave the fuel pump unattendedwhen refueling your vehicle. This isagainst the law in some places.
Keep children away from the fuelpump; never let children pump fuel.
Do not use personal electronicdevices while refueling.
Use the following guidelines to avoidelectrostatic charge build-up when fillingan ungrounded fuel container:
•Place approved fuel container on theground.
•Do not fill a fuel container while it is inthe vehicle (including the cargo area).
•Keep the fuel pump nozzle in contactwith the fuel container while filling.
•Do not use a device that would holdthe fuel pump handle in the fill position.
Fuel Filler Cap
WARNINGS
The fuel system may be underpressure. If you hear a hissing soundnear the fuel filler door, do not refueluntil the sound stops. Otherwise, fuel mayspray out, which could cause seriouspersonal injury.
If you do not use the proper fuel fillercap, excessive pressure or vacuumin the fuel tank may damage the fuelsystem or cause the fuel cap to disengagein a collision, which may result in possiblepersonal injury.
Note:If you must replace the fuel filler cap,replace it with a fuel filler cap that isdesigned for your vehicle. The customerwarranty may be void for any damage to thefuel tank or fuel system if the correctgenuine Ford, Motorcraft® or other certifiedfuel filler cap is not used.
Your fuel tank filler cap has an indexeddesign with a 1/4th turn on and off feature.When fueling your vehicle:
1. Put the vehicle in P (Park).
2. Turn the engine off.
3. Carefully turn the filler capcounterclockwise until it spins off.
4. Pull to remove the cap from the fuelfiller pipe.
5.To install the cap, align the tabs on thecap with the notches on the filler pipe.
6. Turn the filler cap clockwise 1/4 of aturn clockwise until it clicks at leastonce.
If the Check Fuel Cap light or a Check FuelCap message appears in the instrumentcluster and stays on after you start theengine, the fuel filler cap may not beproperly installed.
If the fuel cap light remains on, at the nextopportunity, safely pull off of the road,remove the fuel filler cap, align the capproperly and reinstall it. The check fuel caplight or Check fuel cap message may notreset immediately; it may take severaldriving cycles for the indicators to turn off.A driving cycle consists of an enginestart-up (after four or more hours with theengine off) followed by normal city andhighway driving.
139
Super Duty (), enUSA
Fuel and Refueling
Page 173 of 470
PRINCIPLE OF OPERATION
WARNINGS
Hill descent control cannot controldescent in all surface conditions andcircumstances, such as ice orextremely steep grades. Hill descentcontrol is a driver assist system and cannotsubstitute for good judgment by the driver.Failure to do so may result in loss of vehiclecontrol, crash or serious injury.
Hill descent control does not providehill hold at zero miles per hour (0kilometers per hour). When stopped,the parking brake must be applied or thevehicle must be placed in P (Park) or itmay roll away.
Hill descent control allows the driver to setand maintain vehicle speed whiledescending steep grades in various surfaceconditions.
Hill descent control can maintain vehiclespeeds on downhill grades between 2 mph(3 km/h) and 12 mph (20 km/h). Above 20mph (32 km/h), the system remainsarmed, but descent speed cannot be setor maintained.
Hill descent control requires a coolingdown interval after a period of sustaineduse. The amount of time that the featurecan remain active before cooling varieswith conditions. The system will provide awarning in the message center and a chimewill sound when the system is about todisengage for cooling. At this time,manually apply the brakes as needed tomaintain descent speed.
USING HILL DESCENT
CONTROL
Press and release the hilldescent button located on theinstrument panel. A light in thecluster will illuminate and achime will sound when this feature isactivated.
To increase descent speed, press theaccelerator pedal until the desired speedis reached. To decrease descent speed,press the brake pedal until the desiredspeed is reached.
Whether accelerating or decelerating, oncethe desired descent speed is reached,remove your feet from the pedals and thechosen vehicle speed will be maintained.
Note:Noise from the ABS pump motor maybe observed during hill descent controloperation. This is a normal characteristic ofthe ABS and should be no reason forconcern.
Hill descent modes
•At speeds below 20 mph (32 km/h):When the Hill Descent Control switchis pressed and Hill Descent Control isactive, the Hill Descent Control telltalewill flash.
•At speeds below 20 mph (32 km/h):When the Hill Descent Control switchis pressed and conditions are notcorrect for hill descent activation, theHill Descent Control system will beenabled, the Hill Descent Controltelltale will be solid and a message willdisplay in the information display.
170
Super Duty (), enUSA
Terrain Response (If Equipped)E163957
Page 209 of 470
•Use a damper device such as a tarp,heavy blanket or piece of carpetdraped over the recovery strap to helpabsorb the energy in the event thestrap breaks.
•Make sure the stuck vehicle is notloaded heavier than its gross vehicleweight rating specified on thecertification label.
•Always align the tow vehicle and stuckvehicle in a straight line (within 10degrees).
•Keep bystanders to the sides of thevehicle, at a distance of at least twicethe length of the recovery strap. Thishelps avoid injury from the hazard of arecovery hook or strap breaking, or avehicle lurching into their path.
TRANSPORTING THE VEHICLE
If you need to have your vehicle towed,contact a professional towing service or,if you are a member of a roadsideassistance program, your roadsideassistance service provider.
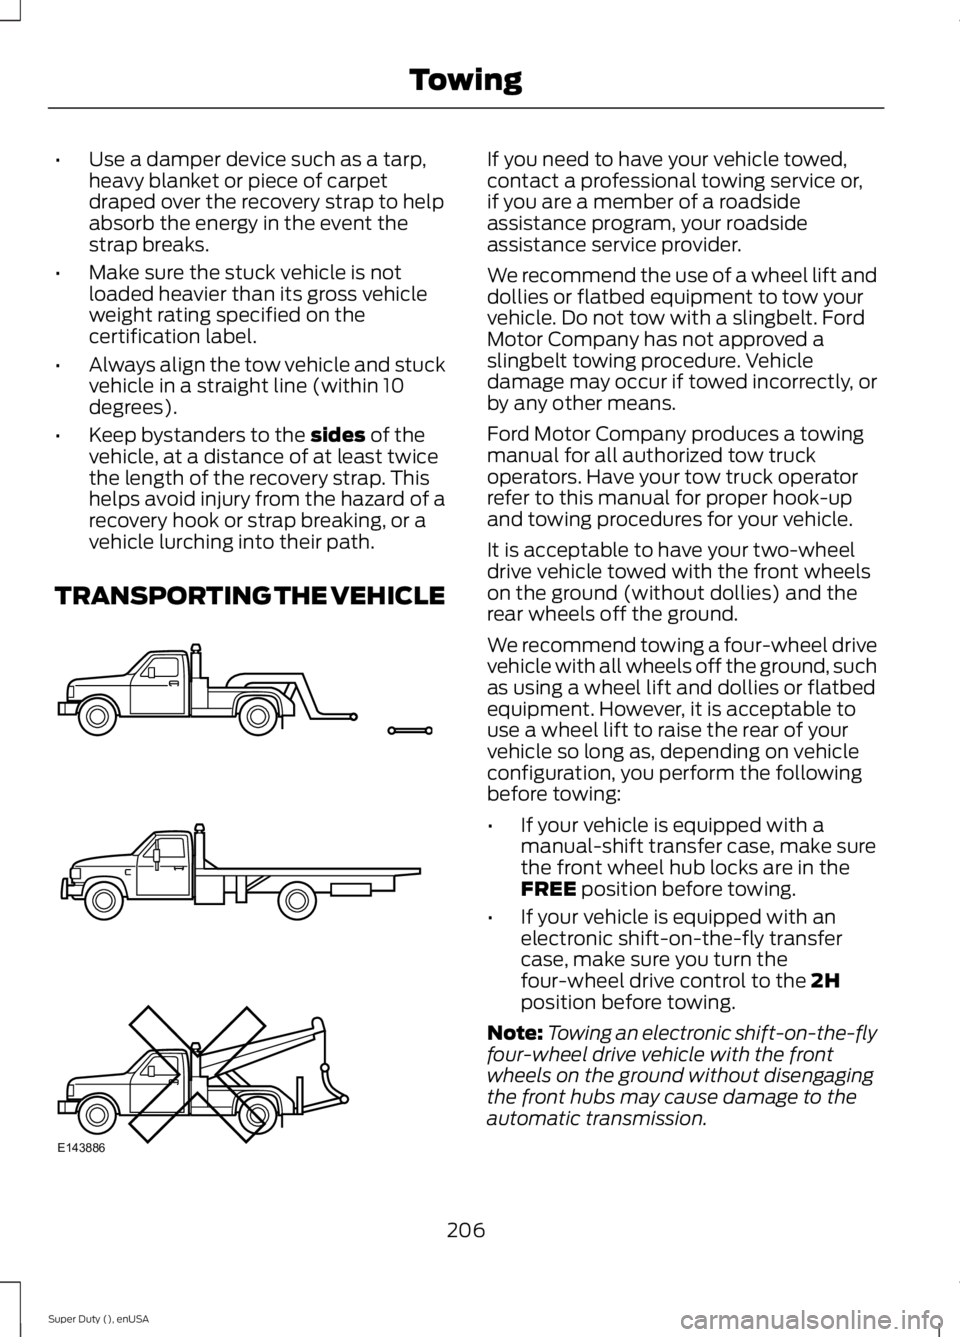
We recommend the use of a wheel lift anddollies or flatbed equipment to tow yourvehicle. Do not tow with a slingbelt. FordMotor Company has not approved aslingbelt towing procedure. Vehicledamage may occur if towed incorrectly, orby any other means.
Ford Motor Company produces a towingmanual for all authorized tow truckoperators. Have your tow truck operatorrefer to this manual for proper hook-upand towing procedures for your vehicle.
It is acceptable to have your two-wheeldrive vehicle towed with the front wheelson the ground (without dollies) and therear wheels off the ground.
We recommend towing a four-wheel drivevehicle with all wheels off the ground, suchas using a wheel lift and dollies or flatbedequipment. However, it is acceptable touse a wheel lift to raise the rear of yourvehicle so long as, depending on vehicleconfiguration, you perform the followingbefore towing:
•If your vehicle is equipped with amanual-shift transfer case, make surethe front wheel hub locks are in theFREE position before towing.
•If your vehicle is equipped with anelectronic shift-on-the-fly transfercase, make sure you turn thefour-wheel drive control to the 2Hposition before towing.
Note:Towing an electronic shift-on-the-flyfour-wheel drive vehicle with the frontwheels on the ground without disengagingthe front hubs may cause damage to theautomatic transmission.
206
Super Duty (), enUSA
TowingE143886
Page 254 of 470
Replacing Fog Lamp Bulbs (IfEquipped
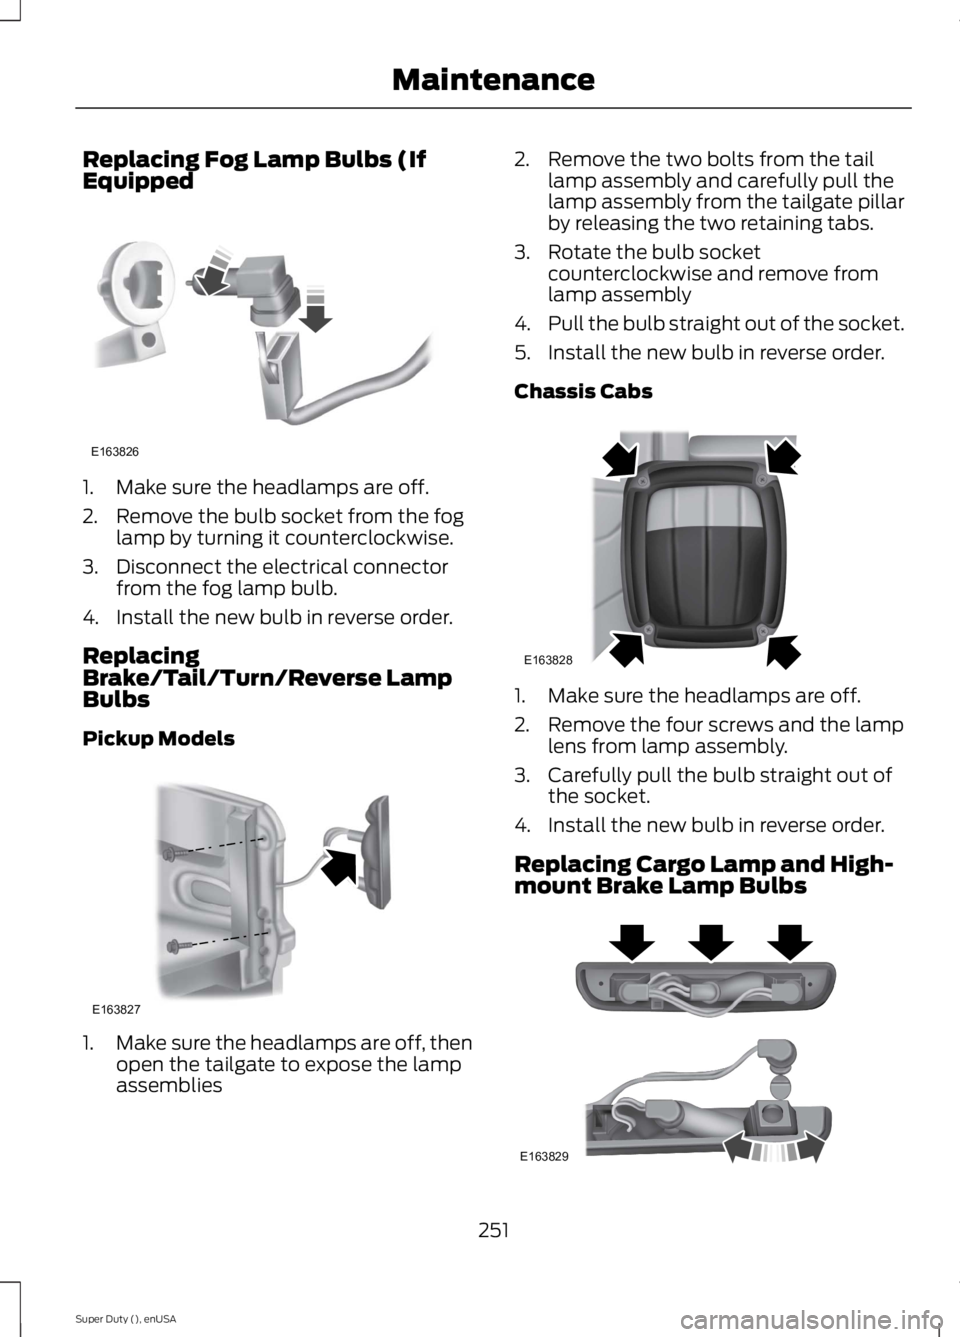
1. Make sure the headlamps are off.
2. Remove the bulb socket from the foglamp by turning it counterclockwise.
3. Disconnect the electrical connectorfrom the fog lamp bulb.
4. Install the new bulb in reverse order.
ReplacingBrake/Tail/Turn/Reverse LampBulbs
Pickup Models
1.Make sure the headlamps are off, thenopen the tailgate to expose the lampassemblies
2. Remove the two bolts from the taillamp assembly and carefully pull thelamp assembly from the tailgate pillarby releasing the two retaining tabs.
3. Rotate the bulb socketcounterclockwise and remove fromlamp assembly
4.Pull the bulb straight out of the socket.
5. Install the new bulb in reverse order.
Chassis Cabs
1. Make sure the headlamps are off.
2. Remove the four screws and the lamplens from lamp assembly.
3. Carefully pull the bulb straight out ofthe socket.
4. Install the new bulb in reverse order.
Replacing Cargo Lamp and High-mount Brake Lamp Bulbs
251
Super Duty (), enUSA
MaintenanceE163826 E163827 E163828 E163829