2015 FORD F250 SUPER DUTY change time
[x] Cancel search: change timePage 96 of 470
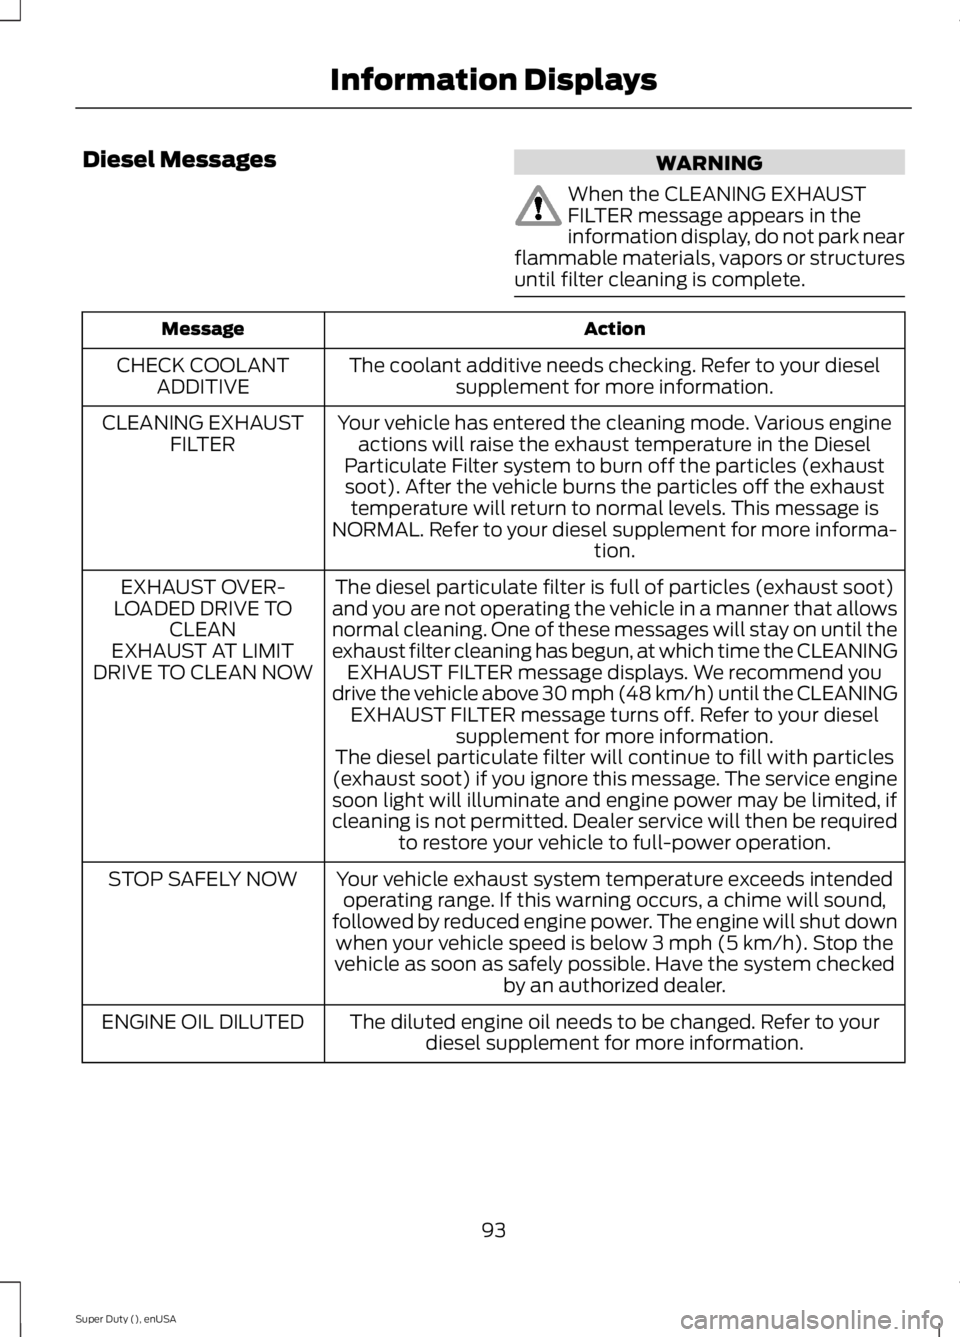
Diesel MessagesWARNING
When the CLEANING EXHAUSTFILTER message appears in theinformation display, do not park nearflammable materials, vapors or structuresuntil filter cleaning is complete.
ActionMessage
The coolant additive needs checking. Refer to your dieselsupplement for more information.CHECK COOLANTADDITIVE
Your vehicle has entered the cleaning mode. Various engineactions will raise the exhaust temperature in the DieselParticulate Filter system to burn off the particles (exhaustsoot). After the vehicle burns the particles off the exhausttemperature will return to normal levels. This message isNORMAL. Refer to your diesel supplement for more informa-tion.
CLEANING EXHAUSTFILTER
The diesel particulate filter is full of particles (exhaust soot)and you are not operating the vehicle in a manner that allowsnormal cleaning. One of these messages will stay on until theexhaust filter cleaning has begun, at which time the CLEANINGEXHAUST FILTER message displays. We recommend youdrive the vehicle above 30 mph (48 km/h) until the CLEANINGEXHAUST FILTER message turns off. Refer to your dieselsupplement for more information.
EXHAUST OVER-LOADED DRIVE TOCLEANEXHAUST AT LIMITDRIVE TO CLEAN NOW
The diesel particulate filter will continue to fill with particles(exhaust soot) if you ignore this message. The service enginesoon light will illuminate and engine power may be limited, ifcleaning is not permitted. Dealer service will then be requiredto restore your vehicle to full-power operation.
Your vehicle exhaust system temperature exceeds intendedoperating range. If this warning occurs, a chime will sound,followed by reduced engine power. The engine will shut downwhen your vehicle speed is below 3 mph (5 km/h). Stop thevehicle as soon as safely possible. Have the system checkedby an authorized dealer.
STOP SAFELY NOW
The diluted engine oil needs to be changed. Refer to yourdiesel supplement for more information.ENGINE OIL DILUTED
93
Super Duty (), enUSA
Information Displays
Page 129 of 470
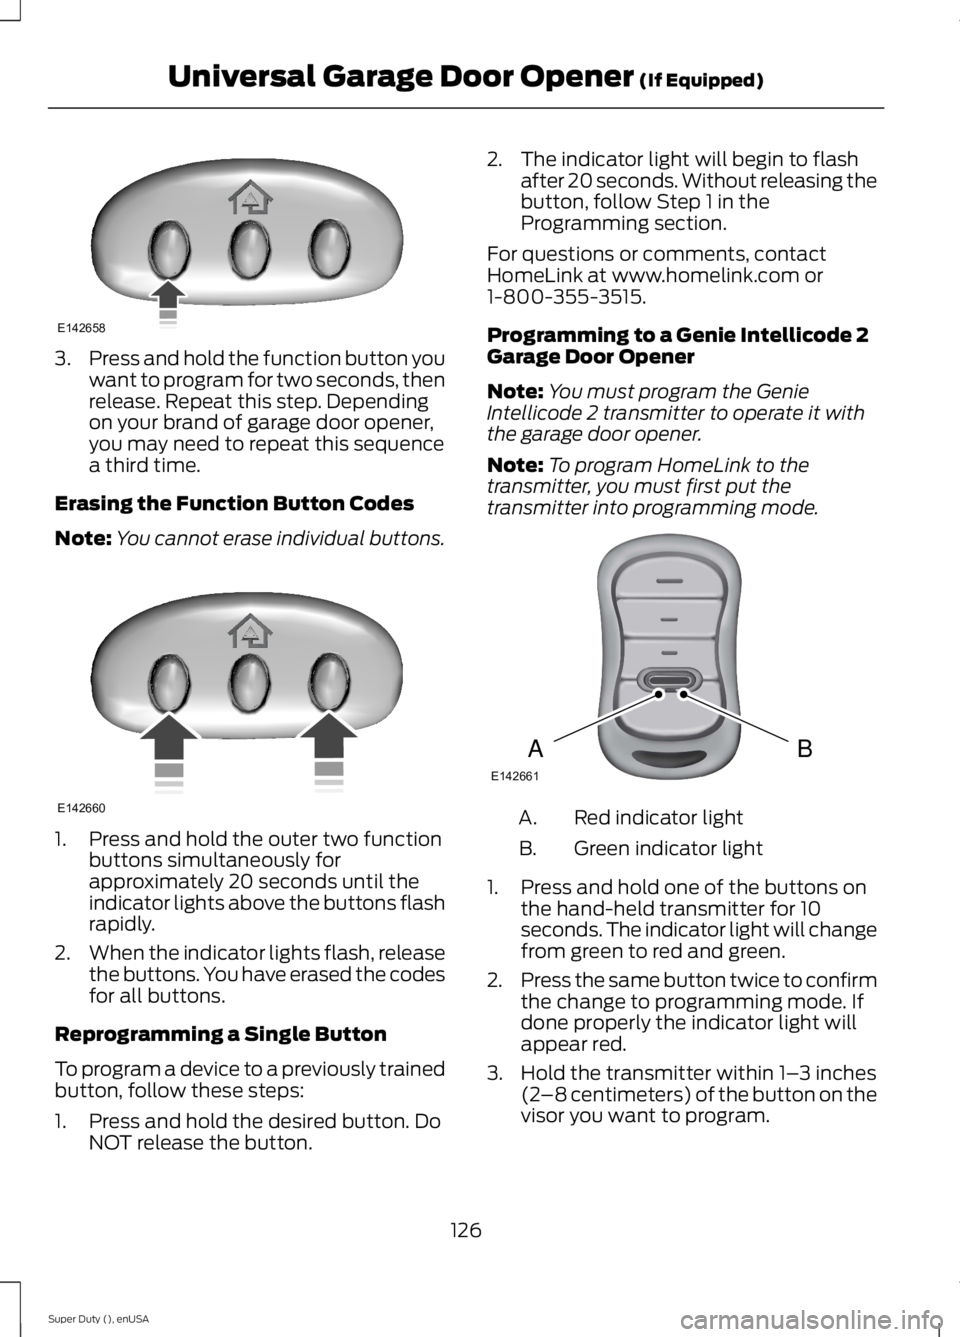
3.Press and hold the function button youwant to program for two seconds, thenrelease. Repeat this step. Dependingon your brand of garage door opener,you may need to repeat this sequencea third time.
Erasing the Function Button Codes
Note:You cannot erase individual buttons.
1. Press and hold the outer two functionbuttons simultaneously forapproximately 20 seconds until theindicator lights above the buttons flashrapidly.
2.When the indicator lights flash, releasethe buttons. You have erased the codesfor all buttons.
Reprogramming a Single Button
To program a device to a previously trainedbutton, follow these steps:
1. Press and hold the desired button. DoNOT release the button.
2. The indicator light will begin to flashafter 20 seconds. Without releasing thebutton, follow Step 1 in theProgramming section.
For questions or comments, contactHomeLink at www.homelink.com or1-800-355-3515.
Programming to a Genie Intellicode 2Garage Door Opener
Note:You must program the GenieIntellicode 2 transmitter to operate it withthe garage door opener.
Note:To program HomeLink to thetransmitter, you must first put thetransmitter into programming mode.
Red indicator lightA.
Green indicator lightB.
1. Press and hold one of the buttons onthe hand-held transmitter for 10seconds. The indicator light will changefrom green to red and green.
2.Press the same button twice to confirmthe change to programming mode. Ifdone properly the indicator light willappear red.
3. Hold the transmitter within 1–3 inches(2–8 centimeters) of the button on thevisor you want to program.
126
Super Duty (), enUSA
Universal Garage Door Opener (If Equipped)E142658 E142660 BAE142661
Page 130 of 470
4. Press and hold both the programmedGenie button on the hand-heldtransmitter and the button you wantto program. The indicator light on thevisor will flash rapidly when theprogramming is successful.
Note:The Genie transmitter will transmitfor up to 30 seconds. If HomeLink does notprogram within 30 seconds you will need topress the Genie transmitter again. If theGenie transmitter indicator light displaysgreen and red, release the button until theindicator light turns off before pressing thebutton again.
Once you have programmed HomeLinksuccessfully, you must change the Genietransmitter out of program mode. To dothis:
1. Press and hold the previouslyprogrammed Genie button on thehand-held transmitter for 10 seconds.The indicator light will change from redto red and green.
2.Press the same button twice to confirmthe change. If done correctly theindicator light will turn green.
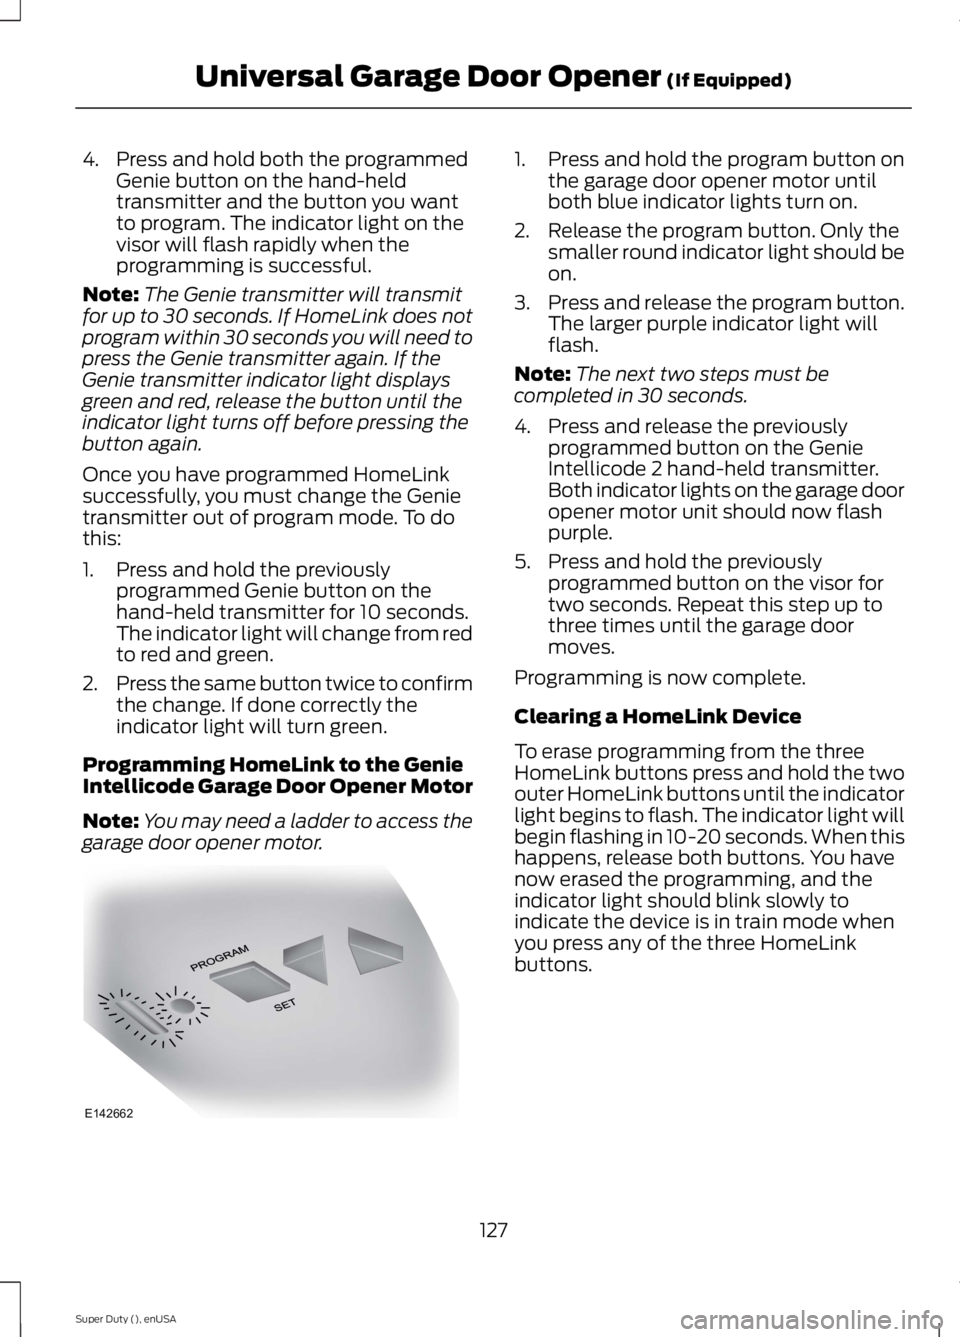
Programming HomeLink to the GenieIntellicode Garage Door Opener Motor
Note:You may need a ladder to access thegarage door opener motor.
1. Press and hold the program button onthe garage door opener motor untilboth blue indicator lights turn on.
2. Release the program button. Only thesmaller round indicator light should beon.
3.Press and release the program button.The larger purple indicator light willflash.
Note:The next two steps must becompleted in 30 seconds.
4. Press and release the previouslyprogrammed button on the GenieIntellicode 2 hand-held transmitter.Both indicator lights on the garage dooropener motor unit should now flashpurple.
5. Press and hold the previouslyprogrammed button on the visor fortwo seconds. Repeat this step up tothree times until the garage doormoves.
Programming is now complete.
Clearing a HomeLink Device
To erase programming from the threeHomeLink buttons press and hold the twoouter HomeLink buttons until the indicatorlight begins to flash. The indicator light willbegin flashing in 10-20 seconds. When thishappens, release both buttons. You havenow erased the programming, and theindicator light should blink slowly toindicate the device is in train mode whenyou press any of the three HomeLinkbuttons.
127
Super Duty (), enUSA
Universal Garage Door Opener (If Equipped)E142662
Page 158 of 470
If SHIFT DELAYED PULL FORWARD isdisplayed in the information display,transfer case gear tooth blockage ispresent. To alleviate this condition, placethe transmission in a forward gear, movethe vehicle forward approximately 5 feet(1.5 meters), and shift the transmissionback to neutral to allow the transfer caseto complete the range shift.
How Your Vehicle Differs FromOther Vehicles
WARNING
Vehicles with a higher center ofgravity such as utility and four-wheeldrive vehicles handle differently thanvehicles with a lower center of gravity.Utility and four-wheel drive vehicles arenot designed for cornering at speeds ashigh as passenger cars any more thanlow-slung sports cars are designed toperform satisfactorily under off-roadconditions. Avoid sharp turns, excessivespeed and abrupt maneuvers in thesevehicles. Failure to drive cautiously couldresult in an increased risk of loss of vehiclecontrol, vehicle rollover, personal injury anddeath.
Truck and utility vehicles can differ fromsome other vehicles. Your vehicle may behigher to allow it to travel over roughterrain without getting hung up ordamaging underbody components.
The differences that make your vehicle soversatile also make it handle differentlythan an ordinary passenger car.
Maintain steering wheel control at alltimes, especially in rough terrain. Sincesudden changes in terrain can result inabrupt steering wheel motion, make sureyou grip the steering wheel from theoutside. Do not grip the spokes.
Drive cautiously to avoid vehicle damagefrom concealed objects such as rocks andstumps.
You should either know the terrain orexamine maps of the area before driving.Map out your route before driving in thearea. To maintain steering and brakingcontrol of your vehicle, you must have allfour wheels on the ground and they mustbe rolling, not sliding or spinning.
Driving Off-Road With Truck andUtility Vehicles
Note:On some models, the initial shift fromtwo-wheel drive to four-wheel drive whilethe vehicle is moving can cause somemomentary clunk and ratcheting sounds.This is the front drivetrain coming up tospeed and the automatic locking hubsengaging and is not cause for concern.
Note:Your vehicle may be equipped witha front air dam that can become damaged(due to reduced ground clearance) whentaking your vehicle off-road. This air damcan be taken off by removing two bolts.
Four-wheel drive vehicles are speciallyequipped for driving on sand, snow, mudand rough terrain and have operatingcharacteristics that are somewhatdifferent from conventional vehicles, bothon and off the road.
Power is supplied to all four wheelsthrough a transfer case. On Four-wheeldrive vehicles, the transfer case allows youto select 4WD when necessary.Information on transfer case operation andshifting procedures can be found in thischapter. Information on transfer casemaintenance can be found in theMaintenance chapter. You should becomethoroughly familiar with this informationbefore you operate your vehicle.
155
Super Duty (), enUSA
Four-Wheel Drive (If Equipped)
Page 203 of 470
•TRAILER CONNECTED:Displays when the systemsenses a correct trailer wiringconnection during a givenignition cycle.
•TRAILER DISCONNECTED:Displays, accompanied by asingle audible time, when thesystem senses a trailerconnection and then adisconnection, eitherintentional or unintentional,during a given ignition cycle. Italso displays if a truck ortrailer-wiring fault occurscausing the trailer to appeardisconnected. This messagecan also display if you use themanual control lever without atrailer connected.
Procedure for Adjusting Gain
Note:Only perform this procedurein a traffic-free environment atspeeds of approximately 20-25mph (30-40 km/h).
The gain setting sets the trailerbrake controller for the specifictowing condition. You shouldchange the setting as towingconditions change. Changes totowing conditions include trailerload, vehicle load, road conditionsand weather.
The gain should be set to providethe maximum trailer brakingassistance while making sure thetrailer wheels do not lock whenusing the brakes. Locked trailerwheels may lead to trailerinstability.
1.Make sure the trailer brakes arein good working condition,functioning normally andproperly adjusted. See yourtrailer dealer if necessary.
2.Hook up the trailer and makethe electrical connectionsaccording to the trailermanufacturer's instructions.
3.When you plug in a trailer withelectric orelectric-over-hydraulic brakes,TRAILER CONNECTEDappears in the informationdisplay.
4.Use the gain adjustment (+ and-) buttons to increase ordecrease the gain setting to thedesired starting point. A gainsetting of 6.0 is a good startingpoint for heavier loads.
5.In a traffic-free environment,tow the trailer on a dry, levelsurface at a speed of 20-25mph (30-40 km/h) andsqueeze the manual controllever completely.
6.If the trailer wheels lock up,indicated by squealing tires,reduce the gain setting. If thetrailer wheels turn freely,
increase the gain setting.Repeat Steps 5 and 6 until the
200
Super Duty (), enUSA
Towing
Page 205 of 470
If the message only displays witha trailer connected, the problemis with the trailer wiring. Consultyour trailer dealer for assistance.This can be a short to ground(such as a chaffed wire), short tovoltage (such as a pulled pin ontrailer emergency breakawaybattery) or the trailer brakes maybe drawing too much current.
Points to Remember
Note:Do not attempt removal ofthe trailer brake controller withoutconsulting the Workshop Manual.Damage to the unit may result.
•Adjust gain setting before usingthe trailer brake controller forthe first time.
•Adjust gain setting, using theprocedure above, wheneverroad, weather and trailer orvehicle loading conditionschange from when the gainwas initially set.
•Only use the manual controllever for proper adjustment ofthe gain during trailer setup.Misuse, such as applicationduring trailer sway, could causeinstability of trailer or towvehicle.
•Avoid towing in adverseweather conditions. The trailerbrake controller does notprovide anti-lock control of thetrailer wheels. Trailer wheelscan lock up on slipperysurfaces, resulting in reducedstability of trailer and towvehicle.
•The trailer brake controller isequipped with a feature thatreduces output at vehiclespeeds below 11 mph (18 km/h)so trailer and vehicle braking isnot jerky or harsh. This featureis only available when applyingthe brakes using your vehicle'sbrake pedal, not the controller.
•The controller interacts withthe brake control system andpowertrain control system ofyour vehicle to provide the bestperformance on different roadconditions.
•Your vehicle's brake systemand the trailer brake systemwork independently of eachother. Changing the gainsetting on the controller doesnot affect the operation of yourvehicle's brakes whether youattach a trailer or not.
202
Super Duty (), enUSA
Towing
Page 208 of 470
Launching or Retrieving a Boator Personal Watercraft (PWC)
Note:Disconnect the wiring to thetrailer before backing the trailerinto the water.
Note:Reconnect the wiring to thetrailer after you remove the trailerfrom the water.
When backing down a rampduring boat launching or retrieval:
•Do not allow the static waterlevel to rise above the bottomedge of the rear bumper.
•Do not allow waves to breakhigher than 6 inches (15centimeters) above the bottomedge of the rear bumper.
Exceeding these limits may allowwater to enter vehiclecomponents:
•Causing internal damage to thecomponents.
•Affecting driveability,emissions, and reliability.
Replace the rear axle lubricantanytime the rear axle has beensubmerged in water. Water mayhave contaminated the rear axlelubricant, which is not normallychecked or changed unless a leakis suspected or other axle repair isrequired.
TOWING POINTS
WARNINGS
Using recovery hooks is dangerousand should only be done by a personfamiliar with proper vehicle recoverysafety practices. Improper use of recoveryhooks may cause hook failure or separationfrom the vehicle and could result in seriousinjury or death.
Always slowly remove the slack fromthe recovery strap prior to pulling.Failure to do so can introducesignificantly higher loads which can causethe recovery hooks to break off, or therecovery strap to fail which can causeserious injury or death.
Never link two straps together witha clevis pin. These heavy metalobjects could become projectiles ifthe strap breaks and can cause seriousinjury or death.
Your vehicle comes equipped withframe-mounted front recovery hooks.These hooks should never have a loadapplied to them greater than the grossvehicle weight rating of your vehicle.
Before using recovery hooks:
•Make sure all attaching points aresecure and capable of withstandingthe applied load.
•Never use chains, cables or tow strapswith metal hook ends.
•Only use recovery straps that have aminimum breaking strength two tothree times the gross vehicle weight ofthe stuck vehicle.
•Make sure the recovery strap is in goodcondition and free of visible cuts, tearsor damage.
205
Super Duty (), enUSA
Towing
Page 211 of 470
BREAKING-IN
You need to break in new tires forapproximately 300 miles (480kilometers). During this time, your vehiclemay exhibit some unusual drivingcharacteristics.
Avoid driving too fast during the first 1000miles (1600 kilometers). Vary your speedfrequently and change up through thegears early. Do not labor the engine.
Do not tow during the first 1000 miles(1600 kilometers).
ECONOMICAL DRIVING
Your fuel economy is affected by severalthings, such as how you drive, theconditions you drive under, and how youmaintain your vehicle.
You may improve your fuel economy bykeeping these things in mind:
•Accelerate and slow down in a smooth,moderate fashion.
•Drive at steady speeds withoutstopping.
•Anticipate stops; slowing down mayeliminate the need to stop.
•Combine errands and minimizestop-and-go driving.
•Close the windows for high-speeddriving.
•Drive at reasonable speeds (travelingat 55 mph [88 km/h] uses 15% lessfuel than traveling at 65 mph [105km/h]).
•Keep the tires properly inflated and useonly the recommended size.
•Use the recommended engine oil.
•Perform all regularly scheduledmaintenance.
Avoid these actions; they reduce your fueleconomy:
•Sudden accelerations or hardaccelerations.
•Revving the engine before turning it off.
•Idle for periods longer than one minute.
•Warm up your vehicle on coldmornings.
•Use the air conditioner or frontdefroster.
•Use the speed control in hilly terrain.
•Rest your foot on the brake pedal whiledriving.
•Drive a heavily loaded vehicle or tow atrailer.
•Carry unnecessary weight(approximately 1 mpg [0.4 km/L] islost for every 400 lb [180 kilogram] ofweight carried).
•Driving with the wheels out ofalignment.
Conditions
•Heavily loading a vehicle or towing atrailer may reduce fuel economy at anyspeed.
•Adding certain accessories to yourvehicle (for example bug deflectors,rollbars, light bars, running boards, skiracks or luggage racks) may reducefuel economy.
•To maximize the fuel economy, drivewith the tonneau cover installed (ifequipped).
•Using fuel blended with alcohol maylower fuel economy.
•Fuel economy may decrease with lowertemperatures during the first 8–10miles (12–16 kilometers) of driving.
•Driving on flat terrain offers improvedfuel economy as compared to drivingon hilly terrain.
208
Super Duty (), enUSA
Driving Hints