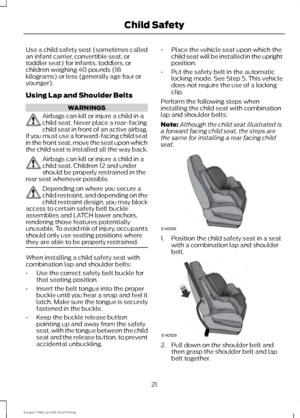
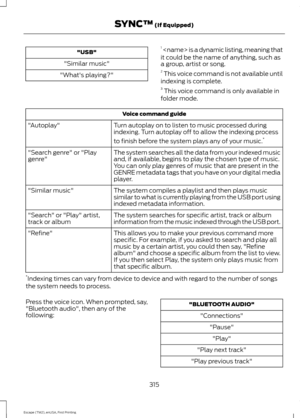
Page 169 of 449

ECO MODE
This system assists you in driving more
efficiently by constantly monitoring
characteristics of gear changing,
anticipation of traffic conditions and
speeds while driving.
The value of these characteristics is
represented by petals shown in the display,
with five petals being the most efficient.
The more efficiently you drive, the better
the rating, and the better your overall fuel
economy
Note:
These efficiency values do not result
in a defined fuel consumption figure. It might
vary as it is not only related to these driving
habits, but also influenced by many other
factors such as short trips and cold starts.
Note: Frequent short trips, where the engine
does not fully warm up, will also increase
fuel consumption
The system is accessed using the
information display control. See General
Information (page 90).
Type 1 Anticipation
A
Efficient speed
B Anticipation
Adjust your vehicle speed and the distance
to other vehicles to avoid the need for
heavy braking or acceleration to improve
fuel economy.
Efficient speed
Reduce your cruising speed on open roads
to improve economy. Higher speeds use
more fuel.
Type 2 and 3
The relevant information is shown in the
display.
Resetting Eco Mode
Reset the average fuel consumption by
using the information display control.
Note:
New values may take a short time to
calculate
STEERING
Electric Power Steering WARNINGS
The electric power steering system
has diagnostic checks that
continuously monitor the system to
ensure proper operation. When a system
error is detected a steering message will
appear in the information display. The electric power steering system
has diagnostic checks that
continuously monitor the system to
ensure proper operation of the electronic
system. When an electronic error is
detected, a message will be displayed in
the information display. If this happens,
stop the vehicle in a safe place, and turn
166
Escape (TM2), enUSA, First Printing Driving AidsABE142444
Page 170 of 449

WARNINGS
off the engine. After at least 10 seconds,
reset the system by restarting the engine,
and watch the information display for a
steering message. If a steering message
returns, or returns while driving, take the
vehicle to your dealer to have it checked. Obtain immediate service if a system
error is detected. You may not notice
any difference in the feel of your
steering, but a serious condition may exist.
Failure to do so may result in loss of
steering control. Your vehicle is equipped with an electric
power-assisted steering system. There is
no fluid reservoir to check or fill.
If your vehicle loses electrical power while
you are driving (or if the ignition is turned
off), you can steer the vehicle manually,
but it takes more effort. Extreme
continuous steering may increase the effort
it takes for you to steer. This occurs to
prevent internal overheating and
permanent damage to your steering
system. If this should occur, you will neither
lose the ability to steer the vehicle
manually nor will it cause permanent
damage. Typical steering and driving
maneuvers will allow the system to cool
and steering assist will return to normal.
Steering Tips
If the steering wanders or pulls, check for:
•
an improperly inflated tire
• uneven tire wear
• loose or worn suspension components
• loose or worn steering components
• improper vehicle alignment
A high crown in the road or high crosswinds
may also make the steering seem to
wander or pull.
167
Escape (TM2), enUSA, First Printing Driving Aids
Page 171 of 449

REAR UNDER FLOOR
STORAGE
Cargo Management System (If
Equipped) The system is located in the floor of the
cargo area. Lift the handle to open.
Adjustable Load Floor
(If Equipped)
Vehicles with the standard size spare tire
can adjust the load floor to two positions.
The front of the load floor can be placed
either on (for high position) or below (for
low position) the ledges behind the rear
seats. The rear of the load floor always sits
on the two small shelves located on the
liftgate trim. LUGGAGE COVERS WARNINGS
Make sure that the posts are properly
latched in mounting features. The
cover may cause injury in a sudden
stop or accident if it is not securely
installed. Do not place any objects on the
cargo area shade. They may obstruct
your vision or strike occupants of
your vehicle in a sudden stop or crash. Use the cargo shade to cover items in the
cargo area of your vehicle.
Insert the ends of the cargo shade into the
mounting features located behind the rear
seat on the rear trim panels to install the
cargo shade.
To operate the cargo shade:
1. Pull the rear edge of the cargo shade
rearward.
2. Secure both ends of the support rod into the retention slots located on the
rear quarter trim panels.
168
Escape (TM2), enUSA, First Printing Load CarryingE142445 E142446 E142447
Page 172 of 449

ROOF RACKS AND LOAD
CARRIERS
WARNING
When loading the roof racks, we
recommend you evenly distribute the
load, as well as maintain a low
center of gravity. Loaded vehicles, with
higher centers of gravity, may handle
differently than unloaded vehicles. Take
extra precautions, such as slower speeds
and increased stopping distance, when
driving a heavily loaded vehicle. The maximum recommended load, evenly
distributed on the crossbars, is:
•
100 pounds (45 kilograms) for vehicles
without a moonroof
• 45 pounds (20 kilograms) for vehicles
with a moonroof.
Note: Never place loads directly on the roof
panel. The roof panel is not designed to
directly carry a load.
For correct roof rack system function, you
must place loads directly on crossbars
affixed to the roof rack side rails. When
using the roof rack system, we recommend
you use Ford Genuine Accessory crossbars
designed specifically for your vehicle.
Make sure that you securely fasten the
load. Check the tightness of the load
before driving and at each fuel stop. Adjusting the Crossbar (If Equipped)
Note: For less wind noise and better
aerodynamics, only install the crossbars
when you need them for carrying cargo. If
you prefer to keep the crossbars installed,
the front crossbar has two positions. The
front position is quieter for wind noise. The
rear position may help to reduce wind noise
from an open moonroof. Follow the steps
to reposition or remove the front crossbar.
You can remove the rear crossbar fasteners
by unscrewing the assembly. 1.
Remove the crossbar thumbwheels at
both sides of the front crossbar by
turning them counterclockwise.
Note: If you cannot loosen the thumbwheel
with your hand, loosen the fastener head.
You can also use a small screwdriver or
similar tool to loosen the thumbwheel by
inserting the shaft between the two paddles
of the thumbwheel and rotating it loose.
2. Remove the crossbar by sliding the ends off of the shoulder bolts in the
side rails.
3. Move the crossbar to the new side rail position and slide the crossbar onto
the shoulder bolt at that position.
4. Replace and tighten the thumbwheels
at both sides of the crossbar by turning
them clockwise until tight. You can use
a small screwdriver or similar tool to
tighten if necessary.
169
Escape (TM2), enUSA, First Printing Load CarryingE142448
Page 173 of 449

Make sure to check that the thumbwheels
are tight each time you add or remove load
from the roof rack, and periodically while
traveling. Make sure that the load is secure
before traveling.
LOAD LIMIT
Vehicle Loading - with and
without a Trailer
This section will guide you in the
proper loading of your vehicle,
trailer or both, to keep your loaded
vehicle weight within its design
rating capability, with or without
a trailer. Properly loading your
vehicle will provide maximum
return of vehicle design
performance. Before loading your
vehicle, familiarize yourself with
the following terms for
determining your vehicle
’s weight
ratings, with or without a trailer,
from the vehicle ’s Tire Label or
Safety Compliance Certification
Label:
Base Curb Weight - is the weight
of the vehicle including a full tank
of fuel and all standard
equipment. It does not include
passengers, cargo, or optional
equipment.
Vehicle Curb Weight -
is the
weight of your new vehicle when
you picked it up from your
authorized dealer plus any
aftermarket equipment. Payload -
is the combined weight
of cargo and passengers that the
vehicle is carrying. The maximum
payload for your vehicle can be
found on the Tire Label on the
B-Pillar or the edge of the driver
door (vehicles exported outside
the US and Canada may not have
a Tire Label). Look for
“THE
COMBINED WEIGHT OF
OCCUPANTS AND CARGO
SHOULD NEVER EXCEED XXX kg OR XXX lb.
” for maximum
payload. The payload listed on the
Tire Label is the maximum
payload for the vehicle as built by
the assembly plant. If you install
any aftermarket or
authorized-dealer installed
equipment on the vehicle, you
must subtract the weight of the
equipment from the payload listed
on the Tire Label in order to
determine the new payload.
170
Escape (TM2), enUSA, First Printing Load CarryingE143816PAYLOAD
Page 174 of 449
WARNING
The appropriate loading
capacity of your vehicle can
be limited either by volume
capacity (how much space is
available) or by payload capacity
(how much weight the vehicle
should carry). Once you have
reached the maximum payload of
your vehicle, do not add more
cargo, even if there is space
available. Overloading or
improperly loading your vehicle
can contribute to loss of vehicle
control and vehicle rollover. Example only:
171
Escape (TM2), enUSA, First Printing Load CarryingE142516
Page 175 of 449
Cargo Weight - includes all
weight added to the Base Curb
Weight, including cargo and
optional equipment. When towing,
trailer tongue load or king pin
weight is also part of cargo weight.
GAW (Gross Axle Weight) -
is
the total weight placed on each
axle (front and rear) including
vehicle curb weight and all
payload. GAWR (Gross Axle Weight
Rating) -
is the maximum
allowable weight that can be
carried by a single axle (front or
rear). These numbers are shown
on the Safety Compliance
Certification Label. The label shall
be affixed to either the door hinge
pillar, door-latch post, or the door
edge that meets the door-latch
post, next to the driver seating
position. The total load on each
axle must never exceed its
Gross Axle Weight Rating.
172
Escape (TM2), enUSA, First Printing Load CarryingE142517 E143817CARGO
Page 176 of 449
Note:
For trailer towing
information refer to the RV and
Trailer Towing Guide available at
an authorized dealer. GVW (Gross Vehicle Weight) -
is the Vehicle Curb Weight, plus
cargo, plus passengers.
GVWR (Gross Vehicle Weight
Rating) - is the maximum
allowable weight of the fully
loaded vehicle (including all
options, equipment, passengers
and cargo). It is shown on the Safety Compliance Certification
Label. The label shall be affixed
to either the door hinge pillar,
door-latch post, or the door edge
that meets the door-latch post,
next to the driver seating position.
The Gross Vehicle Weight must
never exceed the Gross Vehicle
Weight Rating.
Example only: 173
Escape (TM2), enUSA, First Printing Load CarryingE143818GVW E142523