2015 FIAT 500X fuel
[x] Cancel search: fuelPage 61 of 240

Symbol What it means
FUEL LEVEL SENSOR FAILURE
The symbol switches on in the event of fuel level sensor failure. Contact a Fiat Dealership.ENGINE OIL DETERIORATED
(where provided)
Diesel versions: the symbol turns on and is displayed for 3 minute cycles and intervals of 5 seconds until
the oil is changed.
The symbol is displayed until the problem is solved.
Petrol versions: the symbol switches on and then is not displayed when the display cycle is completed.
IMPORTANT After the first indication, each time the engine is started the symbol will continue to switch on
as described above until the oil is changed.
If the symbol flashes, this does not mean that there is a fault on the vehicle, rather it simply reports that it is
now necessary to change the oil as a result of regular use of the vehicle.
The deterioration of engine oil is accelerated by using the vehicle for short drives, preventing the engine
from reaching operating temperature.
Contact a Fiat Dealership as soon as possible.
20) 21)
WARNING
20)Deteriorated engine oil should be replaced as soon as possible after the symbol is switched on, and never more than 500 km after it first
switches on. Failure to observe the above indications may result in severe damage to the engine and invalidate the warranty. The switching
on of this symbol is not correlated to the quantity of oil in the engine; therefore if it flashes you do not need to top up the engine oil.
21)If the symbol flashes whilst driving, contact a Fiat Dealership.
59
15-12-2014 8:23 Pagina 59
Page 76 of 240

58)The system is an aid for the driver, who
must always pay full attention while driving.
The responsibility always rests with the
driver, who must take into account the
traffic conditions in order to drive in
complete safety. The driver must always
maintain a safe distance from the vehicle in
front.
59)If the driver depresses the brake pedal
fully or carries out a fast steering during
system operation, the automatic braking
function may stop (e.g. to allow a possible
manoeuvre to avoid the obstacle).
60)The system intervenes on vehicles
travelling in the same lane. People, animals
and things (e.g. pushchairs) are not taken
into consideration.
61)If the vehicle must be placed on a roller
bench for maintenance interventions or if
it is washed in an automatic roller washing
tunnel with an obstacle in the front part
(e.g. another vehicle, a wall or another
obstacle), the system may detect its
presence and activate. In this case the
system must be deactivated through the
settings of theUconnect™system.
62)If the system signals a pressure
decrease on a specific tyre, it is
recommended to check the pressure on all
four tyres.
63)iTPMS does not relieve the driver from
the obligation to check the tyre pressure
every month; it is not to be considered
a system to replace maintenance or a
safety system.64)Tyre pressure must be checked with
tyres cold. Should it become necessary for
whatever reason to check pressure with
warm tyres, do not reduce pressure even if
it is higher than the prescribed value,
rather repeat the check when tyres are
cold.
65)The iTPMS cannot indicate sudden tyre
pressure drops (e.g. if a tyre bursts). In
this case, stop the vehicle, braking with
caution and avoiding abrupt steering.
66)The system only warns that the tyre
pressure is low: it is not able to inflate
them.
67)Insufficient tyre inflation increases fuel
consumption, reduces the tread duration
and may affect the capacity to drive safely.
WARNING
22)The system may have limited or absent
operation due to weather conditions such
as: heavy rain, hail, thick fog, heavy snow.
23)The section of the bumper before
the sensor must not be covered with
adhesives, auxiliary headlights or any other
object.
24)System intervention might be
unexpected or delayed when other vehicles
transport loads projecting from the side,
above or from the rear, with respect to the
normal size of the vehicle.
25)Operation can be adversely affected by
any structural change made to the vehicle,
such as a modification to the front
geometry, tyre change, or a heavier load
than the standard load of the vehicle.26)Incorrect repairs made on the front part
of the vehicle (e.g. bumper, chassis) may
alter the position of the radar sensor,
and adversely affect its operation. Go to a
Fiat Dealership for any operation of this
type.
27)Do not tamper with nor carry out any
intervention on the radar sensor or on
the camera on the windscreen. In the event
of a sensor failure, contact a Fiat
Dealership.
28)When towing a trailer (with modules
installed after purchasing the vehicle),
a vehicle or during loading manoeuvres on
a vehicle transporter (or in vehicle for
transport), the system must be deactivated
via theUconnect™system.
29)Do not wash with high-pressure jets in
the bumper lower area: in particular do
not operate on the system's electrical
connector.
30)Be careful in the case of repairs and
new paintings in the area around the
sensor (panel covering the sensor on the
left side of the bumper). In the event of
a frontal impact the sensor may
automatically deactivate and display a
warning to indicate that the sensor needs
to be repaired. Even without a malfunction
warning, deactivate the system operation
if you think that the position of the radar
sensor has changed (e.g. due to
low-speed frontal impact as during parking
manoeuvres). In these cases, go to a Fiat
Dealership to have the radar sensor
realigned or replaced.
74
SAFETY
15-12-2014 8:23 Pagina 74
Page 101 of 240

STARTING AND DRIVING
Let’s get to the "heart" of the vehicle:
seeing how you can exploit all of its
potential to the full.
We’ll look at how to drive it safely in any
situation, so that it can be a welcome
companion, with our comfort and
our wallets in mind.STARTING THE ENGINE .................100
ELECTRIC PARKING BRAKE (EPB).101
MANUAL GEARBOX .......................10
AUTOMATIC TRANSMISSION.........10
START&STOP SYSTEM ..................107
SPEED LIMITER ..............................108
ELECTRONIC CRUISE CONTROL ..109
MOOD SELECTOR (DRIVING
MODE SELECTOR) .........................110
PARK ASSIST SYSTEM ..................112
LANE ASSIST SYSTEM (LANE
CROSSING WARNING) ...................114
REAR VIEW CAMERA .....................116
TOWING TRAILERS ........................117
REFUELLING THE VEHICLE ...........119
99
15-12-2014 8:23 Pagina 99
5 4
Page 102 of 240

STARTING THE
ENGINEBefore starting the engine, adjust the
seat, the interior rear view mirrors,
the door mirrors and fasten the seat
belt correctly.
Never press the accelerator pedal for
starting the engine.
If necessary, messages indicating the
starting procedure can be shown on
the display.ENGINE STARTING
PROCEDURE
103) 104) 105) 106)33) 34) 35) 36)
Versions with manual gearboxProceed as follows:
❒engage the electric parking brake
and place the gear lever in neutral;
❒bring the ignition device to MAR. On
Diesel versions, warning light
lights up in the instrument panel:
wait for the warning light to switch off;
❒fully depress the clutch pedal without
touching the accelerator;
❒turn the ignition device to AVV and
release it as soon as the engine starts;❒if the engine does not start within 10
seconds, bring the ignition device
back to STOP and wait for 10-15
seconds before repeating the starting
procedure.
❒after the manoeuvre has been
repeated, if the problem persists,
contact a Fiat Dealership.
Versions with automatic
transmissionProceed as follows:
❒engage
the electric parking brake
and set the gear lever to P (Park) or N
(Neutral);
❒fully depress the brake pedal without
touching the accelerator;
❒set the ignition device to AVV;
❒if the engine does not start, bring the
ignition device back to STOP and
wait for 10-15 seconds before
repeating the starting procedure;
❒after the manoeuvre has been
repeated, if the problem persists,
contact a Fiat Dealership.
ENGINE STARTING
F
AILURE
Starting the engine with electronic
key battery (Keyless Go) run down
or flatIf the ignition device does not respond
when the relevant button is pressed the
electronic key battery might be run
down or flat. Therefore, the system
does not detect the presence of the
electronic key on board the vehicle and
displays a dedicated message. In this
case, rest the rounded edge of the
electronic key (the side opposite the
metal insert) on the ignition device and
press the button using the electronic
key. The ignition device is thus
activated and the engine can be
started.
WARNING
103)Do not try to start the engine by
pouring fuel or other flammable fluid inside
the throttle body air intake: this might
damage the engine and injury people
nearby.
104)It is dangerous to run the engine in
enclosed areas. The engine consumes
oxygen and produces carbon dioxide,
carbon monoxide and other toxic gases.
105)The brake servo is not operational
until the engine has been started; therefore
you need to apply much more force than
usual to the brake pedal.
100
STARTING AND DRIVING
12-1-2015 15:6 Pagina 100
Page 103 of 240

106)Do not start the engine by pushing,
towing or driving downhill. These
manoeuvres may damage the catalytic
converter.
WARNING
33)In the first period of use, i.e. in the first
1,600 km, we recommend not to demand
maximum performance from the vehicle
(for instance excessive accelerations,
extended travel at maximum speed,
sudden braking, etc.).
34)With the engine off, do not leave the
ignition device at MAR to prevent the
battery from draining.
35)A quick burst on the accelerator before
turning off the engine serves absolutely
no practical purpose; it wastes fuel and is
especially damaging to turbocharged
engines.
36)Warning light
will flash after
starting or during prolonged cranking to
indicate a fault with the glow plug heating
system. If the engine starts, the vehicle can
be used as normal, but a Fiat Dealership
must be contacted as soon as possible.
ELECTRIC PARKING
BRAKE (EPB)The vehicle is equipped with electric
parking brake (EPB) to guarantee better
use and optimal performance
compared to a manually operated
parking brake.
The electric parking brake features a
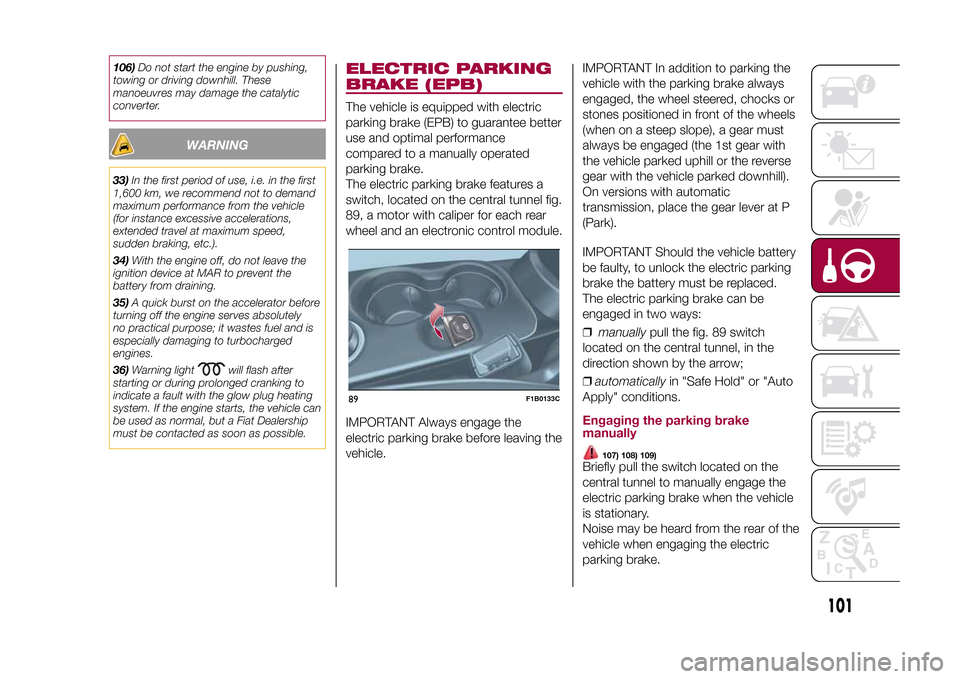
switch, located on the central tunnel fig.
89, a motor with caliper for each rear
wheel and an electronic control module.
IMPORTANT Always engage the
electric parking brake before leaving the
vehicle.IMPORTANT In addition to parking the
vehicle with the parking brake always
engaged, the wheel steered, chocks or
stones positioned in front of the wheels
(when on a steep slope), a gear must
always be engaged (the 1st gear with
the vehicle parked uphill or the reverse
gear with the vehicle parked downhill).
On versions with automatic
transmission, place the gear lever at P
(Park).
IMPORTANT Should the vehicle battery
be faulty, to unlock the electric parking
brake the battery must be replaced.
The electric parking brake can be
engaged in two ways:
❒manuallypull the fig. 89 switch
located on the central tunnel, in the
direction shown by the arrow;
❒automaticallyin "Safe Hold" or "Auto
Apply" conditions.
Engaging the parking brake
manually
107) 108) 109)
Briefly pull the switch located on the
central tunnel to manually engage the
electric parking brake when the vehicle
is stationary.
Noise may be heard from the rear of the
vehicle when engaging the electric
parking brake.
89
F1B0133C
101
12-1-2015 15:6 Pagina 101
Page 113 of 240

"Auto" MODEThis mode is aimed at comfort and
safety in normal grip and driving
conditions. On 4x4 versions, this mode
also reduces fuel consumption, since
it automatically disconnects the
transmission from the rear wheels if the
road and driving conditions allow it, in
addition to changing drive torque
distribution between the front and rear
axles.ActivationStarting from the active "Traction/All
Weather" mode, turn the ring nut
anticlockwise, keeping it in this position
for at least half a second, and in any
case until the relevant LED turns on,
and the selected mode is shown on the
display. The LED for the previously set
mode will simultaneously turn off. Upon
release, the ring nut will return to the
central position.
Starting from the active "Sport" mode,
turn the ring nut clockwise, keeping it in
this position for at least half a second,
and in any case until the relevant LED
turns on, and the selected mode is
shown on the display. The LED for the
previously set mode will simultaneously
turn off. Upon release, the ring nut will
return to the central position.
"Traction"/"All Weather" MODEIt is a driving mode for safety in poor
vehicle grip conditions (wet/slippery
road surface, rain, snow). On the 4x4
versions use is also recommended
on unsurfaced roads or off-road.ActivationStarting from the active "Auto" mode,
turn the ring nut clockwise, keeping it in
this position for at least half a second,
and in any case until the relevant LED
turns on, and the selected mode is
shown on the display. The LED for the
previously set mode will simultaneously
turn off. Upon release, the ring nut will
return to the central position.
Starting from the active "Sport" mode,
turn the ring nut anticlockwise, keeping
it in this position for at least half a
second, and in any case until the
relevant LED turns on, and the selected
mode is shown on the display. The
LED for the previously set mode will
simultaneously turn off. Upon release,
the ring nut will return to the central
position.
"Sport" MODEIt is the mode that emphasises the
pleasure of sport driving; it increases
fuel consumption however. Traction
is optimised on 4x4 versions, allowing
the vehicle road-hold performance
to be improved, even on bends.ActivationStarting from the active "Auto" mode,
turn the ring nut anticlockwise, keeping
it in this position for at least half a
second, and in any case until the
relevant LED turns on, and the selected
mode is shown on the display. The
LED for the previously set mode will
simultaneously turn off. Upon release,
the ring nut will return to the central
position.
Starting from the active "Traction/All
Weather" mode, turn the ring nut
clockwise, keeping it in this position for
at least half a second, and in any case
until the relevant LED turns on, and
the selected mode is shown on the
display. The LED for the previously set
mode will simultaneously turn off. Upon
release, the ring nut will return to the
central position.
111
15-12-2014 8:23 Pagina 111
Page 121 of 240

REFUELLING THE
VEHICLE
122) 123) 124)
PETROL ENGINESOnly use unleaded petrol with a number
of octanes (R.O.N.) not lower than 95
(EN 228 specification).DIESEL ENGINES
50)
Only use Diesel for motor vehicles (EN
590 specification).
When using or parking the vehicle for a
long time in the mountains or cold
areas, it is advisable to refuel using
locally available diesel. In this case, it is
also advisable to keep the tank over
50% full.REFUELLING
PROCEDURE"Capless Fuel" is a device at the
opening for the fuel tank which opens
and recloses automatically when the
fuel supply gun is introduced/removed.
The "Capless Fuel" device is provided
with an inhibitor which prevents
refuelling with incorrect fuel.
Opening the flapTo refuel proceed as follows:
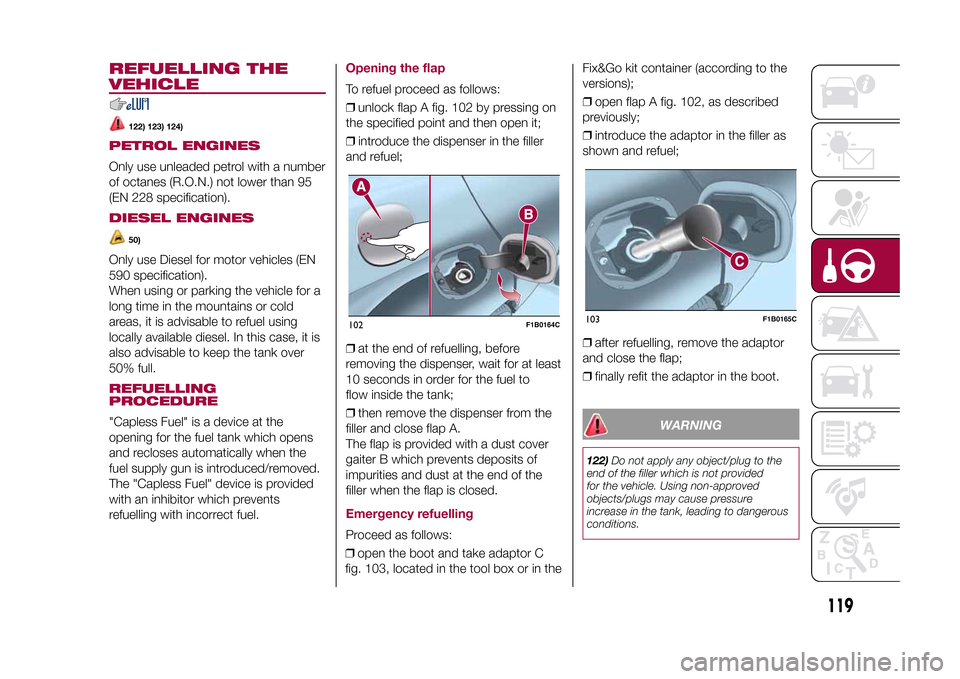
❒unlock flap A fig. 102 by pressing on
the specified point and then open it;
❒introduce the dispenser in the filler
and refuel;
❒at the end of refuelling, before
removing the dispenser, wait for at least
10 seconds in order for the fuel to
flow inside the tank;
❒then remove the dispenser from the
filler and close flap A.
The flap is provided with a dust cover
gaiter B which prevents deposits of
impurities and dust at the end of the
filler when the flap is closed.Emergency refuellingProceed as follows:
❒open the boot and take adaptor C
fig. 103, located in the tool box or in theFix&Go kit container (according to the
versions);
❒open flap A fig. 102, as described
previously;
❒introduce the adaptor in the filler as
shown and refuel;
❒after refuelling, remove the adaptor
and close the flap;
❒finally refit the adaptor in the boot.
WARNING
122)Do not apply any object/plug to the
end of the filler which is not provided
for the vehicle. Using non-approved
objects/plugs may cause pressure
increase in the tank, leading to dangerous
conditions.
102
F1B0164C
103
F1B0165C
119
15-12-2014 8:23 Pagina 119
Page 122 of 240

123)Do not get close to the filler of the
tank with naked flames or lit cigarettes: risk
of fire. Do not get too close to the filler
with your face, in order not to inhale
harmful vapours.
124)Do not use a mobile phone near the
fuel pump: risk of fire.
WARNING
50)Vehicles with a diesel engine must only
be filled with diesel fuel for motor vehicles,
in compliance with European Standard
EN 590. The use of other products or
mixtures may damage the engine beyond
repair and consequently invalidate the
warranty, due to the damage caused. If
you accidentally refuel with another type of
fuel, do not start the engine, and drain
the tank. If the engine has run, even for a
very short time, you will need to have
the entire fuel supply system emptied in
addition to the tank.
120
STARTING AND DRIVING
15-12-2014 8:23 Pagina 120