2015 FIAT 500X fuel
[x] Cancel search: fuelPage 123 of 240

IN AN EMERGENCY
A punctured tyre or a burnt-out bulb?
At times, a problem may interfere
with our journey.
The pages on emergencies can help
you to deal with critical situations
independently and with calm.
In an emergency we recommend that
you call the freephone number found in
the Warranty Booklet.
It is also possible to call the national or
international universal freephone
number to search for the nearest Fiat
Dealership.HAZARD WARNING LIGHTS...........122
BULB REPLACEMENT....................122
REPLACING FUSES........................128
CHANGING A WHEEL ....................133
FIX&GO AUTOMATIC KIT ................136
EMERGENCY STARTING ................138
FUEL CUT-OFF SYSTEM ................140
AUTOMATIC TRANSMISSION
GEAR LEVER UNLOCKING.............140
TOWING THE VEHICLE ..................142
121
15-12-2014 8:23 Pagina 121
Page 135 of 240

CHANGING A WHEELJACKPlease note that:
❒the weight of the jack is 2.8 kg;
❒The jack requires no adjustment;
❒the jack cannot be repaired and in
the event of a fault it must be replaced
by another original one;
❒No tool other than its cranking device
may be fitted on the jack.CHANGING PROCEDURE
132) 133) 134) 135) 136) 137) 138) 139)
Proceed as follows:
❒stop the vehicle in a position that is
not dangerous for oncoming traffic
where you can change the wheel safely.
The ground should be flat if possible,
and sufficiently firm;
❒stop the engine, engage the hazard
warning lights and the electric parking
brake;
❒engage first gear or reverse or, for
versions with automatic transmission,
move the lever to position P (Park);
❒wear the reflective safety jacket
(compulsory by law in certain countries)
before getting out of the vehicle;❒open the boot and position the
reconfigurable load platform in
an inclined position (see "Boot" in the
"Knowing your vehicle" chapter);
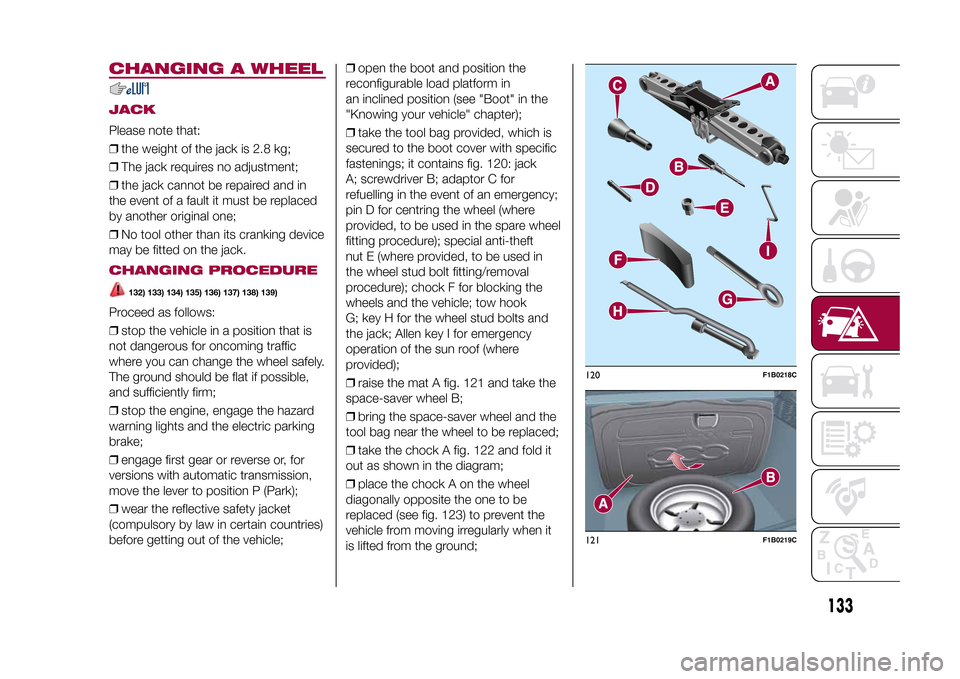
❒take the tool bag provided, which is
secured to the boot cover with specific
fastenings; it contains fig. 120: jack
A; screwdriver B; adaptor C for
refuelling in the event of an emergency;
pin D for centring the wheel (where
provided, to be used in the spare wheel
fitting procedure); special anti-theft
nut E (where provided, to be used in
the wheel stud bolt fitting/removal
procedure); chock F for blocking the
wheels and the vehicle; tow hook
G; key H for the wheel stud bolts and
the jack; Allen key I for emergency
operation of the sun roof (where
provided);
❒raise the mat A fig. 121 and take the
space-saver wheel B;
❒bring the space-saver wheel and the
tool bag near the wheel to be replaced;
❒take the chock A fig. 122 and fold it
out as shown in the diagram;
❒place the chock A on the wheel
diagonally opposite the one to be
replaced (see fig. 123) to prevent the
vehicle from moving irregularly when it
is lifted from the ground;
120
F1B0218C
121
F1B0219C
133
15-12-2014 8:23 Pagina 133
Page 138 of 240

137)The jack is a tool developed and
designed only for changing a wheel, if a
tyre gets punctured or damaged, on the
vehicle with which it is supplied or on other
vehicles of the same model. It must not
be used, for example, to jack other vehicle
models or objects. Never use the jack to
carry out maintenance or repairs under the
vehicle. Never position yourself under a
jacked vehicle. Should it be necessary to
work under the vehicle, contact a Fiat
Dealership. Incorrectly positioning the jack
may cause the vehicle to fall: use it only
in the positions indicated. Do not use the
jack for loads higher than the one shown
on its label.
138)The space-saver wheel cannot be
fitted with snow chains. If a front (drive) tyre
is punctured and chains are needed, use
a standard wheel from the rear axle and
install the space-saver wheel on the rear
axle. In this way, with two normal drive
wheels at the front axle, it is possible to use
snow chains (this instruction is also valid
for 4x4 versions).
139)Never tamper with the inflation valve.
Never introduce tools of any kind between
the rim and the tyre. Check tyre and
space-saver wheel pressures regularly,
complying with the values given in the
"Technical specifications" chapter.
FIX&GO AUTOMATIC
KIT(where provided)DESCRIPTION
140) 141) 142) 143) 144) 145) 146) 147)54)3)
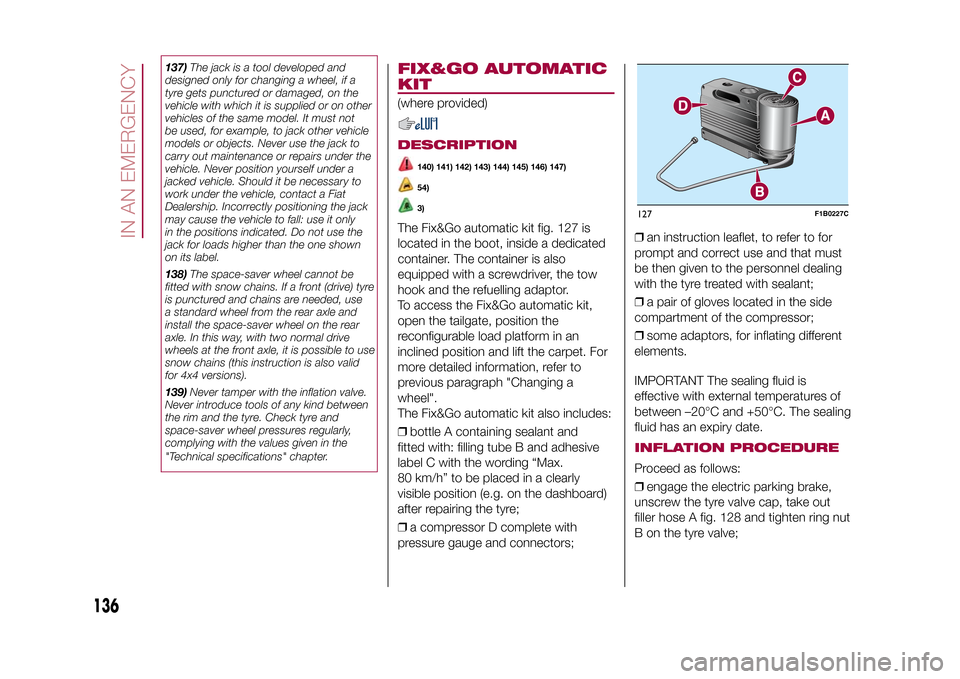
The Fix&Go automatic kit fig. 127 is
located in the boot, inside a dedicated
container. The container is also
equipped with a screwdriver, the tow
hook and the refuelling adaptor.
To access the Fix&Go automatic kit,
open the tailgate, position the
reconfigurable load platform in an
inclined position and lift the carpet. For
more detailed information, refer to
previous paragraph "Changing a
wheel".
The Fix&Go automatic kit also includes:
❒bottle A containing sealant and
fitted with: filling tube B and adhesive
label C with the wording “Max.
80 km/h” to be placed in a clearly
visible position (e.g. on the dashboard)
after repairing the tyre;
❒a compressor D complete with
pressure gauge and connectors;❒an instruction leaflet, to refer to for
prompt and correct use and that must
be then given to the personnel dealing
with the tyre treated with sealant;
❒a pair of gloves located in the side
compartment of the compressor;
❒some adaptors, for inflating different
elements.
IMPORTANT The sealing fluid is
effective with external temperatures of
between –20°C and +50°C. The sealing
fluid has an expiry date.
INFLATION PROCEDUREProceed as follows:
❒engage the electric parking brake,
unscrew the tyre valve cap, take out
filler hose A fig. 128 and tighten ring nut
B on the tyre valve;127
F1B0227C
136
IN AN EMERGENCY
15-12-2014 8:23 Pagina 136
Page 141 of 240

❒connect one end of the cable used
for negative (–) to the negative terminal
(–) of the auxiliary battery;
❒Connect the other end of the cable
used for negative (–) to an engine earth
(a visible metal part of the engine
or gearbox/transmission of the vehicle
with flat battery) away from the battery
and the fuel injection system;
❒start the vehicle engine with the
auxiliary battery, let it run for a
few minutes at idling. Start the engine
of the vehicle with flat battery.
Cable disconnection.Once the engine is started, remove the
leads, reversing the order above.
If after a few attempts the engine does
not start, do not persist but contact
a Fiat Dealership.If it is often necessary to perform an
emergency starting, have the vehicle
battery and the recharging system
checked by a Fiat Dealership.
IMPORTANT Any accessories (e.g.
mobile phones, etc.) connected to the
vehicle power sockets, draw current
even if they are not used. These
devices, if left connected too much time
with engine off, may cause the battery
to drain with following reduction of
its life and/or failure to start the engine.
WARNING
148)Before opening the bonnet, make
sure that the engine is off and that the
ignition key is in the STOP position. Follow
the indications on the plate underneath
the bonnet. We recommend that you
remove the key from the ignition if other
people remain in the vehicle. The vehicle
should always be left after the key has
been removed or turned to the STOP
position. During refuelling, make sure that
the engine is off (and that the ignition key is
in the STOP position).
149)Do not get too close to the radiator
cooling fan: the electric fan may start;
danger of injury. Scarves, ties and other
loose clothing may be pulled by moving
parts.150)Remove any metal objects (e.g. rings,
watches, bracelets), that might cause an
accidental electrical contact and cause
serious injury.
151)Batteries contain acid which may burn
skin and eyes. Batteries produce
hydrogen, which is easily flammable and
explosive. Therefore, keep away flames or
devices which may cause sparks.
WARNING
55)Never use a fast battery-charger to
start the engine as this could damage the
electronic systems of your vehicle,
particularly the ignition and fuel supply
control units.
56)Do not connect the cable to the
negative terminal (–) of the flat battery. The
following spark could lead to battery
explosion and cause serious harm. Only
use the specific earth point; do not use any
other exposed metallic part.
129
F1B0217C
139
15-12-2014 8:23 Pagina 139
Page 142 of 240

FUEL CUT-OFF
SYSTEMDESCRIPTIONThis intervenes in the case of an impact
causing:
❒the interruption of the fuel supply with
the engine consequently switching off;
❒the automatic unlocking of the doors;
❒turning on of the lights inside the
vehicle;
❒deactivation of climate control system
ventilation;
❒switching on of the hazard warning
lights (to deactivate the lights press the
button on the dashboard).
On some versions, the intervention of
the system is indicated by a message
shown on the display. In the same way,
a dedicated message on the display
warns the driver if system operation is
compromised.
IMPORTANT Carefully check the vehicle
for fuel leaks, for instance in the engine
compartment, under the vehicle or
near the tank area. After a collision,
bring the ignition device to STOP to
prevent the battery from running down.
FUEL CUT-OFF SYSTEM
RESETTo restore correct operation of the
vehicle, carry out the following
procedure (this procedure must be
started and completed within less than
1 minute):
152)
Operations to be carried out
With direction indicator lever in neutral
position, bring the ignition device to STOP
Bring the ignition device to MAR
Activate the right direction indicator
Activate the left direction indicator
Activate the right direction indicator
Activate the left direction indicator
Deactivate the left direction indicator
Bring the ignition device to STOP
Bring the ignition device to MAR
WARNING
152)If, after an impact, you smell fuel or
notice leaks from the fuel system, do
not reactivate the system to avoid the risk
of fire.
AUTOMATIC
TRANSMISSION
GEAR LEVER
UNLOCKINGIn the event of a fault, to move the gear
lever from P (Park), proceed as follows:
❒stop the engine;
❒engage the electric parking brake;
❒working carefully in the point
indicated by the arrow, remove the trim
A fig. 130 (complete with gaiter) lifting
it upwards (see also fig. 131);130
F1B0028C
131
F1B0055C
140
IN AN EMERGENCY
15-12-2014 8:23 Pagina 140
Page 148 of 240

SCHEDULED SERVICING PLAN (1.4 Turbo MultiAir versions)The checks listed in the Scheduled Servicing Plan, after reaching 120,000 km/8 years, must be cyclically repeated starting from
the first interval, thus following the same intervals as before.Thousands of miles 9 18 27 36 45 54 63 72 81 90
Thousands of kilometres 15 30 45 60 75 90 105 120 135 150
Years12345678910Check tyre condition/wear and adjust pressure, if
necessary. Check Fix&Go quick tyre repair kit recharge
expiry date (where provided)●●●●●●●●●●
Check operation of lighting system (headlights, direction
indicators, hazard warning lights, boot, passenger
compartment, glove compartment, instrument panel
warning lights, etc.)●●●●●●●●●●
Check and, if necessary, top up fluid levels (engine
coolant, hydraulic clutch/brakes, screen washer, battery,
etc.)●●●●●●●●●●
Check exhaust emissions/smokiness●●●●●●●●●●
Use the diagnosis socket to check engine management
system operation, emissions and, for versions/markets,
where provided, engine oil degradation●●●●●●●●●●
Visually inspect conditions of: exterior bodywork,
underbody protection, pipes and hoses (exhaust, fuel
system, brakes), rubber elements (gaiters, sleeves,
bushes, etc.)●●●●●
Check windscreen and rear window wiper blade position/
wear●●●●●
146
SERVICING AND MAINTENANCE
15-12-2014 8:23 Pagina 146
Page 151 of 240

SCHEDULED SERVICING PLAN (1.6 E.torQ versions)The checks listed in the Scheduled Servicing Plan, after reaching 120,000 km/8 years, must be cyclically repeated starting from
the first interval, thus following the same intervals as before.Thousands of miles 9 18 27 36 45 54 63 72 81 90
Thousands of kilometres 15 30 45 60 75 90 105 120 135 150
Years12345678910Check tyre condition/wear and adjust pressure, if
necessary. Check Fix&Go quick tyre repair kit recharge
expiry date (where provided)●●●●●●●●●●
Check operation of lighting system (headlights, direction
indicators, hazard warning lights, boot, passenger
compartment, glove compartment, instrument panel
warning lights, etc.)●●●●●●●●●●
Check and, if necessary, top up fluid levels (engine
coolant, hydraulic clutch/brakes, screen washer, battery,
etc.)●●●●●●●●●●
Check exhaust emissions/smokiness●●●●●●●●●●
Use the diagnosis socket to check engine management
system operation, emissions and, for versions/markets,
where provided, engine oil degradation●●●●●●●●●●
Visually inspect conditions of: exterior bodywork,
underbody protection, pipes and hoses (exhaust, fuel
system, brakes), rubber elements (gaiters, sleeves,
bushes, etc.)●●●●●
Check windscreen and rear window wiper blade position/
wear●●●●●
149
15-12-2014 8:23 Pagina 149
Page 154 of 240

SCHEDULED SERVICING PLAN (1.6 MultiJet and 2.0 MultiJet versions)The checks listed in the Scheduled Servicing Plan, after reaching 120,000 km/6 years, must be cyclically repeated starting from
the first interval, thus following the same intervals as before.Thousands of miles 12 24 36 48 60 72 84 96 108 120
Thousands of kilometres 20 40 60 80 100 120 140 160 180 200
Years12345678910Check tyre condition/wear and adjust pressure, if
necessary. Check Fix&Go quick tyre repair kit recharge
expiry date (where provided)●●●●●●●●●●
Check operation of lighting system (headlights, direction
indicators, hazard warning lights, boot, passenger
compartment, glove compartment, instrument panel
warning lights, etc.)●●●●●●●●●●
Check and, if necessary, top up fluid levels (engine
coolant, hydraulic clutch/brakes, screen washer, battery,
etc.)●●●●●●●●●●
Check exhaust emissions/smokiness●●●●●●●●●●
Use the diagnosis socket to check supply/engine
management systems operation, emissions and, for
versions/markets, where provided, engine oil degradation●●●●●●●●●●
Visually inspect conditions of: exterior bodywork,
underbody protection, pipes and hoses (exhaust, fuel
system, brakes), rubber elements (gaiters, sleeves,
bushes, etc.)●●●●●
Check windscreen and rear window wiper blade position/
wear●●●●●
152
SERVICING AND MAINTENANCE
15-12-2014 8:23 Pagina 152