2015 FIAT 500E instrument panel
[x] Cancel search: instrument panelPage 50 of 100

BLUE&ME™ HANDS-FREE OPERATION
•FIAT’s Windows Mobile™ based BLUE&ME™ Hands-Free Communication is a personal
telematics system that incorporates communication and entertainment applications that
are specifically designed for use in your car.
•The BLUE&ME™ Hands-Free Communication package installed in your car is equipped
with integral hands-free functionality, message reader, and media player.BLUE&ME™ is
designed to support the future installation of additional services.
•The BLUE&ME™ Hands-Free Communication package features integrated voice recogni-
tion, steering wheel controls and a multifunction electronic display that allows you to use
your Bluetooth® enabled wireless technology enabled mobile phone without having to
take your eyes off the road.You can even keep your phone in a pocket or a bag.You are
not required to train the voice recognition system to recognize your voice.The system is
“speaker independent” and performs equally well for different users.
•Bluetooth® wireless technology enables wireless connection between your mobile
phone and the hands-free kit installed on your car.
•To use the hands-free kit, you need a Bluetooth® wireless technology enabled mobile
phone.This hands-free kit gives you the possibility of interacting vocally with your mobile
phone while driving, even if your mobile device does not feature Voice Recognition.You
can also interact with your mobile phone manually and visually using the steering wheel
controls and the instrument panel multifunction display.Please refer to the Fiat Blue & Me
Radio Supplement for further information.
WARNING!
Driving while distracted can result in loss of vehicle control, accident and injury.It is
strongly recommended that you use extreme caution when using any device or feature
that may take your focus off the road or your hands off the steering wheel.Your pri-
mary responsibility is the safe operation of your vehicle.We recommend against the
use of any handheld device while driving, encourage the use of voice-operated systems
when possible and that you become aware of applicable laws that may affect the use of
electronic devices while driving.
ELECTRONICS
48
Page 53 of 100

BLUE&ME™ Hands-Free Communication
•To use the hands-free feature, you need a Bluetooth® wireless technology enabled
mobile phone.This hands-free feature gives you the possibility of interacting vocally
with your mobile phone while driving, even if your mobile device does not feature this
capability.You can also interact with your mobile phone manually and visually using the
steering wheel controls and the instrument panel Electronic Vehicle Information Center
(EVIC) display.
•To get started with BLUE&ME™ hands-free feature with voice recognition, you have to
simply pair your Bluetooth® wireless technology enabled mobile phone with the
system.
Pair Your Mobile Phone
•Push the VR button on the steering wheel then “Settings.” At the end of the
BLUE&ME™ message say “Pairing.” You may also access the pairing feature via the
menu by selecting it.
•The system will show the phone pairing PIN number on the EVIC display.For the next
two steps, consult your mobile phone owner’s manual about Bluetooth® pairing proce-
dures for your phone.
•On your mobile phone, search for devices equipped with Bluetooth® wireless technol-
ogy (the setting on your mobile phone might be called Discover or New Device).
In this list you will find BLUE&ME™ (name identifying the BLUE&ME™ system on
your car) select it.
•When prompted by the mobile phone, enter the PIN number shown on the instru-
ment panel display using your mobile phone keypad.If pairing is successful, the system
will say “Connecting” and at the end the display will show as confirmation message, the
ID of the paired mobile phone.
•It is essential to wait until you see this confirmation message on the display.Pushing
PHONE/MENU button on the steering wheel or MUTE/ESC button before the mes-
sage is displayed may cancel the pairing process.If the pairing process fails, an error
message will be displayed: in this event repeat the pairing procedure.
•At first pairing, BLUE&ME™ will say “Welcome” immediately after connecting.This
message will no longer be heard when your phone automatically connects to the
BLUE&ME™ system on future ignition cycles.
•BLUE&ME™ will ask if you would like to copy your paired phone phonebook to
BLUE&ME™.It is recommended to copy it.To start copying the phonebook say “Yes,”
otherwise say “No.”
ELECTRONICS
51
Page 69 of 100

If the tire does not inflate to at least 26 psi (1.8 Bar) pressure within 15 minutes:
The tire is too badly damaged.Do not attempt to drive the vehicle further.Call for assis-
tance.
NOTE:
If the tire becomes over-inflated, push the Deflation Button to reduce the tire pressure
to the recommended inflation pressure before continuing.
If the tire inflates to the recommended pressure or is at least 26 psi (1.8 Bar) pressure
within 15 minutes:
1.Push the Power Button (4) to turn off the Tire Service Kit.
2.Remove the Speed Limit sticker from the top of the Sealant Bottle (1) and place the
sticker on the instrument panel.
3.Immediately disconnect the Sealant Hose (6) from the valve stem, reinstall the cap on
the fitting at the end of the hose, and place the Tire Service Kit in the vehicle storage
location.Quickly proceed to (D) “Drive Vehicle.”
(D) Drive Vehicle:
Immediately after injecting sealant and inflating the tire, drive the vehicle 5 miles (8 km)
or 10 minutes to ensure distribution of the Tire Service Kit Sealant within the tire.
Do not exceed 55 mph (88 km/h).
(E) After Driving:
Pull over to a safe location.Refer to “Whenever You Stop to Use Tire Service Kit” before
continuing.
1.Turn the Mode Select Knob (5) to the Air Mode position.
2.Uncoil the Air Pump Hose (7) (black in color) and screw the fitting at the end of
hose (7) onto the valve stem.
3.Uncoil the power plug and insert the plug into the vehicles 12 Volt power outlet.
4.Check the pressure in the tire by reading the Pressure Gauge (3).
If tire pressure is less than 19 psi (1.3 Bar), the tire is too badly damaged. Do not at-
tempt to drive the vehicle further. Call for assistance.
If the tire pressure is 19 psi (1.3 Bar) or higher:
1.Push the Power Button (4) to turn on Tire Service Kit and inflate the tire to the pressure
indicated on the tire and loading information label on the driver-side door opening.
2.Disconnect the Tire Service Kit from the valve stem, reinstall the cap on the valve
stem and unplug from 12 Volt outlet.
WHAT TO DO IN EMERGENCIES
67
Page 70 of 100

3.Place the Tire Service Kit in its proper storage area in the vehicle.
4.Have the tire inspected and repaired or replaced at the earliest opportunity at an
authorized dealer or tire service center.
5.Remove the Speed Limit sticker from the instrument panel after the tire has been
repaired.
6.Replace the Sealant Bottle (1) and Sealant Hose (6) assembly at your authorized
dealer as soon as possible.Refer to “(F) Sealant Bottle and Hose Replacement.”
NOTE:
•If the tire becomes over-inflated, push the Deflation Button to reduce the tire pressure
to the recommended inflation pressure before continuing.
•When having the tire serviced, advise the authorized dealer or service center that the
tire has been sealed using the Tire Service Kit.
(F) Sealant Bottle And Hose Replacement:
1.Uncoil the Sealant Hose (6) (clear in color).
2.Locate the round Sealant Bottle release button in the recessed area under the sealant
bottle.
3.Push the Sealant Bottle release button.The Sealant Bottle (1) will pop up.Remove the
bottle and dispose of it accordingly.
4.Clean any remaining sealant from the Tire Service Kit housing.
5.Position the new Sealant Bottle (1) in the housing so that the Sealant Hose (6) aligns
with the hose slot in the front of the housing.Push the bottle into the housing.
An audible click will be heard indicating the bottle is locked into place.
6.Verify that the cap is installed on the fitting at the end of the Sealant Hose (6) and
return the hose to its storage area (located on the bottom of the air pump).
7.Return the Tire Service Kit to its storage location in the vehicle.
NOTE:
•The metal end fitting from Power Plug (8) may get hot after use, so it should be
handled carefully.
•Failure to reinstall the cap on the fitting at the end of the Sealant Hose (6) can result
in sealant contacting your skin, clothing, and the vehicle’s interior.It can also result in
sealant contacting internal Tire Service Kit components which may cause permanent
damage to the kit.
WHAT TO DO IN EMERGENCIES
68
Page 77 of 100

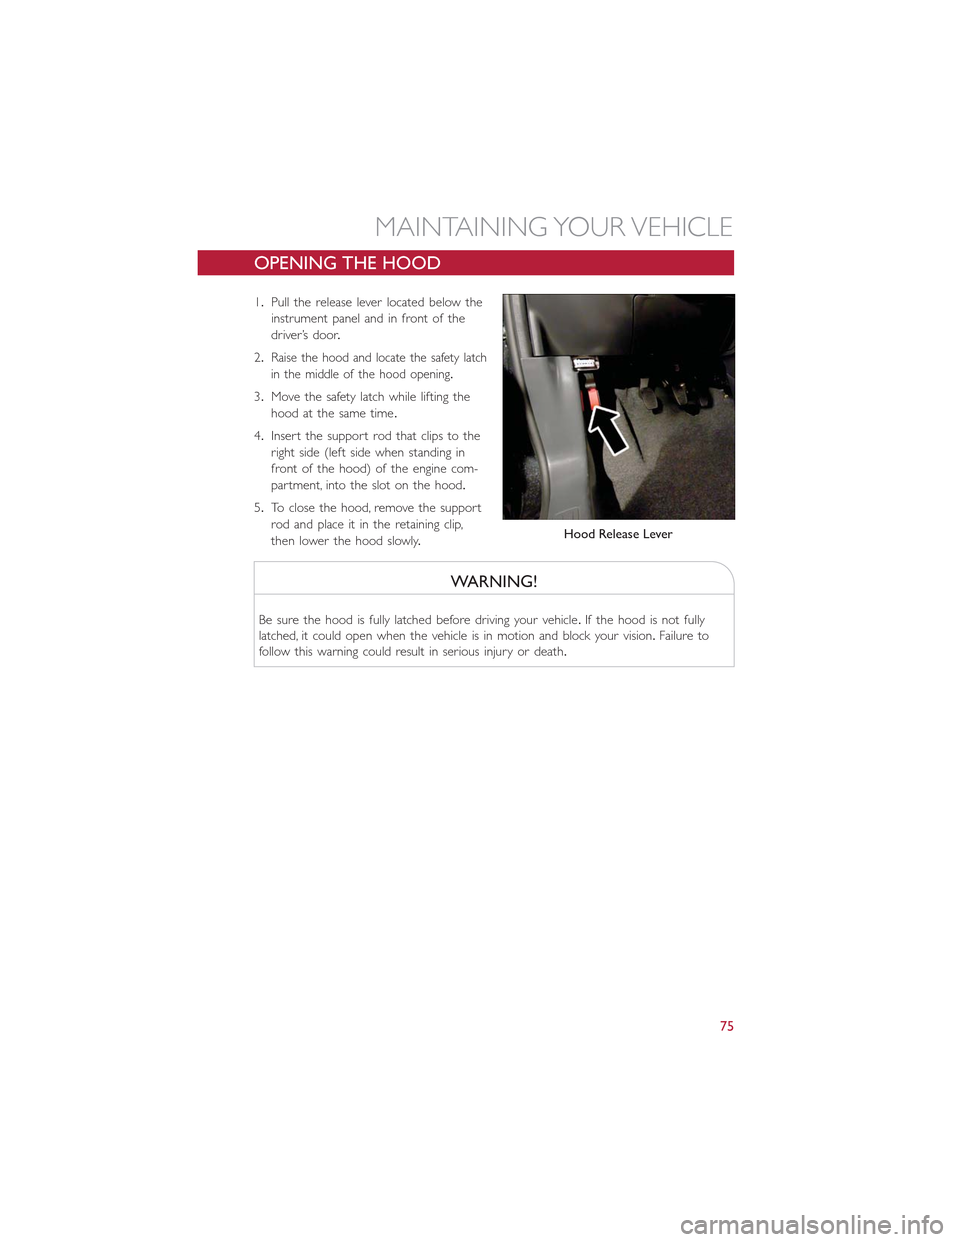
OPENING THE HOOD
1.Pull the release lever located below the
instrument panel and in front of the
driver’s door.
2.Raise the hood and locate the safety latch
in the middle of the hood opening.
3.Move the safety latch while lifting the
hood at the same time.
4.Insert the support rod that clips to the
right side (left side when standing in
front of the hood) of the engine com-
partment, into the slot on the hood.
5.To close the hood, remove the support
rod and place it in the retaining clip,
then lower the hood slowly.
WARNING!
Be sure the hood is fully latched before driving your vehicle.If the hood is not fully
latched, it could open when the vehicle is in motion and block your vision.Failure to
follow this warning could result in serious injury or death.
Hood Release Lever
MAINTAINING YOUR VEHICLE
75
Page 85 of 100

FUSES
Interior Fuses
The interior fuse panel is part of the Body Control Module (BCM) and is located on the
driver's side under the instrument panel.
CavityVehicle FuseNumberMini Fuse Description
1 F12 7.5 Amp Brown Right Low Beam
2 F32 5 Amp TanFront and Rear Ceiling Lights Trunk and DoorCourtesy Lights
3 F53 5 Amp Tan Instrument Panel Node
4 F38 20 Amp Yellow Central Door Locking
5 F36 10 Amp RedDiagnostic Socket, Car Radio, Climate ControlSystem, Tire Pressure Monitor, TCU and CTM
6 F43 20 Amp Yellow Bi-Directional Washer
7 F48 20 Amp Yellow Passenger Power Window
8 F13 7.5 Amp Brown Left Low Beam
9 F50 7.5 Amp Brown Airbag
10 F51 5 Amp TanCar Radio Switch, Climate Control System,Stop Light, Exterior Mirrors, Sunroof Switch,GPS (option) and CTM
11 F37 5 Amp Tan Stop Light Switch, Instrument Panel Node
12 F49 5 Amp TanExterior Mirror, GPS, Electric Mirror, ParkingSensor, Sunroof Switch
13 F31 5 Amp Tan Ignition, Climate Control, RDU and EVCU
14 F47 20 Amp Yellow Driver Power Window
The fuse for the heated mirrors is located behind an access panel on the front of the
Instrument Panel.
NOTE:
This fuse is a single fuse attached directly to the wire harness.
Cavity Mini Fuse Description
F90 5 Amp Tan Heated Mirrors
MAINTAINING YOUR VEHICLE
83
Page 97 of 100

Electronics
Your Vehicle's Sound System......44
Electronic Speed Control
(Cruise Control).............38
Electronic Vehicle Information
Center (EVIC)............54, 55
Emergency, In Case of
Towing.................73
Engine....................76
Air Cleaner...............79
Checking Oil Level............79
Cooling..................79
Oil...................79
Oil Filler Cap..............79
Oil Selection..............79
Enhanced Accident Response Feature....73
Event Data Recorder............74
Exhaust System...............79
Extending Driving Range..........35
Exterior Lights................89
FAQ.....................93
Filters
Air Cleaner...............79
Engine Oil................79
Engine Oil Disposal...........79
Flashers
Turn Signal...............63
Flash-To-Pass.................36
Fluids, Lubricants and Genuine Parts....78Fog Lights..................63Freeing A Stuck Vehicle...........73Front Heated Seats.............33Fuse.....................83Fuses.....................83
General Maintenance............79Glass Cleaning................79
Hands-Free Communication —BLUE&ME™...............48HeadlightsCleaning.................79Heated Mirrors...............42Heated Seats................33High Beam Indicator.............63High Voltage Battery.............16
Hood Release................75
Instrument Cluster
Indicators.................8
Instrument Cluster Warning Lights.....59
Instrument Panel Cover...........79
Instrument Panel Lens Cleaning.......79
Interior and Instrument Lights.......6, 7
Interior Appearance Care..........79
iPod®/USB/MP3 Control..........53
Jump Starting................70
Key Fob...................19Disarm The Alarm............20
Lane Change Assist.............36Lap/Shoulder Belts..............20LATCH (Lower Anchors and Tether forCHildren)...............25, 27Level 1 Charging...............13Level 2 Charging...............13Liftgate....................19Light Bulbs..................89LightsFog...................63High Beam Indicator..........63Seat Belt Reminder...........60Security Alarm.............63Turn Signal...............36LocksKeys...................19Liftgate, Tailgate.............19Lower Anchors and Tether for CHildren(LATCH).................25Lubrication, Body..............79
Maintenance Free Battery..........79Maintenance, General............79Maintenance Procedures..........79Maintenance Record.............82Maintenance Schedule............79Master Cylinder (Brakes)..........79MirrorsHeated.................42MOPAR® Accessories............92
Occupant Restraints.............24
INDEX
95