2015 FIAT 500E warning light
[x] Cancel search: warning lightPage 3 of 100

INTRODUCTION/WELCOMEWELCOME FROM FIAT...............2IMPORTANT VEHICLE INFORMATION......4
CONTROLS AT A GLANCEDRIVER COCKPIT..................6INSTRUMENT CLUSTER..............8
GETTING STARTEDELECTRIC VEHICLE FEATURES..........10ELECTRIC SYSTEM OPERATION.........13CHARGING THE HIGH VOLTAGE BATTERY...16STARTING YOUR 500e...............18KEY FOB......................19VEHICLE SECURITY ALARM...........20POWER DOOR LOCKS..............20SEAT BELT SYSTEMS................20SUPPLEMENTAL RESTRAINT SYSTEM (SRS) —AIR BAGS......................21CHILD RESTRAINTS................24HEAD RESTRAINTS.................28FRONT SEATS....................30REAR SEATS.....................32HEATED SEATS...................33TILT STEERING...................34
OPERATING YOUR VEHICLEEXTENDING YOUR DRIVING RANGE PERCHARGE.......................35TURN SIGNAL/LIGHTS/HIGH BEAM LEVER...36WIPER/WASHER LEVER..............37ELECTRONIC SPEED CONTROL.........38POWER WINDOWS................40AUTOMATIC TEMPERATURECONTROLS (ATC).................41REAR PARK ASSIST.................42POWER SUNROOF.................42WIND BUFFETING.................43
ELECTRONICSYO U R V E H I C L E ' S S O U N D S YS T E M........44AM/FM RADIO WITH CD PLAYER ANDSiriusXM SATELLITE RADIO............46BLUE&ME™ HANDS-FREE OPERATION.....48iPod®/USB/MP3 CONTROL — IF EQUIPPED..53ELECTRONIC VEHICLE INFORMATIONCENTER (EVIC)...................54PROGRAMMABLE FEATURES...........55TRIP BUTTON....................56POWER OUTLET..................57
UTILITY
TRAILER TOWING WEIGHTS (MAXIMUMTRAILER WEIGHT RATINGS)...........58RECREATIONAL TOWING (BEHINDMOTORHOME, ETC.)...............58
WHAT TO DO IN EMERGENCIES
ROADSIDE ASSISTANCE..............59INSTRUMENT CLUSTER WARNING LIGHTS..59INSTRUMENT CLUSTER INDICATORLIGHTS.......................63TIRE SERVICE KIT..................63JUMP-STARTING PROCEDURE — 12 VOLTBATTERY.......................70MANUAL PARK RELEASE.............72TOW I N G A D I S A B L E D V E H I C L E.........73ENHANCED ACCIDENT RESPONSESYSTEM.......................73FREEING A STUCK VEHICLE............73EVENT DATA RECORDER (EDR).........74
MAINTAINING YOUR VEHICLEOPENING THE HOOD..............75UNDERHOOD COMPARTMENT.........76FLUID CAPACITIES.................78FLUIDS, LUBES, AND GENUINE PARTS......78MAINTENANCE PROCEDURES..........79MAINTENANCE SCHEDULE...........79FUSES.........................83TIRE PRESSURES..................85TIRE ROTATION RECOMMENDATIONS....86SPARE TIRES — IF EQUIPPED...........87WHEEL AND WHEEL TRIM CARE........88REPLACEMENT BULBS..............89
CUSTOMER ASSISTANCEFIAT CUSTOMER CENTER.............90ASSISTANCE FOR THE HEARING IMPAIRED..90PUBLICATIONS ORDERING...........90REPORTING SAFETY DEFECTS IN THEUNITED STATES...................91
MOPAR® ACCESSORIESAUTHENTIC ACCESSORIES BY MOPAR®...92
FAQ ’sFREQUENTLY ASKED QUESTIONS........93
INDEX.......................94
TABLE OF CONTENTS
1
Page 6 of 100

IMPORTANT VEHICLE INFORMATION
Your 500e operates entirely on electricity stored in the high voltage battery.Unlike a
conventional vehicle or Hybrid there is no internal combustion engine.Battery Electric
Vehicles have unique operating characteristics that you should become familiar with to
ensure you are getting the optimal performance from your vehicle.
High Voltage Battery
Your vehicle is equipped with a Lithium-ion high voltage battery that is used to power
the electric powertrain systems and the 12 Volt vehicle electrical system.
The high voltage battery is located under the vehicle.The high voltage battery is mainte-
nance free and designed to last for the life of the vehicle.
Lithium-ion batteries provide the following
benefits:
•Lithium-ion batteries are much lighter
than other types of rechargeable batter-
ies of the same size.
•Lithium-ion batteries hold their charge;
they only lose approximately 3% of their
charge per month when not in use.
•Lithium-ion batteries have no memory,
which means that you do not have to
completely discharge them before re-
charging, as with some other batteries.
•Lithium-ion batteries can be recharged
and discharged thousands of times.
High Voltage Battery Service Disconnect
The high voltage battery service disconnect is located under the rear passenger seat
lower cushion.If your vehicle requires service see your authorized dealer.
WARNING!
Never try to remove the high voltage service disconnect.The high voltage service dis-
connect is used when your vehicle requires service by a trained technician at an autho-
rized dealer.Failure to follow this warning can cause severe burns or electrical shock
that may result in serious injury or death.
1 — High Voltage Cables2 — High Voltage Battery
INTRODUCTION/WELCOME
4
Page 10 of 100

INSTRUMENT CLUSTER
1.Speedometer
2.Battery Gauge
3.Messages, Blue & Me and Interface Options
4.Range Projection Indicators
(See page 59 for Instrument Cluster Warning Lights.)
CONTROLS AT A GLANCE
8
Page 20 of 100

STARTING YOUR 500e
•Before starting your vehicle, adjust your seat, adjust both inside and outside mirrors,
and fasten your seat belts.
WARNING!
•Never leave children alone in a vehicle, or with access to an unlocked vehicle.
•Allowing children to be in a vehicle unattended is dangerous for a number of rea-
sons.A child or others could be seriously or fatally injured.Children should be
warned not to touch the parking brake, brake pedal or the shift buttons.
•Do not leave the key fob in or near the vehicle (or in a location accessible to chil-
dren).A child could operate power windows, other controls, or move the vehicle.
NOTE:
Make sure the EVSE is not plugged into the vehicle.
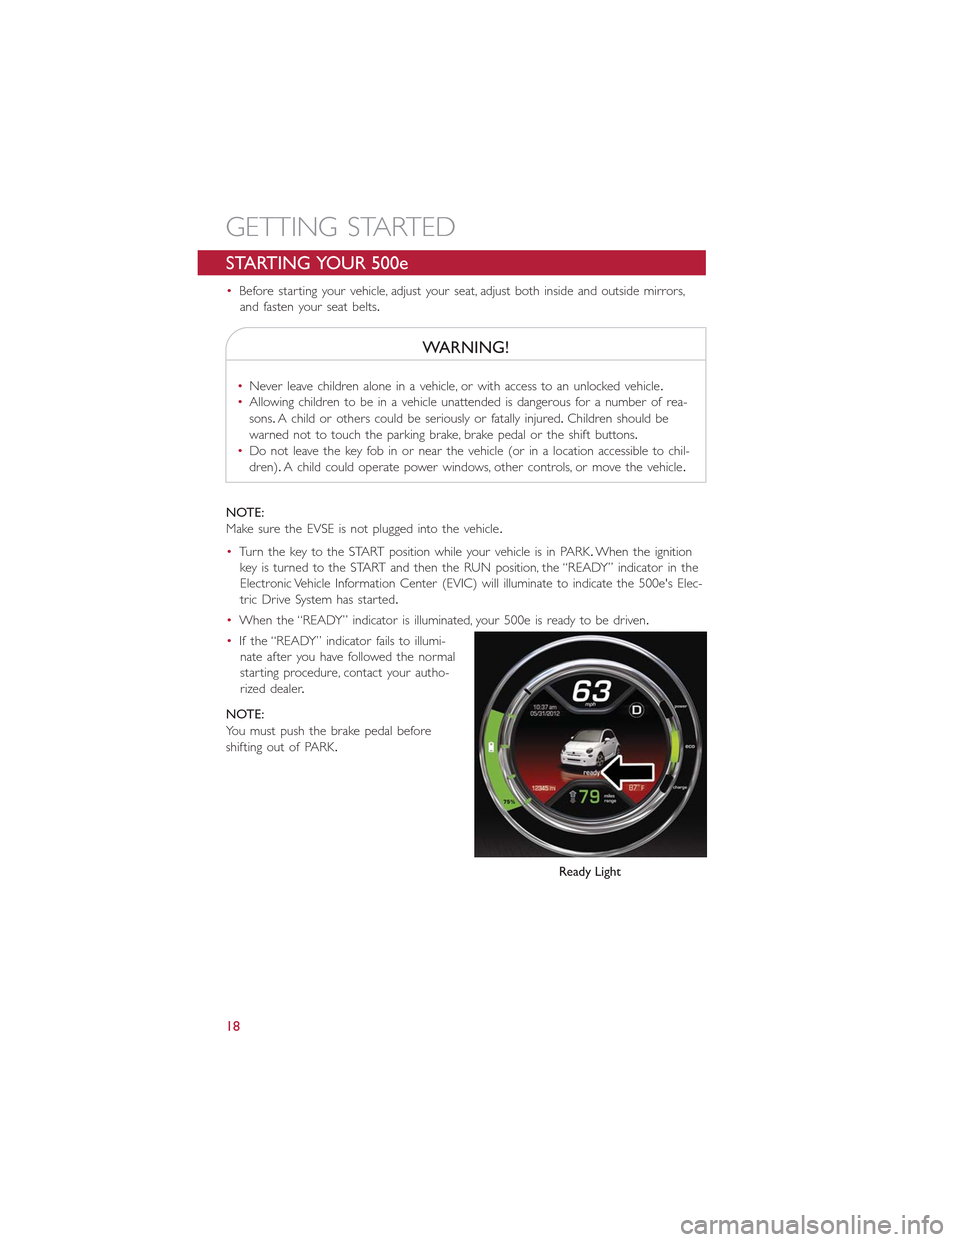
•Turn the key to the START position while your vehicle is in PARK.When the ignition
key is turned to the START and then the RUN position, the “READY” indicator in the
Electronic Vehicle Information Center (EVIC) will illuminate to indicate the 500e's Elec-
tric Drive System has started.
•When the “READY” indicator is illuminated, your 500e is ready to be driven.
•If the “READY” indicator fails to illumi-
nate after you have followed the normal
starting procedure, contact your autho-
rized dealer.
NOTE:
You must push the brake pedal before
shifting out of PARK.
Ready Light
GETTING STARTED
18
Page 23 of 100

Seat Belt Pretensioner
•The front seat belt system is equipped with pretensioning devices that are designed to
remove slack from the seat belt in the event of a collision.
•A deployed pretensioner or a deployed air bag must be replaced immediately.
WARNING!
•In a collision, you and your passengers can suffer much greater injuries if you are
not properly buckled up.You can strike the interior of your vehicle or other pas-
sengers, or you can be thrown out of the vehicle.Always be sure you and others
in your vehicle are buckled up properly.
•A shoulder belt placed behind you will not protect you from injury during a colli-
sion.You are more likely to hit your head in a collision if you do not wear your
shoulder belt.The lap and shoulder belt are meant to be used together.
•A seat belt that is too loose will not protect you properly.In a sudden stop, you
could move too far forward, increasing the possibility of injury.Wear your seat belt
snugly.
•A frayed or torn seat belt could rip apart in a collision and leave you with no pro-
tection.Inspect the seat belt system periodically, checking for cuts, frays, or loose
parts.Damaged parts must be replaced immediately.Do not disassemble or
modify the system.Seat belt assemblies must be replaced after a collision.
SUPPLEMENTAL RESTRAINT SYSTEM (SRS) — AIR BAGS
Air Bag System Components
Your vehicle may be equipped with the following air bag system components:
•Occupant Restraint Controller (ORC)
•Air Bag Warning Light
•Steering Wheel and Column
•Instrument Panel
•Knee Impact Bolsters
•Advanced Front Air Bags
•Supplemental Side Air Bags
•Supplemental Knee Air Bags
•Front and Side Impact Sensors
•Seat Belt Pretenioners
•Seat Belt Buckle Switch
•Seat Track Position Sensors
GETTING STARTED
21
Page 24 of 100

Advanced Front Air Bags
•This vehicle has Advanced Front Air Bags for both the driver and front passenger as a
supplement to the seat belt restraint systems.The Advanced Front Air Bags will not
deploy in every type of collision.
•Advanced Front Air Bags are designed to provide additional protection by supplement-
ing the seat belts.Advanced Front Air Bags are not expected to reduce the risk of
injury in rear, side, or rollover collisions.
•The Advanced Front Air Bags will not deploy in all frontal collisions, including some that
may produce substantial vehicle damage — for example, some pole collisions, truck
underrides, and angle offset collisions.
•On the other hand, depending on the type and location of impact, Advanced Front Air
Bags may deploy in crashes with little vehicle front-end damage but that produce a
severe initial deceleration.
•Because air bag sensors measure vehicle deceleration over time, vehicle speed and
damage by themselves are not good indicators of whether or not an air bag should
have deployed.
•Seat belts are necessary for your protection in all collisions, and also are needed to
help keep you in position, away from an inflating air bag.
•The air bags must be ready to inflate for your protection in a collision.The Occupant
Restraint Controller (ORC) monitors the internal circuits and interconnecting wiring
associated with air bag system electrical components.
•The ORC turns on the Air Bag Warning Light in the instrument panel for approxi-
mately four to eight seconds for a self-check when the ignition switch is first turned to
the ON/RUN position.After the self-check, the Air Bag Warning Light will turn off.
If the ORC detects a malfunction in any part of the system, it turns on the Air Bag
Warning Light, either momentarily or continuously.A single chime will sound to alert
you if the light comes on again after initial startup.
•The ORC monitors the readiness of the electronic parts of the air bag system when-
ever the ignition switch is in the START or ON/RUN position.If the ignition switch is
in the OFF position or in the ACC position, the air bag system is not on and the air
bags will not inflate.
•If the Air Bag Warning Light in the instrument panel is not on during the four to eight
seconds when the ignition switch is first turned to the ON/RUN position, stays on, or
turns on while driving, have the vehicle serviced by an authorized service center imme-
diately.
NOTE:
If the speedometer, tachometer, or any engine related gauges are not working, the Occu-
pant Restraint Controller (ORC) may also be disabled.In this condition the air bags may
not be ready to inflate for your protection.Have an authorized dealer service the air bag
system immediately.
GETTING STARTED
22
Page 45 of 100

Sun Shade
•For vehicles equipped with either a power sunroof or a fixed glass roof, there is a sun
shade that can be open or closed.To open the sun shade push the tab and move the
shade to a full open position.
WARNING!
•Do not let children play with the sunroof, or leave children unattended in the ve-
hicle, and do not leave the key in or near the vehicle (or in a location accessible
to children).Occupants, particularly unattended children, can become entrapped by
the power sunroof while operating the power sunroof switch.Such entrapment
may result in serious injury or death.
•In a collision, there is a greater risk of being thrown from a vehicle with an open
sunroof.You could also be seriously injured or killed.Always fasten your seat belt
properly and make sure all passengers are properly secured.
•Do not allow small children to operate the sunroof.Never allow your fingers,
other body parts, or any object to project through the sunroof opening.Injury
may result.
WIND BUFFETING
•Wind buffeting can be described as a helicopter-type percussion sound.If buffeting
occurs with the windows down, or top down (convertible models), adjust one or both
side windows up or down slightly.
OPERATING YOUR VEHICLE
43
Page 57 of 100

PROGRAMMABLE FEATURES
Electronic Vehicle Information Center (EVIC)
•Push the MENU button to enter the menu mode.
•Push the UPor DOWNbuttons to scroll through the menu settings.
•Once the menu setting is shown in the EVIC display push the MENU button to access
the setting and use the UP or DOWN buttons to change the current setting.Push the
MENU button a second time to save the setting and return to menu screen.
•Charging Schedule•Daytime Running Lights
•Set Date•Button Volume
•Set Time•Hill Start Assist
•Units•Stored Warning
•Languages•Tutorial
•Battery % Display•Connectivity ID
•Auto Door Lock•Restore Factory Settings
•Remote Unlock•Exit Menu
Selecting An Option Of The Main Menu Without Submenu:
•Briefly push the MENU button to select the main menu option to set.
•Push the UP or DOWN button to select the new setting.
•Briefly push the MENU button to store the new setting and go back to the main
menu option previously selected.
Selecting An Option Of The Main Menu With Submenu:
•Briefly push the MENU button to display the first submenu option.
•Push the UP or DOWN button to scroll through all the submenu options.
•Briefly push the MENU button to select the displayed submenu option and to open
the relevant setup menu.
•Push the UP or DOWN button to select the new setting for this submenu option.
•Briefly push the MENU button to store the new setting and go back to the previously
selected submenu option.
•Push and hold the MENU button to return to the main menu (short hold) or the
main screen (longer hold).
NOTE:
The charging schedule is based on the date and time programmed in the EVIC.
ELECTRONICS
55