2015 DODGE GRAND CARAVAN radio
[x] Cancel search: radioPage 3 of 164

INTRODUCTION/WELCOME
WELCOME FROM CHRYSLERGROUP LLC..................3
CONTROLS AT A GLANCE
DRIVER COCKPIT...............6INSTRUMENT CLUSTER...........8
GETTING STARTED
KEY FOB . . . . . . . . . . . . . . . . . . . 10REMOTE START . . . . . . . . . . . . . . . 11KEYLESS ENTER-N-GO™.........12VEHICLE SECURITY ALARM........16SEAT BELT SYSTEMS............17SUPPLEMENTAL RESTRAINT SYSTEM(SRS) — AIR BAGS.............18CHILD RESTRAINTS............21HEAD RESTRAINTS.............26FRONT SEATS................28REAR SEATS.................31HEATED SEATS . . . . . . . . . . . . . . . 36HEATED STEERING WHEEL........37TILT/TELESCOPING STEERINGCOLUMN...................38
OPERATING YOUR VEHICLE
ENGINE BREAK-INRECOMMENDATIONS............39TURN SIGNAL/WIPER/WASHER/HIGHBEAM LEVER.................40HEADLIGHT SWITCH AND HALO LIGHTSWITCH....................42ELECTRONIC SPEED CONTROL......43ELECTRONIC RANGE SELECTION (ERS) . . 45FUEL ECONOMY (ECON) MODE......46MANUAL CLIMATE CONTROLS.......47THREE ZONE MANUAL CLIMATECONTROLS..................48THREE ZONE AUTOMATIC TEMPERATURECONTROLS (ATC)...............50PA R K S E N S E®REAR PARK ASSIST....52PA R K V I E W®REAR BACK-UP CAMERA . . 52BLIND SPOT MONITORING WITH REARCROSS PATH.................52POWER SLIDING SIDE DOORS.......53POWER LIFTGATE..............53POWER SUNROOF..............54WIND BUFFETING..............55
ELECTRONICS
YOUR VEHICLE'S SOUND SYSTEM....56Uconnect®130 . . . . . . . . . . . . . . . . 58Uconnect®130 WITH SiriusXM SATELLITERADIO.....................60Uconnect®430/430N............63
SiriusXM SATELLITE RADIO/TRAVELLINK......................73STEERING WHEEL AUDIO CONTROLS . . 77iPod®/USB/MP3 CONTROL.........77Uconnect®PHONE..............78Uconnect®VOICE COMMAND........81Bluetooth®STREAMING AUDIO......84VIDEO ENTERTAINMENT SYSTEM(VES™)....................84ELECTRONIC VEHICLE INFORMATIONCENTER (EVIC)................86PROGRAMMABLE FEATURES.......87UNIVERSAL GARAGE DOOR OPENER(HomeLink®).................89POWER INVERTER.............91POWER OUTLETS..............92
UTILITY
IN-FLOOR STORAGE — STOW'N GO®...94ROOF LUGGAGE RACK...........94TRAILER TOWING WEIGHTS (MAXIMUMTRAILER WEIGHT RATINGS)........95RECREATIONAL TOWING (BEHINDMOTORHOME, ETC.)............96
WHAT TO DO IN EMERGENCIES
ROADSIDE ASSISTANCE..........97INSTRUMENT CLUSTER WARNINGLIGHTS....................97INSTRUMENT CLUSTER INDICATORLIGHTS...................101IF YOUR ENGINE OVERHEATS......103TIRE SERVICE KIT.............103JACKING AND TIRE CHANGING.....110JUMP-STARTING..............122SHIFT LEVER OVERRIDE.........124TOWING A DISABLED VEHICLE.....124FREEING A STUCK VEHICLE.......125EVENT DATA RECORDER (EDR).....126
MAINTAINING YOUR VEHICLE
OPENING THE HOOD...........127ENGINE COMPARTMENT.........128FLUID CAPACITIES............130FLUIDS, LUBRICANTS AND GENUINEPA RT S . . . . . . . . . . . . . . . . . . . . 1 3 0MAINTENANCE PROCEDURES......132MAINTENANCE SCHEDULE.......132MAINTENANCE RECORD.........136FUSES....................137TIRE PRESSURES.............141SPARE TIRES — IF EQUIPPED.....142ADDING FUEL................144WHEEL AND WHEEL TRIM CARE....145REPLACEMENT BULBS..........146
TABLE OF CONTENTS
Page 8 of 164

DRIVER COCKPIT
1. Headlight Switch pg. 42
2. Electronic Vehicle Information Center (EVIC) Controls pg. 86
3. Turn Signal/Wiper/Washer/High Beams Lever (behind steering wheel) pg. 40
4. Instrument Cluster pg. 8
5. Electronic Vehicle Information Center (EVIC) Display
6. Speed Control pg. 43
7. Ignition
8. Shift Lever
9. Audio System (Touchscreen Radio Shown) pg. 56
10. Manual Climate Controls pg. 47
CONTROLS AT A GLANCE
6
Page 32 of 164

Memory Seat
The memory seat feature allows you to save
two different driver seating positions, driv-
er's outside mirror, adjustable brake and
accelerator pedals, and radio station preset
settings. The memory seat buttons are lo-
cated on the driver's door panel.
To s e t a m e m o r y p o s i t i o n :
1. Cycle the vehicles ignition to the ON
position.
2. Adjust all memory profile settings.
3. Press and release the S (SET) button.
4. Press and release the 1 or 2 button within five seconds.
NOTE:
Before programming your RKE transmitters you must select the select “RKE Linked to
Memory” in the Electronic Vehicle Information Center (EVIC). Refer to “Programmable
Features” in “Electronics” for further information.
To p r o g r a m a K e y F o b t o t h e m e m o r y p o s i t i o n :
1. Cycle the vehicles ignition to the OFF position.
2. Select the desired memory profile 1 or 2.
3. Press and release the S (SET) button on the memory switch, then within five seconds
press and release the 1 or 2 button accordingly.
4. Press and release the LOCK button on the RKE transmitter within 10 seconds.
•Torecallthesavedpositions,press1or2onthememoryswitchorpressUNLOCKon
the programmed RKE transmitter.
CAUTION!
Do not place any article under a power seat or impede its ability to move as it may cause
damage to the seat controls. Seat travel may become limited if movement is stopped
by an obstruction in the seat’s path.
WARNING!
•Adjusting a seat while the vehicle is moving is dangerous. The sudden movement of the
seat could cause you to lose control. The seat belt might not be properly adjusted, and
you could be severely injured or killed. Only adjust a seat while the vehicle is parked.
•Donotridewiththeseatbackreclinedsothattheseatbeltisnolongerresting
against your chest. In a collision, you could slide under the seat belt and be severely
injured or killed. Use the recliner only when the vehicle is parked.
Memory Seat Button Location
GETTING STARTED
30
Page 44 of 164

HEADLIGHT SWITCH AND HALO LIGHT SWITCH
Automatic Headlights/Parking
Lights/Headlights
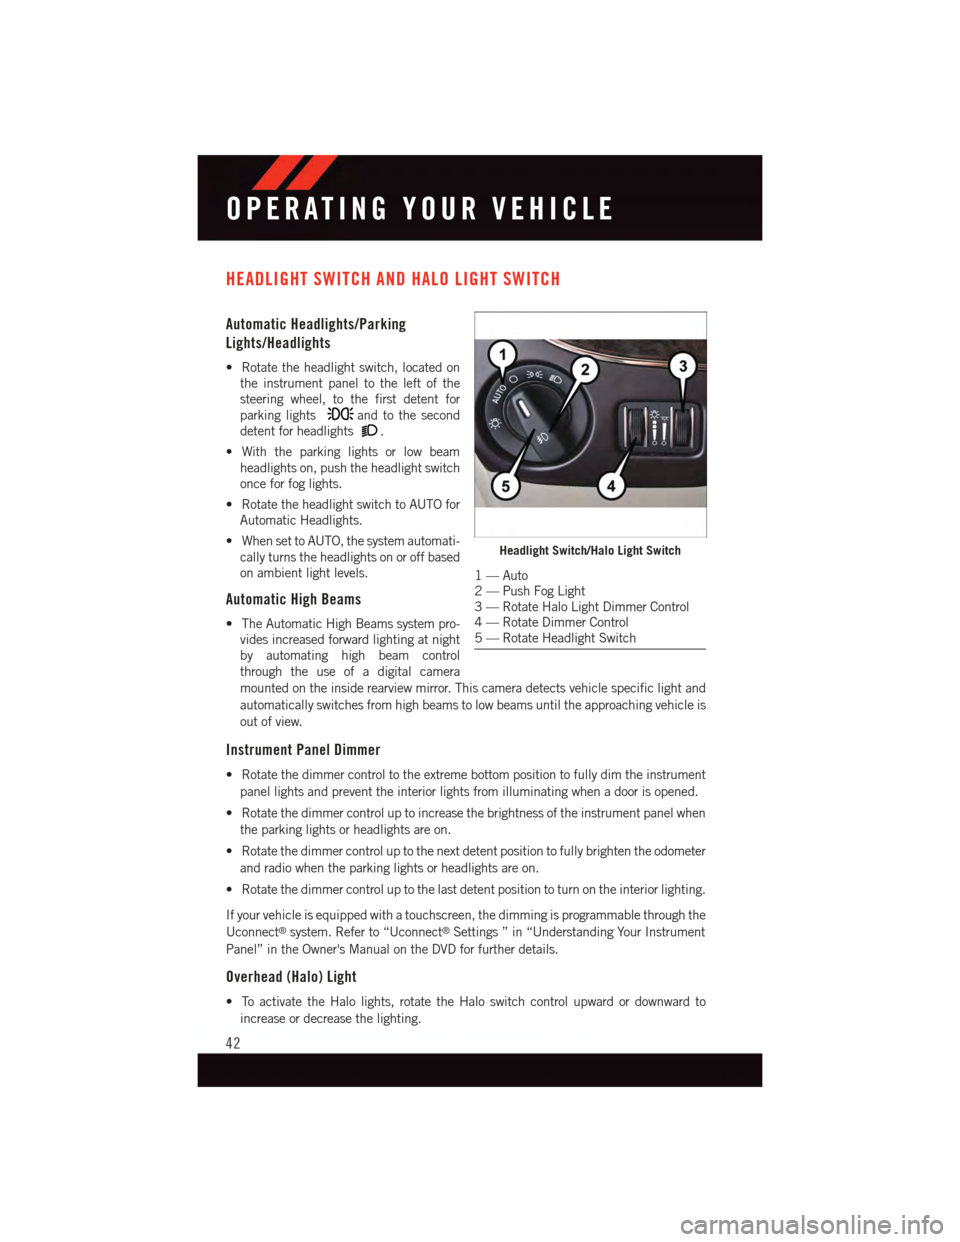
•Rotatetheheadlightswitch,locatedon
the instrument panel to the left of the
steering wheel, to the first detent for
parking lightsand to the second
detent for headlights.
•Withtheparkinglightsorlowbeam
headlights on, push the headlight switch
once for fog lights.
•RotatetheheadlightswitchtoAUTOfor
Automatic Headlights.
•WhensettoAUTO,thesystemautomati-
cally turns the headlights on or off based
on ambient light levels.
Automatic High Beams
•TheAutomaticHighBeamssystempro-
vides increased forward lighting at night
by automating high beam control
through the use of a digital camera
mounted on the inside rearview mirror. This camera detects vehicle specific light and
automatically switches from high beams to low beams until the approaching vehicle is
out of view.
Instrument Panel Dimmer
•Rotatethedimmercontroltotheextremebottompositiontofullydimtheinstrument
panel lights and prevent the interior lights from illuminating when a door is opened.
•Rotatethedimmercontroluptoincreasethebrightnessoftheinstrumentpanelwhen
the parking lights or headlights are on.
•Rotatethedimmercontroluptothenextdetentpositiontofullybrightentheodometer
and radio when the parking lights or headlights are on.
•Rotatethedimmercontroluptothelastdetentpositiontoturnontheinteriorlighting.
If your vehicle is equipped with a touchscreen, the dimming is programmable through the
Uconnect®system. Refer to “Uconnect®Settings ” in “Understanding Your Instrument
Panel” in the Owner's Manual on the DVD for further details.
Overhead (Halo) Light
•ToactivatetheHalolights,rotatetheHaloswitchcontrolupwardordownwardto
increase or decrease the lighting.
Headlight Switch/Halo Light Switch
1—Auto2—PushFogLight3—RotateHaloLightDimmerControl4—RotateDimmerControl5—RotateHeadlightSwitch
OPERATING YOUR VEHICLE
42
Page 54 of 164

PARKSENSE® REAR PARK ASSIST
If an object is detected behind the rear bumper while the vehicle is in REVERSE, a
warning will display in the instrument cluster and a tone will sound, (closer the object the
faster the tone) that changes speed depending on the distance of the object from the
bumper, will sound.
When the Instrument Cluster reads either “Clean Sensor” or “Blinded”, clean off the
bumper sensors to see if the condition is corrected.
PARKVIEW® REAR BACK-UP CAMERA
Yo u c a n s e e a n o n - s c r e e n i m a g e o f t h e r e a r o f y o u r v e h i c l e w h e n e v e r t h e s h i f t l e v e r i s p u t
into REVERSE. The ParkView®Rear Back-Up Camera image will be displayed on the radio
display screen, located on the center stack of the instrument panel.
If the radio display screen appears foggy, clean the camera lens located on the liftgate.
Refer to your Owner's Manual on the DVD for further details.
WARNING!
Drivers must be careful when backing up; even when using the ParkView®Rear
Back-Up Camera. Always check carefully behind your vehicle, and be sure to check for
pedestrians, animals, other vehicles, obstructions, or blind spots before backing up.
Yo u m u s t c o n t i n u e t o p a y a t t e n t i o n w h i l e b a c k i n g u p . F a i l u r e t o d o s o c a n r e s u l t i n
serious injury or death.
BLIND SPOT MONITORING WITH REAR CROSS PATH
The Blind Spot Monitoring (BSM) system uses two radar-based sensors, located inside the
rear bumper fascia, to detect Highway licensable vehicles (automobiles, trucks, motor-
cycles etc.) that enter the blind spot zones from the rear/front/side of the vehicle.
The Blind Spot Monitoring (BSM) system warning light, located in the outside mirrors, will
illuminate if a vehicle moves into a blind spot zone.
The BSM system can also be configured to sound an audible (chime) alert and mute the
radio to notify you of objects that have entered the detection zones.
Refer to your Owner's Manual on the DVD for further details.
OPERATING YOUR VEHICLE
52
Page 60 of 164

Uconnect® 130
NOTE:
•Yourradiohasmanyfeaturesthataddtothecomfortandconvenienceforyouandyour
passengers.
•Someoftheseradiofeaturesshouldnotbeusedwhendrivingbecausetheytakeyour
eyes from the road or your attention from driving.
Clock Setting
1. Push and hold the TIME button until the hours blink.
2. Turn the TUNE/SCROLL control knob to set the hours.
3. Push the TUNE/SCROLL control knob until the minutes begin to blink.
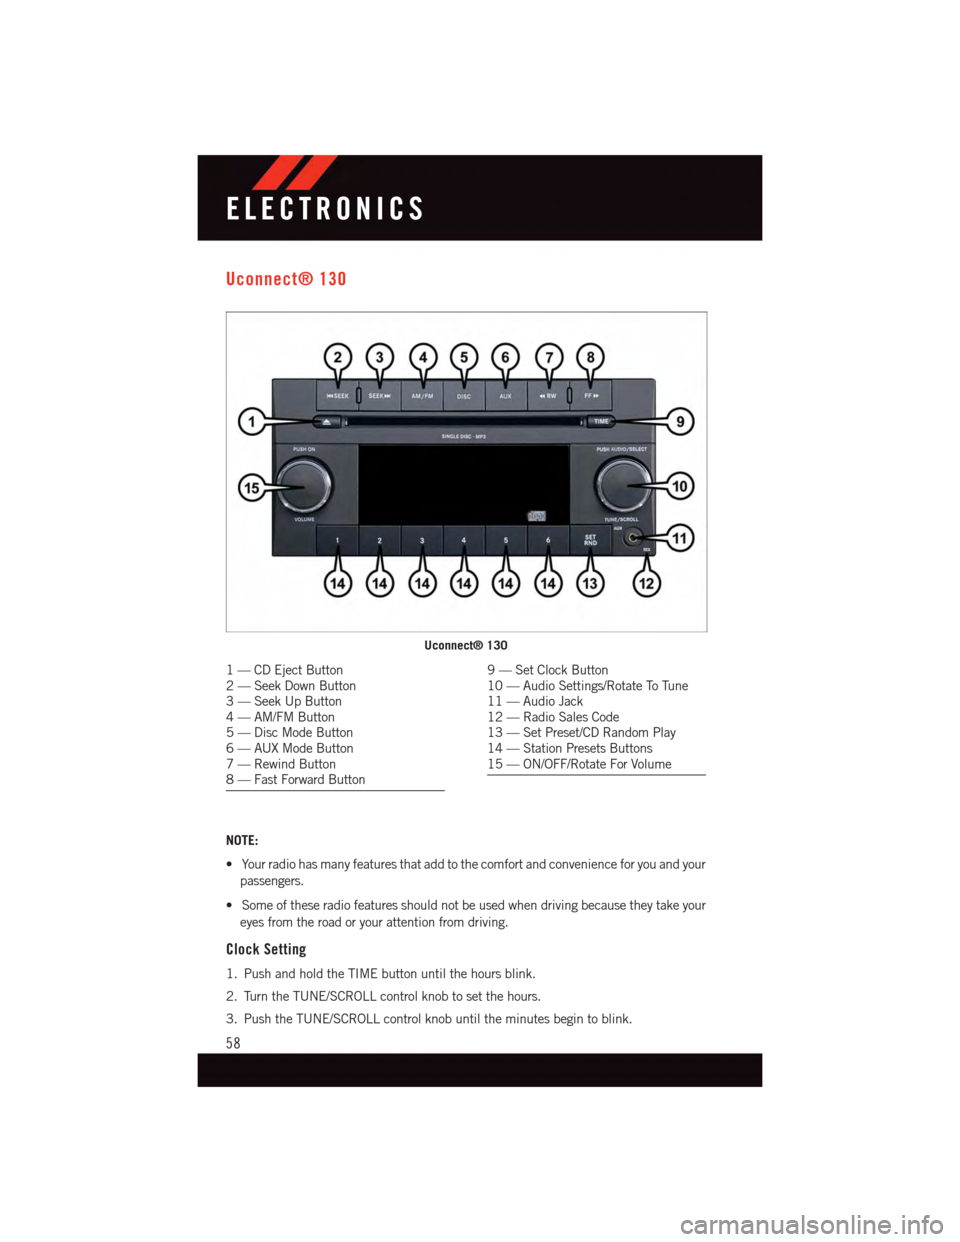
Uconnect® 130
1—CDEjectButton2—SeekDownButton3—SeekUpButton4—AM/FMButton5—DiscModeButton6—AUXModeButton7—RewindButton8—FastForwardButton
9—SetClockButton10 — Audio Settings/Rotate To Tune11 — Audio Jack12 — Radio Sales Code13 — Set Preset/CD Random Play14 — Station Presets Buttons15 — ON/OFF/Rotate For Volume
ELECTRONICS
58
Page 61 of 164

4. Turn the TUNE/SCROLL control knob to set the minutes.
5. Push the TUNE/SCROLL control knob to save the changes.
6. Push any button/knob or wait five seconds to exit.
Equalizer, Balance And Fade
1. Push the TUNE/SCROLL control knob and “BASS” will display.
2. Rotate the TUNE/SCROLL control knob to select the desired setting.
3. Continue pushing the TUNE/SCROLL control knob to display and set “MID RANGE,”
“TREBLE,” “BALANCE” and “FADE.”
Radio Operation
Seek Up/Down Buttons
•PushtoseekthroughradiostationsinAMorFMbands.
•Holdeitherbuttontobypassstationswithoutstopping.
Store Radio Presets
•PushtheSET/RNDorSET(dependingontheradio)buttononceandSET1willshow
in the display. Then select a preset button (1–6).
•Asecondstationmaybeaddedtoeachpushbutton.PushtheSET/RNDorSET
(depending on the radio) button twice and SET 2 will show in the display. Then select
apresetbutton(1–6).
CD/DISC Operation
Seek Up/Down Buttons
•PushtoseekthroughCDtracks.
•Holdeitherbuttontobypasstrackswithoutstopping.
SET/RND Or RND (Depending On Radio) Button (Random Play)
•PushthisbuttonwhiletheCDisplayingtoactivateRandomPlay.
•ThisfeatureplaystheselectionsontheCDinrandomordertoprovideaninteresting
change of pace.
Audio Jack Operation
The AUX/Audio Jack provides a means to connect a portable audio device, such as an
MP3 player or an iPod®,tothevehicle’ssoundsystem.Thisrequirestheuseofa3.5mm
stereo audio patch cable.
•PushingtheAUXbuttonwillchangethemodetoauxiliarydeviceiftheAudioJackis
connected, allowing the music from your portable device to play through the vehicle's
speakers.
The functions of the portable device are controlled using the device buttons, not the buttons
on the radio. However, the volume may be controlled using the radio or portable device.
ELECTRONICS
59
Page 62 of 164

Uconnect® 130 WITH SiriusXM SATELLITE RADIO
NOTE:
•YourradiomaynotbeequippedwiththeUconnect®Voice Command and Uconnect®
Phone features. To determine if your radio has these features, push the Voice Command
button on the radio. You will hear a voice prompt if you have the feature, or see a
message on the radio stating “Uconnect Phone not available” if you do not.
•Yourradiohasmanyfeaturesthataddtothecomfortandconvenienceofyouandyour
passengers. Some of these radio features should not be used when driving because they
take your eyes from the road or your attention from driving.
Uconnect® 130 With SiriusXM Satellite Radio
1—CDEjectButton2—SeekDownButton3—SeekUpButton4—VoiceCommandButton5—Uconnect®Phone Button6—StationInfoButton7—RewindButton8—FastForwardButton9—SetClockButton10 — Audio Settings/Rotate To Tune11 — Audio Jack
12 — Radio Sales Code13 — Set Preset/CD Random Play14 — Station Preset Buttons15 — ON/OFF/Rotate For Volume16 — AM/FM Mode Button17 — List Folders On A CD18 — Satellite Radio Button19 — Music Type Button20 — Disc Mode Button21 — Set Up Function Button
ELECTRONICS
60