2015 DODGE GRAND CARAVAN manual radio set
[x] Cancel search: manual radio setPage 44 of 164

HEADLIGHT SWITCH AND HALO LIGHT SWITCH
Automatic Headlights/Parking
Lights/Headlights
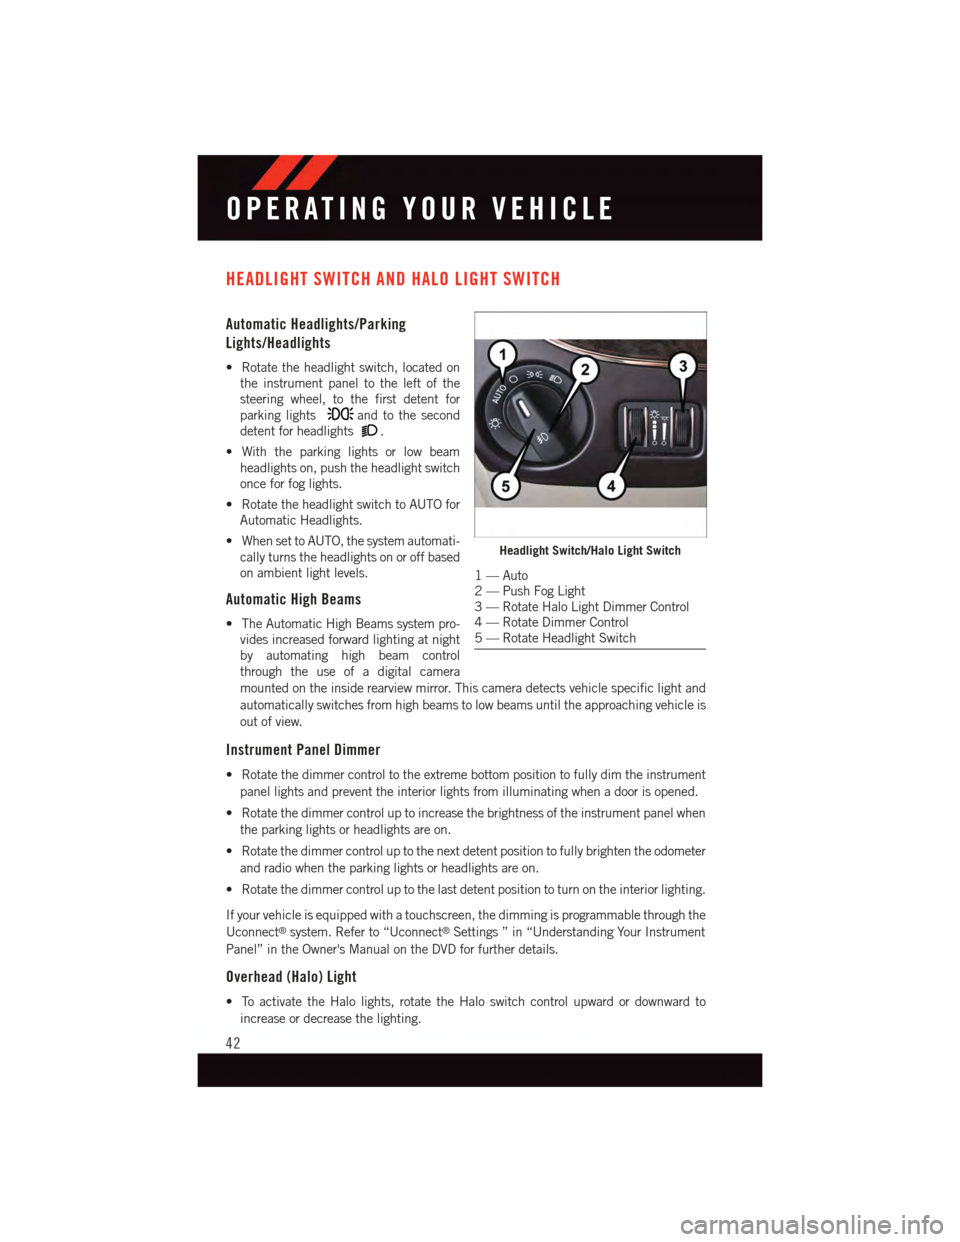
•Rotatetheheadlightswitch,locatedon
the instrument panel to the left of the
steering wheel, to the first detent for
parking lightsand to the second
detent for headlights.
•Withtheparkinglightsorlowbeam
headlights on, push the headlight switch
once for fog lights.
•RotatetheheadlightswitchtoAUTOfor
Automatic Headlights.
•WhensettoAUTO,thesystemautomati-
cally turns the headlights on or off based
on ambient light levels.
Automatic High Beams
•TheAutomaticHighBeamssystempro-
vides increased forward lighting at night
by automating high beam control
through the use of a digital camera
mounted on the inside rearview mirror. This camera detects vehicle specific light and
automatically switches from high beams to low beams until the approaching vehicle is
out of view.
Instrument Panel Dimmer
•Rotatethedimmercontroltotheextremebottompositiontofullydimtheinstrument
panel lights and prevent the interior lights from illuminating when a door is opened.
•Rotatethedimmercontroluptoincreasethebrightnessoftheinstrumentpanelwhen
the parking lights or headlights are on.
•Rotatethedimmercontroluptothenextdetentpositiontofullybrightentheodometer
and radio when the parking lights or headlights are on.
•Rotatethedimmercontroluptothelastdetentpositiontoturnontheinteriorlighting.
If your vehicle is equipped with a touchscreen, the dimming is programmable through the
Uconnect®system. Refer to “Uconnect®Settings ” in “Understanding Your Instrument
Panel” in the Owner's Manual on the DVD for further details.
Overhead (Halo) Light
•ToactivatetheHalolights,rotatetheHaloswitchcontrolupwardordownwardto
increase or decrease the lighting.
Headlight Switch/Halo Light Switch
1—Auto2—PushFogLight3—RotateHaloLightDimmerControl4—RotateDimmerControl5—RotateHeadlightSwitch
OPERATING YOUR VEHICLE
42
Page 66 of 164

Clock Setting
1. Turn the radio on, then press the screen where the time is displayed.
2. Press the “User Clock” button on the touchscreen or the time display (Navigation radio
only).
3. To adjust the hours, press either the “Hour Forward” or “Hour Backward” button on the
touchscreen.
4. To adjust the minutes, press either the “Minute Forward” or “Minute Backward”
button on the touchscreen.
5. To save the new time setting, press the screen where the word “Save” is displayed.
Menu
•PushtheMENUbuttononthefaceplatetoaccesstheSystemSetupmenuandtheMy
Files menu.
•PushtheMENUbuttononthefaceplateinanactivemode(SAT,CD,AUX,etc.)to
change mode specific settings.
Equalizer, Balance And Fade
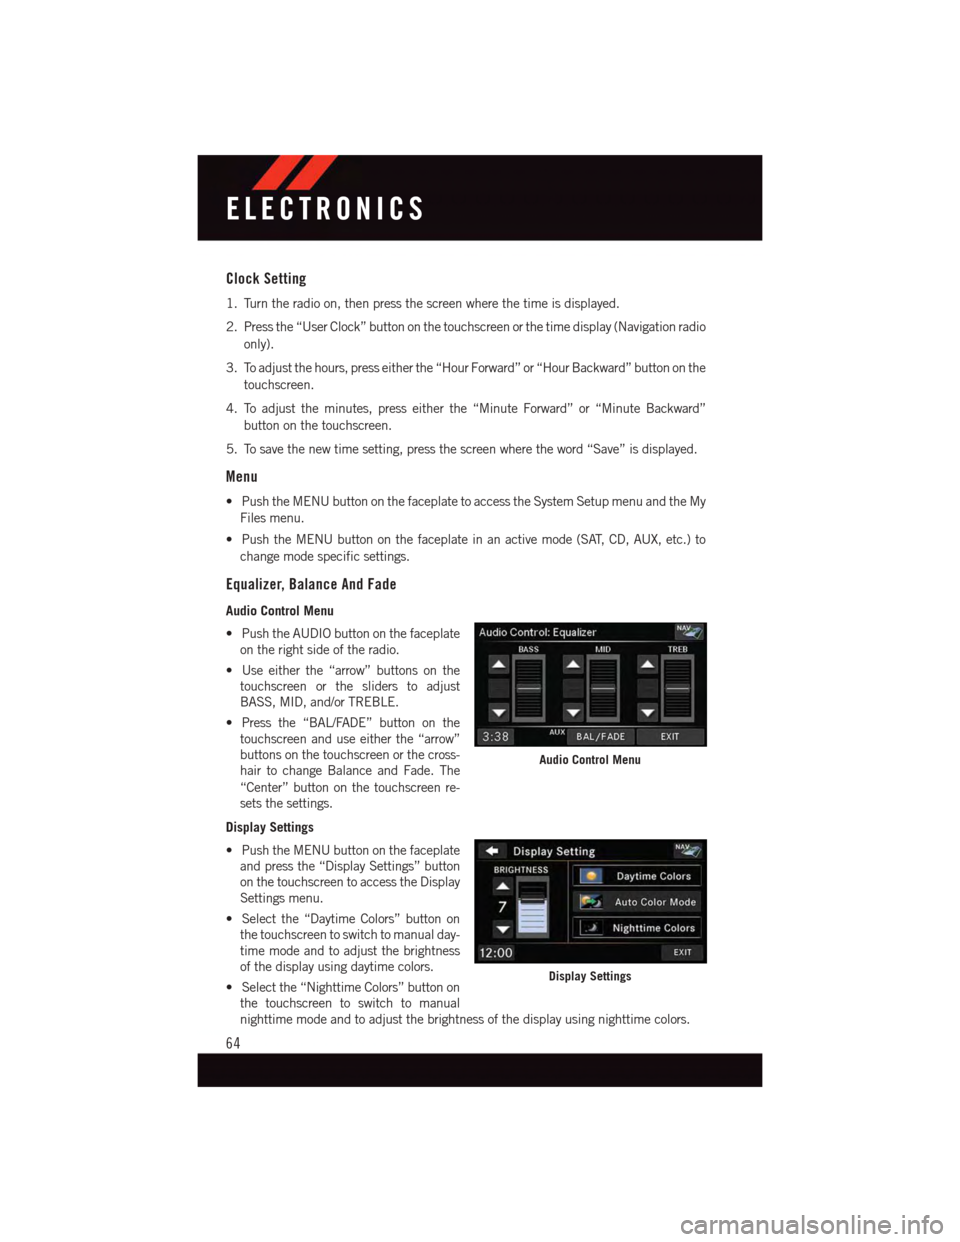
Audio Control Menu
•PushtheAUDIObuttononthefaceplate
on the right side of the radio.
•Useeitherthe“arrow”buttonsonthe
touchscreen or the sliders to adjust
BASS, MID, and/or TREBLE.
•Pressthe“BAL/FADE”buttononthe
touchscreen and use either the “arrow”
buttons on the touchscreen or the cross-
hair to change Balance and Fade. The
“Center” button on the touchscreen re-
sets the settings.
Display Settings
•PushtheMENUbuttononthefaceplate
and press the “Display Settings” button
on the touchscreen to access the Display
Settings menu.
•Selectthe“DaytimeColors”buttonon
the touchscreen to switch to manual day-
time mode and to adjust the brightness
of the display using daytime colors.
•Selectthe“NighttimeColors”buttonon
the touchscreen to switch to manual
nighttime mode and to adjust the brightness of the display using nighttime colors.
Audio Control Menu
Display Settings
ELECTRONICS
64
Page 76 of 164

Search/Browse
•Pressthe“magnifyingglass”buttononthetouchscreentosearch/browsetheSiriusXM
channel listing by Favorites and Categories such as Song, Artist and Channel Name.
The Search/Browse also allows you to manage your Favorites.
SiriusXM™ Satellite Radio Favorites (SAT Favorites)
•Youcansave50favoritesongsand50favoriteartists.
•Pressthe“AddFavorite”buttononthe
touchscreen to add either the song or the
artist of the currently playing program to
the SAT Favorites list. The favorite star
will appear in the upper right corner,
below the “SAT” button on the touch-
screen.
•Youwillseeafavoritestarindicatorin
the upper right side of the screen below
the “SAT” button on the touchscreen
and a pop up will alert you that a favorite song or artist is currently playing on one of the
SiriusXM™ satellite radio channels.
NOTE:
Refer to your Uconnect®730N or 430/
430N Supplement Manual for more infor-
mation.
SAT Browse
Manage SAT Favorites
Favorites Alert
ELECTRONICS
74
Page 157 of 164

Programmable Electronic Features . . .87
Radio Operation...........59,61
Rain Sensitive Wiper System......40
Rear Camera...............52
Rear Cross Path . . . . . . . . . . . . .52
Rear Heated Seats............36
Rear ParkSense System.........52
Recreational Towing...........96
Refrigerant . . . . . . . . . . . . . . .132Remote Keyless Entry (RKE)Arm The Alarm . . . . . . . . . . .16Disarm The Alarm . . . . . . . . . .16Lock The Doors...........10Remote Keyless Entry (RKE)....10Unlock The Doors..........10Remote Starting System........11Replacement Bulbs..........146Reporting Safety Defects.......148Restraint, Head.............26Rocking Vehicle When Stuck.....125Roof Rack (Luggage Rack).......94
Satellite Radio (Uconnect®
studios). . . . . . . . . . . . . .60, 62Schedule, Maintenance........132Seat Belt Maintenance........132Seat BeltsAdjustable Shoulder Belt......17Pretensioners............17Reminder..............99Seats. . . . . . . . . . . . . . . . .28, 29Adjustment.............29Fold in Floor (Stow `n Go) . . . . .31Heated . . . . . . . . . . . . . . .36Lumbar Support..........28Manual................29Memory...............30Power................28Stow `n Go (Fold in Floor) . . . . .31Security Alarm.............101Arm The System...........16Disarm The System.........16Security Alarm............16Selection of Coolant (Antifreeze) . . .130Shift Lever Override..........124Signals, Turn . . . . . . . . . . . .40, 101Sirius Satellite Radio..........73
SIRIUS Travel Link . . . . . . . . . . .73
Spare Tire.........110, 142, 143
Spark Plugs..............130
Speed Control
Accel/Decel.............43
Cancel................44
Resume . . . . . . . . . . . . . . .44
Set . . . . . . . . . . . . . . . . . .43
Starting
Remote...............11SteeringTi l t C o l u m n . . . . . . . . . . . . . 3 8Wheel, Heated...........37Steering Wheel Audio Controls.....77Stow `n Go (Fold in Floor) Seats....31Stuck, Freeing.............125Sun Roof.................54Supplemental Restraint System -Airbag . . . . . . . . . . . . . . . . .18
Te t h e r A n c h o r, C h i l d R e s t r a i n t.....23Ti l t S t e e r i n g C o l u m n . . . . . . . . . . . 3 8Ti r e sAir Pressure . . . . . . . . . . . .141Changing.............110Compact Spare..........142Jacking...........110, 116Spare Tire.............110Ti r e S e r v i c e K i t..........103, 104To u c h s c r e e n R a d i o
Cleaning Your Touchscreen Radio..70To w i n g . . . . . . . . . . . . . . . . . . 9 5Disabled Vehicle . . . . . . . . . .124Recreational.............96Tr a i l e r To w i n gTr a i l e r a n d To n g u e W e i g h t.....95Tr a i l e r W e i g h t . . . . . . . . . . . . . . 9 5Tr a n s m i s s i o nFluid . . . . . . . . . . . . .131, 132Maintenance............132Tu r n S i g n a l s............40,101
Uconnect®Voice Command.......81
Vehicle Security Alarm Disarming . . .16Video Entertainment System™(Rear Seat Video System)......84Voice Command.............81
INDEX
155