2015 DODGE GRAND CARAVAN change time
[x] Cancel search: change timePage 5 of 164

WELCOME FROM CHRYSLER GROUP LLC
Congratulations on selecting your new Chrysler Group LLC vehicle. Be assured that it
represents precision workmanship, distinctive styling, and high quality - all essentials that
are traditional to our vehicles.
Yo u r n e w C h r y s l e r G r o u p L L C v e h i c l e h a s c h a r a c t e r i s t i c s t o e n h a n c e t h e d r i v e r ' s c o n t r o l
under some driving conditions. These are to assist the driver and are never a substitute for
attentive driving. They can never take the driver's place. Always drive carefully.
Yo u r n e w v e h i c l e h a s m a n y f e a t u r e s f o r t h e c o m f o r t a n d c o n v e n i e n c e o f y o u a n d y o u r
passengers. Some of these should not be used when driving because they take your eyes
from the road or your attention from driving. Never text while driving or take your eyes more
than momentarily off the road.
This guide illustrates and describes the operation of features and equipment that are
either standard or optional on this vehicle. This guide may also include a description of
features and equipment that are no longer available or were not ordered on this vehicle.
Please disregard any features and equipment described in this guide that are not available
on this vehicle. Chrysler Group LLC reserves the right to make changes in design and
specifications and/or make additions to or improvements to its products without imposing
any obligation upon itself to install them on products previously manufactured.
This User Guide has been prepared to help you quickly become acquainted with the
important features of your vehicle. It contains most things you will need to operate and
maintain the vehicle, including emergency information.
The DVD includes a computer application containing detailed owner's information which
can be viewed on a personal computer or MAC computer. The multimedia DVD also
includes videos which can be played on any standard DVD player (including the
Uconnect®To u c h s c r e e n R a d i o s i f e q u i p p e d w i t h D V D p l a y e r c a p a b i l i t i e s ) . A d d i t i o n a l
DVD operational information is located on the back of the DVD sleeve.
For complete owner information, refer to your Owner's Manual on the DVD in the owner’s
kit provided at the time of new vehicle purchase.For your convenience, the information
contained on the DVD may also be printed and saved for future reference.
Chrysler Group LLC is committed to protecting our environment and natural resources. By
converting from paper to electronic delivery for the majority of the user information for
your vehicle, together we greatly reduce the demand for tree-based products and lessen
the stress on our environment.
INTRODUCTION/WELCOME
3
Page 42 of 164

TURN SIGNAL/WIPER/WASHER/HIGH BEAM LEVER
Turn Signal/Lane Change Assist
•Taptheleverupordownonceandtheturnsignal(rightorleft)willflashthreetimesand
automatically turn off.
NOTE:
Vehicles equipped with Blind Spot Monitoring will produce a visual alert and may be
programmed to produce an audible alert when signaling a lane change; refer to your
Owner’s Manual on the DVD for operation.
Front Wipers
Intermittent, Low And High Operation
•Rotatetheendofthelevertothefirstdetentpositionforoneoffiveintermittent
settings, the second detent for low wiper operation and the third detent for high wiper
operation.
Rain Sensing Wipers
This feature senses moisture on the vehicle’s windshield and automatically activates the
wipers for the driver when the switch is in the intermittent positions. Refer to “Program-
mable Features” in “Electronics” for further details.
Multifunction Lever
1—Mist(PushToFirstDetent)2—RearWiper/Washer3—PushLeverForHighBeams4—FrontWipers5—FrontWasher(PushToSecondDetent)
OPERATING YOUR VEHICLE
40
Page 63 of 164

Clock Setting
1. Push and hold the TIME button until the hours blink.
2. Turn the TUNE/SCROLL control knob to set the hours.
3. Push the TUNE/SCROLL control knob until the minutes begin to blink.
4. Turn the TUNE/SCROLL control knob to set the minutes.
5. Push the TUNE/SCROLL control knob to save the changes.
6. Push any button/knob or wait five seconds to exit.
Equalizer, Balance And Fade
1. Push the TUNE/SCROLL control knob and “BASS” will display.
2. Rotate the TUNE/SCROLL control knob to select the desired setting.
3. Continue pushing the TUNE/SCROLL control knob to display and set “MID RANGE,”
“TREBLE,” “BALANCE” and “FADE.”
Radio Operation
Seek Up/Down Buttons
•PushtoseekthroughradiostationsinAM,FM,orSATbands.
•Holdeitherbuttontobypassstationswithoutstopping.
Store Radio Presets
•PushtheSET/RNDorSET(dependingontheradio)buttononceandSET1willshow
in the display. Then select a preset button (1–6).
•Asecondstationmaybeaddedtoeachpushbutton.PushtheSET/RNDorSET
(depending on the radio) button twice and SET 2 will show in the display. Then select
apresetbutton(1–6).
Music Type
NOTE:
The Music Type function only operates when in FM mode.
•PushtheMUSICTYPEbuttontoactivatethismode.PushtheMUSICTYPEbutton
again or turn the TUNE/SCROLL control knob to select the desired music type (Adult
Hits, Country, Jazz, Oldies, Rock, etc.).
•WhenamusictypeischosenandtheMusictypeisdisplayed,PusheitherSEEKbutton
and the radio will only search for stations with the selected music type.
SETUP Button
•PushingtheSETUPbuttonallowsyoutoselectbetweenitemsthatareavailableinthat
particular mode.
•TurntheTUNE/SCROLLcontrolknobtoscrollthroughtheentries.PushtheAUDIO/
SELECT button to select an entry and make changes.
ELECTRONICS
61
Page 66 of 164

Clock Setting
1. Turn the radio on, then press the screen where the time is displayed.
2. Press the “User Clock” button on the touchscreen or the time display (Navigation radio
only).
3. To adjust the hours, press either the “Hour Forward” or “Hour Backward” button on the
touchscreen.
4. To adjust the minutes, press either the “Minute Forward” or “Minute Backward”
button on the touchscreen.
5. To save the new time setting, press the screen where the word “Save” is displayed.
Menu
•PushtheMENUbuttononthefaceplatetoaccesstheSystemSetupmenuandtheMy
Files menu.
•PushtheMENUbuttononthefaceplateinanactivemode(SAT,CD,AUX,etc.)to
change mode specific settings.
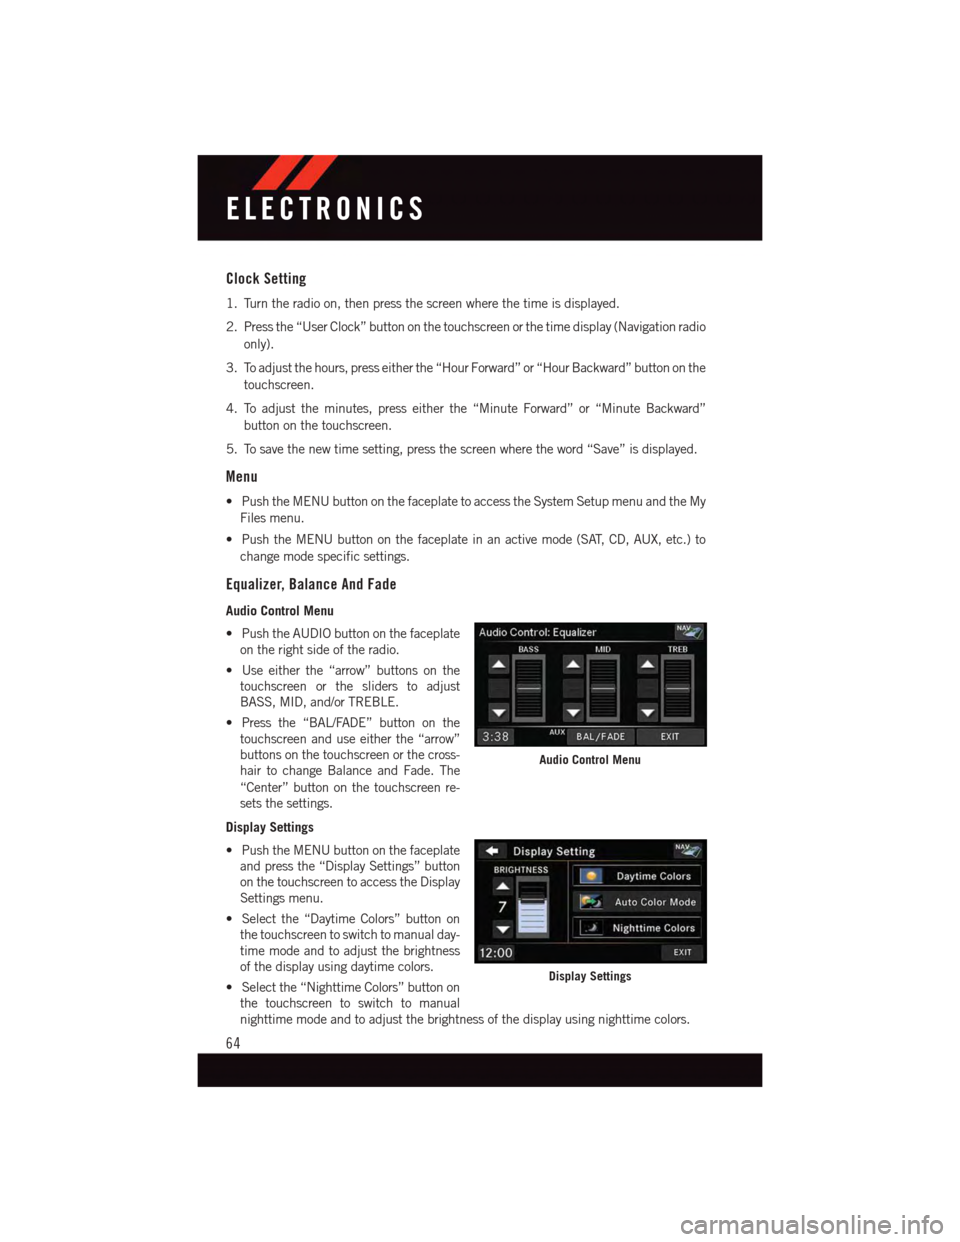
Equalizer, Balance And Fade
Audio Control Menu
•PushtheAUDIObuttononthefaceplate
on the right side of the radio.
•Useeitherthe“arrow”buttonsonthe
touchscreen or the sliders to adjust
BASS, MID, and/or TREBLE.
•Pressthe“BAL/FADE”buttononthe
touchscreen and use either the “arrow”
buttons on the touchscreen or the cross-
hair to change Balance and Fade. The
“Center” button on the touchscreen re-
sets the settings.
Display Settings
•PushtheMENUbuttononthefaceplate
and press the “Display Settings” button
on the touchscreen to access the Display
Settings menu.
•Selectthe“DaytimeColors”buttonon
the touchscreen to switch to manual day-
time mode and to adjust the brightness
of the display using daytime colors.
•Selectthe“NighttimeColors”buttonon
the touchscreen to switch to manual
nighttime mode and to adjust the brightness of the display using nighttime colors.
Audio Control Menu
Display Settings
ELECTRONICS
64
Page 77 of 164

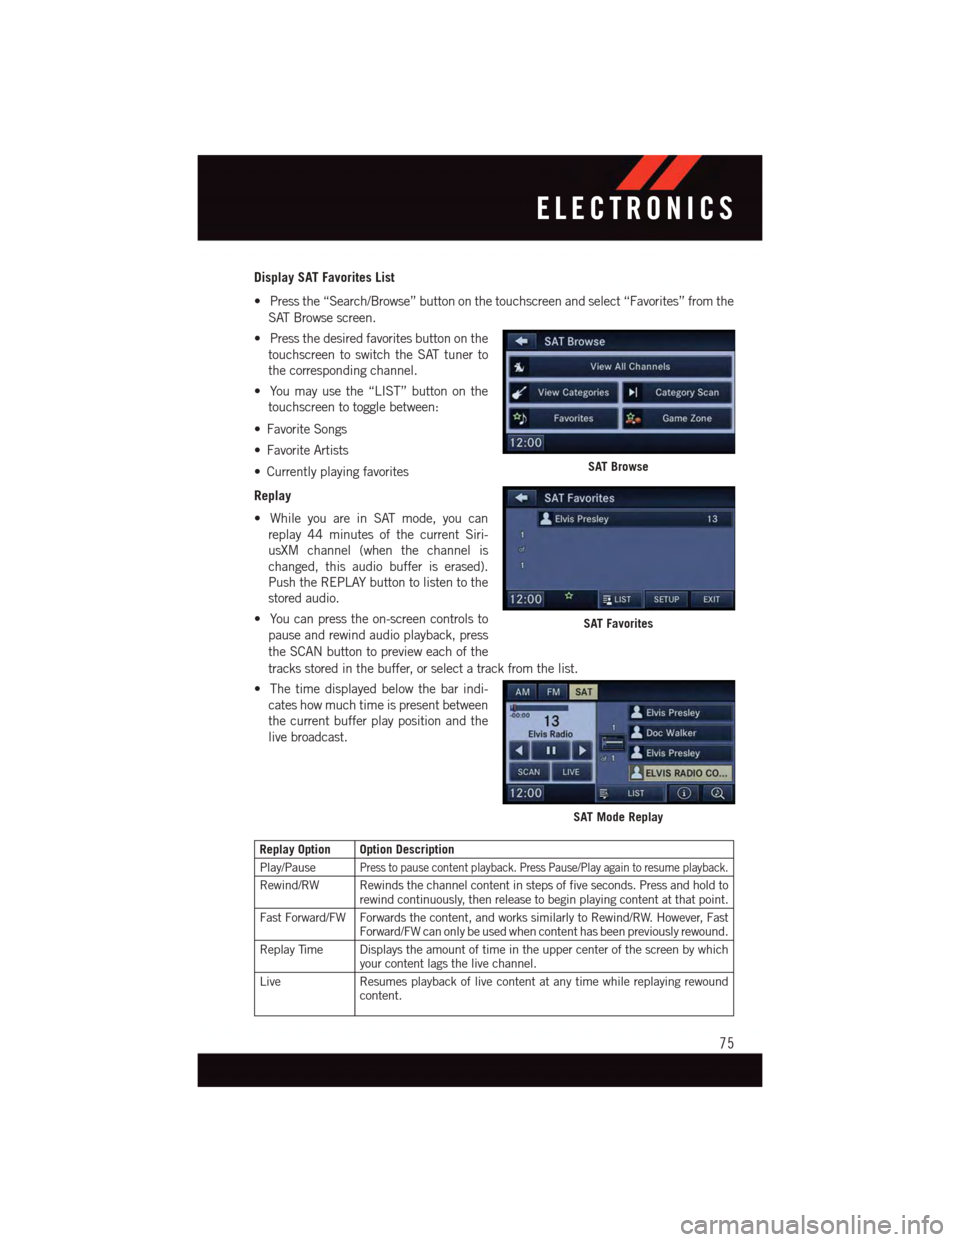
Display SAT Favorites List
•Pressthe“Search/Browse”buttononthetouchscreenandselect“Favorites”fromthe
SAT Browse screen.
•Pressthedesiredfavoritesbuttononthe
touchscreen to switch the SAT tuner to
the corresponding channel.
•Youmayusethe“LIST”buttononthe
touchscreen to toggle between:
•FavoriteSongs
•FavoriteArtists
•Currentlyplayingfavorites
Replay
•WhileyouareinSATmode,youcan
replay 44 minutes of the current Siri-
usXM channel (when the channel is
changed, this audio buffer is erased).
Push the REPLAY button to listen to the
stored audio.
•Youcanpresstheon-screencontrolsto
pause and rewind audio playback, press
the SCAN button to preview each of the
tracks stored in the buffer, or select a track from the list.
•Thetimedisplayedbelowthebarindi-
cates how much time is present between
the current buffer play position and the
live broadcast.
Replay Option Option Description
Play/PausePress to pause content playback. Press Pause/Play again to resume playback.
Rewind/RW Rewinds the channel content in steps of five seconds. Press and hold torewind continuously, then release to begin playing content at that point.
Fast Forward/FW Forwards the content, and works similarly to Rewind/RW. However, FastForward/FW can only be used when content has been previously rewound.
Replay Time Displays the amount of time in the upper center of the screen by whichyour content lags the live channel.
Live Resumes playback of live content at any time while replaying rewoundcontent.
SAT Browse
SAT Favorites
SAT Mode Replay
ELECTRONICS
75
Page 82 of 164

Phonebook
Phonebook Download — Automatic Phonebook Transfer From Mobile Phone
If equipped and specifically supported by your phone, Uconnect®Phone automatically
downloads names (text names) and number entries from your mobile phone’s phonebook.
Specific Bluetooth®Phones with Phone Book Access Profile may support this feature.
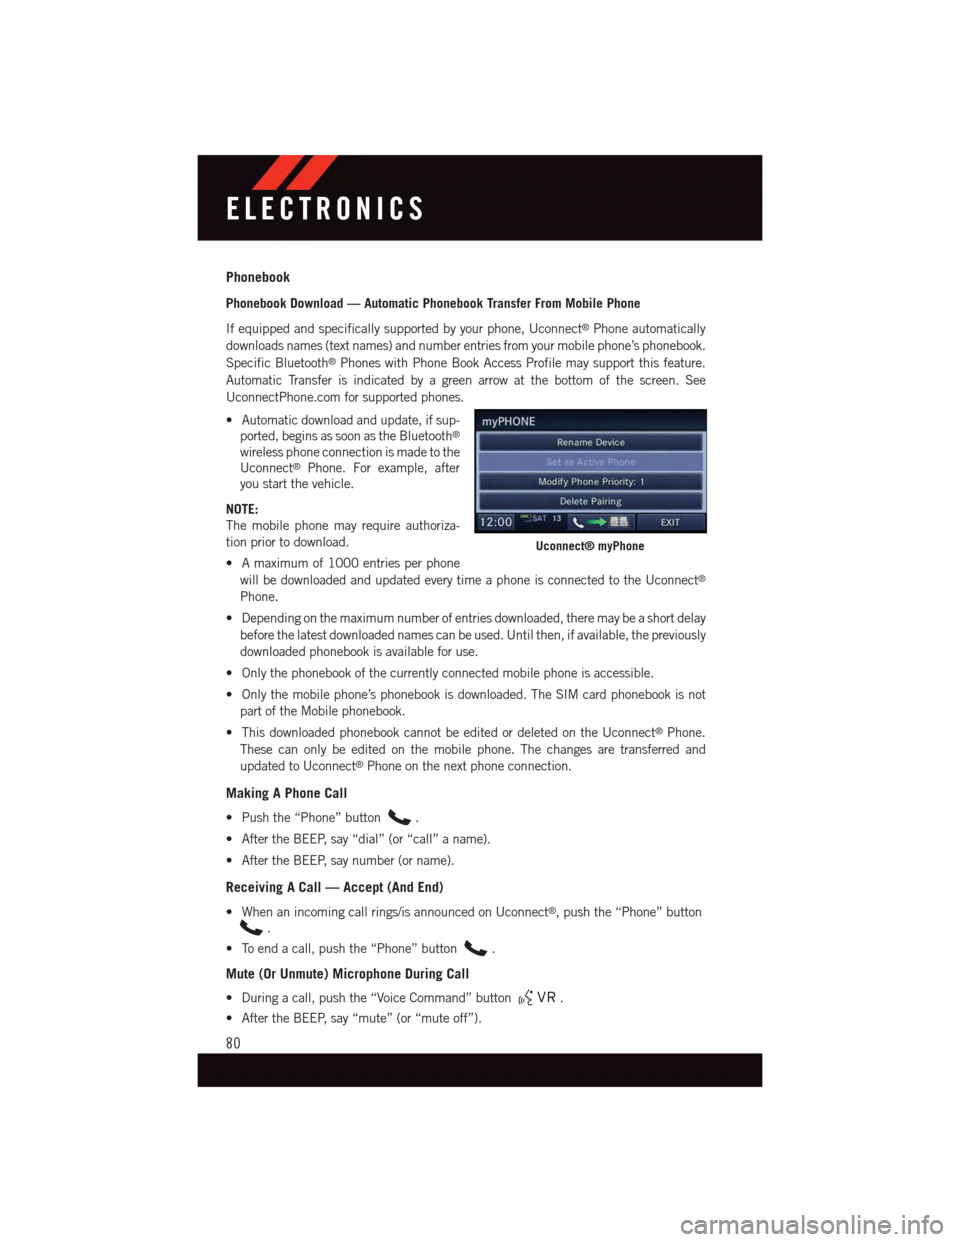
Automatic Transfer is indicated by a green arrow at the bottom of the screen. See
UconnectPhone.com for supported phones.
•Automaticdownloadandupdate,ifsup-
ported, begins as soon as the Bluetooth®
wireless phone connection is made to the
Uconnect®Phone. For example, after
you start the vehicle.
NOTE:
The mobile phone may require authoriza-
tion prior to download.
•Amaximumof1000entriesperphone
will be downloaded and updated every time a phone is connected to the Uconnect®
Phone.
•Dependingonthemaximumnumberofentriesdownloaded,theremaybeashortdelay
before the latest downloaded names can be used. Until then, if available, the previously
downloaded phonebook is available for use.
•Onlythephonebookofthecurrentlyconnectedmobilephoneisaccessible.
•Onlythemobilephone’sphonebookisdownloaded.TheSIMcardphonebookisnot
part of the Mobile phonebook.
•ThisdownloadedphonebookcannotbeeditedordeletedontheUconnect®Phone.
These can only be edited on the mobile phone. The changes are transferred and
updated to Uconnect®Phone on the next phone connection.
Making A Phone Call
•Pushthe“Phone”button.
•AftertheBEEP,say“dial”(or“call”aname).
•AftertheBEEP,saynumber(orname).
Receiving A Call — Accept (And End)
•Whenanincomingcallrings/isannouncedonUconnect®,pushthe“Phone”button
.
•Toendacall,pushthe“Phone”button.
Mute (Or Unmute) Microphone During Call
•Duringacall,pushthe“VoiceCommand”button.
•AftertheBEEP,say“mute”(or“muteoff”).
Uconnect® myPhone
ELECTRONICS
80
Page 87 of 164

Operation Of The Touchscreen Radio/DVD Player/Blu-Ray® Player
To v i e w a D V D / B l u - r a y, p u s h t h e O P E N / C L O S E o r L O A D b u t t o n o n t h e f a c e p l a t e a n d i n s e r t
the disc or insert the disc into the optional DVD/Blu-ray player. Playback will begin
automatically after the DVD/Blu-ray is recognized by the disc drive. If playback does not
begin automatically when the disc is inserted into the DVD/Blu-ray player push the PLAY
button. If playback does not begin automatically after the disc is inserted into the
touchscreen radio follow these steps:
•PushtheMENUbuttononthefaceplate,thenPresstheRearVES™buttononthe
touchscreen. If a chapter list appears on the right side of the screen, press the HIDE
LIST button on the touchscreen to display the Rear VES™ control screen.
•Pressthe“1“buttononthetouchscreentoselectanaudiochannel,thenpressthe
“DISC” button on the touchscreen in the MEDIA column.
Operation Of The Remote Control
The remote control operates similarly to any DVD remote you may have used before and
allows the rear seat passengers to change stations, tracks, discs and audio/video modes.
The remote control is designed to control either channel by using the selector switch
located on the right side of the remote.
Connect the video game or other external media devices to the AUX jacks following the
color coding for the VES™ jacks.
•PushingthepowerbuttonwillturntheVES™systemON/OFF.
•PushingthemodebuttoncausestheMODESELECTIONmenutoappearontheVES™
screen. Use the remote control arrow buttons to scroll through the available modes, and
then push ENTER to select the desired mode.
Auxiliary Audio/Video Input Jacks
The AUX jacks are located on the drivers side rear trim panel behind the sliding door.
Connect the video game or other external media devices to the AUX jacks following the
color coding for the VES™ jacks.
Using either the touchscreen radio or remote control, select AUX from the REAR VES™
CONTROL or the MODE SELECTION screen.
Refer to the Uconnect®Multimedia – Video Entertainment System (VES™) section in the
vehicle Owner's Manual on the DVD for further details.
ELECTRONICS
85
Page 89 of 164

PROGRAMMABLE FEATURES
Electronic Vehicle Information Center (EVIC) — If Equipped
Personal Settings allows you to set and recall features when the transmission is in PARK.
If the transmission is out of PARK or the vehicle begins moving, a warning message
SYSTEM SETUP NOT AVAILABLE VEHICLE NOT IN PARK displays when you try to select
“System Setup” from the main menu.
The EVIC can be used to program the following Personal Settings. Push the RIGHT arrow
buttonuntil Personal Settings displays, then push the DOWN buttonto scroll
through the settings. Push the RIGHT arrow buttonto change the setting.
•SelectLanguage•Key-OffPowerDelay
•Nav-TurnByTurn•IlluminatedApproach
•AutoLockDoors•HillStartAssist
•AutoUnlockDoors•FlasherswithSlidingDoor
•RemoteUnlockSequence•CalibrateCompass
•RemoteStartComfortSys.•CompassVariance
•HornwithRemoteLock•ParkAssist-IfEquipped
•FlashLampsWithLock•AutomaticHighBeams-IfEquipped
•HeadlampOffDelay•KeylessEnter-N-Go-IfEquipped
•HeadlampsWithWipers•RKELinkedToMemory-IfEquipped
Key Fob Programmable Features
The following features may also be programmed by using the Key Fob transmitter or the
ignition switch and driver's door lock switch.
NOTE:
Pushing the LOCK button while you are inside the vehicle will activate the Vehicle Security
Alarm. Opening a door with the Vehicle Security Alarm activated will cause the alarm to
sound. Push the UNLOCK button to deactivate the Vehicle Security Alarm.
Unlock On First Press
To u n l o c k e i t h e r t h e d r i v e r ' s s i d e , o r a l l d o o r s , o n t h e f i r s t p u s h o f t h e U N L O C K b u t t o n :
•PushandholdtheLOCKbuttonforatleastfourseconds,butnolongerthan10
seconds. Then, push and hold the UNLOCK button while still holding the LOCK button.
•Releasebothbuttonsatthesametime.
ELECTRONICS
87