2015 Citroen C4 ECU
[x] Cancel search: ECUPage 258 of 494

256
C4-2_en_Chap11_info-pratique_ed01-2015
C4-2_en_Chap11_info-pratique_ed01-2015
12 V battery
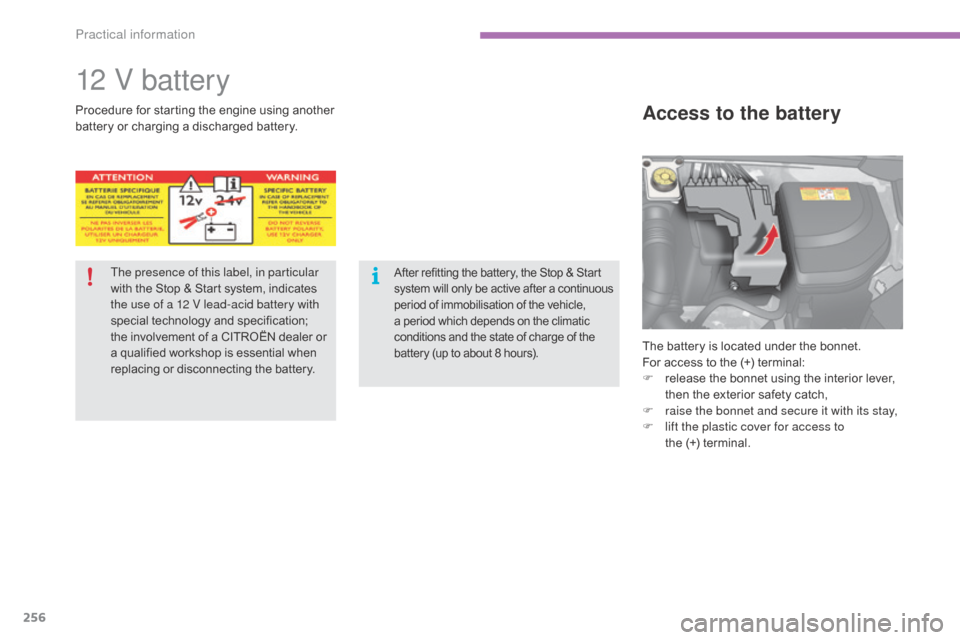
The battery is located under the bonnet.
For access to the (+) terminal:
F
r
elease the bonnet using the interior lever,
t
hen the exterior safety catch,
F
r
aise the bonnet and secure it with its stay,
F
l
ift the plastic cover for access to
the (+)
terminal.
Access to the batteryProcedure for starting the engine u sing another b
attery or charging a discharged battery.
The presence of this label, in particular
with
the Stop & Start system, indicates
t
he use of a 12 V lead-acid battery with
special
t
echnology
a
nd
s
pecification;
t
he involvement of a CITROËN dealer or
a
qualified workshop is essential when
r
eplacing or disconnecting the battery.
After refitting the battery, the Stop & Start system w ill o nly b e a ctive a fter a c ontinuous p
eriod of immobilisation of the vehicle,
a
period which depends on the climatic
c
onditions and the state of charge of the
b
attery (up to about 8 hours).
Practical information
Page 265 of 494

263
C4-2_en_Chap11_info-pratique_ed01-2015
C4-2_en_Chap11_info-pratique_ed01-2015
Towing the vehicle
The towing eye is installed in the boot under the floor.
To
gain access to it:
F
o
pen the boot,
F
r
aise the floor,
F
s
ecure it by hooking its cord on the hook
o
n the rear parcel shelf
s
upport,
F
r
emove the towing eye from the holder.
Access to the tools General recommendations
In the following cases, you must always call o
n a professional recovery service:
-
v
ehicle broken down on a motor way or
f
ast road,
-
f
our-wheel drive vehicle,
-
w
hen it is not possible to put the
gearbox
into neutral, unlock the
s
teering, or release the parking brake,
-
t
owing with only two wheels on the
g
round,
-
w
here there is no approved towing arm
a
vailable...
Procedure
for
having
your
vehicle
towed
or
for
towing
another
vehicle
using
a
removable
towing
ey
e.
Observe
the
legislation
in
force
in
your
c
o unt r y.
Ensure
that
the
weight
of
the
towing
vehicle
i
s
higher
than
that
of
the
towed
vehicle.
The
driver
must
remain
at
the
wheel
of
the
t
owed
vehicle
and
must
have
a
valid
driving
l
icence.
When
towing
a
vehicle
with
all
four
wheels
o
n
the
ground,
always
use
an
approved
t
owing
arm;
rope
and
straps
are
prohibited.
The
towing
vehicle
must
move
off
gently.
When
towing
a
vehicle
with
the
engine
off,
t
here
is
no
longer
any
power
assistance
for
b
raking
or
steering.
11
Practical information
Page 269 of 494

267
C4-2_en_Chap11_info-pratique_ed01-2015
C4-2_en_Chap11_info-pratique_ed01-2015
Towbar with quickly detachable towball
Presentation
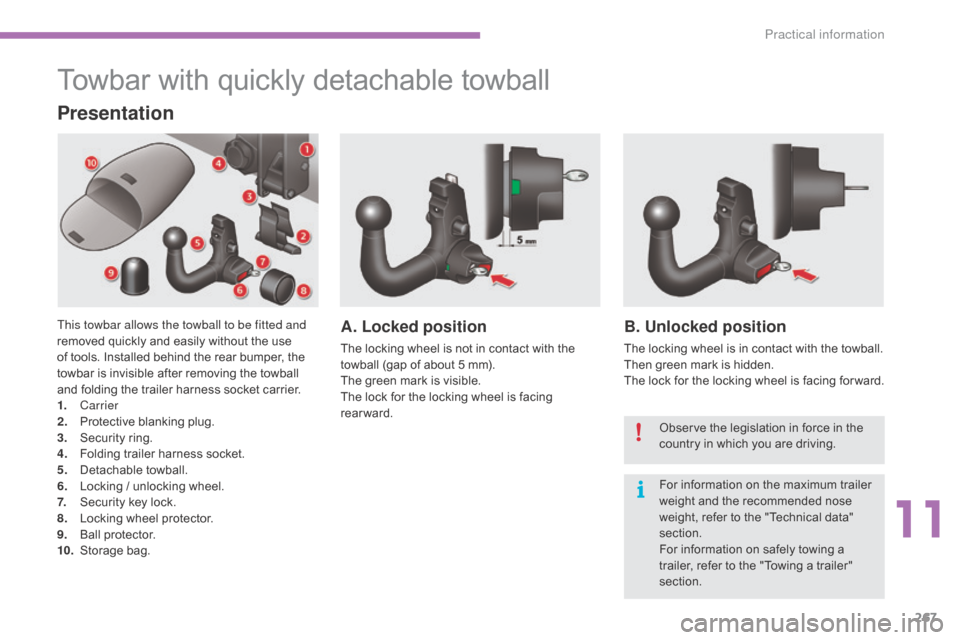
This towbar allows the towball to be fitted and
removed quickly and easily without the use
o
f tools. Installed behind the rear bumper, the
t
owbar is invisible after removing the towball
a
nd folding the trailer harness socket carrier.
1.
Carrier
2.
P
rotective blanking plug.
3.
S
ecurity ring.
4.
F
olding trailer harness socket.
5.
D
etachable
t
owball.
6.
L
ocking / unlocking wheel.
7.
S
ecurity key lock.
8.
L
ocking wheel protector.
9.
Ba
ll
pro
tector.
10.
St
orage
b
ag.A. Locked position
The locking wheel is not in contact with the towball (gap of about 5 mm).
The
green mark is visible.
The
lock for the locking wheel is facing
r
earward.
B. Unlocked position
The locking wheel is in contact with the towball.
T hen green mark is hidden.
The
lock for the locking wheel is facing for ward.
Observe
the legislation in force in the
c
ountry in which you are driving.
For
information on the maximum trailer
w
eight and the recommended nose
w
eight, refer to the "Technical data"
s
ection.
For
information on safely towing a
t
railer, refer to the "Towing a trailer"
s
ection.
11
Practical information
Page 270 of 494

268
C4-2_en_Chap11_info-pratique_ed01-2015
C4-2_en_Chap11_info-pratique_ed01-2015
Before each use
Check that the towball is correctly fitted by verifying the following points:
- t he towball is correctly locked in place (position A),
-
t
he security key lock is on and the key removed; the locking wheel can no longer be
ope
rated,
-
t
he towball must no longer move at all in its carrier; try to shake it by hand.
During use
Never unlock the device when a trailer or load carrier is fitted to the towball.
N ever exceed the maximum authorised weight for the vehicle plus trailer (Gross Train
W
eight - GTW).
After use
For journeys made without a trailer or load carrier, the trailer harness socket must be folded away, the towball removed and the blanking plug inserted in the carrier. This measure
a
pplies particularly if the towball could hinder visibility of the number plate or lighting.
Practical information
Page 272 of 494

270
C4-2_en_Chap11_info-pratique_ed01-2015
C4-2_en_Chap11_info-pratique_ed01-2015
Attach the trailer to the towball.attach the cable on the trailer to the security
ring
located on the carrier.
Lower
the trailer harness socket carrier by
p
ulling down on the ring visible below the
b
u m p e r.
Remove
the protective cover from the socket
a
nd connect the trailer wiring harness.
Removing the towball
Disconnect the trailer harness from the socket on the carrier.
Detach
the cable on the trailer from the security
r
ing on the carrier.
Unhook
the trailer from the towball.
Return the trailer harness connector carrier to
the
folded position. Insert
the key into the lock.
Turn the key anti-clockwise to unlock the
t
owball
f
ixing
m
echanism.
Practical information
Page 275 of 494

273
C4-2_en_Chap11_info-pratique_ed01-2015
C4-2_en_Chap11_info-pratique_ed01-2015
accessories
Conversion kits
You can obtain an "Enterprise" kit to convert a trade vehicle to a private car and vice-versa.
"Comfort":
door deflectors, side window blinds, rear
screen blind, insulated module, coat hanger
f
ixed to head restraint, reading lamp, mirror for
c
aravan, cruise control, scented air freshener
and
cartridges, parking sensors...
"Transport systems":
boot carpet, boot liner, boot net, boot spacers,
transverse roof bars, bicycle carrier, ski carrier,
r
oof boxes, towbars, towbar wiring harnesses...
"Styling":
gear lever knobs, aluminium foot rest, alloy wheels, wheel embellishers, chrome mirror
s
hells, chrome door
a
perture finishers, door sill
f
inishers, tailgate lower chrome finisher...
*
T
o avoid any risk of jamming the pedals:
-
e
nsure that mats are correctly positioned
a
nd secured,
-
n
ever fit one mat on top of
a
nother.
"Security and safety":
anti-intrusion alarm, microwave sensor, anti-tilt sensor, stolen vehicle tracking system, child
sea
ts and booster cushions, breathalyser, first
aid
kit, fire extinguisher, warning triangle, high
v
isibility vest, dog guard, pet seat belt, wheel
s
ecurity bolts, snow chains, non-slip covers,
front
foglamp kit...
"Protection":
mats*, seat covers compatible with l ateral a
irbags, door sill protectors, mud flaps, door
p
rotective rubbing strips, bumper protection
s
trips, protective covers for pets, vehicle
cover...
If
a
towbar
and
wiring
harness
are
fitted
o
utside
the
CITROËN
dealer
network,
t
he
installation
must
be
done
using
t
he
vehicle's
electrical
pre-equipment
a
nd
in
line
with
the
manufacturer's
r
ecommendations.
A
wide
range
of
accessories
and
genuine
parts
is
available
from
the
CITROËN
dealer
network.
These
accessories
and
parts
are
all
suitable
for
your
vehicle
and
benefit
from
CITROËN's
recommendation and warranty.
11
Practical information
Page 409 of 494

8
Safety5
C4-2-add_en_Chap08_securite_ed01-2015
For the airbags to be fully effective, observe the following safety rules:
Front airbags
Do not drive holding the steering wheel by its spokes or resting your hands on the centre part of the wheel. Passengers must not place their feet on the dashboard. Do not smoke as deployment of the airbags can cause burns or the risk of injury from a cigarette or pipe. Never remove or pierce the steering wheel or hit it violently. Do not fit or attach anything to the steering wheel or dashboard, this could cause injuries with deployment of the airbags.
Lateral airbags
Use only approved covers on the seats, compatible with the deployment the lateral airbags. For information on the range of seat covers suitable for your vehicle, you can contact a CITROËN dealer. Refer to the "Accessories" section. Do not fix or attach anything to the seat backs (clothing...). This could cause injury to the chest or arms if the lateral airbag is deployed. Do not sit with the upper part of the body any nearer to the door than necessary.
Curtain airbags
Do not fix or attach anything to the roof. This
could cause injury to the head if the curtain airbag is deployed. If fitted on your vehicle, do not remove the grab handles installed on the roof, they play a part in securing the curtain airbags.
Sit in a normal upright position. Wear a correctly adjusted seat belt. Do not leave anything between the occupants and the airbags (a child, pet, object...), nor fix or attach anything close to the inflation trajectory of the airbags; this could cause injuries during their deployment. Never modify the original definition of your vehicle, particularly in the area directly around the airbags. After an accident or if the vehicle has been stolen or broken into, have the airbag systems checked. All work on the airbag system must be carried out by a CITROËN dealer or a qualified workshop. Even if all of the precautions mentioned are observed, a risk of injury or of minor burns to the head, chest or arms when an airbag is deployed cannot be ruled out. The bag inflates almost instantly (within a few milliseconds) then deflates within the same time discharging the hot gas via openings provided for this purpose.
Page 468 of 494

.
Audio and Telematics 65
C4-2-add_en_Chap13b_SMEGplus_ed01-2015
Level 1Level 2Level 3Comments
Internet
Secondary page
Bluetooth Connection
Search Start the search for a device to connect.
Connect / Disconnect Start or end the Bluetooth connection to the selected device.
Update Import contacts from the selected telephone to save them in the audio system.
Delete Delete the selected telephone.
Confirm Save the settings.
Internet
Secondary page
Transfer rate
Reset
Reset the usage monitor, them confirm.
Confirm
Internet
Secondary page
WiFi connection
All Display all Wi-Fi networks.
Secure Display secure Wi-Fi networks.
Stored Memorise the selected Wi-Fi network(s).
Add Add a new Wi-Fi network.
Activate / Deactivate Activate or deactivate a Wi-Fi network.
Connect Select a Wi-Fi network found by the system and
connect to it.