2015 BMW Z4 SDRIVE35IS I car 03
[x] Cancel search: I car 03Page 240 of 289
Hood
Opening the hood Working in the engine compartment
Never attempt to perform any service or
repair operations on your vehicle without the necessary professional technical training.
If you are unfamiliar with the statutory guide‐
lines, have any work on the vehicle performed
only by a service center.
If this work is not carried out properly, there is
the danger of subsequent damage and related
safety hazards.◀
To avoid damage, make sure that the
wiper arms are resting against the wind‐
shield before you open the engine compart‐
ment. Do not open the engine hood before the
engine has cooled down; otherwise, injuries
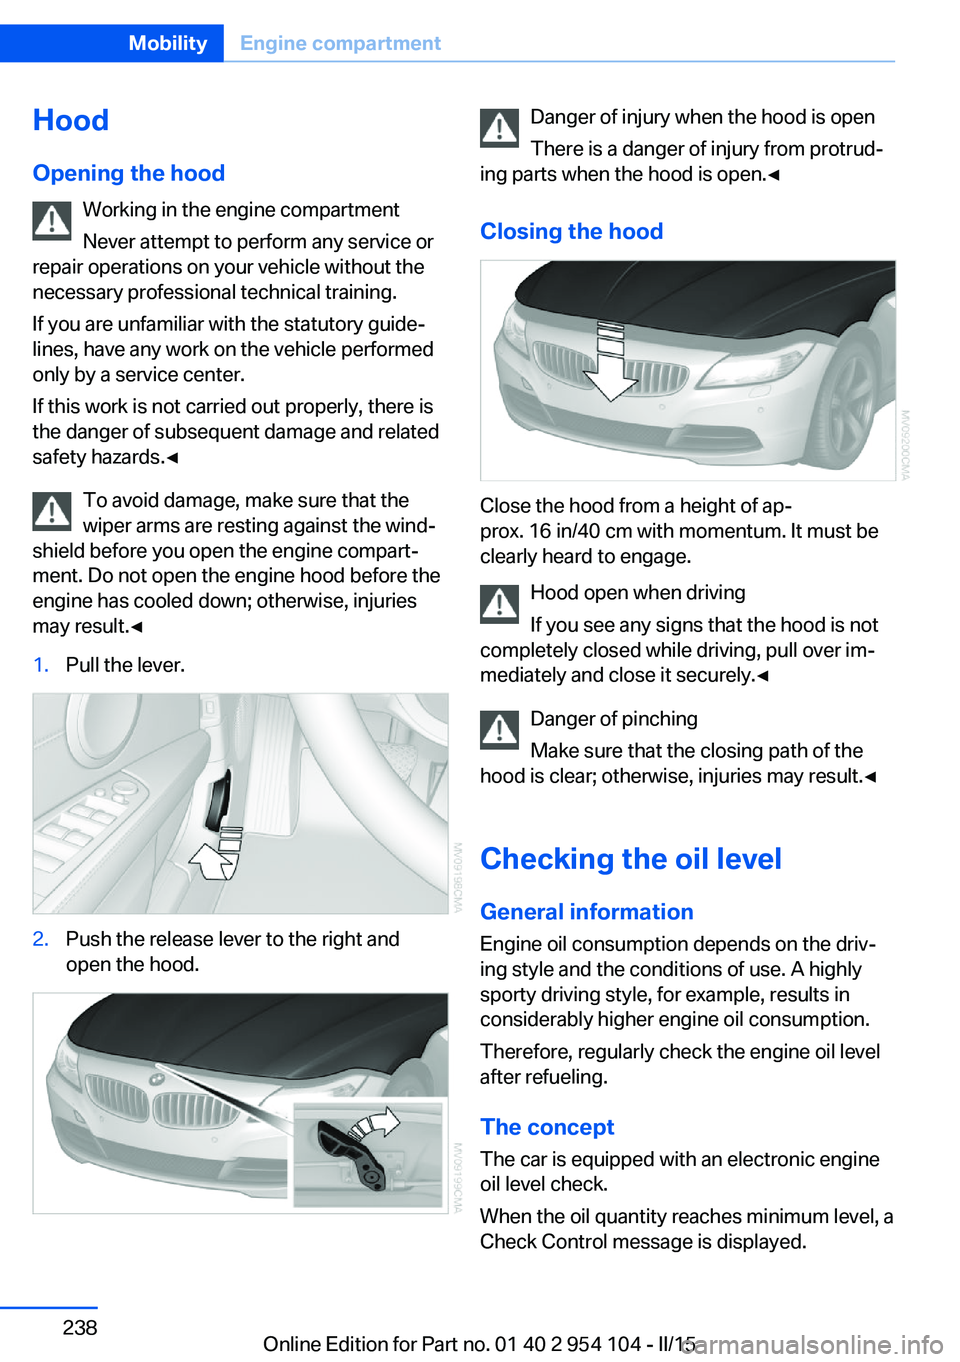
may result.◀1.Pull the lever.2.Push the release lever to the right and
open the hood.Danger of injury when the hood is open
There is a danger of injury from protrud‐
ing parts when the hood is open.◀
Closing the hood
Close the hood from a height of ap‐
prox. 16 in/40 cm with momentum. It must be
clearly heard to engage.
Hood open when driving
If you see any signs that the hood is not
completely closed while driving, pull over im‐
mediately and close it securely.◀
Danger of pinching
Make sure that the closing path of the
hood is clear; otherwise, injuries may result.◀
Checking the oil level General information
Engine oil consumption depends on the driv‐
ing style and the conditions of use. A highly
sporty driving style, for example, results in
considerably higher engine oil consumption.
Therefore, regularly check the engine oil level
after refueling.
The concept
The car is equipped with an electronic engine
oil level check.
When the oil quantity reaches minimum level, a
Check Control message is displayed.
Seite 238MobilityEngine compartment238
Online Edition for Part no. 01 40 2 954 104 - II/15
Page 241 of 289

Requirements▷The engine must be running and warm af‐
ter the vehicle has been driven for at least
6.2 miles/10 km.▷The vehicle is stopped or being driven on a
level roadway.
Display in the instrument cluster
1.Press button 1 in the turn indicator lever up
or down repeatedly until the appropriate
symbol appears in the display, accompa‐
nied by the word "OIL".2.Press button 2 in the turn indicator lever.
The oil level is checked and the reading
displayed.
Possible displays
Too much engine oil
Have the vehicle checked immediately;
otherwise, surplus oil can lead to engine dam‐
age.◀
1Oil level OK2Oil level is being checked. This can take
about 3 minutes if the car is at a standstill
on a level surface, or about 5 minutes while
the car is on the move.3Oil level at minimum: add engine oil as
soon as possible, but no more
than 1 US quart/1 liter.4Oil level is too high.5The oil level sensor is defective. Do not
add engine oil. It is possible to continue
driving. Note the newly calculated remain‐
ing mileage until the next oil service. Have
the system checked as soon as possible.
Display via iDrive
1."Vehicle Info"Seite 239Engine compartmentMobility239
Online Edition for Part no. 01 40 2 954 104 - II/15
Page 247 of 289
Replacing componentsVehicle equipmentThis chapter describes all series equipment as
well as country-specific and special equipment
offered for this model series. Therefore, it also
describes equipment that may not be found in
your vehicle, for instance due to the selected
special equipment or the country version. This
also applies to safety-related functions and
systems.
When using the features and systems descri‐
bed here, adhere to local regulations.
Tool kit
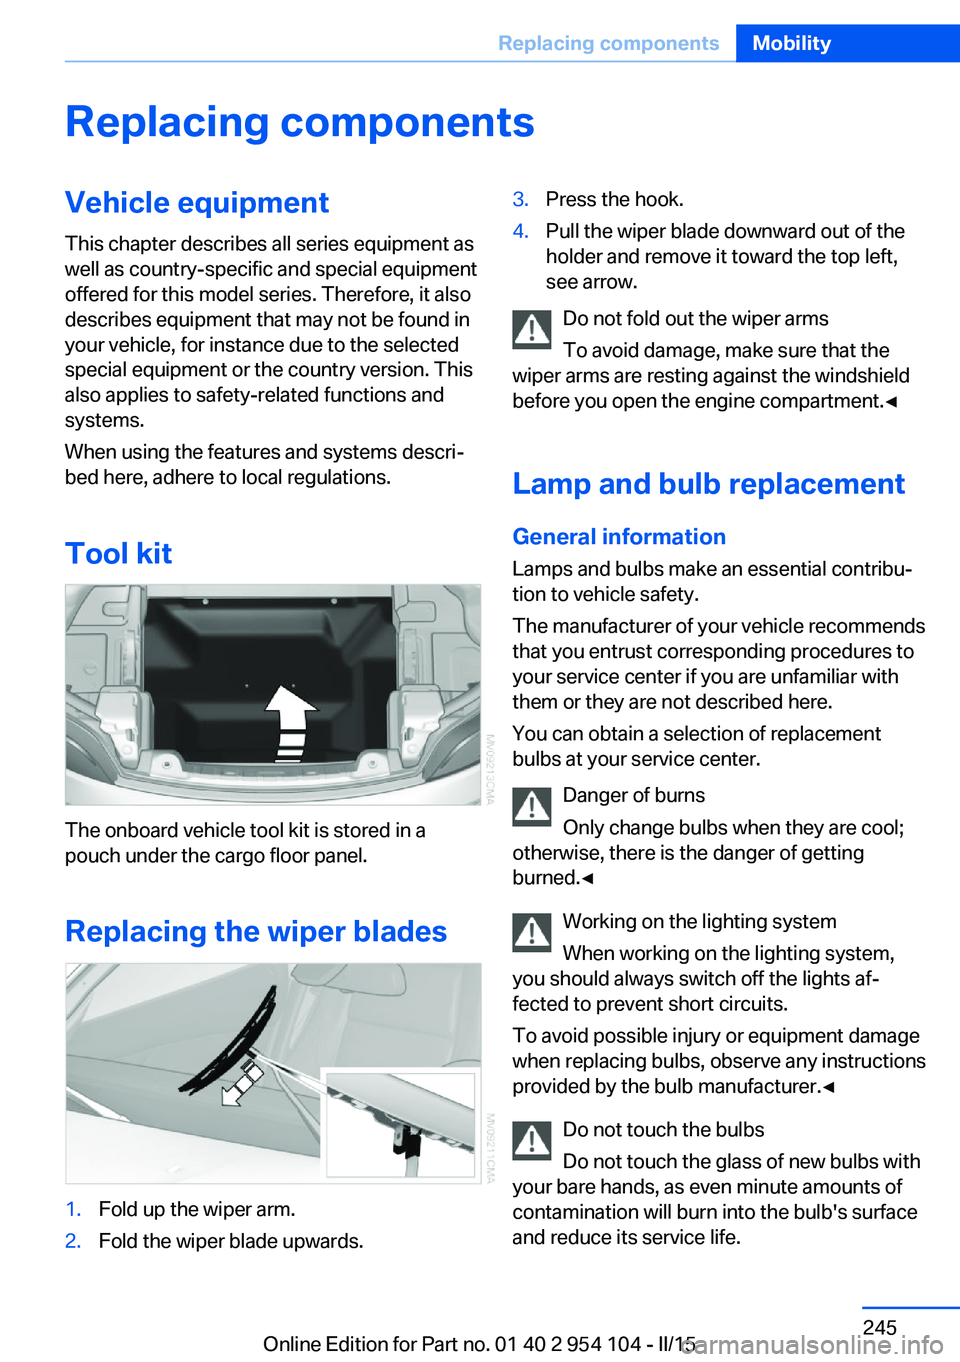
The onboard vehicle tool kit is stored in a
pouch under the cargo floor panel.
Replacing the wiper blades
1.Fold up the wiper arm.2.Fold the wiper blade upwards.3.Press the hook.4.Pull the wiper blade downward out of the
holder and remove it toward the top left,
see arrow.
Do not fold out the wiper arms
To avoid damage, make sure that the
wiper arms are resting against the windshield
before you open the engine compartment.◀
Lamp and bulb replacement
General information Lamps and bulbs make an essential contribu‐
tion to vehicle safety.
The manufacturer of your vehicle recommends
that you entrust corresponding procedures to
your service center if you are unfamiliar with
them or they are not described here.
You can obtain a selection of replacement
bulbs at your service center.
Danger of burns
Only change bulbs when they are cool;
otherwise, there is the danger of getting
burned.◀
Working on the lighting system
When working on the lighting system,
you should always switch off the lights af‐
fected to prevent short circuits.
To avoid possible injury or equipment damage
when replacing bulbs, observe any instructions
provided by the bulb manufacturer.◀
Do not touch the bulbs
Do not touch the glass of new bulbs with
your bare hands, as even minute amounts of
contamination will burn into the bulb's surface
and reduce its service life.
Seite 245Replacing componentsMobility245
Online Edition for Part no. 01 40 2 954 104 - II/15
Page 248 of 289

Use a clean tissue, cloth or something similar,
or hold the bulb by its base.◀
Light-emitting diodes LED
Light-emitting diodes installed behind translu‐
cent lenses serve as the light source for many
of the controls and displays in your vehicle.
These light-emitting diodes, which operate us‐
ing a concept similar to that applied in conven‐
tional lasers, are officially designated as
Class 1 light-emitting diodes.
Do not remove the covers
Do not remove the covers, and never
stare into the unfiltered light for several hours;
otherwise, irritation of the retina could result.◀
Headlight glass
Condensation can form on the inside of the ex‐
ternal lights in cool or humid weather. When
you drive with the lights switched on, the con‐
densation evaporates after a short time. The
headlight glasses do not need to be changed.
If the condensation in the headlights does not
evaporate after trips with the lights switched
on, and the amount of moisture in the head‐
lights increases, for example if water droplets
form, have them checked by your service cen‐
ter.
Headlight setting
Changing the bulbs and lights may influence
the headlight settings. Have the headlight set‐
ting checked by a service center and corrected
if necessary after changing bulbs or lights.Xenon headlights
At a glance1Parking lights / daytime running lights2Low beams/high-beams/headlight flasher3Turn signal
Because of the long life of these bulbs, the
likelihood of failure is very low. Switching the
lights on and off frequently shortens their life.
Do not perform work/bulb replacement
on xenon headlamps
Have any work on the xenon lighting system,
including bulb replacement, performed only by
a service center.
Due to the high voltage present in the system,
there is the danger of fatal injuries if work is
carried out improperly.◀
Adhere to the general instructions, refer to
page 245.
With Xenon headlights, the following lights are
designed with LED technology:
▷Parking and roadside parking lights.▷Daytime running lights.
Contact your service center in the event of a
malfunction.
Seite 246MobilityReplacing components246
Online Edition for Part no. 01 40 2 954 104 - II/15
Page 249 of 289
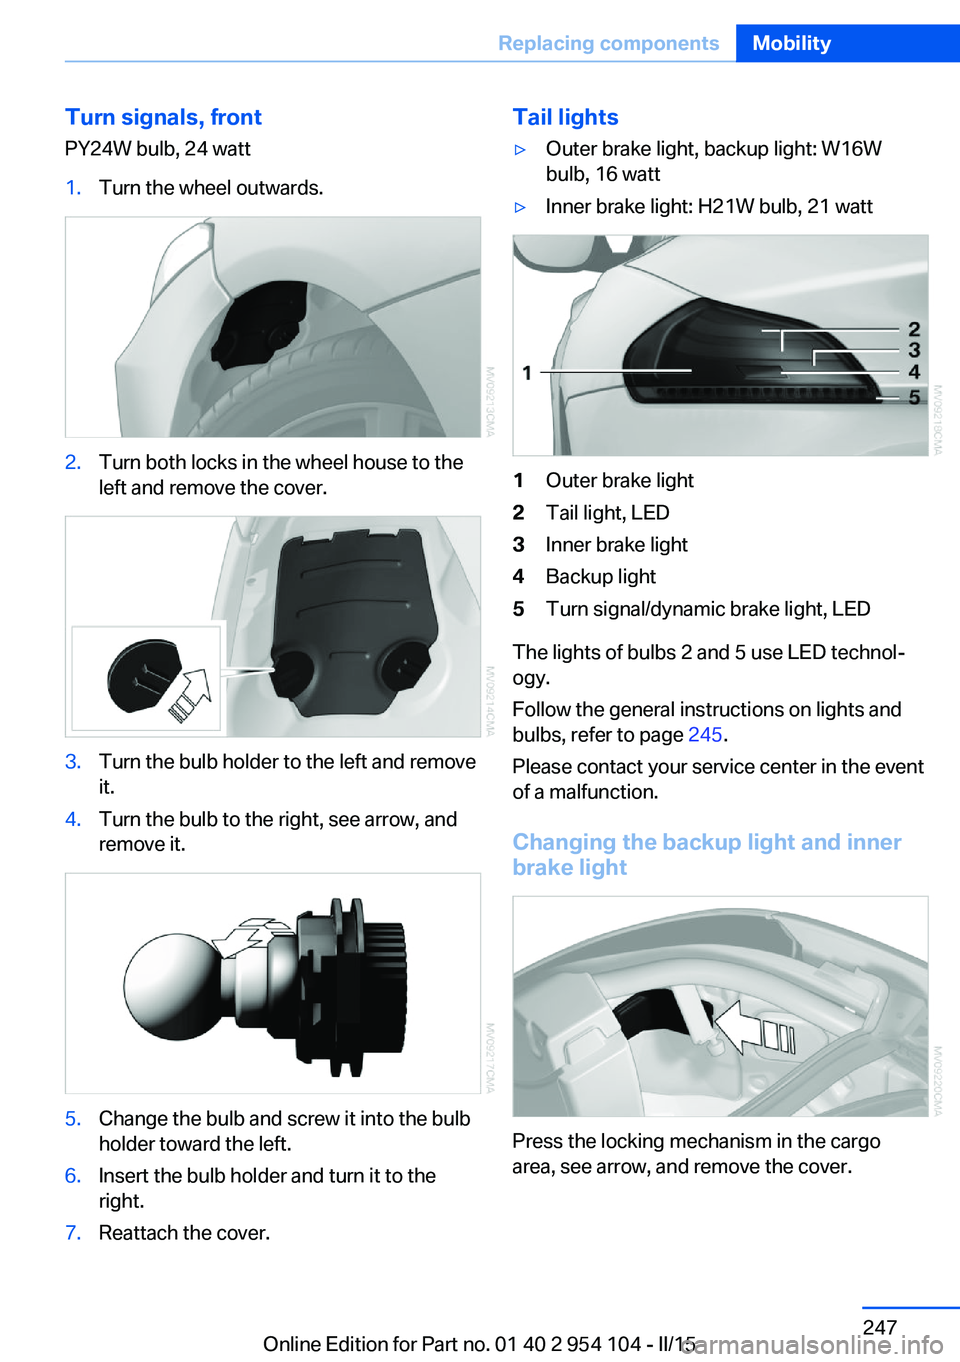
Turn signals, frontPY24W bulb, 24 watt1.Turn the wheel outwards.2.Turn both locks in the wheel house to the
left and remove the cover.3.Turn the bulb holder to the left and remove
it.4.Turn the bulb to the right, see arrow, and
remove it.5.Change the bulb and screw it into the bulb
holder toward the left.6.Insert the bulb holder and turn it to the
right.7.Reattach the cover.Tail lights▷Outer brake light, backup light: W16W
bulb, 16 watt▷Inner brake light: H21W bulb, 21 watt1Outer brake light2Tail light, LED3Inner brake light4Backup light5Turn signal/dynamic brake light, LED
The lights of bulbs 2 and 5 use LED technol‐
ogy.
Follow the general instructions on lights and
bulbs, refer to page 245.
Please contact your service center in the event
of a malfunction.
Changing the backup light and inner brake light
Press the locking mechanism in the cargo
area, see arrow, and remove the cover.
Seite 247Replacing componentsMobility247
Online Edition for Part no. 01 40 2 954 104 - II/15
Page 250 of 289
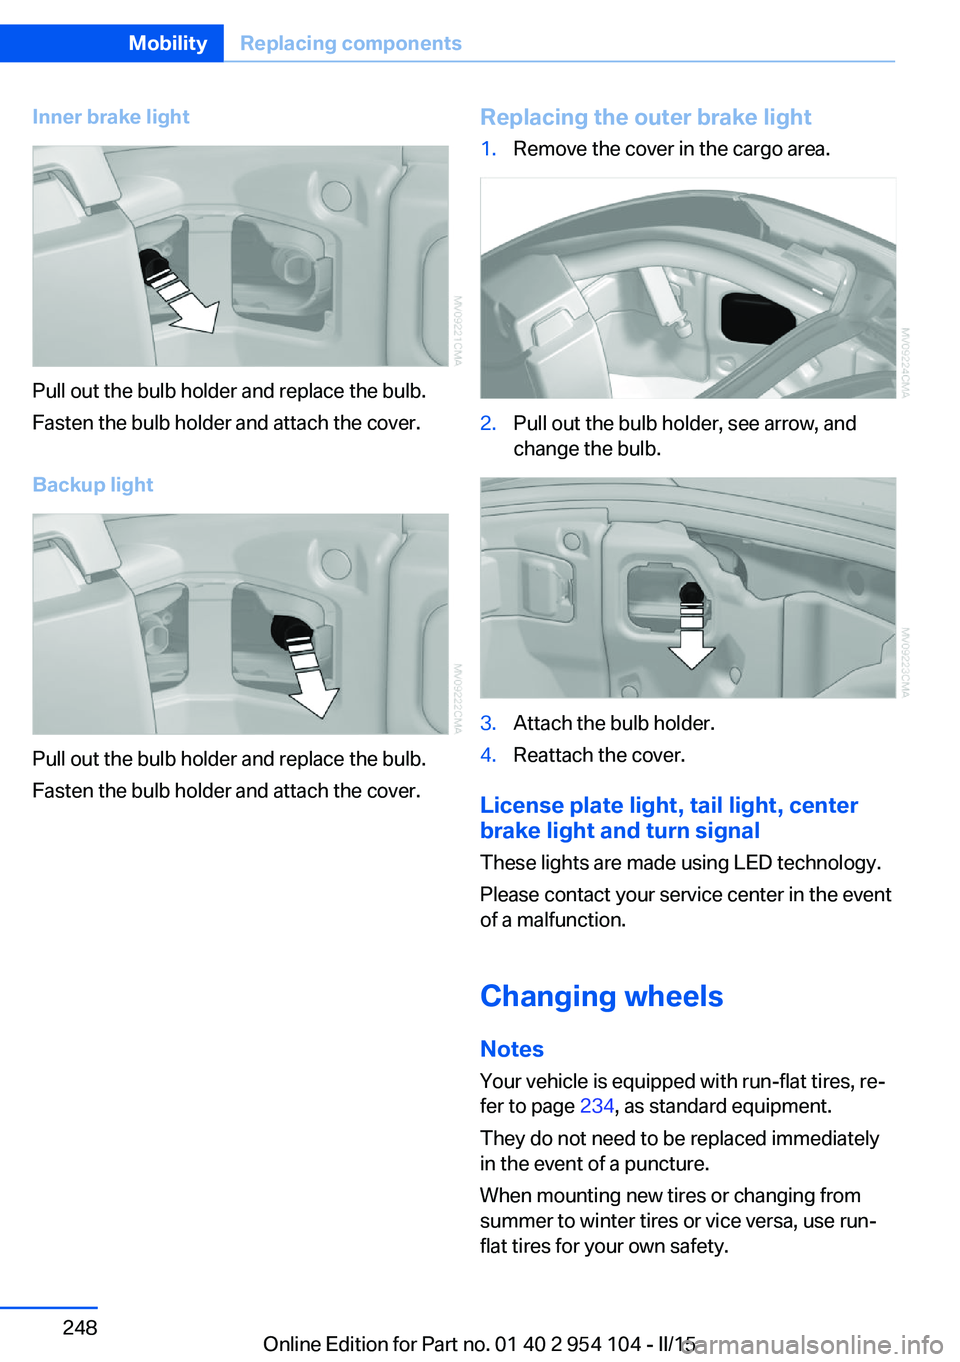
Inner brake light
Pull out the bulb holder and replace the bulb.
Fasten the bulb holder and attach the cover.
Backup light
Pull out the bulb holder and replace the bulb.
Fasten the bulb holder and attach the cover.
Replacing the outer brake light1.Remove the cover in the cargo area.2.Pull out the bulb holder, see arrow, and
change the bulb.3.Attach the bulb holder.4.Reattach the cover.
License plate light, tail light, center
brake light and turn signal
These lights are made using LED technology.
Please contact your service center in the event
of a malfunction.
Changing wheels Notes
Your vehicle is equipped with run-flat tires, re‐
fer to page 234, as standard equipment.
They do not need to be replaced immediately
in the event of a puncture.
When mounting new tires or changing from
summer to winter tires or vice versa, use run-
flat tires for your own safety.
Seite 248MobilityReplacing components248
Online Edition for Part no. 01 40 2 954 104 - II/15
Page 253 of 289
Breakdown assistanceVehicle equipment
This chapter describes all series equipment as
well as country-specific and special equipment
offered for this model series. Therefore, it also
describes equipment that may not be found in
your vehicle, for instance due to the selected
special equipment or the country version. This
also applies to safety-related functions and
systems.
When using the features and systems descri‐
bed here, adhere to local regulations.
Hazard warning system
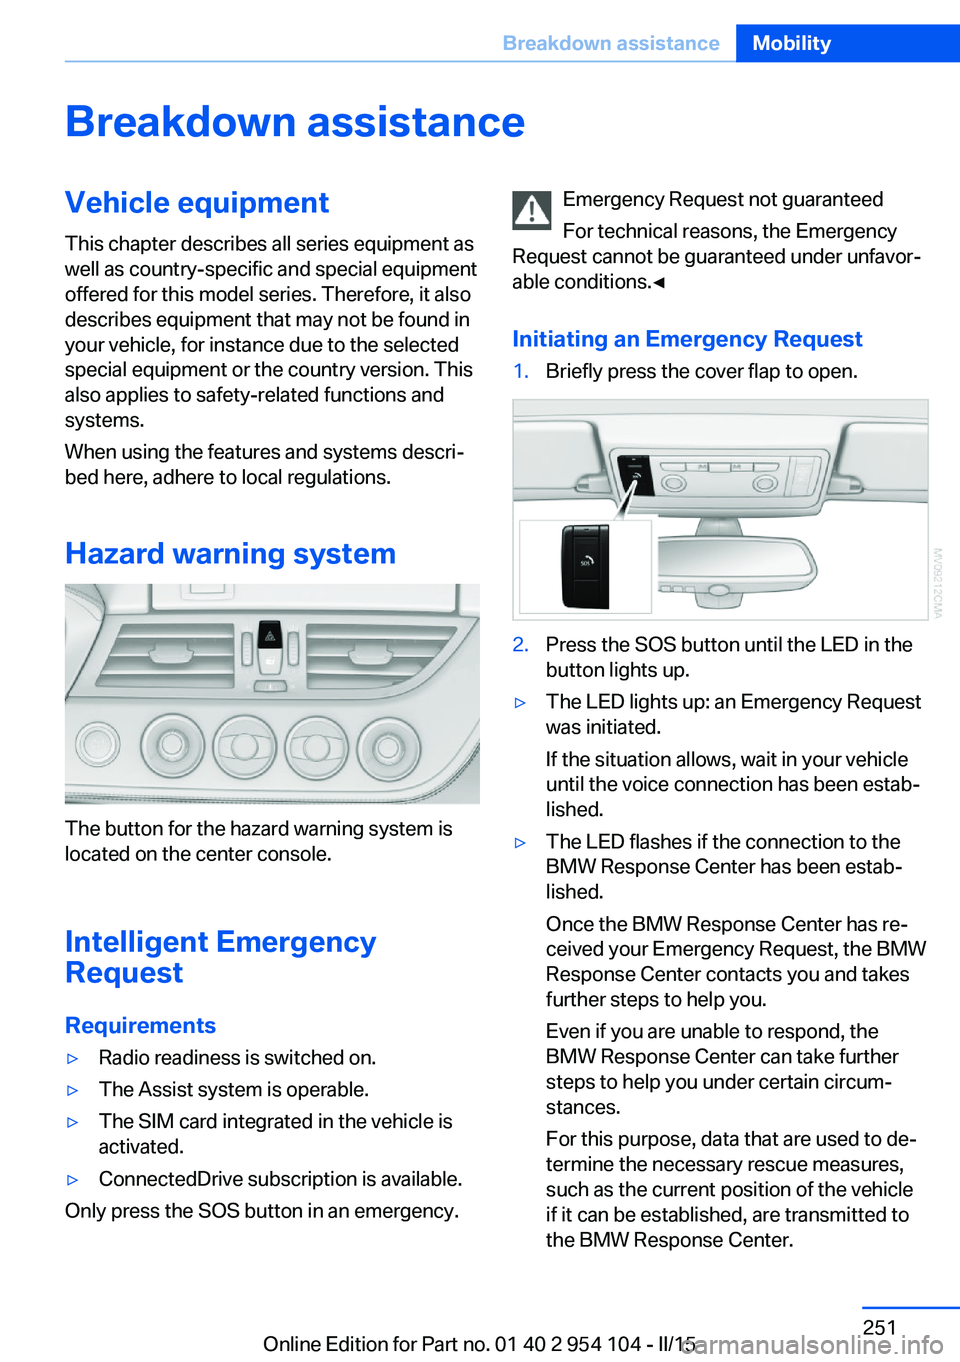
The button for the hazard warning system is
located on the center console.
Intelligent Emergency
Request
Requirements
▷Radio readiness is switched on.▷The Assist system is operable.▷The SIM card integrated in the vehicle is
activated.▷ConnectedDrive subscription is available.
Only press the SOS button in an emergency.
Emergency Request not guaranteed
For technical reasons, the Emergency
Request cannot be guaranteed under unfavor‐
able conditions.◀
Initiating an Emergency Request1.Briefly press the cover flap to open.2.Press the SOS button until the LED in the
button lights up.▷The LED lights up: an Emergency Request
was initiated.
If the situation allows, wait in your vehicle
until the voice connection has been estab‐
lished.▷The LED flashes if the connection to the
BMW Response Center has been estab‐
lished.
Once the BMW Response Center has re‐
ceived your Emergency Request, the BMW
Response Center contacts you and takes
further steps to help you.
Even if you are unable to respond, the
BMW Response Center can take further
steps to help you under certain circum‐
stances.
For this purpose, data that are used to de‐
termine the necessary rescue measures,
such as the current position of the vehicle
if it can be established, are transmitted to
the BMW Response Center.Seite 251Breakdown assistanceMobility251
Online Edition for Part no. 01 40 2 954 104 - II/15
Page 258 of 289
Tow fitting
The screw-in tow fitting should always be car‐
ried in the vehicle. It can be screwed in at the
front or rear of the BMW.
It is stored in the onboard vehicle tool kit under
the cargo floor panel, refer to page 245.
Tow fitting, information on use▷Use only the tow fitting provided with
the vehicle and screw it all the way in.▷Use the tow fitting for towing on paved
roads only.▷Avoid lateral loading of the tow fitting, e.g.,
do not lift the vehicle by the tow fitting.
Otherwise, damage to the tow fitting and the
vehicle can occur.◀
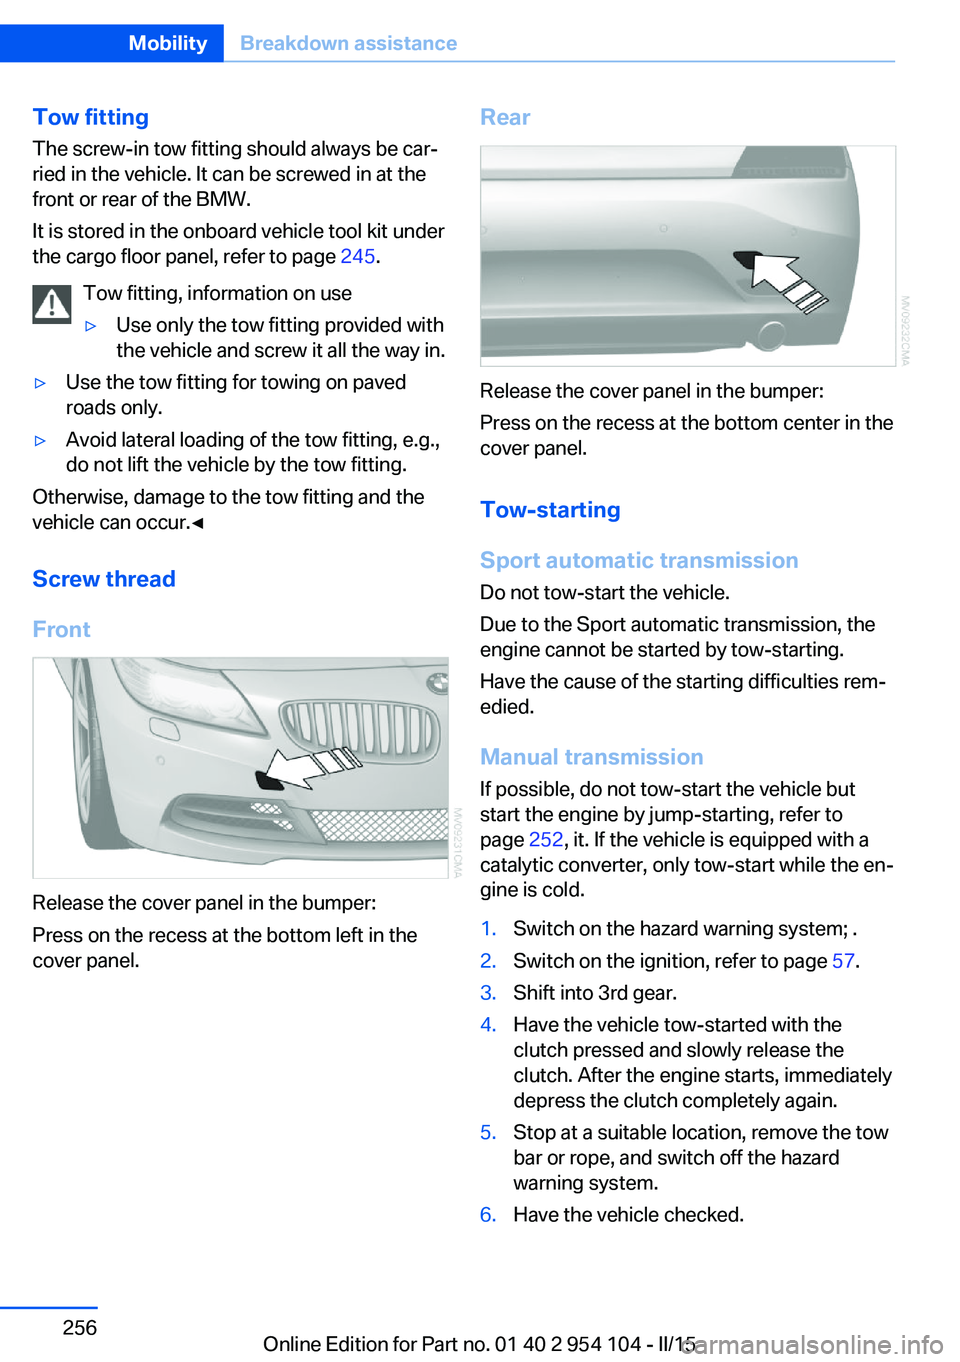
Screw thread
Front
Release the cover panel in the bumper:
Press on the recess at the bottom left in the
cover panel.
Rear
Release the cover panel in the bumper:
Press on the recess at the bottom center in the
cover panel.
Tow-starting
Sport automatic transmission Do not tow-start the vehicle.
Due to the Sport automatic transmission, the
engine cannot be started by tow-starting.
Have the cause of the starting difficulties rem‐
edied.
Manual transmission If possible, do not tow-start the vehicle but
start the engine by jump-starting, refer to
page 252, it. If the vehicle is equipped with a
catalytic converter, only tow-start while the en‐
gine is cold.
1.Switch on the hazard warning system; .2.Switch on the ignition, refer to page 57.3.Shift into 3rd gear.4.Have the vehicle tow-started with the
clutch pressed and slowly release the
clutch. After the engine starts, immediately
depress the clutch completely again.5.Stop at a suitable location, remove the tow
bar or rope, and switch off the hazard
warning system.6.Have the vehicle checked.Seite 256MobilityBreakdown assistance256
Online Edition for Part no. 01 40 2 954 104 - II/15