2015 BMW I8 charging
[x] Cancel search: chargingPage 92 of 224
10Overall range 8311Battery charge indicator 7712Fuel gauge 8213Computer 87Variable drive mode displays
ECO PRO displays In ECO PRO, the instrument cluster switches
to the ECO PRO displays. These displays sup‐
port a driving style that saves on fuel con‐
sumption with more prominent representation
of the efficiency display and various ECO PRO
tips. ECO PRO, refer to page 145.Sport program displays
In the Sport program, the instrument cluster
switches the instrument cluster to the Sport
displays. These displays support a sporty driv‐
ing style with more prominent representation
of the tachometer and a clearer representation
of the eBOOST performance in the form of a
blue illuminated ring.
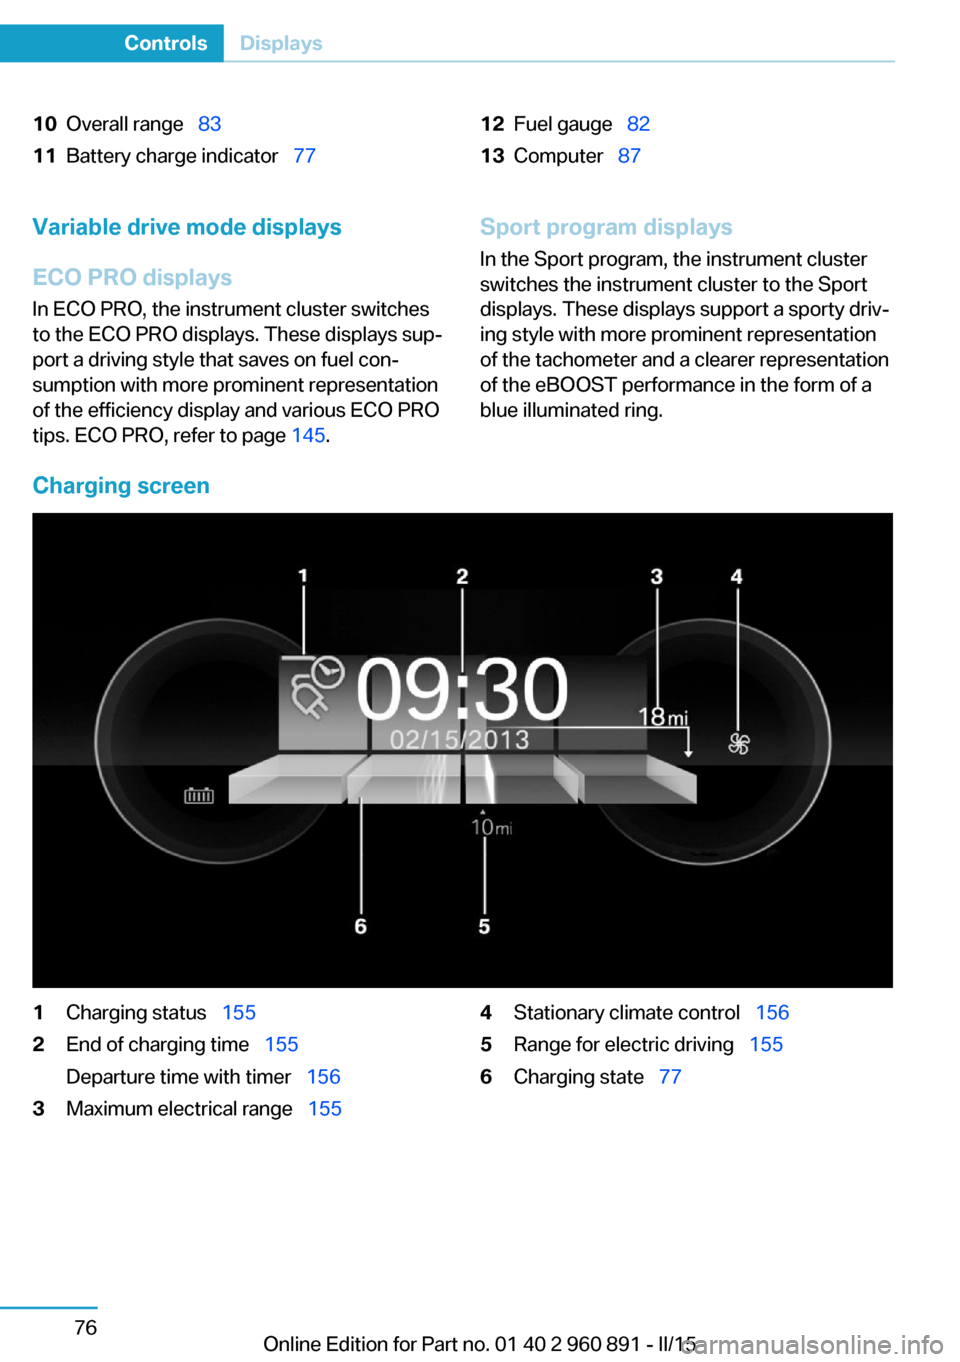
Charging screen
1Charging status 1552End of charging time 155
Departure time with timer 1563Maximum electrical range 1554Stationary climate control 1565Range for electric driving 1556Charging state 77Seite 76ControlsDisplays76
Online Edition for Part no. 01 40 2 960 891 - II/15
Page 93 of 224
Displays of the hybrid
system
Displays in the instrument cluster
The concept The following functions of the hybrid system
are displayed:▷High-voltage battery charge indicator, refer
to page 77.▷Max eDrive, refer to page 64▷Maintaining charging state, refer to
page 78.▷Electric driving: ePOWER, refer to
page 77.▷Acceleration boost: eBOOST, refer to
page 78.▷Energy recovery: CHARGE, refer to
page 78.▷Drive readiness: READY, refer to
page 77.
The display depends on the system's operat‐
ing condition.
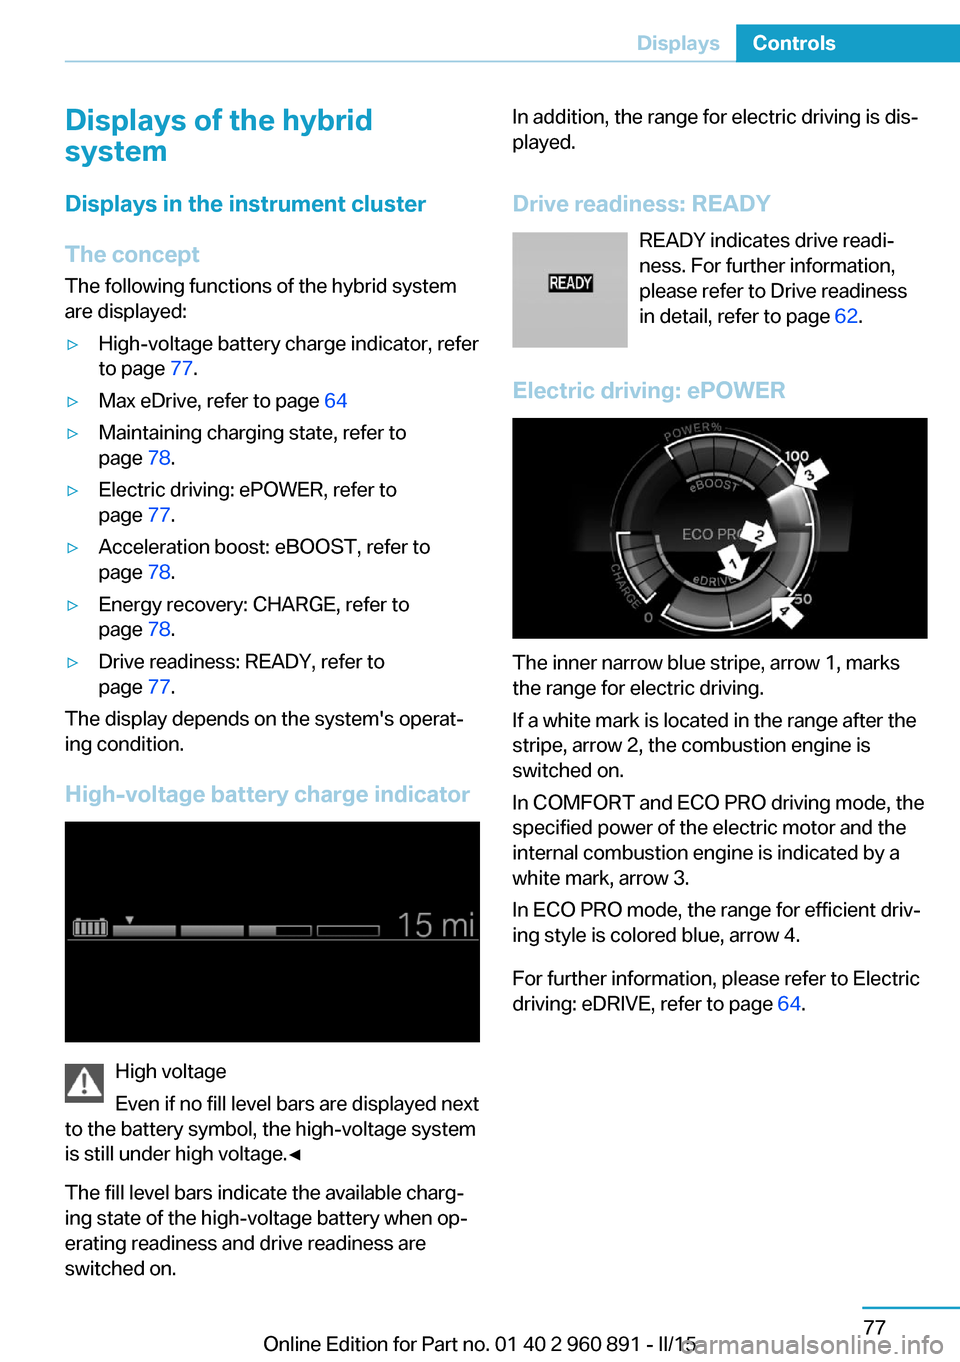
High-voltage battery charge indicator
High voltage
Even if no fill level bars are displayed next
to the battery symbol, the high-voltage system
is still under high voltage.◀
The fill level bars indicate the available charg‐
ing state of the high-voltage battery when op‐
erating readiness and drive readiness are
switched on.
In addition, the range for electric driving is dis‐
played.
Drive readiness: READY READY indicates drive readi‐
ness. For further information,
please refer to Drive readiness
in detail, refer to page 62.
Electric driving: ePOWER
The inner narrow blue stripe, arrow 1, marks
the range for electric driving.
If a white mark is located in the range after the
stripe, arrow 2, the combustion engine is
switched on.
In COMFORT and ECO PRO driving mode, the
specified power of the electric motor and the
internal combustion engine is indicated by a
white mark, arrow 3.
In ECO PRO mode, the range for efficient driv‐
ing style is colored blue, arrow 4.
For further information, please refer to Electric
driving: eDRIVE, refer to page 64.
Seite 77DisplaysControls77
Online Edition for Part no. 01 40 2 960 891 - II/15
Page 94 of 224
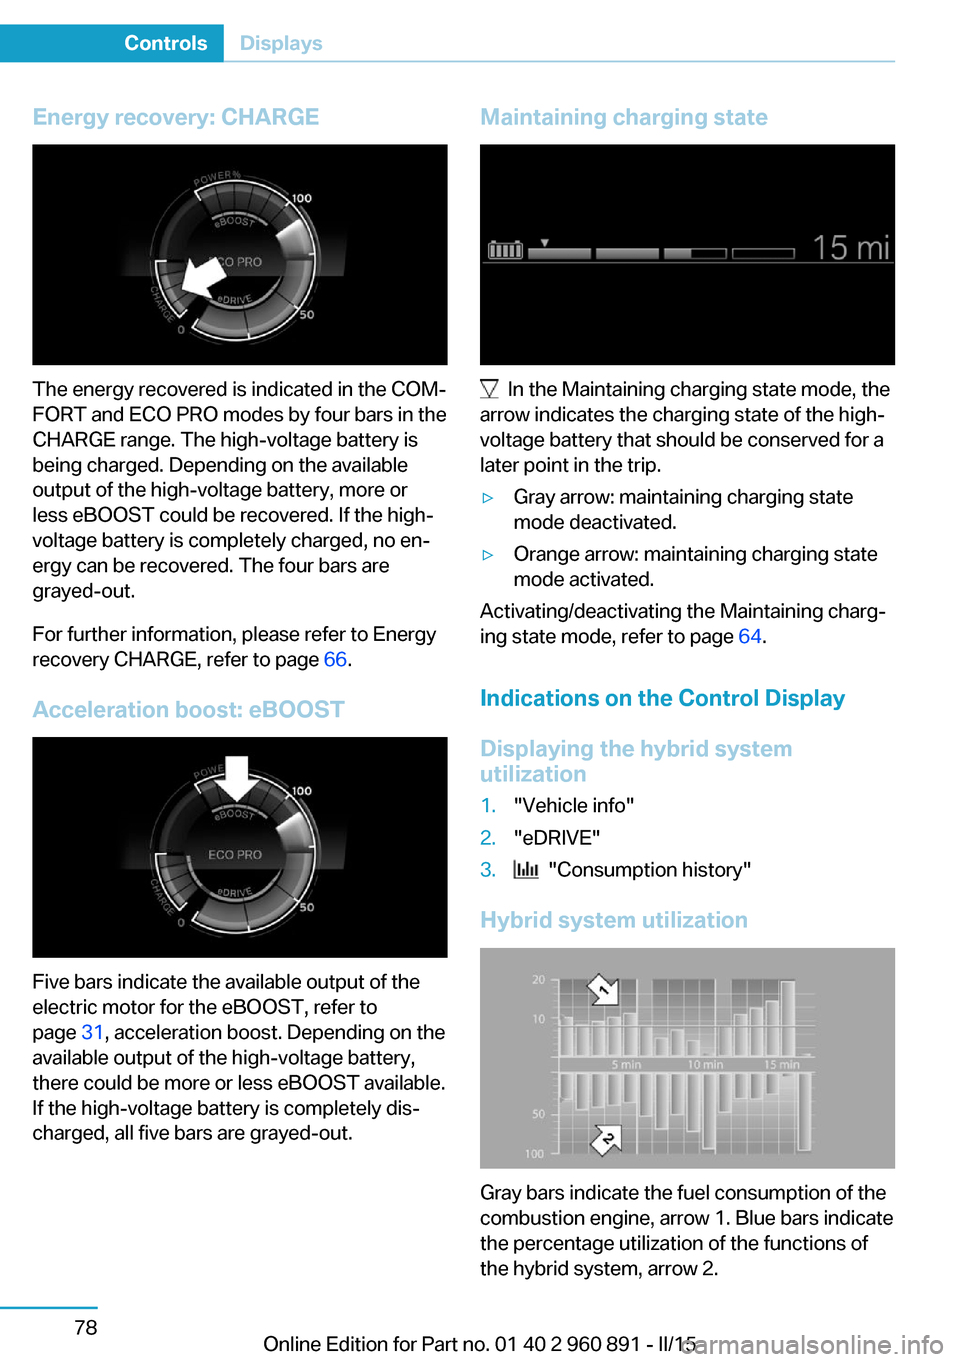
Energy recovery: CHARGE
The energy recovered is indicated in the COM‐
FORT and ECO PRO modes by four bars in the
CHARGE range. The high-voltage battery is
being charged. Depending on the available
output of the high-voltage battery, more or
less eBOOST could be recovered. If the high-
voltage battery is completely charged, no en‐
ergy can be recovered. The four bars are
grayed-out.
For further information, please refer to Energy
recovery CHARGE, refer to page 66.
Acceleration boost: eBOOST
Five bars indicate the available output of the
electric motor for the eBOOST, refer to
page 31, acceleration boost. Depending on the
available output of the high-voltage battery,
there could be more or less eBOOST available.
If the high-voltage battery is completely dis‐
charged, all five bars are grayed-out.
Maintaining charging state
In the Maintaining charging state mode, the
arrow indicates the charging state of the high-
voltage battery that should be conserved for a
later point in the trip.
▷Gray arrow: maintaining charging state
mode deactivated.▷Orange arrow: maintaining charging state
mode activated.
Activating/deactivating the Maintaining charg‐
ing state mode, refer to page 64.
Indications on the Control Display
Displaying the hybrid system
utilization
1."Vehicle info"2."eDRIVE"3. "Consumption history"
Hybrid system utilization
Gray bars indicate the fuel consumption of the
combustion engine, arrow 1. Blue bars indicate
the percentage utilization of the functions of
the hybrid system, arrow 2.
Seite 78ControlsDisplays78
Online Edition for Part no. 01 40 2 960 891 - II/15
Page 95 of 224

One bar indicates one minute.
The combustion engine's average fuel con‐
sumption is indicated by a line above the bar
display and as a value to the right of the graph.
Displaying the energy flow1."Vehicle info"2."eDRIVE"3. "Energy flow"
Energy flow of the hybrid system
The following are displayed:
▷Active components of the hybrid system.▷Direction of the energy flows:
Orange: energy flow of the combustion en‐
gine.
Blue: energy flow of the hybrid system▷Driving states:▷ePOWER.▷POWER.▷eBOOST.▷CHARGE.▷Coasting.▷Charging.▷System requirements of the hybrid system,
e. g., drive system not yet warmed up to
operating temperature.▷Driving requirement, e. g., transmission se‐
lector lever in the Sport position.Adapting to the course of the road
When the navigation system destination guid‐
ance is active, hybrid operation adapts to spe‐
cific route sections.
Use of the hybrid system is optional.
Symbols in the energy flow display indicate
that a situation has been detected ahead and
hybrid operation is prepared for it.
SymbolsSymbolMeaningDownhill gradients: the system is
ready to charge the high-voltage
battery.Target zone: ePOWER electric driv‐
ing is being prepared.
Check Control
The concept The Check Control system monitors functions
in the vehicle and notifies you of malfunctions
in the monitored systems.
A Check Control message is displayed as a
combination of indicator or warning lights and
text messages in the instrument cluster and in
the Head-up Display.
In addition, an acoustic signal may sound and a text message may appear on the Control Dis‐
play.
Indicator/warning lights
General information
The indicator and warning lights in the instru‐
ment cluster can light up in a variety of combi‐
nations and colors.
Several lights indicate function checks and
light up only temporarily when drive readiness
or operating readiness are activated.
Seite 79DisplaysControls79
Online Edition for Part no. 01 40 2 960 891 - II/15
Page 99 of 224

Engine oil temperatureIf the engine oil along with the engine becomes
too hot, a Check Control message is displayed.
Coolant temperature If the coolant along with the engine becomes
too hot, a Check Control message is displayed.
Check the coolant level, refer to page 177.
Odometer and trip odometer
Display▷Odometer, scope of the computer, refer to
page 87.▷Trip odometer, lower right display in the in‐
strument cluster.
Show/reset kilometers
Press the knob.
▷With operating readiness
turned off, the time, the ex‐
ternal temperature and the
odometer are displayed.▷When operating readiness is switched on,
the trip odometer is reset.
External temperature
If the indicator drops to +37 ℉/+3 ℃ or lower, a
signal sounds.
A Check Control message is displayed.
There is an increased risk of ice on roads.
Ice on roads
Even at temperatures above
+37 ℉/+3 ℃, roads might be icy.
Therefore, drive carefully on bridges and
shaded roads, e.g., to avoid the increased risk
of an accident.◀
Time
The time is displayed in the instrument cluster.
Setting the time and time format, refer to
page 89.
Date
The date is displayed in the computer.
Setting the date and date format, refer to
page 89.
Range Display
The following information about the range is
displayed:
▷Fill level bars of the fuel gauge, arrow 1.▷Charging state of the high-voltage battery,
arrow 2.▷Range for electric driving, arrow 3.▷Total range from fuel supply and electric
range, arrow 4.
Two Check Control messages indicate a lim‐
ited total range.
The range display is dynamic and is influenced
by several factors, such as driving style.
Refuel promptly
Refuel no later than at a range of
30 miles/50 km or engine operation might fail
and damage might occur.◀
Seite 83DisplaysControls83
Online Edition for Part no. 01 40 2 960 891 - II/15
Page 144 of 224
With the BMW i Remote App, refer to
page 128, the standing air conditioning can be
switched on.
The system switches off automatically after a
certain period of time.
If stationary climate control is used during the
charging process, less air conditioning ca‐
pacity will be required while driving. This opti‐
mizes the range.
Functional requirements▷When the departure time is preselected:
depends on internal, external and set tem‐
perature.▷Direct operation via iDrive: any external
temperature.▷Charging cable connected or high-voltage
battery sufficiently charged.▷Motor switched off and/or drive readiness
deactivated.▷The vents are open to allow air to flow out.
Switching on/off directly
On the Control Display:
1."Settings"2."Climate"3."Activate comfort climate control"
The symbol on the automatic climate con‐
trol flashes if the stationary climate control is
switched on.
Activate climate control at departuretime
The reel-on time is automatically determined
based on the temperature. The system
promptly switches on before the selected de‐
parture time.
On the Control Display:
1."Settings"2."Departure time"3."Departure 1:"4."Precondition for departure time"5.Set and activate Desired departure time,
refer to page 156.
The symbol on the automatic climate con‐
trol lights up when the departure time is acti‐
vated.
The symbol on the automatic climate con‐
trol flashes when the stationary climate control
has been switched on.
If drive readiness is switched off, changes can
be made on the Control Display. Departure
time can only be changed once. Scheduled de‐
parture times are not adjusted. Settings for cli‐
mate control and charging operation are also
applied for scheduled departure times.
Activating with BMW i Remote App
Using the BMW i Remote App, the system can
be directly switched on or via a preset depar‐
ture time.
Seite 128ControlsClimate control128
Online Edition for Part no. 01 40 2 960 891 - II/15
Page 147 of 224
4.Likewise, press and hold the button of the
desired function on the hand-held trans‐
mitter.5.Release both buttons as soon as the inte‐
rior rearview mirror LED flashes more rap‐
idly. The LED flashing faster indicates that
the button on the interior rearview mirror
has been programmed. The system can
then be controlled by the button on the in‐
terior rearview mirror.
If the LED does not flash faster after at
least 60 seconds, change the distance and
repeat the step. Several more attempts at
different distances may be necessary. Wait
at least 15 seconds between attempts.
Canada: if programming with the hand-
held transmitter was interrupted, hold
down the interior rearview mirror button
and repeatedly press and release the
hand-held transmitter button for 2 sec‐
onds.
Controls
Before operation
Before operating a system using the uni‐
versal garage door opener, ensure that there are no people, animals, or objects within the
range of movement of the remote-controlled
system; otherwise, there is a risk of injury or
damage.
Also follow the safety instructions of the hand-
held transmitter.◀
The system, such as the garage door, can be
operated using the button on the interior rear‐
view mirror while the engine is running or when
the ignition is started. To do this, hold down
the button within receiving range of the system
until the function is activated. The interior rear‐ view mirror LED stays lit while the wireless sig‐
nal is being transmitted.
Deleting stored functions Press and hold the left and right button on the
interior rearview mirror simultaneously for ap‐
proximately 20 seconds until the LED flashes
rapidly. All stored functions are deleted. The
functions cannot be deleted individually.
Sun visor Glare shieldFold the sun visor down or up.
Vanity mirror A vanity mirror is located in the sun visor be‐
hind a cover. When the cover is opened, the
mirror lighting switches on.
Connecting electricaldevices
Hints Do not connect charging devices to the12 volt socket in the vehicle
Do not connect battery chargers to the fac‐
tory-installed 12 volt sockets in the vehicle as
this may damage the vehicle battery due to an
increased power consumption.◀
Replace the cover after use
Reinsert the lighter or socket cover after
use, otherwise objects may get into the lighter
socket or fixture and cause a short circuit.◀
Sockets
General information
The lighter socket can be used as a socket for
electrical equipment while the engine is run‐
ning or when the ignition is switched on.
Note
The total load of all sockets must not exceed 140 watts at 12 volts.
Do not damage the socket by using unsuitable
connectors.Seite 131Interior equipmentControls131
Online Edition for Part no. 01 40 2 960 891 - II/15
Page 155 of 224

The driving style is efficient as long as the ac‐
celerator pedal pointer is within the lower
range highlighted in blue during acceleration
and deceleration.
The energy recovery occurs during coasting
and braking and is displayed in the perform‐
ance display by the accelerator pedal indicator.
The accelerator pedal pointer is within the
CHARGE range.
Efficient energy recovery:
▷The accelerator pedal moves to the left
within the blue range of the CHARGE dis‐
play, arrow 1.▷The energy use while driving can be opti‐
mized by efficient acceleration.
Efficient acceleration:
▷The accelerator pedal moves to the right
within the blue range of the eDRIVE dis‐
play, arrow 2.▷Use deceleration during coasting as often
as possible for energy recovery.
Brake according to traffic and circum‐
stances
Brake in accordance with the traffic conditions,
or there is the risk of accident.◀
Using drive modes and assistance
systems
Max eDRIVE
Max eDRIVE, refer to page 64, forces electric
driving. Electric driving is especially efficient
for short distances, low to medium speeds and
in stop-and-go traffic.
SAVE battery
SAVE Battery, refer to page 64, conserves the
electric range for a later point in time. In this
case, the vehicle is driven primarily by the
combustion engine.
ECO PRO ECO PRO, refer to page 145, supports a driv‐
ing style that saves on fuel consumption. For
this purpose, the engine control and comfort
features, e. g. the climate control output, are
adjusted.
Discharge of the high-voltage battery Longer idle periods, refer to page 190, can re‐
duce the charging state of the high-voltage
battery.
Do not allow the vehicle to sit idle for ex‐
tended periods with a low charging state
Before storing the vehicle for an extended pe‐
riod, check the battery charge indicator to en‐
sure that the high-voltage battery is fully
charged. During the idle period, connect the
vehicle to a charging station at a suitable
charging location. If necessary, the high-volt‐
age battery will be charged automatically.
Make sure that the charging process takes
place. Regularly check the charging state.
Don't allow battery charge status to drop too
low - it will damage the battery.◀
General driving notes
Closing the tailgate Drive with the tailgate closed
Only drive with the tailgate closed; other‐
wise, in the event of an accident or braking and
evasive maneuvers, passengers and other traf‐Seite 139Things to remember when drivingDriving tips139
Online Edition for Part no. 01 40 2 960 891 - II/15