2015 BMW I8 garage door opener
[x] Cancel search: garage door openerPage 145 of 224
Interior equipmentVehicle features and optionsThis chapter describes all standard, country-
specific and optional features offered with the
series. It also describes features that are not
necessarily available in your car, e. g., due to
the selected options or country versions. This
also applies to safety-related functions and
systems. The respectively applicable country
provisions must be observed when using the
respective features and systems.
Universal Integrated Remote Control
The concept The universal garage door opener can operate
up to 3 functions of remote-controlled sys‐
tems such as garage door drives or lighting
systems. The universal garage door opener re‐
places up to 3 different hand-held transmitters.
To operate the remote control, the buttons on
the interior rearview mirror must be program‐
med with the desired functions. The hand-held
transmitter for the particular system is required
in order to program the remote control.
During programming
During programming and before activat‐
ing a device using the universal garage door
opener, ensure that there are no people, ani‐
mals or objects in the area of the remote-con‐
trolled device; otherwise, there is a risk of in‐
jury or damage.
Also follow the safety instructions of the hand-
held transmitter.◀
Before selling the vehicle, delete the stored
functions for the sake of security.Compatibility
If this symbol is printed on the packag‐
ing or in the instructions of the system
to be controlled, the system is gener‐
ally compatible with the universal garage door opener.
If you have any questions, please contact:▷Your service center.▷www.homelink.com on the Internet.
HomeLink is a registered trademark of Gentex
Corporation.
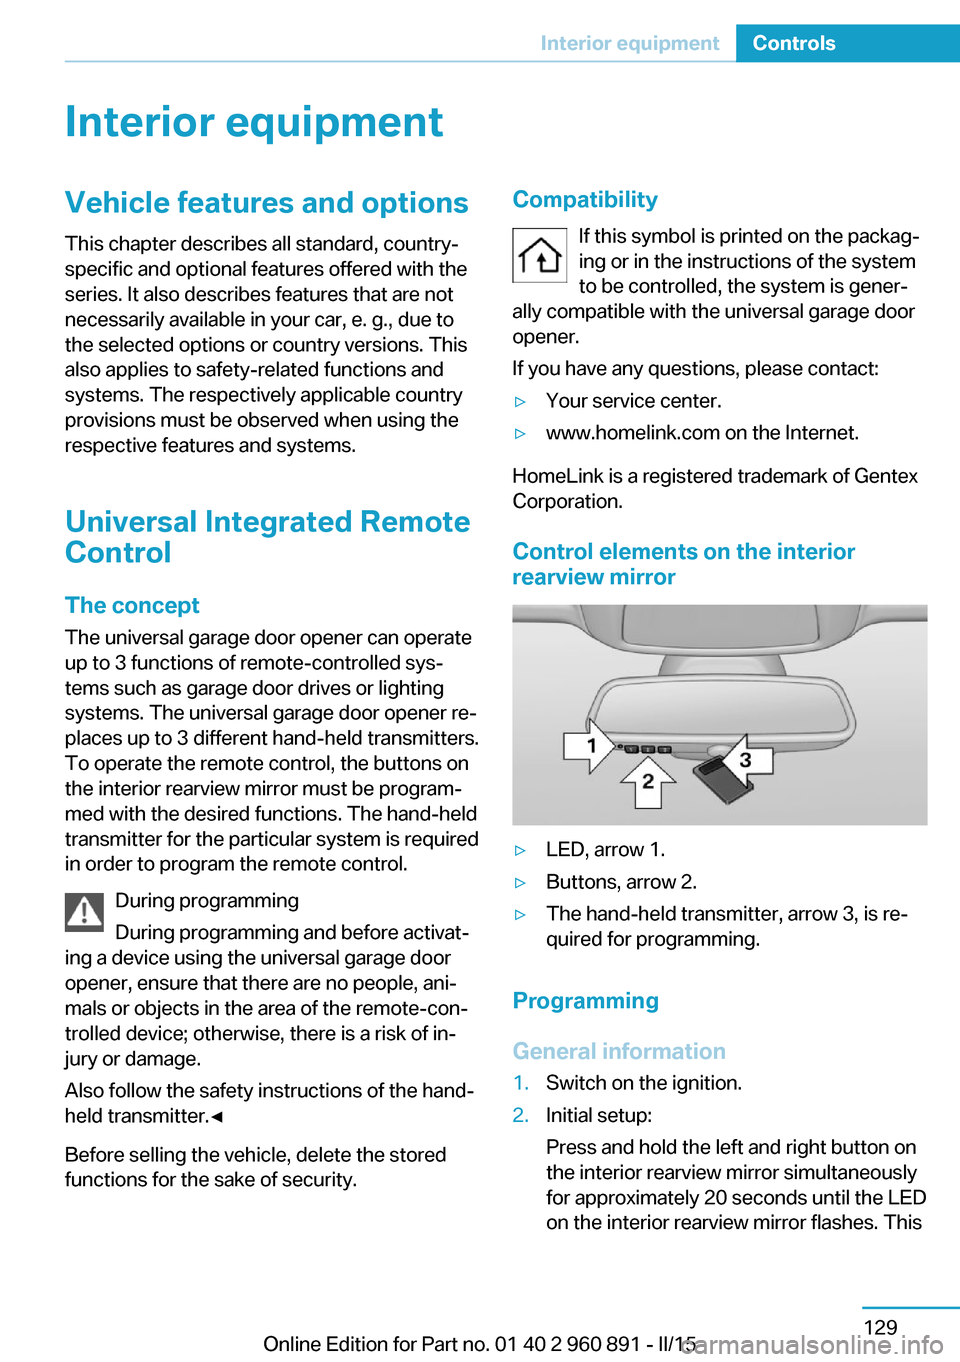
Control elements on the interior
rearview mirror
▷LED, arrow 1.▷Buttons, arrow 2.▷The hand-held transmitter, arrow 3, is re‐
quired for programming.
Programming
General information
1.Switch on the ignition.2.Initial setup:
Press and hold the left and right button on
the interior rearview mirror simultaneously
for approximately 20 seconds until the LED
on the interior rearview mirror flashes. ThisSeite 129Interior equipmentControls129
Online Edition for Part no. 01 40 2 960 891 - II/15
Page 146 of 224
erases all programming of the buttons on
the interior rearview mirror.3.Hold the hand-held transmitter for the sys‐
tem to be controlled approx. 1 to 3 in/2.5 to
8 cm away from the buttons of the interior
rearview mirror. The required distance de‐
pends on the manual transmitter.4.Simultaneously press and hold the button
of the desired function on the hand-held
transmitter and the button to be program‐
med on the interior rearview mirror. The
LED on the interior rearview mirror will be‐
gin flashing slowly.5.Release both buttons as soon as the LED
flashes more rapidly. The LED flashing
faster indicates that the button on the inte‐
rior rearview mirror has been programmed.
If the LED does not flash faster after at
least 60 seconds, change the distance be‐
tween the interior rearview mirror and the
hand-held transmitter and repeat the step.
Several more attempts at different distan‐
ces may be necessary. Wait at least
15 seconds between attempts.
Canada: if programming with the hand-
held transmitter was interrupted, hold
down the interior rearview mirror button
and repeatedly press and release the
hand-held transmitter button for 2 sec‐
onds.6.To program other functions on other but‐
tons, repeat steps 3 to 5.
The systems can be controlled using the inte‐
rior rearview mirror buttons.
Special feature of the alternating-
code wireless system
If you are unable to operate the system after
repeated programming, please check if the
system to be controlled features an alternat‐
ing-code system.
Read the system's operating manual, or press
the programmed button on the interior rear‐
view mirror longer. If the LED on the interior
rearview mirror starts flashing rapidly and then
stays lit constantly for 2 seconds, the system
features an alternating-code system. Flashing
and continuous illumination of the LED will re‐
peat for approximately 20 seconds.
For systems with an alternating-code system,
the universal garage door opener and the sys‐
tem also have to be synchronized.
Please read the operating manual to find out how to synchronize the system.
Synchronizing is easier with the aid of a sec‐
ond person.
To synchronize:1.Park the vehicle within range of the re‐
mote-controlled system.2.Program the relevant button on the interior
rearview mirror as described.3.Locate and press the synchronizing button
on the system being programmed. You
have approx. 30 seconds for the next step.4.Hold down the programmed button on the
interior rearview mirror for approximately
3 seconds and then release it. If necessary,
repeat this step up to three times in order
to finish synchronization. Once synchroni‐
zation is complete, the programmed func‐
tion will be carried out.
Reprogramming individual buttons
1.Switch on the ignition.2.Press and hold the interior rearview mirror
button to be programmed.3.As soon as the interior rearview mirror LED
starts flashing slowly, hold the hand-held
transmitter for the system to be controlled
approx. 1 to 3 in/2.5 to 8 cm away from the
buttons of the interior rearview mirror. The
required distance depends on the manual
transmitter.Seite 130ControlsInterior equipment130
Online Edition for Part no. 01 40 2 960 891 - II/15
Page 147 of 224
4.Likewise, press and hold the button of the
desired function on the hand-held trans‐
mitter.5.Release both buttons as soon as the inte‐
rior rearview mirror LED flashes more rap‐
idly. The LED flashing faster indicates that
the button on the interior rearview mirror
has been programmed. The system can
then be controlled by the button on the in‐
terior rearview mirror.
If the LED does not flash faster after at
least 60 seconds, change the distance and
repeat the step. Several more attempts at
different distances may be necessary. Wait
at least 15 seconds between attempts.
Canada: if programming with the hand-
held transmitter was interrupted, hold
down the interior rearview mirror button
and repeatedly press and release the
hand-held transmitter button for 2 sec‐
onds.
Controls
Before operation
Before operating a system using the uni‐
versal garage door opener, ensure that there are no people, animals, or objects within the
range of movement of the remote-controlled
system; otherwise, there is a risk of injury or
damage.
Also follow the safety instructions of the hand-
held transmitter.◀
The system, such as the garage door, can be
operated using the button on the interior rear‐
view mirror while the engine is running or when
the ignition is started. To do this, hold down
the button within receiving range of the system
until the function is activated. The interior rear‐ view mirror LED stays lit while the wireless sig‐
nal is being transmitted.
Deleting stored functions Press and hold the left and right button on the
interior rearview mirror simultaneously for ap‐
proximately 20 seconds until the LED flashes
rapidly. All stored functions are deleted. The
functions cannot be deleted individually.
Sun visor Glare shieldFold the sun visor down or up.
Vanity mirror A vanity mirror is located in the sun visor be‐
hind a cover. When the cover is opened, the
mirror lighting switches on.
Connecting electricaldevices
Hints Do not connect charging devices to the12 volt socket in the vehicle
Do not connect battery chargers to the fac‐
tory-installed 12 volt sockets in the vehicle as
this may damage the vehicle battery due to an
increased power consumption.◀
Replace the cover after use
Reinsert the lighter or socket cover after
use, otherwise objects may get into the lighter
socket or fixture and cause a short circuit.◀
Sockets
General information
The lighter socket can be used as a socket for
electrical equipment while the engine is run‐
ning or when the ignition is switched on.
Note
The total load of all sockets must not exceed 140 watts at 12 volts.
Do not damage the socket by using unsuitable
connectors.Seite 131Interior equipmentControls131
Online Edition for Part no. 01 40 2 960 891 - II/15
Page 217 of 224

External temperature warn‐ing 83
F Failure message, see Check Control 79
False alarm, refer to Uninten‐ tional alarm 48
Fan, refer to Air flow 126
Filler neck for engine oil 175
First aid kit 184
Fitting for towing, see Tow fit‐ ting 185
Flat tire, changing wheels 181
Flat tire, Tire Pressure Moni‐ tor TPM 99
Flat tire, warning lamp 100
Flooding 140
Floor carpet, care 189
Floor mats, care 189
Fold-out position, wiper 70
Foot brake 140
Front airbags 96
Front armrest 134
Front beverage holder, front cup holder 135
Front bottle holder, refer to Front cup holder 135
Front can holder, refer to Front cup holder 135
Front cup holder 135
Front-end collision warning with City Braking func‐
tion 103
Front holder for bever‐ ages 135
front-seat passenger airbags, automatic deactivation 98
Front-seat passenger airbags, indicator lamp 98
Fuel 161
Fuel consumption, current 87 Fuel consumption, refer to
Average fuel consump‐
tion 87
Fuel filler flap 158
Fuel gauge 82
Fuel lid 158
Fuel quality 161
Fuel recommendation 161
Fuel, tank capacity 195
Fuse 182
G
Garage door opener, refer to Universal Integrated Remote
Control 129
Gasoline 161
Gear change, Steptronic Sport transmission 71
Gear shift indicator 85
Gearshift, see Steptronic Sport transmission 70
General driving notes 139
Glare shield 131
Glove compartment 134
GPS location, vehicle posi‐ tion 90
Gross vehicle weight, ap‐ proved 195
H
Handbrake, refer to parking brake 66
Hand-held transmitter, alter‐ nating code 130
Hazard warning flashers 183
Head airbags 96
Headlight control, auto‐ matic 93
Headlight courtesy delay fea‐ ture 92
Headlight courtesy delay fea‐ ture, remote control 47
Headlight courtesy delay fea‐ ture via remote control 42 Headlight flasher 68
Headlight glass 180
Headlights, care 188
Head restraints 51
Head restraints, front 54
Head-up Display 90
Head-up Display, care 190
Heavy cargo, stowing 143
Height, vehicle 194
High-beam Assistant 94
High beams 68
High beams/low beams, refer to High-beam Assistant 94
High-voltage battery, charg‐ ing state indicator 77
High-voltage battery, dis‐ charge 139
High-voltage system, auto‐ matic deactivation 34
High-voltage system, contact with water 34
High-voltage system, safety 34
Hills 141
Hill start assistant, refer to Drive-off assistant 112
Hints 6
Homepage 6
Hood 44
Horn 14
Hot exhaust system 140
HUD Head-up Display 90
Hybrid system, adapting to the course of the road 79
Hybrid system, displays 77
Hydroplaning 140
I Ice warning, see External temperature warning 83
Icy roads, see External tem‐ perature warning 83
Identification marks, tires 164 Seite 201Everything from A to ZReference201
Online Edition for Part no. 01 40 2 960 891 - II/15