2015 BMW I8 turn signal
[x] Cancel search: turn signalPage 31 of 224

Turn signal 67High beams, head‐
light flasher 67High-beam Assistant 94Roadside parking lights 93On-board computer 879Shift paddles 7310Steering wheel buttons, leftStore speed 113Resume speed 114Cruise control on/off, interrupt‐
ing 113Cruise control rocker switch 11411Instrument cluster 7512Steering wheel buttons, rightEntertainment sourceVolumeVoice activation 26TelephoneThumbwheel for selection lists 8613Right steering column stalkWiper 68Rain sensor 69Clean the windshields and head‐
lights 6914Horn, total area15Adjust steering wheel 56Seite 15CockpitAt a glance15
Online Edition for Part no. 01 40 2 960 891 - II/15
Page 39 of 224

Additional symbolsSymbolMeaning Spoken instructions are turned off. Check the current vehicle position.
Split screen
General information Additional information can be displayed on the
right side of the split screen, e.g., information
from the on-board comupter.
In the divided screen view, the so-called split
screen, this information remains visible even when you change to another menu.
Switching the split screen on and off On the Control Display:
1. Press button.2."Split screen"
Selecting the display
On the Control Display:
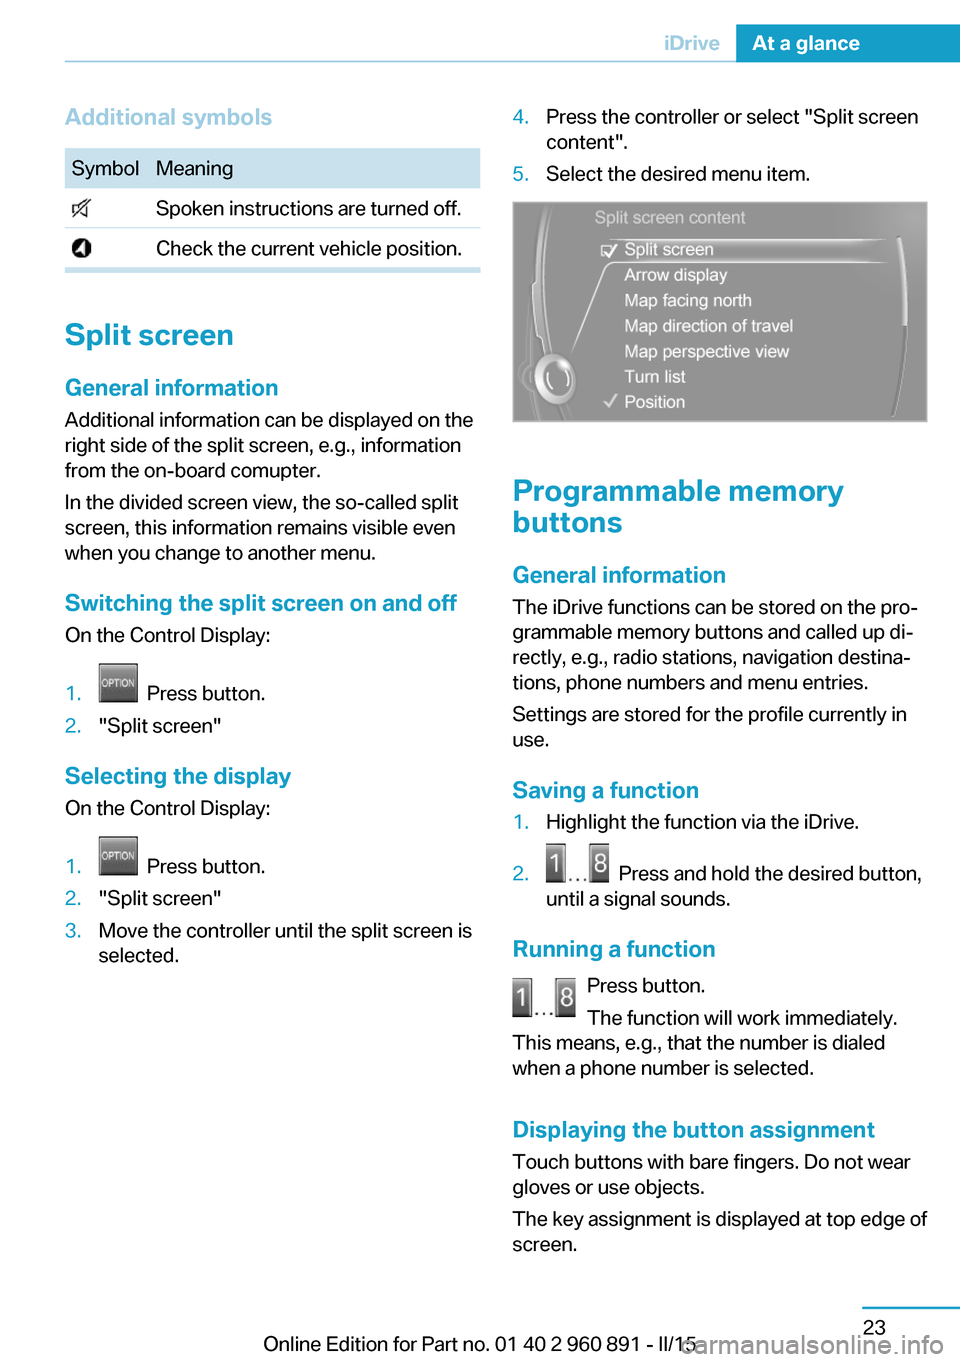
1. Press button.2."Split screen"3.Move the controller until the split screen is
selected.4.Press the controller or select "Split screen
content".5.Select the desired menu item.
Programmable memory
buttons
General information
The iDrive functions can be stored on the pro‐
grammable memory buttons and called up di‐
rectly, e.g., radio stations, navigation destina‐
tions, phone numbers and menu entries.
Settings are stored for the profile currently in
use.
Saving a function
1.Highlight the function via the iDrive.2. Press and hold the desired button,
until a signal sounds.
Running a function
Press button.
The function will work immediately.
This means, e.g., that the number is dialed
when a phone number is selected.
Displaying the button assignment Touch buttons with bare fingers. Do not wear
gloves or use objects.
The key assignment is displayed at top edge of
screen.
Seite 23iDriveAt a glance23
Online Edition for Part no. 01 40 2 960 891 - II/15
Page 79 of 224

Lighting lights up steady blue
After drive readiness is switched on, light turns
blue. The vehicle is ready to drive. The READY
indicator lights up in the instrument cluster. In
addition, a signal sounds.
Lighting off
Drive readiness, operating readiness and
radio-ready state are turned off. The vehicle is
in the idle state. The charging cable may be
connected.
Activating drive readiness1.Close the driver's door.2.Depress the brake pedal.3.Press the Start/Stop button.
Drive readiness is active, electric driving, Silent
Start or Start of the combustion engine.
Electric drive readiness, Silent Start
The vehicle is ready for driving without starting
the combustion engine.
Silent Start is possible if the requirements for
Electric driving, refer to page 64, are met.
Display READY indicates drive readi‐
ness.
Starting the combustion engine Enclosed areas
Do not let the engine run in enclosed
areas, since breathing in exhaust fumes may
lead to loss of consciousness and death. The
exhaust gases contain carbon monoxide, an
odorless and colorless but highly toxic gas.◀
Unattended vehicle
Do not leave the vehicle unattended with
engine running or drive readiness switched on;
otherwise, it may pose a risk.
Before leaving the vehicle, engage lever in po‐
sition P P, and set the parking brake; other‐
wise, the vehicle is not secured against rolling
away.◀
Repeated starting in quick succession
Avoid trying to start the vehicle repeat‐
edly and in quick succession. Otherwise, the
fuel is not burned or is inadequately burned,
posing a risk of overheating and damage to the
catalytic converter.◀
The combustion engine is started with Acti‐
vate drive, refer to page 63, readiness under
the following conditions:▷The temperature of the hybrid system is
too high.▷The charge level or temperature of the
high-voltage battery is too low.
Driving away
1.Activate drive readiness.2.Apply the brake and engage lever in posi‐
tion P D, SPORT or R.3.Release the parking brake.4.Drive away.
Deactivating drive readiness
After parking the vehicle, you may hear noises due to operation of the hybrid system, such as
for cooling of the high-voltage battery.
After stopping the vehicle:
1.Depress the brake pedal.2.Set the parking brake.3.Press the Start/Stop button.
The READY indicator goes out and a signal
sounds. In case of longer idle times, follow the
instructions in the Care chapter, refer to
page 190.
Seite 63DrivingControls63
Online Edition for Part no. 01 40 2 960 891 - II/15
Page 83 of 224

If the vehicle is slowed down down to a speed
of approx. 2 mph/3 km/h the parking brake is
set.
Releasing
With drive readiness switched on:
Press the reel while stepping on the
brake pedal or selector lever position P is
set.
The LED and indicator lamp go out.
The parking brake is released.
Automatic release For automatic release, step on the accelerator
pedal.
The LED and indicator lamp go out.
The parking brake is automatically released
when you step on the accelerator:▷Drive readiness switched on.▷Drive mode engaged.▷Driver buckled in and doors closed.
Inadvertent operation of the accelerator
pedal
Make sure that the accelerator pedal is not op‐
erated unintentionally; otherwise, the vehicle is
set in motion and there is a risk of an acci‐
dent.◀
Malfunction In the event of a failure or malfunction of the
parking brake, secure the vehicle against roll‐
ing using a wheel chock, e.g., when leaving it.
After a power failure
Putting the parking brake into
operation
1.Switch on the ignition.2. Press the reel while stepping on the
brake pedal or selector lever position P is
set.
It may take several seconds for the brake to be
put into operation. Any sounds associated with
this are normal.
The indicator lamp in the instrument
cluster goes out as soon as the parking
brake is ready for operation.
Turn signal, high beams,
headlight flasher
Turn signal
Hints Do not adjust the exterior mirrors
Do not adjust the exterior mirror while
driving and when turn signals/hazard warning
flashers are on, or else the additional turn sig‐
nal lights in the exterior mirror are out of posi‐
tion and can't be seen.◀
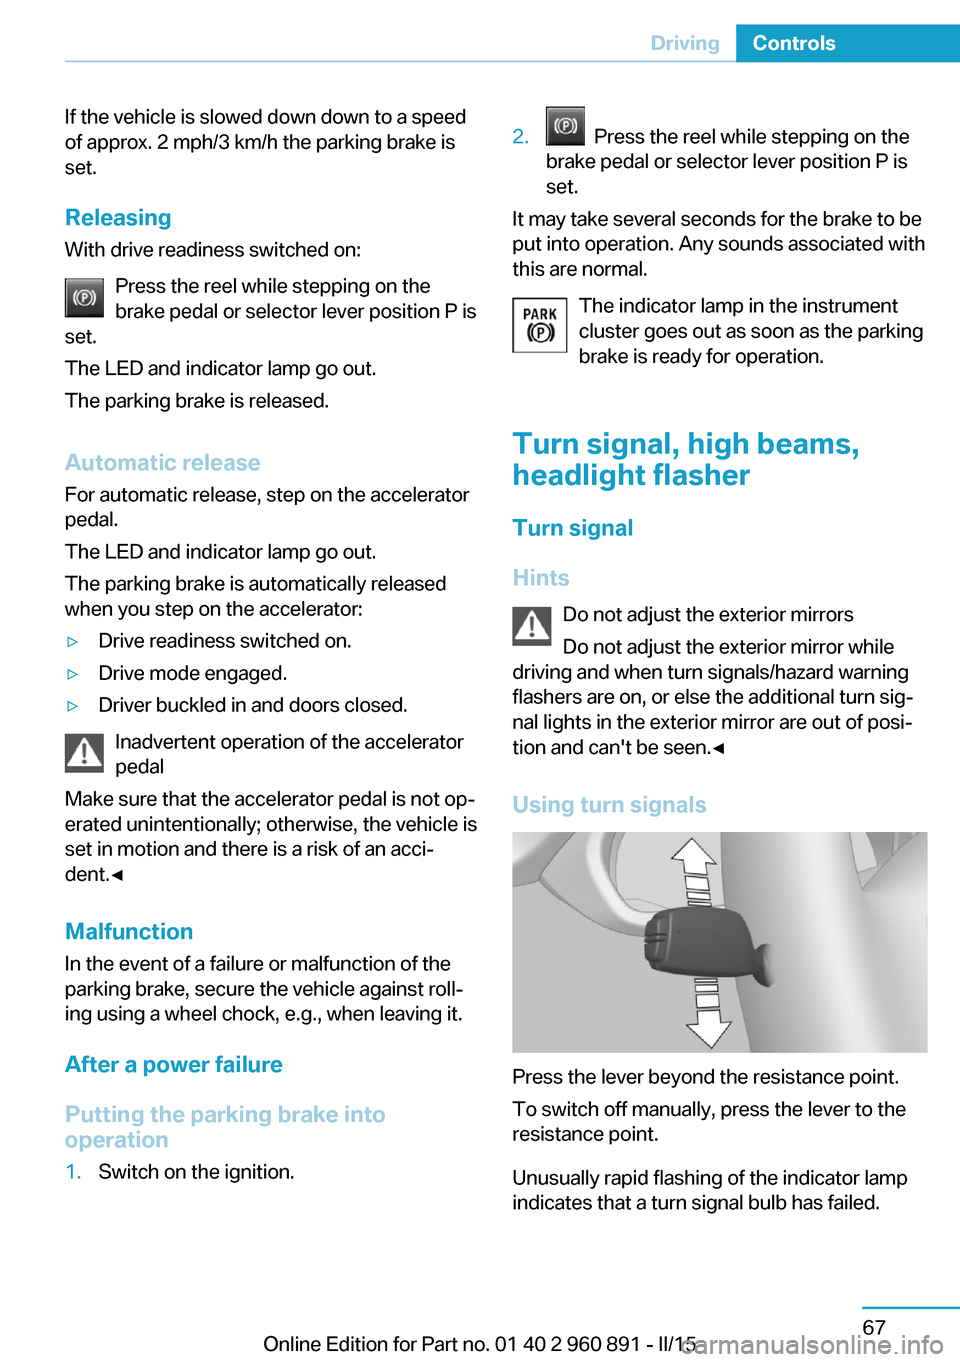
Using turn signals
Press the lever beyond the resistance point.
To switch off manually, press the lever to the
resistance point.
Unusually rapid flashing of the indicator lamp
indicates that a turn signal bulb has failed.
Seite 67DrivingControls67
Online Edition for Part no. 01 40 2 960 891 - II/15
Page 84 of 224

Triple turn signal activationPress the lever to the resistance point.
The turn signal flashes three times.
The function can be activated or deactivated.
On the Control Display:1."Settings"2."Lighting"3."Triple turn signal"
Settings are stored for the profile currently in
use.
Signaling briefly
Press the lever to the resistance point and hold
it there for as long as you want the turn signal
to flash.
High beams, headlight flasher
▷High beams, arrow 1.▷Headlight flasher, arrow 2.
Washer/wiper system Switching the wipers on/off and brief
wipe
Hints Do not activate wipers if frozen to wind‐
shield
Do not switch on the wipers if they are frozen
to the windshield; otherwise, the wiper blades
and the wiper motor may be damaged.◀
Do not activate wipers on dry windshield
Do not use the wipers if the windshield is
dry, as this may damage the wiper blades or
cause them to become worn more quickly.◀
Switching on
Push wiper lever up.
The lever automatically returns to its initial po‐
sition when released.
▷Normal wiper speed: push up once.
The wipers switch to intermittent operation
when the vehicle is stationary.▷Fast wiper speed: press up twice or press
once beyond the resistance point.
Wipers change to normal speed when ve‐
hicle comes to standstill.
Switch off and brief wipe
Push wiper lever down.
The lever automatically returns to its initial po‐
sition when released.
▷Single wipe: press down once.▷To switch off normal wipe: press down
once.Seite 68ControlsDriving68
Online Edition for Part no. 01 40 2 960 891 - II/15
Page 97 of 224

ing the area of the interference, the system
automatically becomes active again.▷TPM could not conclude the reset: perform
the reset of the system again.▷A wheel without TPM electronics is fitted:
have the service center check it if needed.▷Malfunction: have the system checked by
your service center.
For more information, see Tire Pressure Moni‐
tor, refer to page 99.
Steering system Steering system in some cases defec‐
tive.
Have the steering system checked by
the service center.
Engine functions Have the vehicle checked by the serv‐ice center.
For additional information, refer to On-
board Diagnostics socket, refer to page 179.
Acoustic pedestrian protection inactive Acoustic pedestrian protection possi‐
bly defective.
Have the system checked by the serv‐
ice center.
Green lights Turn signal Turn signal on.
Unusually rapid flashing of the indicator
lamp indicates that a turn signal bulb
has failed.
For additional information, refer to Turn signal, refer to page 67.
Parking lights, headlight control
Parking lights or headlights are acti‐
vated.
For additional information, refer to
Parking lights/low beams, headlight control, re‐
fer to page 92.
High-beam Assistant High-beam Assistant is switched on.
High beams are activated and off auto‐
matically as a function of the traffic sit‐
uation.
For additional information, refer to High-beam
Assistant, refer to page 94.
Cruise control The system is switched on. It maintains
the speed that was set using the con‐
trol elements on the steering wheel.
Blue lights
High beams High beams are activated.
For additional information, refer to High
beams, refer to page 68.
General lamps
Check Control At least one Check Control message is
displayed or is stored. The symbol is
shown in the display of the instrument
cluster.
Text messagesText messages in combination with a symbol
in the instrument cluster explain a Check Con‐ trol message and the meaning of the indicator
and warning lights.Seite 81DisplaysControls81
Online Edition for Part no. 01 40 2 960 891 - II/15
Page 98 of 224

Supplementary text messages
Additional information, such as on the cause of
an error or the required action, can be called up
via Check Control.
With urgent messages the added text will be
automatically displayed on the Control Display.
Symbols
Depending on the Check Control message, the
following functions can be selected.▷ "Owner's Manual"
Display additional information about the
Check Control message in the Integrated
Owner's Manual.▷ "Service request"
Contact your service center.▷ "Roadside Assistance"
Contact Roadside Assistance.
Hiding Check Control messages
Press the onboard computer button on the
turn signal lever.
▷Some Check Control messages are dis‐
played continuously and are not cleared
until the malfunction is eliminated. If sev‐
eral malfunctions occur at once, the mes‐
sages are displayed consecutively.
These messages can be faded for approx.
8 seconds. After this time, they are dis‐
played again automatically.▷Other Check Control messages are faded
automatically after approx. 20 seconds.They are stored and can be displayed
again later.
Displaying stored Check Control
messages
On the Control Display:
1."Vehicle info"2."Vehicle status"3. "Check Control"4.Select the text message.
Messages after trip completion Special messages displayed while driving are
displayed again after drive readiness is
switched off.
Fuel gauge
Vehicle tilt position may cause the display to
vary.
Hints on refueling, refer to page 158.
Tachometer The tachometer is only available in the Sport
program.
Always avoid engine speeds in the red warning
field. In this range, the fuel supply is inter‐
rupted to protect the engine.
Seite 82ControlsDisplays82
Online Edition for Part no. 01 40 2 960 891 - II/15
Page 99 of 224

Engine oil temperatureIf the engine oil along with the engine becomes
too hot, a Check Control message is displayed.
Coolant temperature If the coolant along with the engine becomes
too hot, a Check Control message is displayed.
Check the coolant level, refer to page 177.
Odometer and trip odometer
Display▷Odometer, scope of the computer, refer to
page 87.▷Trip odometer, lower right display in the in‐
strument cluster.
Show/reset kilometers
Press the knob.
▷With operating readiness
turned off, the time, the ex‐
ternal temperature and the
odometer are displayed.▷When operating readiness is switched on,
the trip odometer is reset.
External temperature
If the indicator drops to +37 ℉/+3 ℃ or lower, a
signal sounds.
A Check Control message is displayed.
There is an increased risk of ice on roads.
Ice on roads
Even at temperatures above
+37 ℉/+3 ℃, roads might be icy.
Therefore, drive carefully on bridges and
shaded roads, e.g., to avoid the increased risk
of an accident.◀
Time
The time is displayed in the instrument cluster.
Setting the time and time format, refer to
page 89.
Date
The date is displayed in the computer.
Setting the date and date format, refer to
page 89.
Range Display
The following information about the range is
displayed:
▷Fill level bars of the fuel gauge, arrow 1.▷Charging state of the high-voltage battery,
arrow 2.▷Range for electric driving, arrow 3.▷Total range from fuel supply and electric
range, arrow 4.
Two Check Control messages indicate a lim‐
ited total range.
The range display is dynamic and is influenced
by several factors, such as driving style.
Refuel promptly
Refuel no later than at a range of
30 miles/50 km or engine operation might fail
and damage might occur.◀
Seite 83DisplaysControls83
Online Edition for Part no. 01 40 2 960 891 - II/15