2015 AUDI TT ROADSTER engine overheat
[x] Cancel search: engine overheatPage 13 of 244

Instrument s and warning /indicator lights 11
Digital clock with date display
Your vehicle is equipped with a quartz con
trolled digital clock .
Fig. 4 In str um en t cl uste r w it h t he dig ita l cloc k
To set the hour
.. Pull the knob (hou r d isp lay flashes) and turn
i t to the left o r right.
To set the minutes
.. Pull the knob as ma ny times as necessary
un til the mi nute display flash es.
.. Turn the knob to the left or right .
To set the date
.. Pull the knob as many times as necessary
unt il the day, month or year display flashes.
.. Turn the knob to the left or right .
To hide or d isplay the date
.. Pull the knob as many times as necessary
unti l the date display flashes.
.. Turn the knob to the left or right.
When the date disp lay stops blinking, this
means the time and date have been success
fu lly stored.
W ith the ignition off, pushing or pulling the
Set/Check button¢
page 10, fig . 3@ can
turn on the dis play f ie ld lighting for a few sec
onds .
Engine coolant temperature gauge
The engine coo la nt gauge ¢ page 10 , fig. 3@
only works when the ign ition is on. To prevent
damage to your e ngine, please note the fo l
l owing important points:
Engine cold
As long as the nee dle rem ains a t the left end
of the gauge, the engine s till h as not reac hed
its operating temperat ure. Avoid high engine
speeds, heavy engine loads and heavy throt
tle.
Normal temperature
W hen the engine has re ache d its ope rat ing
temperature, the need le w ill move into the
mid dle of t he gauge and rema in there .
If the
engine is working hard at high outside tem
peratures, the needle may turn fu rther to the
right. This is no cause for concern as long as
the . warning light in the instrument cluster
does not illuminate .
When the. warning light sta rts to flash,
th is can mean one of two things: either the
coolant
temperature is too high, o r the coo l
ant
level is too low ¢ page 17 .
A WARNING
--Always obs erv e th e war ning in
¢ page 164 before openi ng the eng ine
h o od and che ck ing t he e ngine coolant
leve l.
- N ever open t he eng ine hood if you see or
he ar steam, or if you see engi ne coo lant
drippin g from t he en gine compar tment .
You could burn yourse lf . Let the engi ne
coo l off fi rst until yo u can n o longe r see
or hea r steam or coolant escap ing.
(D Note
- M ounting ad ditiona l lights or accessories
i n fr ont of the air inlets reduces the coo l
ing effect of t he radiato r. At high o utsi de
tempe rat ures or h igh engine load, the
eng ine could overheat.
- The front spoiler has been designed to
properly d istribute the cooling a ir when
the vehicle is movi ng. If the spoiler is
damaged, this could reduce the coo ling
e ff ect a nd th e eng ine could then ove r
heat . As k yo ur au thori zed A udi deal er for
a ssis tan ce.
Page 14 of 244

12 Instruments and warning/indicator lights
Fuel gauge
The fuel gauge works only when the ignition is
on . When the needle reaches the red area, the
warning light in the instrument cluster will il
luminate ¢
page 20 Ill Time to refuel!
The total tank capacity of your veh icle is listed
in
¢ page 223
CD Note
Never run the tank completely dry! An ir
regula r supply of fue l can cause engine
m isfiri ng and fuel could enter into the ex
haust system. The catalyt ic converter
could then overheat and be damaged.
Speedometer with odometer
The speedometer shows you the vehicle
speed , and the odometer shows you how
many miles (kilometers) you have driven.
Fig . S Spee domete r close -up: odometer display
The dis tance driven is shown in miles (USA
models) or in kilometers (Canada models) .
Lower odometer
The lower odometer shows the total number
of miles (kilometers) driven.
Upper odometer (trip odometer)
The upper odometer shows the total number
of mi les (kilometers) driven since you last re
set the odometer back to zero. You can use
this odometer wh en you want to keep track of
how many miles (kilometers) you have driven
for a sing le trip or errand. The last digit indi
ca tes 1/10 of a mile (100 me ters). You can se t the trip odometer
back to zero by pressing the
reset button
¢ fig. 5.
With the ign ition off, pushing of the Set/
Check button ¢
page 10, fig . 3 ® can turn on
the display fie ld lighting for a few seconds.
Malfunction message
If there is a malfunct ion somewhere in the in
strument cluster,
dEF will appear in the trip
odometer and will stay on. Contact your au
thorized Audi dea ler to have the problem cor
rected.
Immobilizer
When the ignition is sw itched on, the data on
the ignition key are scanned automat ically .
If an unauthor ized key was used,
SAFE is dis
played continuously in the odometer display
field . The vehicle cannot be operated
¢ page 33.
Warning/indicator
Lights
Description
T he ind icator lights in the instrument cluster
blink or turn on . They indicate funct ions or
malfunctions ¢
,&.
Messages may appear with some indicator
lights . The messages turn
off after a short
time . To display a message again, press the
Set/Check button¢
page 10, fig . 3 ® · If
there is more than one ma lfunction, the indi
cator lights will turn on one after the other for
approximat ely two seconds each.
Some indicators lights in the display can turn
on in severa l colors.
A WARNING
=
- Failure to heed warning lights and other
important vehicle information may result
in ser ious personal in jury or vehicle dam
age.
- Whenever stalled or stopped for repair,
move the vehicle a safe distance
off the
Page 15 of 244

Instrument s and warnin g/indic ator ligh ts 13
road, stop the engine, and turn on the
emergency flasher¢
page 51.
-The engine com partment of any motor
vehicle is a potentially hazardous area.
Before you check anything in the engine
compartment, stop the engine and let it
cool down. Always exercise extreme cau
t ion when wor king under the hood
¢ page 164, Working in the engine
compartment
@ Tips
Ma lfunctions or faults w ill be identified e i
ther with a red symbo l (pr iority 1 -Dan
ge r!) o r with a ye llow symbol (pr iority 2 -
Warn ing).
Overview
Some ind icator lights turn on briefly to check
the function of that system when yo u switch
the ignition on. These systems are marked
with a./ in the following tab les. If one of
these ind icator lights does not turn on, there
is a malfunction in that system.
R ed indicator lights
Red symbols indicate a priority malfu nction -
Danger!
- P ull off the road.
- Stop t he vehicle.
- T urn off the engine .
- Check the ma lfunction ing system. Contact
you r authorized Aud i dealer o r a qualified
workshop for assistance .
USA models: Malfunction in the
brake system ¢
page 14
Canada models: Malfunction in
the b rake system ¢
page 14
USA model s: Airbag system ./
¢page 15
Canada models: Airbag system ./
¢page 15
Safety belt
¢page 16
Battery ./
¢page 16
Engine oil pressure too low
¢page 16
Engine coolant leve l too low/
engine coolant temperature too
h igh
¢ page 17
Elect ro-mechanical power assis t
¢page 17
Clutch is overheat ing
¢ page86
Yellow indicator lights
Ye llow symbo ls indicate a prior ity 2 malfunc
tion -Wa rning!
~ .,.,
OFF
ABS
(8)
"O~ I I ~ ,,
(D
TPMS
EPC
~
CHECK
Conver tible top
¢ page 17
Electro ni c Stabiliza tion Control
( E S C) ./ ¢
page 17
Elect ron ic Stabilization Control
( E SC) ./ ¢
page 17
USA models: anti-lock brake sys
t em (ABS) ./ defective
¢page 18
Canada models : anti-lock brake
system (ABS) ./ defective
¢page 18
Worn brake pads
¢page 19
Tire pressure too low
¢page 199
Tire pressure monitoring system
¢page 199
Electro ni c power control./
¢page 19
USA models : Malfunction Indica
to r Lamp (MIL)
¢page 19
Canada models : Malfunction Indi
cator Lamp (MIL)
¢ page 19
Engine speed limitat ion *
¢page 19
Check engine oi l level
¢page 19
Page 76 of 244
7 4 On the road
@ For the sake of the environment
To avoid unnecessary engine wear and to reduce exhaust emissions, do not let your
veh icle stand and warm up. Be ready to
drive off immediately after start ing your
veh icle. Maintain moderate speed until the
engine is comp letely warm. Remember,
the engine performs best at operating
temperature.
Stopping the engine
• Turn the ign ition key to position@
~ page 72, fig. 81.
&_ WARNING
-Never turn off the engine before the ve
hicle has come to a complete stop. The
full function of the brake booster and the
power steering is not guaranteed. You
must use more force to turn or brake if
necessary. Because you cannot steer and
brake as you usually would, this could
lead to crashes and serious injuries.
- The radiator fan can continue to run for
up to 10 minutes even after you have
turned off the engine and removed the
ignition key . The radiator fan can also
turn on again if the engine coolant heats up because of intense sunlight or heat
build-up in the engine compartment.
(D Note
Do not stop the engine immediate ly after
hard or extended driving. Keep the engine
running for approximately two minutes to
prevent excessive heat build-up.
Parking brake
Parking brake
When the parking brake is set, it prevents the
vehicle from rolling away unintentionally.
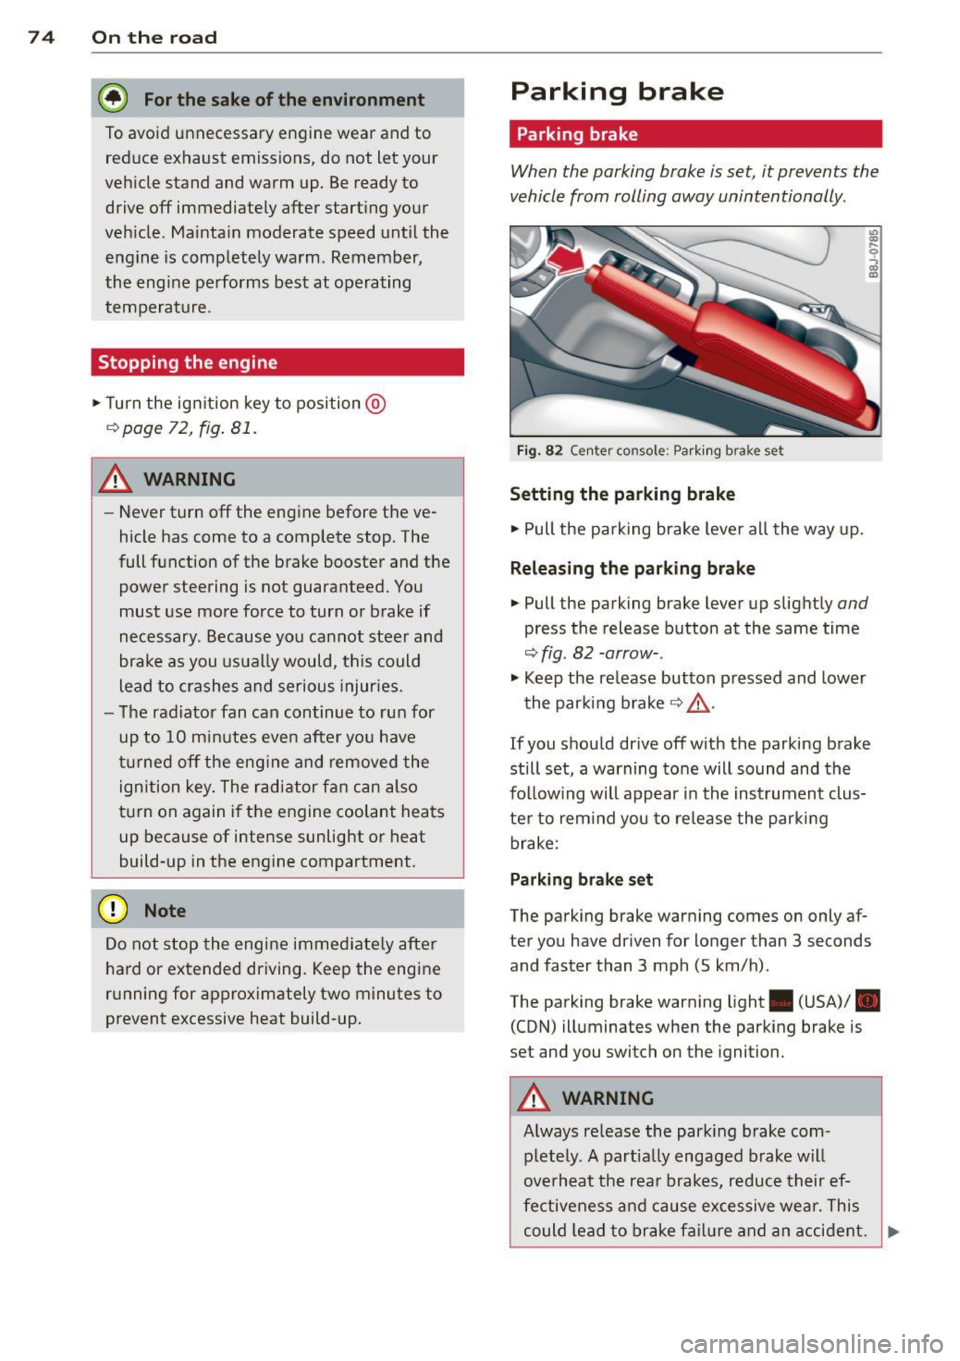
Fi g. 82 Center console: Park ing brake set
Setting the parking brake
• Pull the pa rking brake lever all the way up.
Releasing the parking brake
• Pull the parking brake lever up slightly and
press the release button at the same time
~fig. 82 -arrow-.
• Keep the release button pressed and lower
the parking brake~.&,.
If you should drive off with the parking brake
still set, a warning tone will sound and the
fol low ing will appear in the instrument clus
ter to remind you to release the parking
brake:
Parking brake set
The parking brake warning comes on only af
ter you have driven for longer than 3 seconds
and faster than 3 mph (5 km/h).
The parking brake warning light . (USA)/ .
(CON) illuminates when the parking brake is
set and you switch on the ignition.
&_ WARNING
Always release the park ing brake com-
pletely. A partially engaged brake will
overheat the rear brakes, reduce their ef
fectiveness and cause excessive wear. This
could lead to brake failure and an accident. .,..
Page 85 of 244
Driving Notes
The forward gears are shifted up or down au
tomatically.
--
-
-
-
-
-
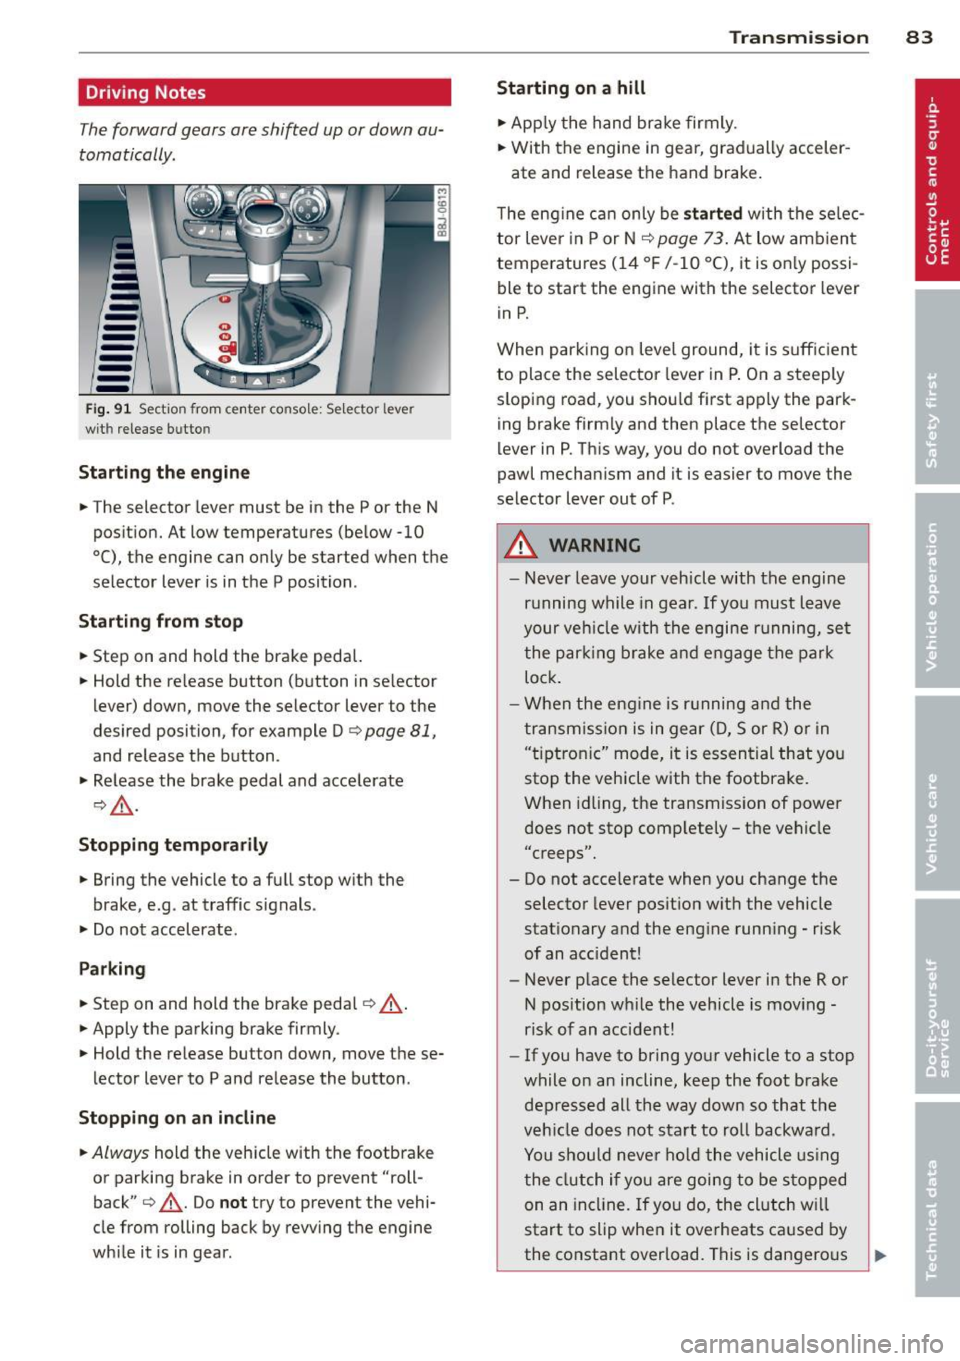
--Fig . 91 Sect io n from center co nsole: Sele ctor leve r
wit h release bu tto n
Starting the engine
.. The selector lever must be in the P or the N
position. At low temperatures (below -10
0 (), the engine can only be started when the
selector lever is in the P position .
Starting from stop
.. Step on and hold the brake pedal.
.. Hold the release button (button in se lector
lever) down, move the selector lever to the
desired position, for example D
c:> page 81,
and release the button .
.. Release the brake pedal and accelerate
¢,& .
Stopping temporarily
.. Bring the vehicle to a full stop with the
brake, e.g . at traffic signals .
.. Do not accelerate .
Parking
.. Step on and hold the brake pedal¢_& .
.. Apply the parking brake firmly.
.. Hold the release button down, move these
lector lever to P and release the button.
Stopping on an incline
.. Always hold the vehicle with the footbrake
or parking brake in order to prevent "roll
back"
¢ _& . Do not try to prevent the vehi
cle from rolling back by rewing the engine
while it is in gear.
Transmission 83
Starting on a hill
.. Apply the hand brake firmly.
.. With the engine in gear, gradually acceler-
ate and release the hand brake.
The engine can only be
started with the selec
tor lever in P or N
c:> page 7 3. At low amb ient
temperatures (14
°F /-10 °C), it is only possi
ble to start the engine with the selector lever
in P.
When parking on level ground, it is sufficient
to place the selector lever in P. On a steeply
sloping road, you should first apply the park
ing brake firmly and then place the selector
lever in P. This way, you do not overload the
pawl mechanism and it is easier to move the
selector lever out of P .
A WARNING
- Never leave your vehicle with the engine
running while in gear . If you must leave
your veh icle with the engine running, set
the parking brake and engage the park
lock .
- When the engine is running and the
transmission is in gear (D, Sor R) or in
"t iptroni c" mode, it is essential that you
stop the vehicle with the footbrake .
When idling, the transmission of power
does not stop completely - the vehicle
"creeps".
- Do not accelerate when you change the selector lever position with the vehicle
stationary and the engine running - risk
of an accident!
- Never place the selector lever in the R or
N position while the vehicle is moving -
risk of an accident!
- If you have to bring your vehicle to a stop
while on an incline, keep the foot brake depressed all the way down so that the
vehicle does not start to roll backward .
You should never hold the vehicle using
the clutch if you are going to be stopped
on an incline. If you do, the clutch w ill
start to slip when it overheats caused by
the constant overload. This is dangerous .,.
Page 88 of 244
86 Transmis sion
& WARNING ,-
- Always adapt your driving to the traffic
flow.
- Only use Launch Control when road and
traffic conditions allow it and other driv
ers will not be endangered or annoyed by
your driving and the acceleration of the
vehicle .
- Make sure that ESC remains enabled.
With the ESC disabled, the vehicle could
brake away, particularly on a slick and
slippery road - risk of skidding!
- Once acce lerat ion is finished, switch ASR
on again by briefly pushing the ESC but
ton.
(j) Tips
- The transmission temperature may in
crease significantly after using the Launch Control Program. If that hap
pens, the program may not be available
for a few minutes.
It will be available
again after a cool-down period.
- When accelerating using the Launch
Control program, all vehicle parts are
subject to heavy loads . This can result in
increased wear.
Back-up program
In the event of a system malfunction, there is
a back-up program.
In the event of system malfunction, the auto
matic transmission switches to the fail-safe
mode. Al l of the selector lever position dis
plays for the automatic transmission are high
lighted with a light background in the instru
ment cluster display . In some cases you can
not use reverse gear any more.
If the transmission switches to fail-safe mode, you should take the vehicle to an au
thorized Audi dealership as soon as possible
to have the condition corrected .
Clutch is overheating
• Clutch is overheating! Please stop vehi
cle!
If the symbols are illum inated, the clutch is
overheating and could be damaged if you con
t inu e to drive. Stop the vehicle and allow the
transmission to cool with the se lector lever in
the P position while the engine runs at idle. If
the warning does not turn off, do not continue driving. See your authorized Audi dealer or
qualified repair facility for assistance. Other
wise serious transmission damage could re
sult . Once the indicator light has turned off,
drive to your authorized Audi dealer or quali
fied repa ir facility immed iately to have the
malfunction corrected .
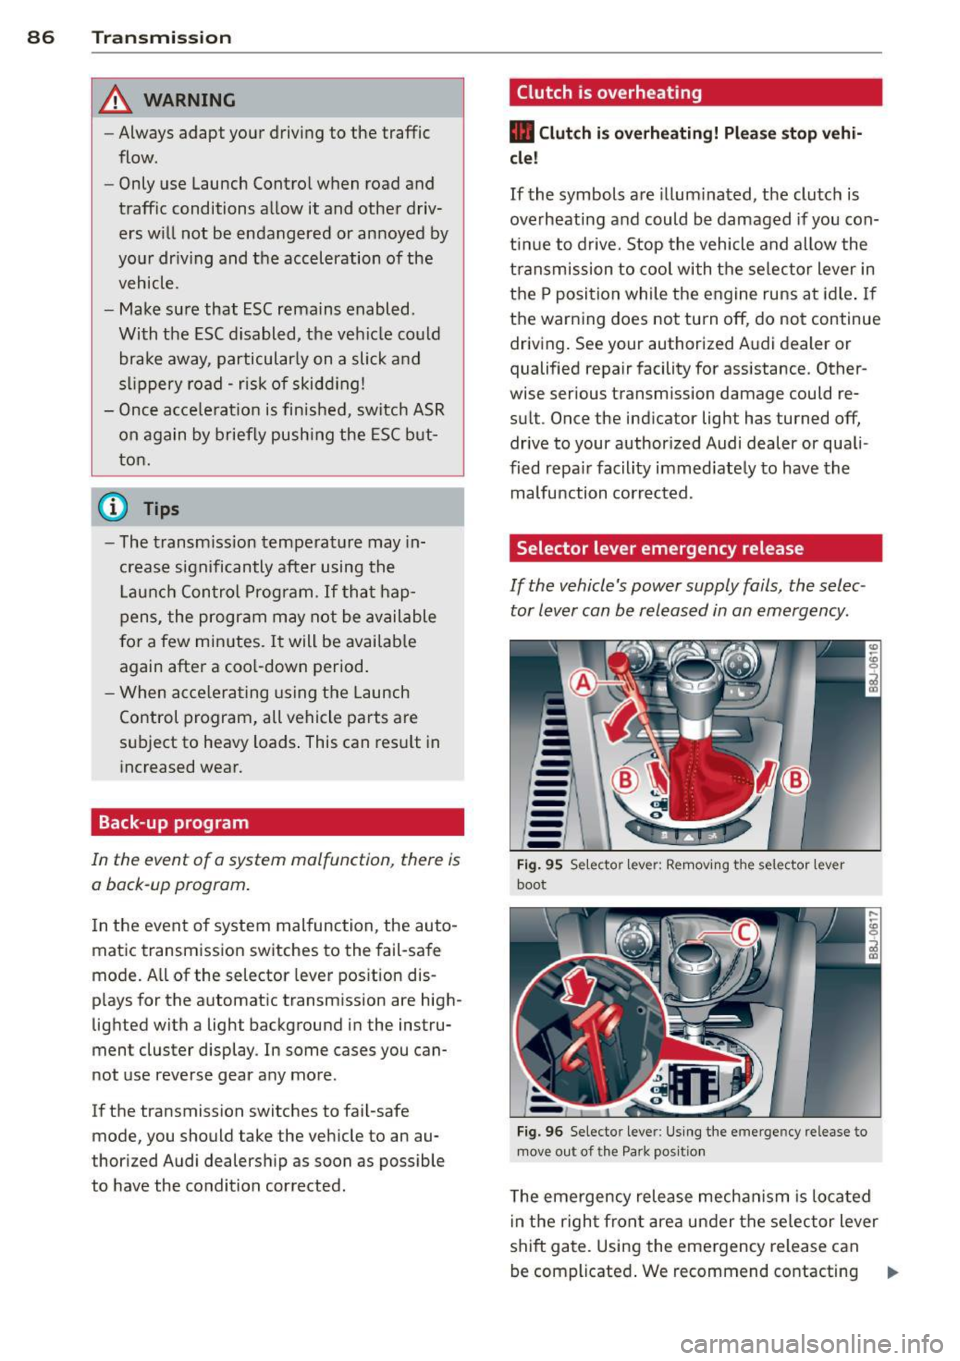
Selector lever emergency release
If the vehicle's power supply fails, the selec
tor lever can be released in an emergency.
--
-
-
-
-
---Fig. 95 Selecto r lev er: Remov ing the selector le ver
boot
Fig. 96 Selecto r lever : Using the emerge ncy release to
move out of the Park positio n
The emergency release mechanism is located
i n the right front area under the selector lever
shift gate. Using the emergency release can
be complicated. We recommend contacting ..,_
Page 90 of 244
88 Homelin k
Homelink
Universal remote
control
General information
The Homelink universal remote control can
be programmed with hand-held transmitters
from existing equipment .
You must first program the Homelink trans
mitter before you can use the system
~ page 88 , Programming the Homelink
transmitter.
In order to program the Homelink transmit
ter for devices utilizing rolling code, a second
person on a ladder who can safely reach the
garage door opener motor is recommended.
It is also necessary to locate the "learn" but
ton on your garag e door open er motor . Refer
to the ope rating instructions for the opener ,
as the location and color of this bu tton may
vary by manufacturer .
You can still use the original remote control
for the device at any time.
A WARNING
-
- Never use the Homelink transmitter
with any garage door opener that does
have not the safety stop and reverse fea
ture as required by federal safety stand
ards. This includes any garage door open
er model manufactured before April 1,
1982.
- A garage door opener which cannot de
tect an object, signaling the door to stop
and reverse does not meet current feder
al safety standards. Using a garage door
opener without these features increases
risk of serious injury or death.
- For safety reasons never release the
parking brake or start the engine while
anyone is standing in front of the vehicle.
- A garage door or an estate gate may
sometimes be set in motion when the
Homelink remote control is being pro
grammed. If the device is repeatedly ac- tivated, this can overstrain motor and
damage its electrical components - an
overheated motor
is a fire hazard!
- To avoid possible injuries or property
damage, please always make absolutely
certain that no persons or objects are lo
cated in the range of motion of any
equipment being operated.
(!) Tips
- If you would like more information on
Homelink, where to purchase the Home
Link compatible products, or would like
to purchase the Homelink Home Light
ing Package, please call toll-free :
1-800-355-3515.
- For Declaration of Compliance to United
States FCC and Industry Canada regula
tions ~
page 228.
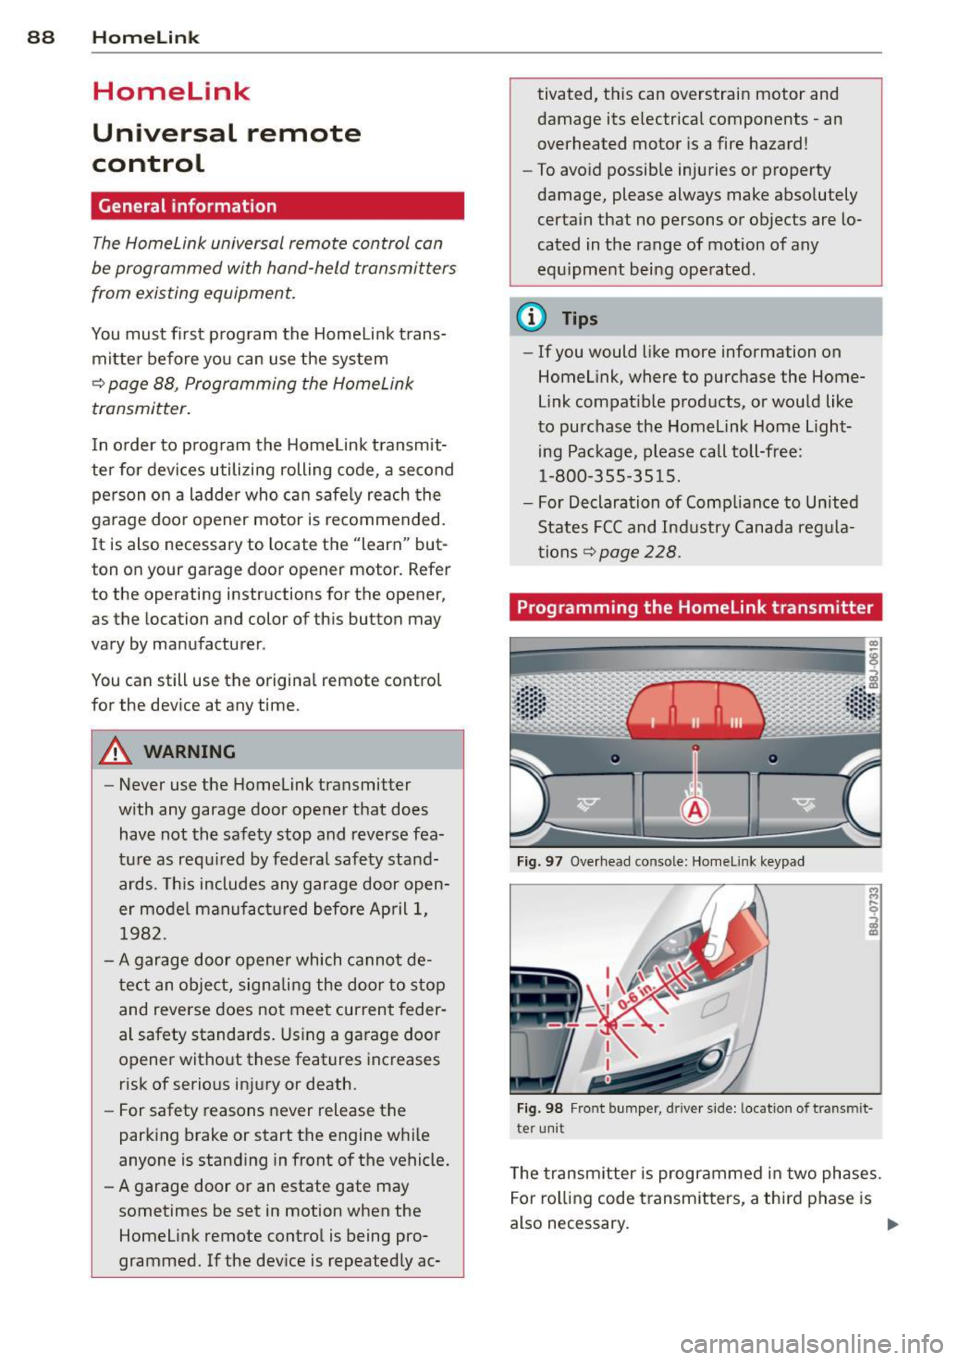
Programming the Homelink transmitter
Fig. 97 Overhead co nsole: Homelink keypad
Fig. 98 Front bumper , driver side: lo catio n of tra n smi t
te r unit
The transmitter is programmed in two phases.
For rolling code transmitters, a third phase is
also necessary.
ll-
Page 144 of 244
142 Intelligent technology
switched on all the time. In certain situations
when you need less traction, you can switch
off ESC by pressing the button
l!l . Be sure to
switch ESC on again when you no longer need
less traction.
Anti -toc k brak ing system (ABS)
ABS prevents the wheels from lock ing up
when braking . The vehicle can still be steered
even during hard brak ing . Apply steady pres
sure to the brake pedal. Do not pump the ped
al. A puls ing in the brake pedal ind icates that
the system is he lp ing you to brake the vehicle .
Brake assist sy stem
The brake assist system can decrease braking
d istance. It increases braking power when the
driver presse s the brake pedal quickly in emer
gency si tuations. You must press and hold the
brake peda l until the situation is over .
Anti-slip regulation (ASR)
ASR reduces engine power when the drive
wheels begin to spin and adapts the force to the road conditions . This makes it easier to
start, accelerate and drive up hills.
E lectronic differential lock (EDL )
The ED L brakes wheels that are spinning and
transfers the drive power to the other drive
wheel or whee ls if the vehicle is equipped with
all-wheel drive*. This function is available up
to about 60 mph (100 km/h) .
In extreme cases, EDL a utomatica lly switches
off to help keep the brake on the braked whee l
from overheating. EDL will switch on aga in au
tomatically when conditions have returned to normal.
A WARNING
- ESC, ABS, ASR and ED L can not ove rcome
t h e laws of phy sics. This is espe cial ly im
por tant on slip pery or wet ro ads .
If th e
sys tems begin a ct in g to stab ilize your ve
hicle, you shou ld imme diately change
yo ur speed to match the road and traffic
condit ions. Do not let the inc reased safe
ty provided by these systems tempt you to take risks. Do
ing so w ill increase the
risk of a loss of veh icle control, co llision
and serious pe rsonal injuries .
- Always adapt your speed to road, traffic
and weather conditions. The risk of los
ing control of t he vehicle increases when
driving too fast, espec ially through
curves and on slippe ry or wet roads, and
wh en dr iv ing too clos e to vehicl es u p
ahead. ESC, A BS, the brake ass ist sys
tem, ED L and ASR cannot p reven t coll i
si ons .
- Always acceler ate wi th sp ecial c are on
even, smoo th s urfaces such as those th at
are wet or covered with ice and snow .
The drive wheels can spin even with
these assistance systems that cannot al ways he lp to reduce the risk of loss of ve
h icle co ntrol.
(D Tips
- ABS an d ASR only wo rk correct ly when
all four whee ls are equipped with identi
cal tires . D ifferent tire si zes can lead to a
reduction in engine powe r.
- Yo u may hear noises when the systems
descr ibed are working.
- If the ind icator light Ii) or II (USA
mode ls)/ Ei] (Canada models) appears,
there may be a malfunction
¢ page 18,
¢ page 17.
Switching on and off
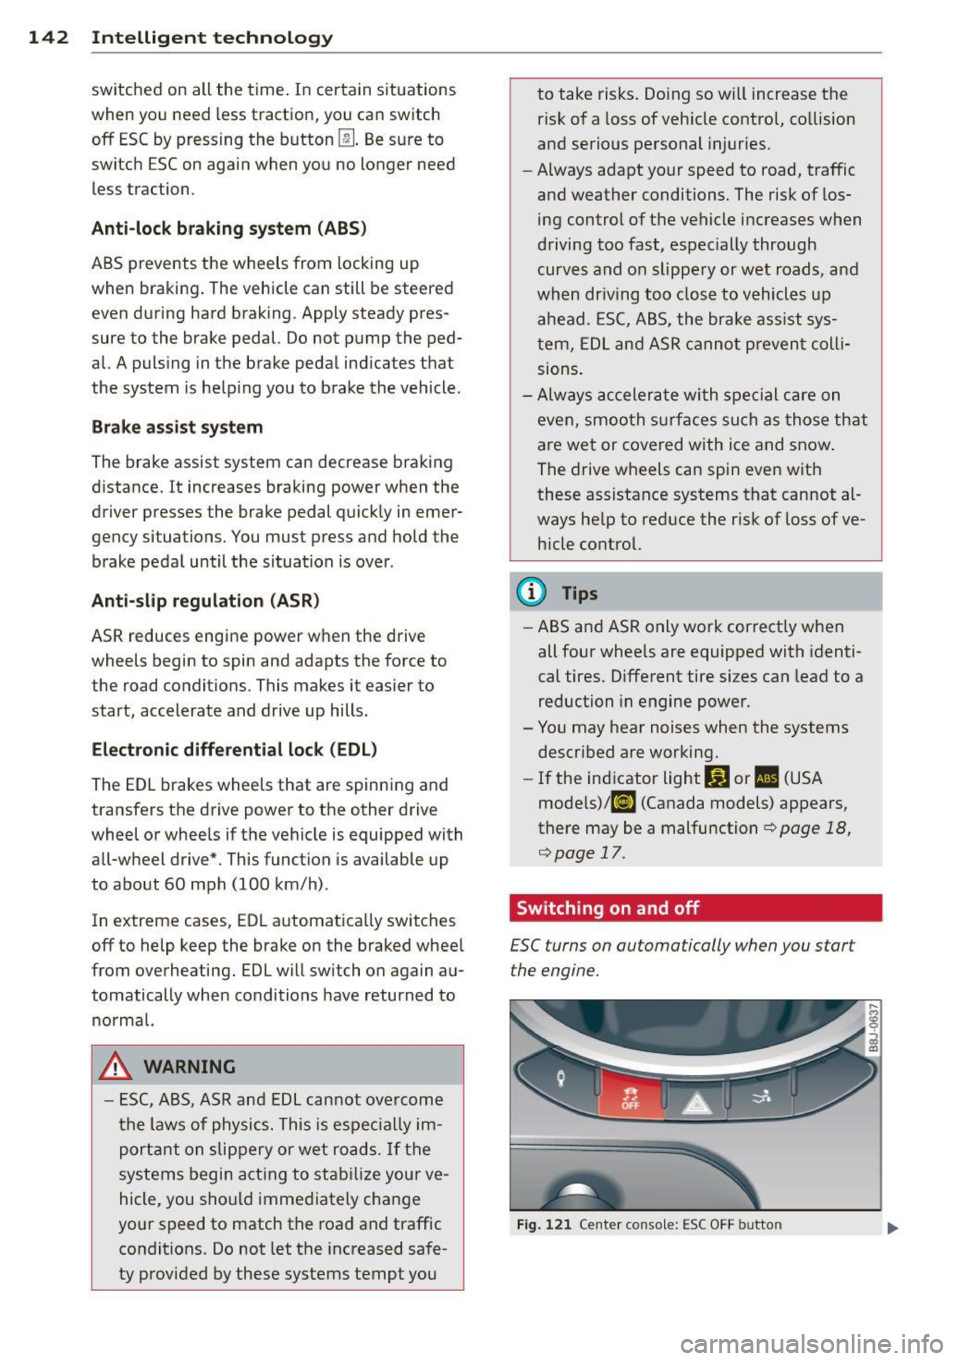
£SC turns on automatically when you start
the engine.
Fig . 12 1 Ce nte r conso le: ESC OFF b utto n