2015 AUDI TT ROADSTER window
[x] Cancel search: windowPage 159 of 244
Vehicl e ca re a nd cl eanin g 157
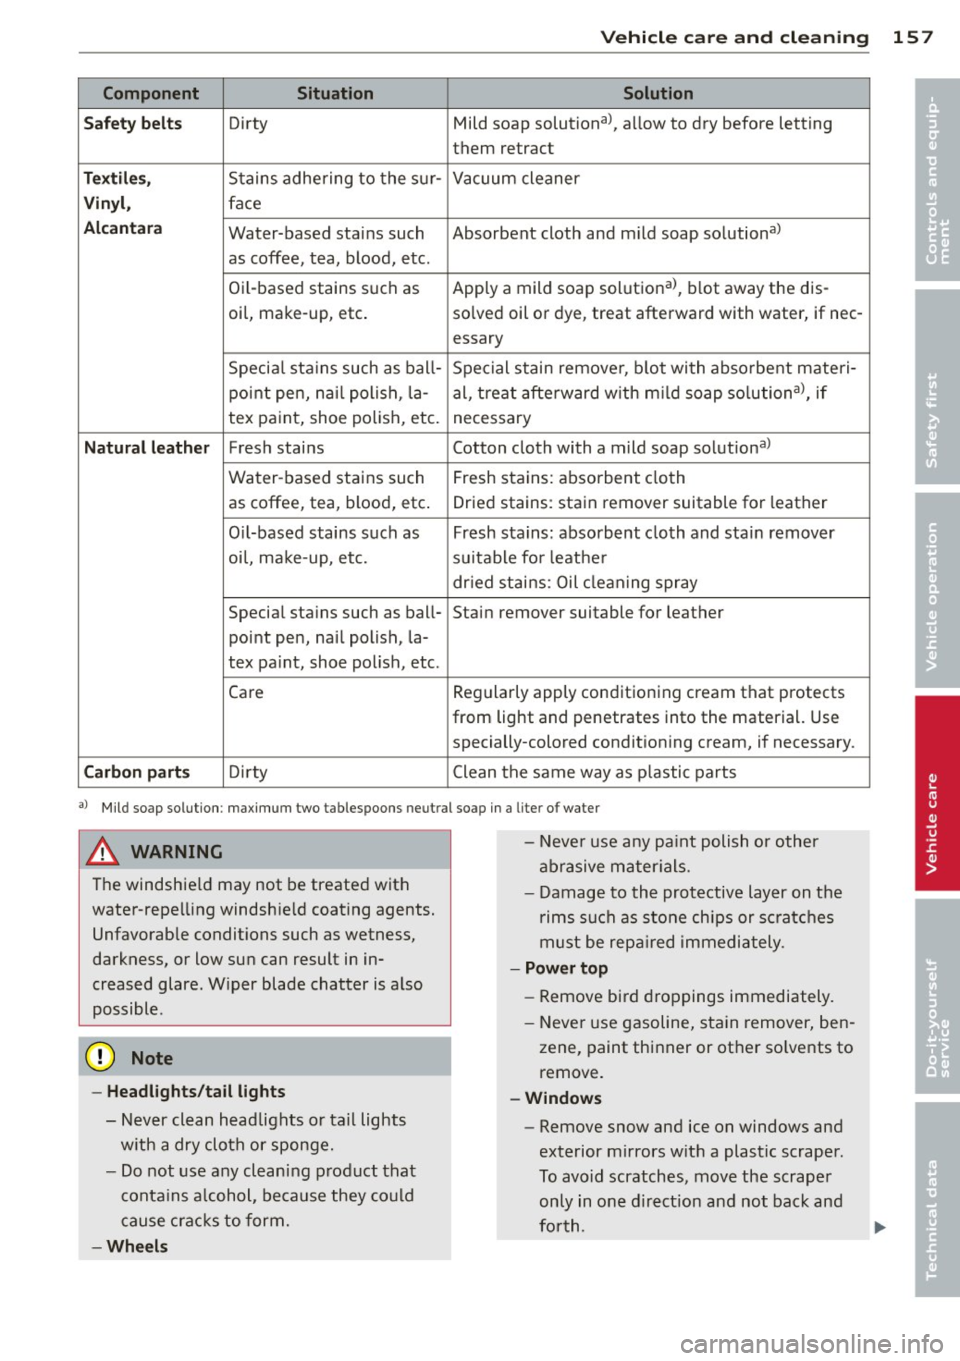
Component Situation Solution
•
Sa fe ty be lt s Dirty Mild soap solutional, allow to dry before letting
• them retract
Tex til es, Stains adhering to the sur- Vacuum cleaner
Vinyl , face
Alcanta ra Water-based stains such Absorbent cloth and mild soap solutional
as coffee, tea, blood, etc.
Oil-based stains such as Apply a mild soap solutional, blot away the dis-
oil, make-up, etc. solved oil or dye, treat afterward with water, if nee-
essary
Specia l sta ins such as ball- Special stain remover, blot with absorbent materi-
point pen, nai l polish, la- al, treat afterward w ith m ild soap solutional, if
tex paint, shoe polish, etc.
necessary
Natura l lea ther Fresh stains Cotton cloth with a m ild soap solutional
Water-based stains such Fresh stains: absorbent cloth
as coffee, tea, blood, etc. Dried stains: sta in remover suitable for leather
O il-based stains such as Fresh stains: absorbent cloth and stain remover
oi l, make-up, etc. suitable for leather
dr ied stains: Oil clean ing spray
Special stains such as ball- Stain remover suitable for leather
point pen, nail polish, la-
tex pa int, shoe pol ish, etc .
Care Regularly
apply conditioning cream that protects
from light and penetrates into the material. Use specially-colored conditioning cream, if necessary.
Carbon part s Dirty Clean the same way as plastic parts
al Mild soap solution: maximum two tablespoons neut ral soap in a lit er of water
A WARNING
The windshie ld may not be treated with
water-repelling windshie ld coating agents.
Unfavorable conditions such as wetness,
darkness, or low sun can result in in
creased glare. W iper blade chatter is also
possible.
(D Note
- Headl ights /ta il li ghts
- Never clean headlights or tail lights
w ith a dry cloth or sponge.
- Do not use any cleaning p roduct that
contains a lcohol, because they could
cause cracks to form.
-W heels
- Neve r use any pa int polish or other
abrasive mater ials.
- Damage to the protective layer on the rims such as stone chips or sc ratches
must be repa ired immediately.
- Po wer top
- Remove bird droppings immediately.
- Never use gasoline, stain remover, ben-
zene, paint thinner or other so lvents to
remove.
- W ind ow s
-Remove snow and ice on windows and
exterior mirrors with a plastic scraper.
To avoid scratches, move the scrape r
only in one d irect ion and not back and
forth.
Page 160 of 244
158 Vehicle care and cleaning
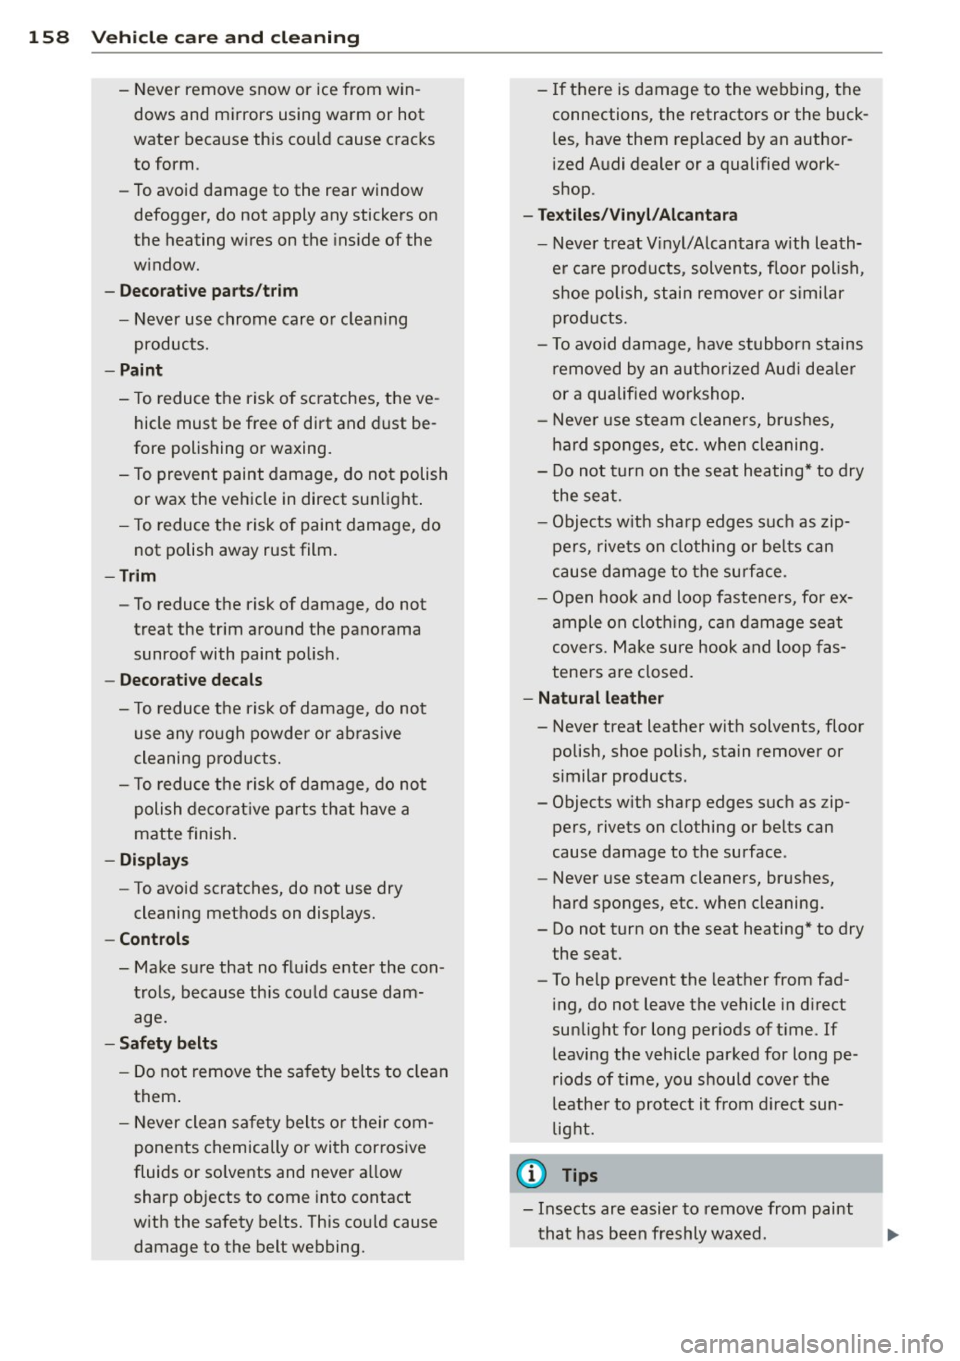
- Never remove snow or ice from win
dows and mirrors using warm or hot
water because this could cause cracks to form .
- To avoid damage to the rear window
defogger, do not apply any stickers on
the heating wires on the inside of the
window.
- Decorative parts/trim
-Never use chrome care or cleaning
products.
- Paint
- To reduce the risk of scratches, the ve-
hicle must be free of dirt and dust be
fore polishing or waxing.
- To prevent paint damage, do not polish or wax the vehicle in direct sunlight.
- To reduce the risk of paint damage, do
not polish away rust film .
-Trim
-To reduce the risk of damage, do not
treat the trim around the panorama
sunroof with paint polish.
- Decorative decals
-To reduce the risk of damage, do not
use any rough powder or abrasive
cleaning products.
- To reduce the risk of damage , do not
polish decorative parts that have a
matte finish.
- Displays
-To avoid scratches, do not use dry
cleaning methods on displays.
- Controls
- Make sure that no fluids enter the con -
trols, because this could cause dam age.
- Safety belts
- Do not remove the safety belts to clean
them.
- Never clean safety belts or their com
ponents chemically or with corrosive
fluids or solvents and never allow sharp objects to come into contact
with the safety belts. This could cause damage to the belt webbing. - If there is damage to the webbing, the
connections, the retractors or the buckles, have them replaced by an author
i z ed Audi dealer or a qualified work
shop.
- Textiles/Vinyl/Alcantara
- Never treat Vinyl/Alcantara with leath-
er care products , solvents, floor polish ,
shoe polish , stain remover or similar
products.
- To avoid damage, have stubborn stains
removed by an authorized Audi dealer
or a qualified workshop.
- Never use steam cleaners, brushes,
hard sponges, etc. when cleaning.
- Do not turn on the seat heating* to dry
the seat.
- Objects with sharp edges such as zip
pers , rivets on clothing or belts can
cause damage to the surface.
- Open hook and loop fasteners, for ex
ample on clothing, can damage seat
covers. Make sure hook and loop fas
teners are closed.
-Natural leather
-Never treat leather with solvents, floor
polish, shoe polish, stain remover or
similar products.
- Objects with sharp edges such as zip
pers, rivets on clothing or belts can
cause damage to the surface .
- Never use steam cleaners, brushes,
hard sponges, etc. when cleaning.
- Do not turn on the seat heating* to dry
the seat.
- To help prevent the leather from fad
ing, do not leave the vehicle in direct
sunlight for long periods of time . If
leaving the vehicle parked for long pe
riods of time, you should cover the
leather to protect it from direct sun
light.
@ Tips
- Insects are easier to remove from paint
that has been freshly waxed.
Page 177 of 244
@ For the sake of the environment
Because of the problem of proper disposa l
of brake flu id as we ll as the special tools
requ ired and the necessary expert ise, we
recommend that you have the brake fluid
changed by your author ized Audi dealer .
Battery
General information
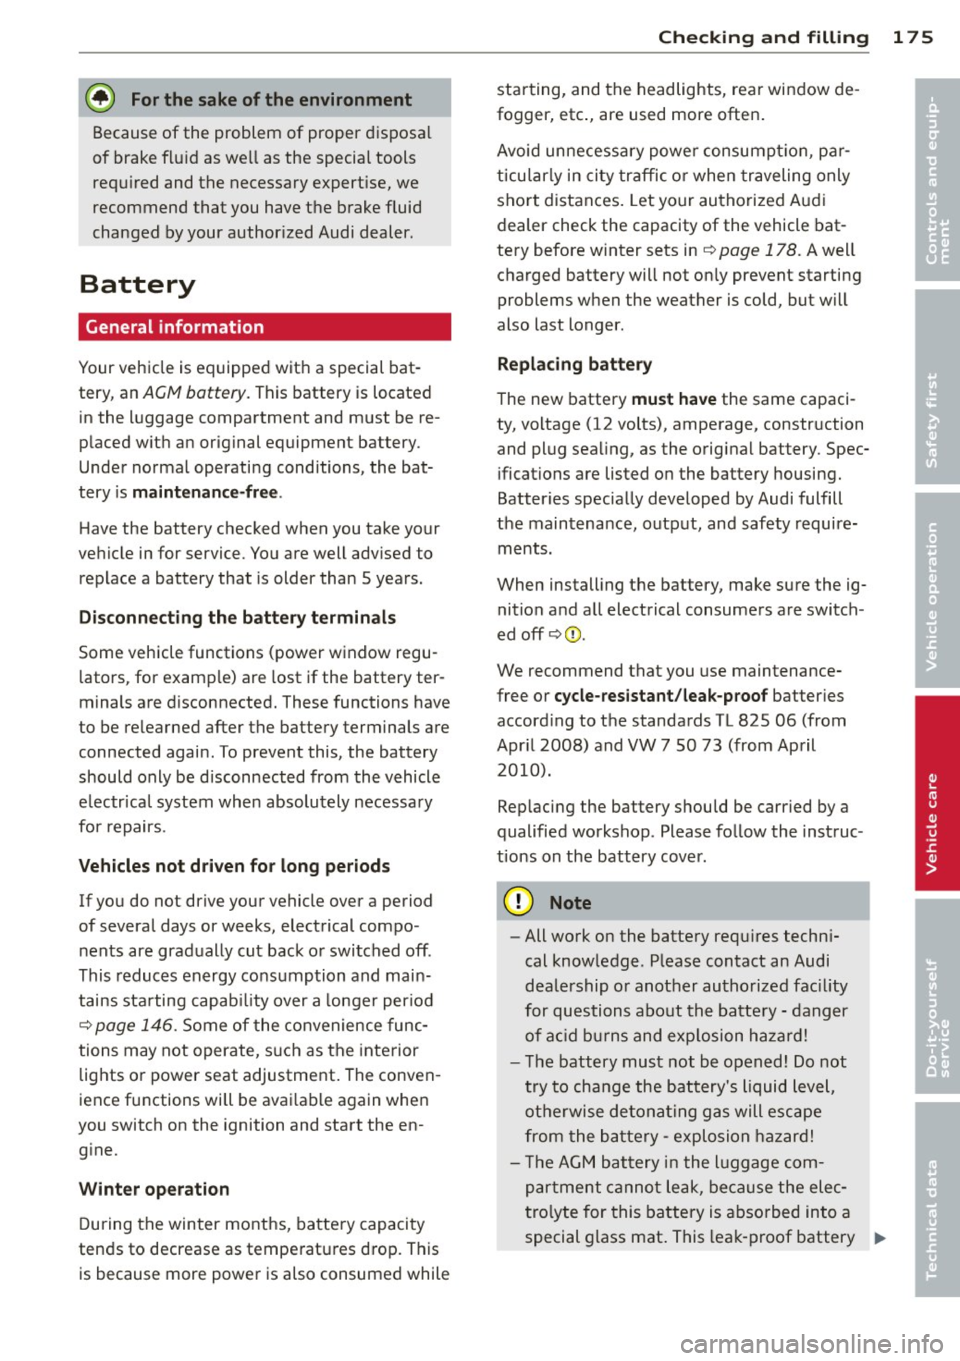
Your vehicle is equipped with a special bat
tery, an
ACM battery. This battery is located
in the luggage compartment and must be re
p laced w ith an original equipment battery .
Under normal operati ng conditions, the bat
tery is
maint enan ce -fre e.
Have the battery checked when you take your
ve hicle in for service. You are well adv ised to
replace a battery that is older than
5 years.
Di sconn ect ing the battery terminal s
Some vehicle functions (power window regu
lators, for example) are lost if the battery ter
minals are d isconnected. These functions have
to be re learned after the battery terminals are
connected again . To prevent this, the battery
should only be d isconnected from the vehicle
e lectr ica l system when absolutely necessary
for repairs .
Vehicles not driven for l ong period s
If you do not drive your vehicle over a period
of several days or weeks, electrical compo
nents are gradually cut back o r switched off .
This reduces energy consumption and main
tains sta rting capab ility over a longer per iod
c::> page 146. Some of the convenience func
tions may not operate, s uch as the interior
lights or power seat adjustment. The conven
ience functions will be avai lab le again when
you switch on the ignition and start the en g ine.
Winter operation
D uring the winter months, ba tte ry capaci ty
tends to decrease as temperatures d rop. This
is because more powe r is also consumed while
Checkin g and fillin g 175
starting, and the headlights, rear window de
fogger, etc ., are used more often .
Avoid unnecess ary powe r consumpt io n, p ar
t icu lar ly in city traffic o r when traveling only
sho rt distances. Let your authorized A udi
dealer check the capacity of the vehicle bat
tery before winter sets in
c::> page 178. A well
charged battery will not on ly prevent starting
problems when the weather is cold, but will
also last longer .
Replacing battery
The new battery must ha ve the same capaci
ty, voltage (12 volts), amperage, construction
and plug sea ling, as the original battery. Spec
ifications are listed o n the battery housing.
Batter ies spec ia lly developed by Audi fulfill
the maintenance, outp ut, and safety require
ments.
When installing the battery, make sure the ig nition and a ll electrical consumers are switch
ed off
c::> (D .
We recommend that you use maintenance
free or
cycle -res istant /leak-proof batter ies
accord ing to the standards TL 825 06 (from
Apr il 2008) and VW 7 50 73 (from Ap ril
2010).
Rep lacing the battery should be carried by a
qualified workshop. Please fo llow the instruc
tions on the battery cover.
([) Note
-All work on the battery requ ires techn i
cal know ledge. P lease contact an Audi
deale rship o r anot her au tho rized fac ility
for questions abo ut the batte ry -dang er
of a cid b urns and exp losion ha zard!
- T he battery must not be opened! Do not
try to cha nge the battery 's liquid level,
ot herwise de tona ting gas will esc ape
from the ba ttery -explosion ha zard!
- T he AGM battery in the l uggage com
p artment cannot leak, because the elec
tro lyte for this battery is abso rbed into a
special glass mat. This lea k-p roof battery
Iii>
•
•
Page 179 of 244

-Do not interchange the positive and neg
ative cables .
- When working on the battery , be sure
not to short-circuit the terminals with
tools or other metal objects. This would cause the battery to heat up very quickly,
which could lead to damage or explosion and personal injury.
- When a battery is charged, it produces
hydrogen gas which is explosive and
could cause personal injury .
- Always keep the battery well out of the reach of children .
- Before work is done on the electrical sys
tem, disconnect the negative ground ca
ble .
- Before performing any work on the elec
trical system , switch off the engine and
ignition as well as any electrical equip
ment. The negative cable on the battery
must be disconnected. If you are just go
ing to replace a light bulb, then it is
enough to switch off the lights.
- Before disconnecting the battery , switch
off the anti-theft alarm system! Other
wise you will set off the alarm.
- When disconnecting the battery, first
disconnect the negative cable and then
the positive cable.
- Before reconnecting the battery, make
sure all electrical consumers are switch
ed off. Reconnect the positive cable first
and then the negative cable. Never inter
change the cables - this could start a fire!
- Never charge a fro zen or a thawed-out
battery. It could explode! If a battery has
frozen, then it must be replaced. A dis
charged battery can freeze over at 32 °F
(0 °C) .
-Make sure the vent hose is always attach
ed to the opening on the side of the bat
tery.
- Never use batteries which are damaged.
Danger of explosion! Always replace a
damaged battery.
Checking and filling 177
A WARNING
California Proposition 65 Warning:
- Battery posts, terminals and related ac cessories contain lead and lead com
pounds, chemicals known to the State of
California to cause cancer and reproduc
tive problems . Wash hands after han
dling.
Q) Note
- Do not disconnect the vehicle battery
when the ignition is switched on or when
the engine is running, otherwise , you will
damage electronic components in the
electrical system.
- If your vehicle is going to stand for a
long period of time without being driven,
protect the battery from "freezing", oth
erwise it will be damaged and will then
have to be replaced.
Checking the battery acid level on magic
eye batteries*
The battery acid level in the battery can be
checked through the clear inspection window .
Fig. 134 Lugg age compar tme nt: Battery w ith mag ic
e ye .
On top of the battery, there is a round "win
dow". This window (magic eye) changes color
as the battery charge and acid level change.
.,. Read and heed all WARNINGS
~.&_ in
Working on the battery on page 176
.. Read the acid level from the window on the
battery ~
fig. 134. Ill>-
Page 180 of 244

178 Checking and filling
Ai r bubbles in the window can cause an inac
curate reading. Carefully tap on the side of
the w indow.
- If the window is gr ee n, the battery ac id leve l
is correct.
- If the window has no c olo r or is brigh t yel
low ,
the battery acid leve l is too low . Have
the battery tested by your authorized A udi
dealer or a qualified workshop .
- If the window is
black , then the batte ry is
insufficiently charged. Recharge the battery
as soon as possible ¢
page 178.
@ Note
Do not overfill the battery, otherwise bat
tery acid will overflow through the vent
opening. This can damage the paint and
cause corros ion.
Charging of battery
Starting the engine requires a well charged
battery.
• Alw ay s rea d and heed all WARNING S be
low ¢
A and ¢ A in Working on the bat
tery on page 176.
• Switch off the ignit ion and all electrical con
sumers.
• Make sure the area is well vent ilated when
you charge the battery .
• Connect charger cables.
ALW AYS conn ect
c harg er cab les POSITIVE
G) to POSITIVE
G) ; NEGATIVE Qto NEGATIVE Q.
• Switch on the charger .
•T urnoff the charger ¢,& .
• Disconnect the charger cables.
• Connect both battery cables to the battery if
necessary-
first plus, then m inus.
When charging at
low voltages (e.g . with a
tri ckle char ger), the battery cables do not
have to be d isconnected first. Before charging
at
high voltages, i.e. "fa st charg ing ", you
must disconnect both cables. In e ither case,
follow the instruct ions from the manufacturer
of the charger. Fastcharging a battery is
dangerou
s ¢.&. in
Working on the battery on page 176 .
It re
quires special charging equipment and the
knowledge to go with it. We recommend hav
ing your battery fast charged only by a quali
fied workshop .
A d ischarged battery can
freeze at tempera
tures of only
32 °F (0 °C). Allow a frozen bat
tery to thaw completely before attempting to
charge it¢,&.. However, we recommend not
us ing a thawed battery aga in because the bat
tery casing can be cracked due to ice fo rma
t ion and can leak battery acid.
Do not open the battery caps when charging
the battery .
A WARNING ,..__ -
Charging a battery can be dangerous.
- Never charge a frozen battery . It may ex
p lode because of gas trapped in the ice .
Allow a frozen battery to thaw out first.
- Do not reuse batteries wh ich were fro
zen. The battery hous ing may have
cracked and weakened when the battery
fro ze.
- Cha rge t he battery in a well venti lated
area. Keep away from open flame or elec
tr ica l spar k. Do not smo ke. Hyd rogen gas
genera ted by the battery is explos ive .
- To reduce the danger of explosion, never
connect or d isconnect charger cab les
while the charger is operating.
- Fast charging a ba ttery is dange rous and
should only be at tempted by a compe
tent technician with the proper equip
ment.
- Battery acid tha t may sp ill dur ing cha rg
ing should be washed off with a solution
of warm water and baking soda to neu
tralize the ac id.
(D Note
Neve r use a fast charger as a booster to
start the engine. This wi ll seriously dam
age sensit ive e lectronic components, such
as contro l units, re lays, radio, etc., as well
as the battery charger.
Page 183 of 244
-Never mount used tires on yo ur vehicle if
yo u are not sure of their "previous histo
ry." Old used tires may have been dam
aged even though the damage cannot be
seen that can lead to sudden tire failure
and loss of vehicle control.
- If you notice unusual vibration or if the
vehicle pulls to one side when d riving, al
ways stop as soon as it is safe to do so
and check the wheels and tires for dam
age .
(D Note
-Please note that summer and winter
tires are designed for the cond itions that
are typ ic al in those seasons. Aud i recom
mends using w inter t ires du ring the win-
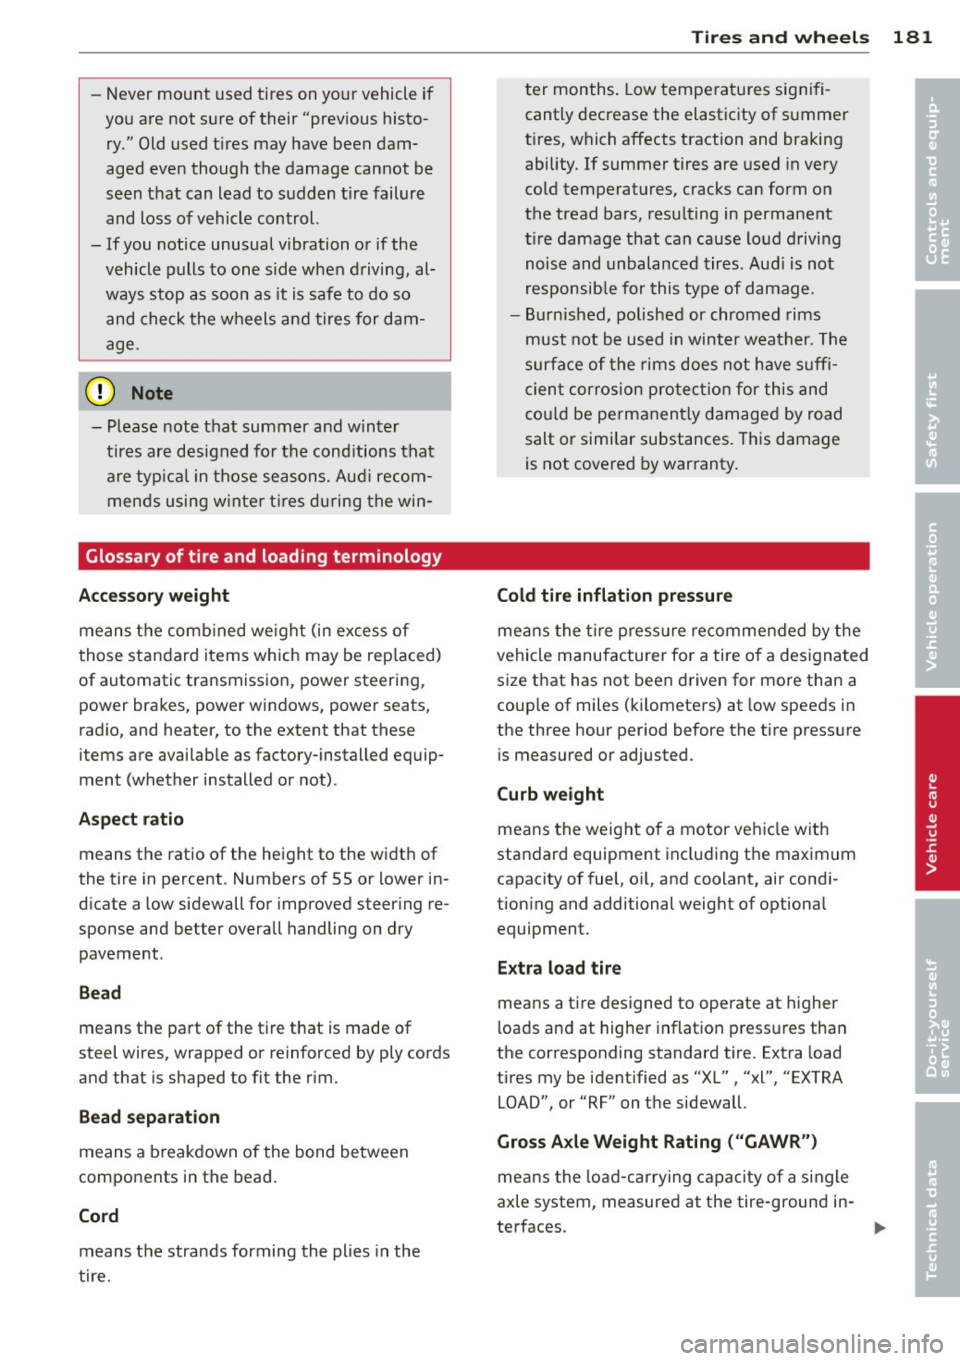
Glossary of tire and loading terminology
Accessory weight
means the comb ined weight (in excess of
those standard items which may be replaced)
of automatic tra nsmission, power steering,
power brakes, power windows, power seats,
radio, and heater, to the extent that these
items are availab le as factory-installed equip
ment (whether installed or not) .
Aspect ratio
means the ratio of the height to the width of
the tire in percent . Numbers of 55 or lower in
d icate a low sidewall for improved steering re
sponse and better overall handling on dry
pavement .
Bead
means the pa rt of the ti re that is made of
steel wires, wrapped or reinforced by ply cords
and that is shaped to fit the rim.
Bead s eparation
means a b reakdown of the bond between
components in the bead.
Cord
means the strands forming the plies in the
tire.
Tire s an d wheel s 181
ter months . Low temperatu res signifi
cantly decrease the elastic ity of summer
t ires, which affects traction and braking
ability. If summer tires are used in very
co ld temperatures, cracks can form on
the tread bars, res ulting in permanent
ti re damage that can cause loud drivi ng
noise and unbalanced tires. Aud i is not
responsib le for this type of damage.
- Burn ished, polished or chromed rims
must not be used in winter weather. Th e
surfa ce of the rims does not have suffi
c ien t cor rosion pro te cti on for this and
c o ul d be pe rmanen tly damaged by road
salt or similar substances. This damage
is not covered by warranty.
Cold tir e inflation pressure
me ans the t ire press ure re commended by the
vehicle manufacturer fo r a tire o f a des igna ted
size that has not bee n driven for more than a
coup le of miles (k ilomete rs) at low speeds in
the three hour pe riod before the tire press ure
is measured or adjusted.
Curb weight
means the weight o f a motor vehicle with
standard equipment including the maximum
capacity of fuel, o il, and coolant, air cond i
tion ing and additional weight of optiona l
equipment.
E xtra load tire
means a tire designed to operate at higher
l oads and at higher inflation press ures than
the corresponding standard tire. Extra load
tires my be ident ified as "XL", "xl", "EXTRA
LOAD", or "RF" on the sidewall.
Gross Axle Weight Rating ("GAWR")
means the load-carrying capacity of a single
axle system, measured at the tire-ground in-
ter~ces.
~
•
•
Page 216 of 244

214 Fuses and bulb s
No. Equipment
24 Transmi ssion (contro l un it)
25 Heate
r rear window Coupe /
heated rear window Roadster
26 Driver'
s side power window
27 Passenger's s ide power window
28 No
t used
29 Washer pump
30 Cigarette lighter
31 Start er
32 Steering column module
33 Instrument clust er
34 Radio navigation system , radio
35 Aud io amplifi er
36 Engine (control un it)
37 CAN (Gat
eway)
38 Ciga
rette lighter
39 Not us ed
40 Not used
4 1 Not u sed
42 Not used
43 No t used
44 Not used
45 No
t used
46 Not used
47 SOARS tuner, cell phone pack-
age,
TV tuner
48 VOA interface
49 Not used
Fuse location, left side of engine
compartment Amps
15
30/ 20
30 30
15
20
40 5
5
20/15
30 10
5
20
5 5
Fi g. 162 Ill ustra tion of fus e ho lde r on l eft side o f en·
gi ne compar tment: fuse s (withou t fuse c over)
Some of the equipment items listed are op
tiona l or only avai lable on c ertain mod el con
figurations.
Note tha t the foll owing table i s ac cur ate at
the time of going to pre ss and is subject to
change .
Fus e holder (bla ck )
No . Equipment Amps
1 Not used
2 Not used
3 Not used
4 No t used
Anti- theft warning system (sen -
5 sor), ant
i-theft warn ing system
5
(horn)
6 Headlamp washer system
30
7 Elec
tric fuel pumps (supp ly)
15
8 W
indshield wipers
30
9 H
eat ed seats (dr iver and pas-
25
senger)
10 L
umbar support (d river and
10
passenger)
11 Not u sed
12 Vent ilation blower 40
Fus e holder (brown )
No. Equipment Amps
1 Not used
2 Not used
3 Not used
4 Not used
5 Relay coil
relay volume cont ro l
5
va lve
6 02
sensors
10
7 P
ositioning valves pre-wired en-
10
gine harness
8 Ignition coi ls 20
9 Eng
in e (cont rol unit)
25
10 Water pump de layed-off 10
1 1 F
e e d (brak e pedal)
5
1 2 Activated charcoal filter/charge
10
p ress ure control va lve
Page 219 of 244
@ Tips
The discharged battery must be properly connected to the vehicle's electrical sys
tem.
Use of jumper cables
Make sure to connect the jumper coble
clomps in exactly the order described below!
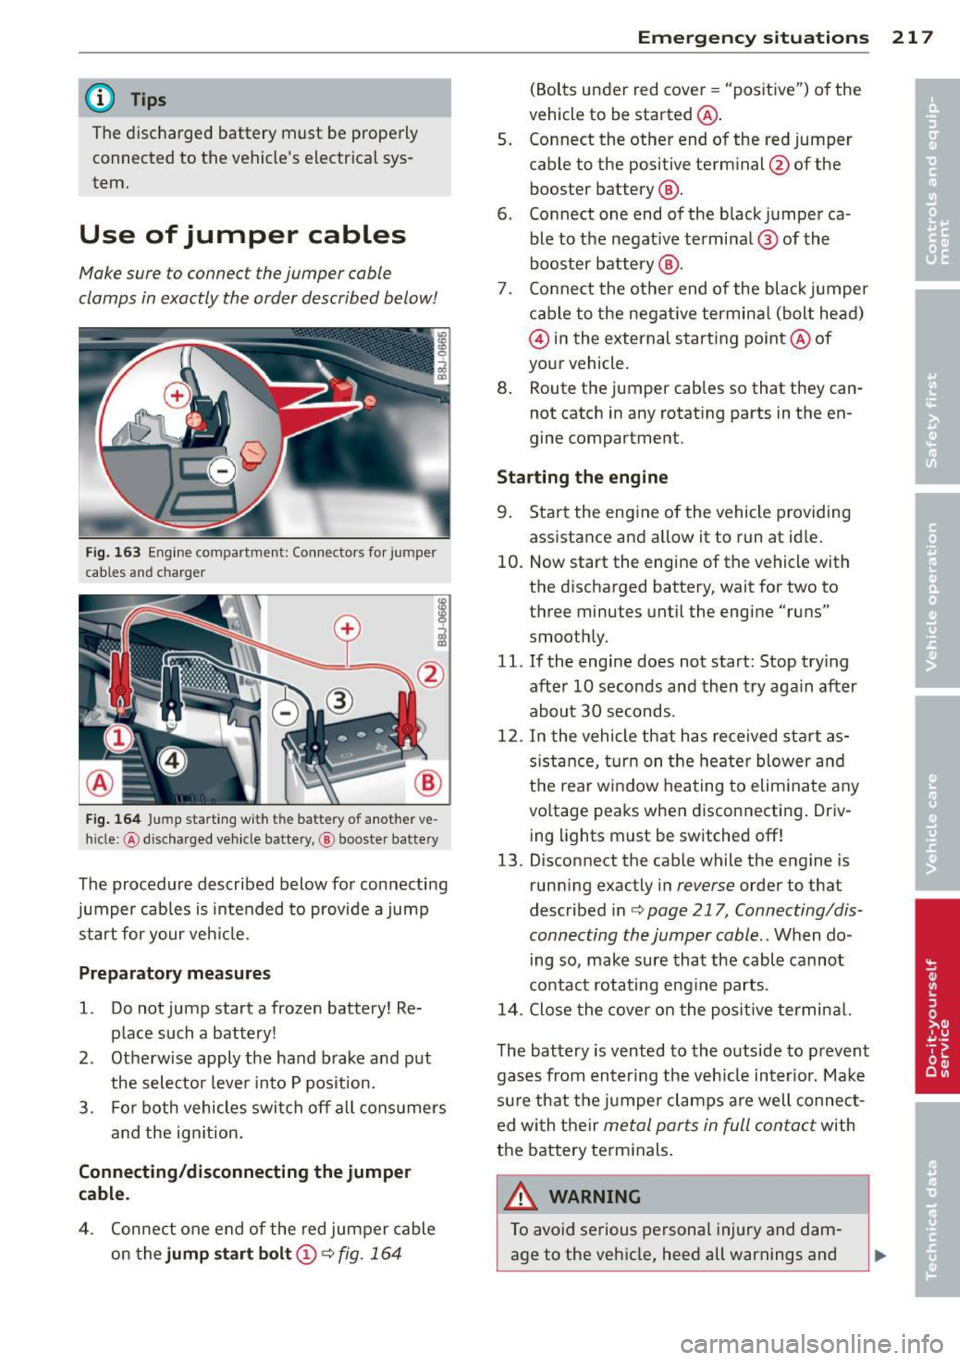
Fig. 163 Eng ine compartme nt: Co nnecto rs for jumper
cables and charger
F ig . 164 Jump start ing with the battery of another ve
h icle: @discharged ve hicle batte ry, @ booste r battery
The procedure described below for connecting
jumper cables is intended to provide a jump
start for your veh icle.
Preparatory me asures
1. Do not jump start a frozen battery! Re
place such a battery!
2 . Otherwise apply the hand brake and put
the selector leve r into P pos ition.
3. For both vehicles swi tch off all cons umers
and the ignit ion.
Conn ecting /disconnecting the jumper
cable .
4. Con nect one end of the red jumper cable
on the
jump st a rt bo lt @ ¢ fig. 164
Emergenc y situ ation s 21 7
(Bolts under red cover = "positive") o f the
vehicle to be started @.
5 . Connect the other end of the red jumper
cable to the positive terminal @ofthe
booster battery @.
6 . Connect one end of the black jumper ca
ble to the negat ive terminal ® of the
booster battery @.
7. Co nnect the othe r end of the black jumper
c able to the negat ive termina l (bolt head)
@ in the external starting po int @ of
your vehicle.
8 . Route the jumper cables so that they can
not catch in any rotat ing parts in the en
gine compartment.
Sta rting th e engine
9. Sta rt the eng ine of the vehicle providing
assistance and allow it to run at idle.
10. Now start the engine of the vehicle with
the discharged battery, wait for two to
three minutes until the engine "runs"
smooth ly.
11. If the eng ine does not start: Stop try ing
after 10 seconds and then try aga in after
about 30 seconds.
12 . In the vehicle that has received sta rt as
s istance, tur n on the heate r blower and
the rear window hea ting to elim inate a ny
vo ltage peaks when disconnecting . Driv
ing lights must be switched off!
13 . Disconnect the cable while the engine is
runn ing exactly in
reverse order to that
described in<=>
page 217, Connecting/dis
connecting the jumper coble ..
When do
ing so, make sure that the cable cannot
contact rotating eng ine parts.
14 . Close the cove r on the posit ive termina l.
T he battery is vented to the outside to p revent
gases from enter ing the veh icle inter ior. Make
s ur e that the jumper clamps a re well connec t
ed with their
me tal parts in full contact with
the battery terminals.
A WARNING
To avoid serious personal injury and dam
age to the vehicle, heed all warnings and