2015 AUDI TT ROADSTER ESP
[x] Cancel search: ESPPage 57 of 244

During brief stops, e.g. at a red light, wiper
motion will automatically be reduced to the
next lower speed. Wipers already turning at
low speed change to intermittent wiping.
When the ignition is turned on, the washer
jets are heated.
A WARNING
- Wiper blades are crucial for safe driving!
Only when they are in good condition are
they able to clear the windows properly
to provide uncompromising visibility .
Worn or damaged wiper blades are a safety hazard ¢
page 5 7, Replacing
windshield wiper blades!
- The light/rain sensor* is only designed to
assist and support the driver.
It remains
entirely the driver's responsibility to
monitor outside weather conditions and
to manually activate the wipers as soon as rain or drizzle reduces visibility
through the windshield.
- The windshield must not be treated with
water-repellent materials. They can in
crease glare under poor visibility condi
tions such as wetness, darkness, or when
the sun is low on the horizon. In addi
tion, they can cause the windshield wip
ers to chatter .
(I) Note
In freezing or near freezing conditions:
- Always check that the wiper blades are
not frozen to the glass before you turn
the wipers on . Loosen a wiper blade
which is frozen in place before operating
the wipers to prevent damage to the
wiper blade or the wiper motor.
- Do not use the wipers to clear a frosted window . Using the wipers as a conven
ient ice scraper will destroy the wiper
blades.
- Before you take your vehicle to an auto
matic car wash, make sure you have the
windshield wiper system switched off (lever in position 0), otherwise the wind
shield wiper system could get damaged
Clear vision 5 5
in the car wash if it should suddenly
come on.
(0 Tips
- The windshield wipers are switched off
when the ignition is turned off. Activate
the windshield wipers after the ignition
is switched back on by moving the wind
shield wiper lever to any position.
- Worn or dirty windshield wiper blades
cause smearing, which can affect the op
eration of the light/rain sensor* . Check
the condition of your windshield wiper
blades regularly.
- The rain sensor is part of the interval
wiping system . Turning off the ignition
will also deactivate the rain sensor. To re activate the sensor, switch off the inter
val wiping function, then switch it back
on again.
-Applies to vehicles with light/rain sen
sor : When the wipers are switched on
manually and in rain conditions, the au
tomatic headlights* turn on¢
page 48,
Switching the headlights on and off
or
off during the day when the wipers are
no longer operating. The automatic
headlights* function is available in this
case only when the light switch is in the
"AUTO" position¢
page 48, fig. 52.
-Make sure the washer fluid reservoir in
the engine compartment is topped off
before going on a long trip. Look up
¢
page 179 for checking and filling the
washer container .
- The wipers only operate with the hood
completely closed .
Headlight washer system
Applies to vehicles: with headlight washer system
The headlight washer system cleans the
headlights.
"'Operate the windshield wiper/washer sys
tem
o page 54, fig. 62 ® with the head
lights turned on by holding the lever for lon-
ger than one second . ..,.
Page 61 of 244
Seats and storage
General recommen
dations
Why is your seat adjustment so important?
The safety belts and the airbag system can
only provide maximum protection if the front
seats are correctly adjusted.
There are various ways of adjusting the front
seats to provide safe and comfortable support
for the driver and the front passenger. Adjust
your seat properly so that :
- you can easily and quick ly reach all the
switches and controls in the instrument
panel
- your body is properly supported thus reduc ing physical stress and fatigue
- the safety belts and airbag system can offe r
maximum protection
¢ page 108.
In the following sections, you will see exactly
how you can best adjust your seats .
There are special regulations and instructions
for installing a child safety seat on the front passenger's seat. Always heed the informa
tion regard ing child safety provided in
¢ page 129, Child Safety.
A WARNING
Incorrect seating position of the driver and
all other passengers can result in serious
personal injury.
- Always keep your feet on the f loor when
the vehicle is in motion -never p ut your
feet on top of the instrument panel, out
of the w indow or on top of the seat cush
ion! This applies espec ially to the passen
gers . If your seating position is incorrect
you increase the r isk of injury in the case
of sudden braking or an acc ident. If the
airbag inflates and the seating position
is incorrect this could result in personal
injury or even death.
- It is important for bo th the driver and
front passenger to keep a distance of a t
Seat s an d sto rage 59
least 10 inches (25 cm) between them
selves and the steering wheel and/or in
strument panel. If you're s itting any
closer than th is, the airbag system can
not protect you properly. In addition to
this, the front seats and head restra ints
must be adjusted to yo ur body height so
that they can give you max imum prote c
tion.
- Always try to keep as much distance as
possible be tween yourself and the s teer
ing wheel o r instrument pane l.
- Do not adjust the driver's or front pas
senger's seat whi le the vehicle is moving.
Your seat may move unexpected ly, caus
ing sudden loss of vehicle control and
personal injury . If you ad just yo ur seat
while the veh icle is moving, you are out
of posit ion.
Driver's seat
The correct seat position is important for safe
and relaxed driving.
We recommend that you adjust the driver's
seat in the fo llowing manner:
.,. Adj ust the seat in fore and aft direction so
t ha t you can easily push the peda ls to the
floor whi le keeping your knee sligh tly bent
c::> A in Why is your seat adjustment so im
portant? on page 59 .
.,. Adjust the seatback so that when you sit
w ith your back against the seatback, you can
still grasp the top of the steering wheel.
.,. Pos it ion the head restrai nt accord ing to the
occupant 's height
c::> page 62 . For maxi
mum protection, the top of the head re
straint shou ld be at least at eye level, pref
erably higher and idea lly level with the top
of the head
¢ page 94, fig. 100 .
A WARNING
Never place any objects in the dr iver's foot
well. An object could get into the pedal
area and interfere with pedal funct ion. In
case of sudden braking or an acc ident, you
would not be able to brake or accelerate!
Page 63 of 244
seating position and improperly posi
tioned safety belts!
Power seats
Adjustment switches
App lies to vehicles: with power seats
The operating logic for the switches corre
sponds to the construction and function of the seat.
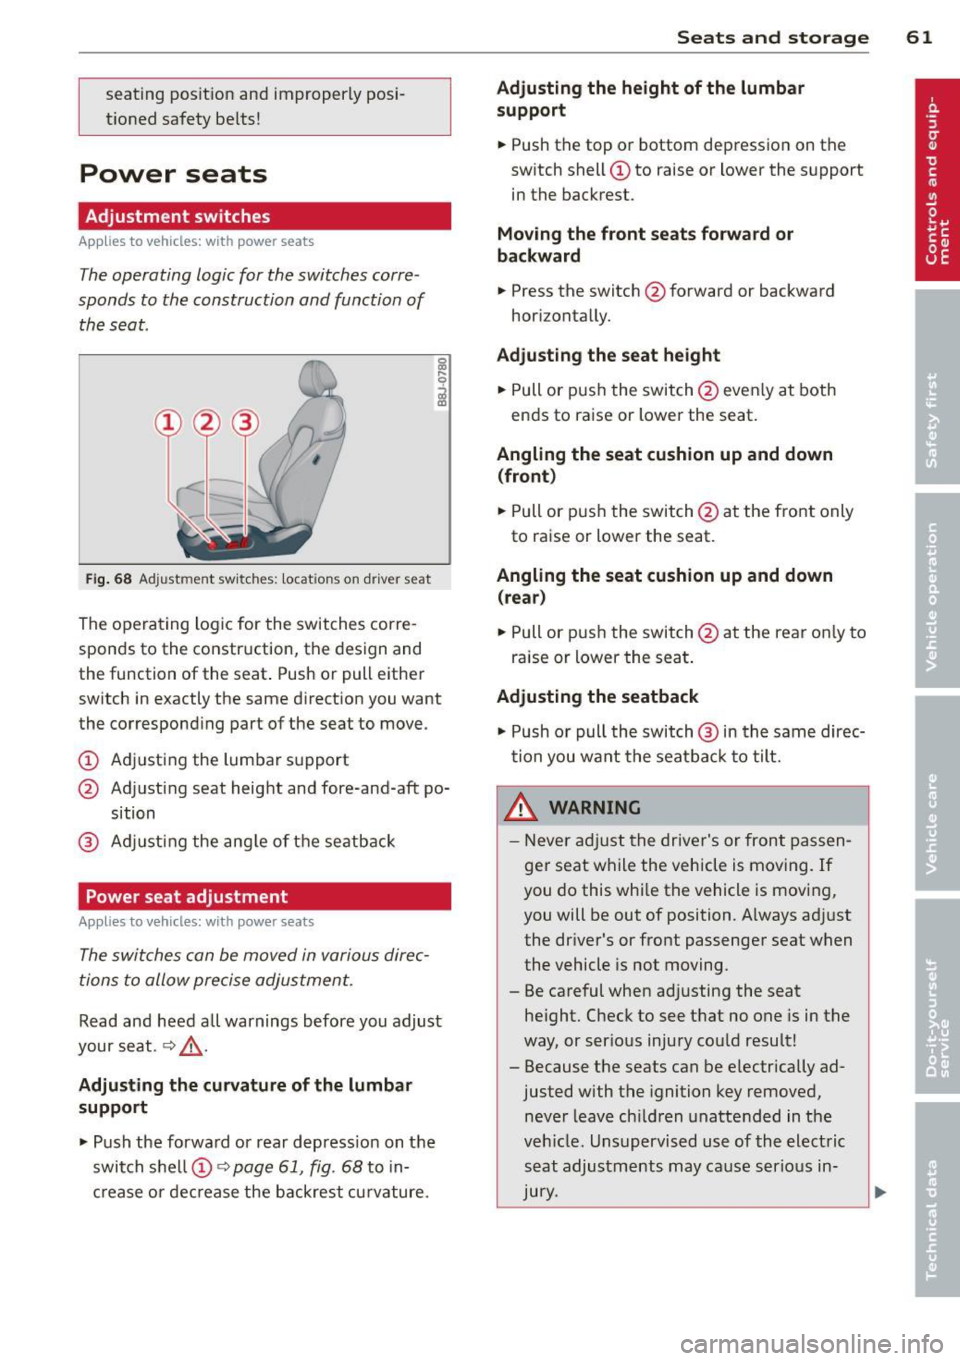
Fig . 68 Adjustment switches: locations on driver seat
The operating logic for the switches corre
sponds to the construction, the design and
the function of the seat . Push or pull either
switch in exactly the same direction you want
the corresponding part of the seat to move.
(!) Adjusting the lumbar support
@ Adjusting seat height and fore-and-aft po
sition
® Adjusting the angle of the seatback
Power seat adjustment
Applies to vehicles: with power seats
The switches can be moved in various direc
tions to allow precise adjustment.
Read and heed a ll warnings before you adjust
your seat.
~ &,.
Adjusting the curvature of the lumbar
support
"' Push the forward or rear depress ion on the
switch shell@~
page 61, fig. 68 to in
crease or decrease the backrest curvature.
Seats and storage 61
Adjusting the height of the lumbar
support
"'Push the top or bottom depression on the
switch shell(!) to raise or lower the support
in the backrest.
Moving the front seats forward or
backward
"' Press the switch @forwa rd or backward
horizontally.
Adjusting the seat height
"' Pull or push the switch@even ly at both
ends to raise or lower the seat.
Angling the seat cushion up and down
(front)
"' Pull or push the switch @at the front only
to raise or lower the seat.
Angling the seat cushion up and down
(rear)
"' Pull or push the switch@at the rear on ly to
raise or lower the seat.
Adjusting the seatback
"' Push or pull the switch @ in the same direc
tion you want the seatba ck to tilt.
LD._ WARNING
- Never adjust the driver's or front passen
ger seat while the vehicle is moving. If
you do this whi le the vehicle is moving,
you will be out of position. Always adjust
the dr iver's or front passenger seat when
the vehicle is not moving.
- Be careful when adjusting the seat he ight. Check to see that no one is in the
way, or ser ious injury could result!
- Because the seats can be e lectrically ad
justed with the ignition key removed,
never leave children unattended in the
veh icle. Unsupervised use of the electric
seat adjustments may cause serious in
Jury.
Page 77 of 244
(D Note
On ly after the vehi cle has come to com
plete stop, should you f irm ly set the park
ing brake and either move the selector lev
er into "P".
Parking
P ar kin g
"' Stop the vehicle using the brake pedal.
"' Set the parking brake firmly .
"' Switch
off the eng ine .
"' Move the se lector lever into the P pos ition
i=> & .
"'When on incl ines or declines, turn the steer
ing wheel so that the vehicle w ill roll into
the curb if it begins to move .
A WARNING
This is how you can reduce the risk of in
jury when leaving your veh icle.
- Never park the vehicle where it can come
in contact with dry grass, spilled f uel or
any other flammable mater ials.
- Never allow anyone -especially small
children -to remain in the vehicle when
it is locked . Locked doors make it more
difficult for rescuers to access the pas
senger compartment in the event of an
eme rgency. Danger to life!
- Never leave ch ild ren unsupervised in the
vehicle . Children co uld re lease the park
ing brake. The vehicle co uld start to roll
away and cause an accident.
- No matter what the season is, the tem
perature in a par ked vehicle can reach
dange ro us levels.
Starting on hills
App lies to vehicles : wit h hill hold assist
Hill hold ass ist makes it easier to start on
hill s.
-
The system is act ivated when the brake pedal
i s depressed for a few second s.
On the ro ad 75
After releasing the brake pedal, the b rake
power is held for a
brief moment to p revent
the ve hicle from rolling back when starting . At
th is time, you can easi ly beg in to move your
vehicle.
A WARNING
- If you did not begin moving immed iate ly
after releasing the brake pedal, under
certain ci rc u mstances, the vehicle would
beg in to rol l backwa rd. Dep ress the
bra ke peda l immedi ate ly o r engage the
hand brake .
- Should the e ngine sta ll, dep ress the
brake peda l immedi ate ly or engage the
hand brake .
- I n order to prevent the vehicle from roll
i n g back unintentionally when s tarting in
stop -and -go traffic, keep the brake pedal
depressed for a few seconds before driv
ing off.
(D Tips
You can find o ut if yo ur vehicle is eq uipped
with "Hill hold assist" at an authorized
A udi dealership.
Speed warning system
Overv iew
The speed warning system helps you to keep
your driving speed below a set speed limit.
The speed warning system warns the driver if
he exceeds a previous ly stored max imum
speed . A warning tone will sound as soon as
the ve hicle speed exceeds the set speed by
about 3 mph (3 km/h). At the same time, a
warning symbo l appea rs in the disp lay.
The speed warning system has two warning
thre sholds that function independently of
each other and that have somewhat different
purposes:
Speed warning 1
You can use speed warning 1 to set the maxi mum speed while you are driving . This setting
will remai n in effect until yo u tur n
off the .,..
Page 79 of 244
Speed warning 2: setting a speed limit
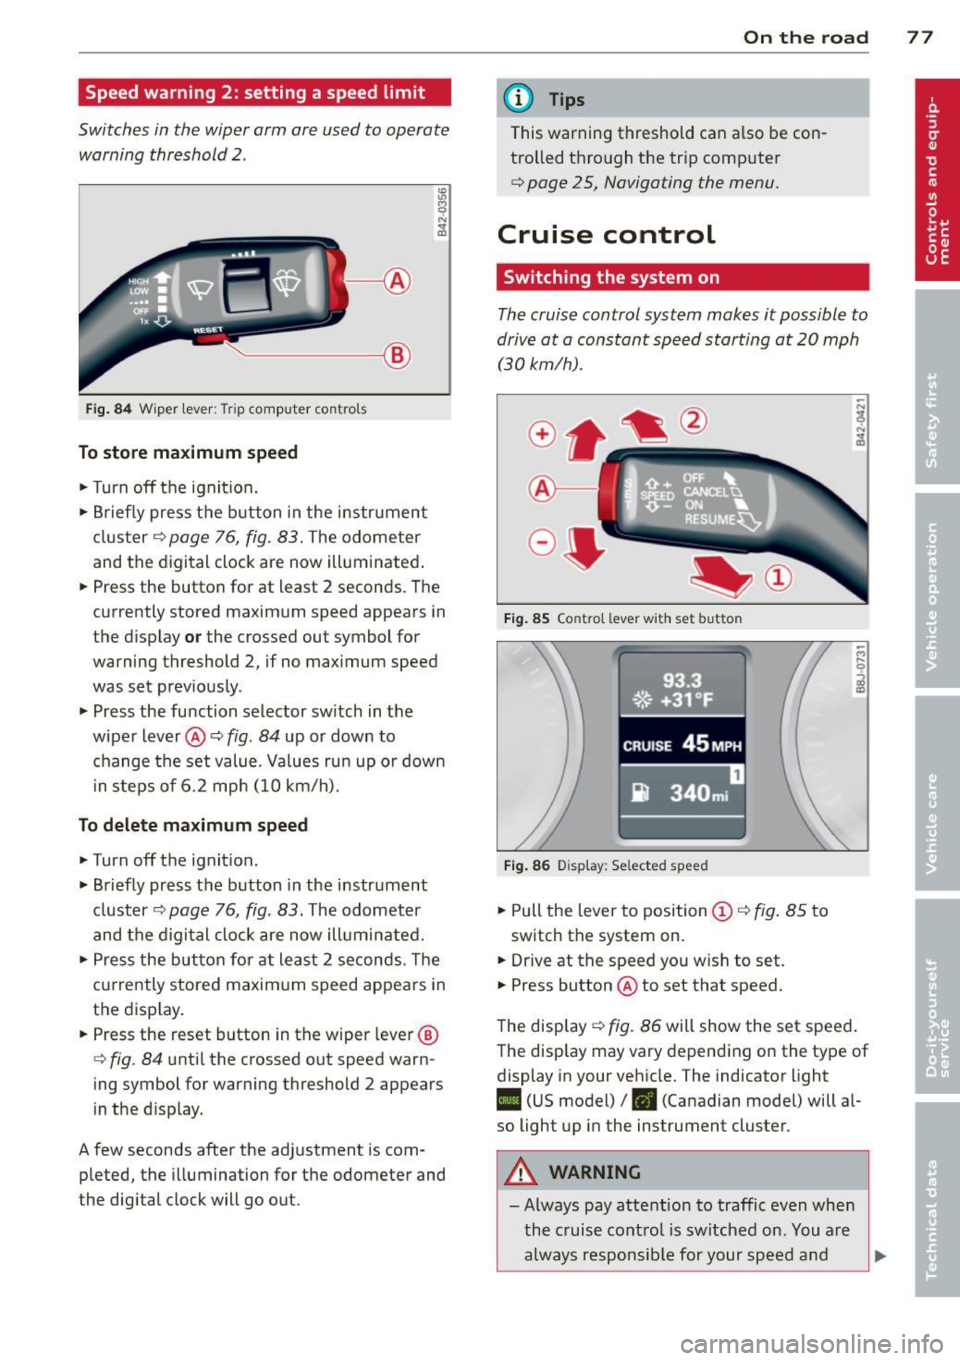
Switches in the wiper arm are used to operate warning threshold
2 .
'----I ®
Fig. 84 W iper lever: Trip computer controls
To store maximum speed
.. Turn off the ignit ion .
.. Briefly press the button in the instrument
cluster¢
page 76, fig. 83. The odometer
and the digital clock are now illuminated .
.. Press the button for at least 2 seconds. The
currently stored maximum speed appears in
the display
or the crossed out symbol for
warning threshold 2, if no maximum speed
was set previously .
.. Press the function selector switch in the
wiper lever@¢
fig. 84 up or down to
change the set value. Values run up or down
i n steps of 6.2 mph (10 km/h).
To delete maximum speed
.. Turn off the ignition.
.. Briefly press the button in the instrument
cluster ¢
page 76, fig. 83. The odometer
and the digital clock are now illuminated.
.. Press the button for at least 2 seconds. The
currently stored maximum speed appears in
the display.
.. Press the reset button in the wiper lever®
¢
fig . 84 until the crossed out speed warn
ing symbol for warning threshold 2 appears
in the d isplay.
A few seconds after the adjustment is com pleted, the illumination for the odometer and
the digital clock will go out.
On the road 77
@ Tips
This warning threshold can a lso be con
trolled through the trip computer
¢ page 25, Navigating the menu.
Cruise control
Switching the system on
The cruise control system makes it possible to
drive at a constant speed starting at
20 mph
(30kmlh).
®-
Fig. 85 Co ntro l leve r w ith set b utto n
Fig. 86 Display : Se lected speed
.. Pull the lever to position @¢ fig. 85 to
switch the system on .
.. Dr ive at the speed you w ish to set .
.. Press button @ to set that speed.
The display ¢
fig. 86 will show the set speed .
The display may vary depending on the type of
display in your vehicle. The indicator light
II (US model) /. (Canadian model) will al
so light up in the instrument cluster .
A WARNING
-Always pay attention to traffic even when
the cruise control is switched on. You are
always responsible for your speed and
Page 81 of 244

Audi magnetic ride
Applies to vehicles: with magnetic ride
Damping can be adjusted to the driver's pref
erence and it adapts automatically to the cur
rent driving situation.
Fig. 87 Ce nter console : Switc h for Au di magnet ic ride
• Press the sw itch Q fig . 87 to tu rn sport set-
t ing on or off.
Aud i magnetic ride is an electronically con
trolled damping system. This chassis system
assists the dr iver by adapting to the particular
situation through imperceptible control proc
esses. The
da mping provides individua l modu
lation of damping forces. For example, with
damping characteristics set to provide greater
comfort, damping is set somewhat harder for
a brief period only
as required, when rounding
a curve and when braking.
St andard setti ng
Select the standard sett ing if you prefer a sus
pension setting emphasizing comfort .
Sport setting
Select the sport setting if you prefer a sporty
suspens ion setting . The LED in the switch
R
comes on to indicate sport setting.
@ T ips
The warning/indicator light R in the in
strument cluster comes on in the event of
a ma lfunction. Drive to the closest author
ized Audi dealer as soon as possible and
have the malfunction repaired.
On th e road 7 9
Sport mode
Applies to vehicles: wit h Sport button
Fig . 88 Butto n in the center console
.,. To switch sport mode on, press the button
in the center console . The indicator light
turns on.
• To switch sport mode off, press the button
in the center console again. The indicator
light turns on .
A more agile and sporty driving style is possi
ble when driving the vehicle in "sport mode".
T his mode affects throttle response and the
sound of the engine and the damping charac
teristics of the Audi magnetic ride for dynamic
suspension tuning .
(1} Tips
If there is a malfunction in the retractable
rear spoiler* or the Audi magnetic ride*, it
may not be poss ible to activate sport
mode.
Acoustic parking system
Rear acoustic park assist
Applies to vehicles: with 4-channe l acoustic park assist
Acoustic park assist gives a warning about
obstacles behind the vehicle.
D es cription
The rear acoustic park assist (4-channel
acoustic park assist) determines the distance
of the vehicle from an obstacle using ultra
sonic sensors. The sensors are in the rear
bumper. The volume and the pitch of the
Page 93 of 244
Driving Safely
General notes
Safe driving habits
Please remember -safety first!
This chapter contains important information,
tips, instructions and warnings that you need
to read and observe for your own safety, the
safety of your passengers and others . We have
summarized here what you need to know
about safety belts, airbags, child restraints as
well as child safety. Your safety is for us
priori
ty number 1.
Always observe the information
and warnings in this section - for your own
safety as well as for that of your passengers.
The information in this section applies to all
model versions of your vehicle . Some of the
features described in this sections may be
standard equipment on some models, or may
be optional equipment on others. If you are
not sure, ask your authorized Audi dealer.
A WARNING
- Make certain that you follow the instruc
tions and heed the WARNINGS in this
Manual. It is in your interest and in the
interest of your passengers.
- Always keep the complete Owner's Liter
ature in your Audi when you lend or sell
your vehicle so that this important infor
mation will always be available to the
driver and passengers.
- Always keep the Owner's literature handy
so that you can find it easily if you have
questions.
Safety equipment
The safety features are part of the occupant
restraint system and work together to help
reduce the risk of injury in a wide variety of
accident situations .
Your safety and the safety of your passengers
should not be left to chance. Advances in
technology have made a variety of features
available to help reduce the risk of injury in an
Driving Safely 91
accident. The following is a listing of just a
few of the safety features in your Audi:
- sophisticated safety belts for driver and all
passenger seating positions,
- safety belt pre-tensioners,
- front airbags,
- knee airbags for the front seats,
- side airbags in the front seats,
- LATCH anchorages for child restraints,
- adjustable steering column.
These individual safety features can work to
gether as a system to help protect you and
your passengers in a wide range of accidents.
These features cannot work as a system if
they are not always properly adjusted and
properly used!
Safety is everybody's responsibility!
Important things to do before driving
Safety is everybody's job! Vehicle and occu
pant safety always depends on the informed and careful driver.
For your safety and the safety of your passen
gers,
before driving always:
~ Make sure that all lights and signals are op
erating correctly .
~ Make sure that the tire pressure is correct.
~ Make sure that all windows are clean and af
ford good visibility to the outside.
~ Secure all luggage and other items carefully
c::> page 65.
~ Make sure that nothing can interfere with
the pedals.
~ Adjust front seat, head restraint and mirrors
correctly for your height .
~ Instruct passengers to adjust the head re
straints according to their height .
~ Make sure to use the right child restraint
correctly to protect children¢
page 129,
Child Safety.
~ Sit properly in your seat and make sure that
your passengers do the same¢
page 59,
General recommendations. .,..
•
•
Page 94 of 244
92 Driving Safel y
• Fasten your safety be lt and wear it properly .
Also instruct your passengers to fasten their
safety belts proper ly ¢
page 100.
What impairs driving safety?
Safe driving is directly related to the condi
tion of the vehicle, the driver as well as the
driver's ability to concentrate on the rood
without being distracted.
The driver is responsible for the safety of the
vehicle and all of its occupants. If your ability
to drive is impaired, safety risks for everybody
in the vehicle increase and you also become a
hazard to everyone else on the road ¢
.&,.
Therefore:
• Do not let yourself be distracted by passen
gers or by using a cellular telephone.
• NEVER drive when your dr iving ability is im
paired (by medicat ions, alcohol, drugs, etc.) .
• Observe all traffic laws, rules of the road
and speed limits and plain common sense.
• ALWAYS adjust your speed to road, traffic
and weather conditions.
• Take frequent breaks on long trips . Do not
drive for more than two hours at a stretch .
• Do NOT drive when you are tired , under
pressure or when you are stressed.
A WARNING ,.
Impai red driving safety increases the risk
of serious personal injury and death when
ever a vehicle is being used.
Proper occupant
seating positions
Proper seating position for the driver
The proper driver seating position is impor
tant for safe, relaxed driving.
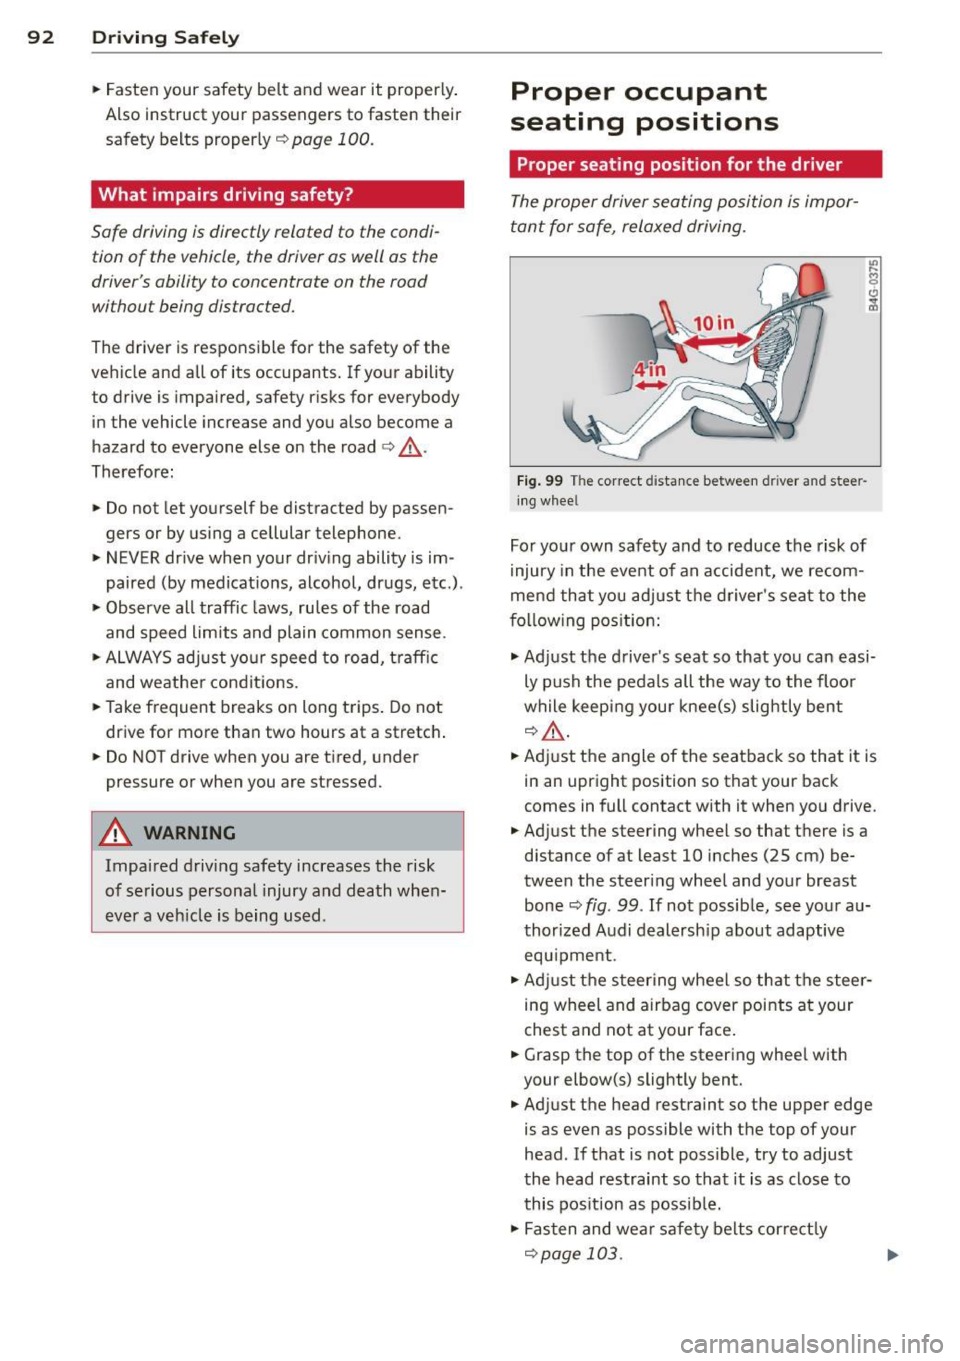
Fig. 99 The correct distance between driver and steer
ing whee l
For your own safety and to reduce the risk of
injury in the event of an accident, we recom
mend that you adjust the driver's seat to the
f o llow ing position:
• Adjust the driver's seat so that you can easi
ly push the pedals all the way to the floo r
while keeping your knee(s) slightly bent
q &_.
• Adjust the angle of the seatback so that it is
in an upright position so that your back
comes in full contact with it when you drive.
• Adjust the steering wheel so that there is a
distance of at least 10 inches (25 cm) be
tween the steering wheel and your breast bone¢
fig. 99 . If not possible, see your au
thorized Audi dealersh ip about adaptive
equ ipment.
• Adjust the steering wheel so that the steer
ing wheel and airbag cover points at your
chest and not at your face.
• Grasp the top of the steering whee l with
your elbow(s) slightly bent.
• Adjust the he ad restraint so the upper edge
is as even as possible with the top of your
head . If that is not possible, try to adjust
the head restraint so that it is as close to
this pos ition as possib le.
• Fasten and wear safety belts correctly
¢page 103.