2015 AUDI S3 SEDAN tire pressure
[x] Cancel search: tire pressurePage 230 of 282
Tires and wheels
are listed on the safety compli
ance sticker label located on the
driver's side B-pillar
¢ page 224,
fig. 170 .
& WAR NING
-
Overloading a vehicle can cause
loss of vehicle control, a crash
or other acc ident, serious per
sonal injury, and even death.
-Carrying more weight than your vehicle was designed to carry will prevent the vehicle
from handling properly and in crease the risk of the loss of
vehicle control.
-The brakes on a vehicle that
has been overloaded may not
be able to stop the vehicle
within a safe distance .
-Tires on a vehicle that has been overloaded can fail sud
denly, including a blowout and
sudden deflation, causing loss of control and a crash.
-Always make sure that the to tal load being transported -
inc luding the weight of a trail
er hitch and the tongue
weight of a loaded trailer -
does not make the vehicle
heavier than the vehicle's
Gross Vehicle Weight Rating.
228
Determining correct load
limit
Use the example below to calcu
late the total weight of the pas
sengers and luggage or other
things that you plan to transport so that you can make sure that
your vehicle will not be overload
ed.
Step s for Determining Correct
Load Limit
1. Locate the statement "THE
COMBINED WE IGHT OF OCCU
PANTS AND CARGO SHOULD
NEVER EXCEED XXX KG OR XXX
L BS"on your vehicle's placard
(tire inflation pressure label)
¢ page 224, fig . 170 .
2. Determine the combined
weight of the drive r and pas
sengers that will be riding in
your vehic le.
3. Subtract the combined weight of the driver and passengers
from "XXX" kilograms or "XXX"
pounds shown on the sticker
¢ page 224, fig . 170 .
4. The resulting figure equals the
available amount of cargo and luggage load capacity . For ex
ample, if the
"XXX" amount
equals 1400 lbs . and there will ...
Page 231 of 282

M N
0 > co ,...., \!) 1.1'1
1.1'1
1.1'1
,....,
be five 150 lbs. passengers in
your vehicle, the amount of
available cargo and luggage load capacity is 650 lbs.
(1400-750 (5
X 150) = 650
lbs.)
5. Determine the combined weight of luggage and cargo
being loaded on the vehicle.
That weight may not safely
ex
ceed the available cargo and
luggage load capacity calculat
ed in Step 4.
6. If your vehicle will be towing a trailer, load from your trailer
will be transferred to your vehi
cle. Consult this manual to de
termine how this reduces the available cargo and luggage
load capacity of your vehicle.
.,.Check the tire sidewall
(c> page 214, fig. 168) to deter
mine the designated load rating
for a specific tire.
Wheel bolts and rims
Wheel bolts
Wheel bolts must be clean and loosen/tighten
easily.
Rims
Rims with a bolted rim ring* or with bolted wheel
covers* consis t of mul tiple pieces. These compo
nents were bolted together using special bolts
and a special procedure . You must not repair or
disassemble them
Q ,& .
Tires and wheels
A WARNING
Wheel bolts that are tightened or repaired in
correctly can become loose and result in loss
of vehicle control, which increases the risk of
an accident . For the correct tightening specifi
cation, refer to~
page 242, A~er changing a
wheel.
- Always keep the wheel bolts and the threads
in the wheel hub clean and free of grease.
- Only use wheel bolts that fit the rim.
-Always have damaged rims repaired by an
authorized Audi dealer or authorized Audi
Service Facility. Never repair or disassemble
rims yourself, because this increases the risk
of an accident.
Winter tires
Winter tires significantly improve the vehicle's
handling when driving in winter conditions. Be
cause of their construction (width, compound,
tread pattern), summer tires provide less traction on ice and snow.
.. Use winter tires on all four wheels.
.. Only use winter tires that are approved for your
vehicle .
.. Please note that the maximum permitted
speed may be lower with winter tires
Q _& . An
authorized Audi dealer or authorized Audi Serv
ice Facility can inform you about the maximum
permitted speed for your tires.
.. Check the tire pressure after installing wheels
Qpage 224.
The effectiveness of winter tires is reduced great
ly when the tread is worn down to a depth of
0.157 inch (4 mm). The characteristics of winter
tires also decrease greatly as the tire ages, re
gardless of the remaining tread.
A WARNING
-Never drive faster than the maximum per
mitted speed for your tires. This could cause
the tires to heat up too much. This increases
the risk of an accident because it can cause
the tire to burst.
229
Page 232 of 282
Tires and wheel s
-Always adapt your driving to the road and
traff ic conditions. Dr ive carefully and red uce
yo ur speed on icy or slippery roads. Even
winter tires can lose tract io n on black ice .
@ For the sake of the environment
Reinstall summer tires at the appropriate
time, because they provide better handling
when roads are free of snow a nd ice. Summer
tires cause less road noise, tire wear and fuel
consumptio n.
(D Tips
You can also use all season tires instead of
w inte r tires. Please note that in some coun
t ries w here winter tires are requ ired, on ly win
t er tire s wi th the .& symbol may be pe rm it
t ed.
Snow chains
Snow chains improve traction in the snow .
.,. Only install snow chains on the front wheels.
Th is applies also to veh icles with all wheel
drive* .
.,. Ch eck and correct the seating of th e snow
c h ains if necessa ry afte r dri ving a few feet. Fo l
l ow the ins tructions from the manuf acturer.
.,. Note t he max imum permit ted speed w hen driv
ing with snow chains . Do not exceed 30 mph
(SO km/h).
Snow chains not only improve the
driving in win
ter road conditions, but a lso t he
braking .
Use of s now chai ns is o nly pe rm itted with certa in
r im/t ire comb ina tion s due to techn ica l reason s.
Chec k w ith an au thori zed A udi d ealer or au tho r
ized A udi Service Facility to see if yo u may use
snow cha ins.
Use
fine -mesh snow chain s. They mus t not add
mo re th an 0 .5 3 inch ( 13.S mm) in height, in clu d
ing the chain lock.
You must remove the chai ns when dr iv ing on
roads tha t are
free of snow. W hen r oads are free
of snow, snow chains can imp air handling an d
230
'
damage the tires, and the chains wi ll quick ly be
dest royed.
A WARNING
Using incorrect snow chains o r insta lling snow
cha ins incor rectly can res ult in loss of veh icle
c o ntrol, which increases the risk of an acc i
dent.
(D Note
- Snow chains can damage the rims/wheel
cove rs* if the c hains come into direct c on
tact with them. Remove the wheel covers*
first . Use coa ted snow cha ins.
Low aspect ratio tires
Your A udi is fac to ry-eq uipped w ith low aspect ra
t io t ires. These t ires have been thoroug hly tes ted
a nd been sele cted specifi ca lly f or your mode l for
the ir su perb pe rformance, r oad fee l and h andlin g
u nder a var iety of dr iv ing con ditions. As k your au
t h orized Aud i dea le r fo r more details .
The low aspe ct ratio of these tires is ind icated by
a n umer al of
55 or less in the t ire's s ize design a
tion . The nume ral represents the ratio of the
ti re's si dewall height in relatio n to its tread width
expressed i n pe rcentage. Conventional tires have
a height/width rat io o f 60 o r more .
The performance of low-aspect-ratio tire s is par
ticularly sensitive to imprope r inflation pres
sure. It is therefore important that low aspect ratio tires are inflated to the specified pressure
and that the inflation pressure is regularly
checked and maintained. Tire pressures should be checked at least once a month and always
b efor e a long trip
Q page 224 .
What you can do to avoid tire and rim
damage
Low aspect rat io tires can be damaged mo re eas i
l y by impact w ith potho les, c urbs , g ull ies o r
r idges on t he road, pa rti cularly if th e tire is un
der i nflated.
Page 234 of 282

Tires and wheels
The grade C corresponds to a level of perform
ance which all passenger car tires must meet un
der the Federal Motor Vehicle Safety Standard No.
109 . Grades Band A represent higher levels
of pe rformance on the laboratory test wheel than
the minimum required by law .
A WARNING
The traction grade assigned to this tire is
based on straight-ahead braking traction
tests, and does not include acceleration, cor
nering, hydroplaning or peak traction charac
teristics.
A WARNING
The temperature grade for this tire is estab
lished for a tire that is properly inflated and
not overloaded. Excessive speed, underinfla
tion, or excessive loading, either separate ly or
in combination, can cause heat buildup and
possible tire failure.
A WARNING
Temperature grades apply to tires that are properly inflated and not over or underinflat
ed .
Tire pressure monitoring
system
CD General notes
Applies to veh icles: w ith tire pressure monitoring system
Each tire, including the spare (if provided),
should be checked monthly when cold and inflat
ed to the inflation pressure recommended by the
vehicle manufacturer on the vehicle placard or
tire inflation pressure label.
(If your vehicle has
tires of a different size than the size indicated on
the vehicle placard or tire inflation pressure la
bel, you should determine the proper tire infla
tion pressure for those tires).
As an added safety feature, your vehicle has been
equipped with a tire pressure monitoring system
(TPMS) that illuminates a low tire pressure tell
tale when one or more of your tires is significant
ly under-inflated. Accordingly, when the low tire
pressure telltale illuminates, you should stop and
232
check your tires as soon as possible, and inflate
them to the proper pressure . Driving on a signifi
cantly under-inflated tire causes the tire to over
heat and can lead to tire failure. Under-inflation
also reduces fuel efficiency and tire tread life,
and may affect the vehicle's handling and stop
ping ability .
Please note that the TPMS is not a substitute for
proper tire maintenance, and it is the driver's re
sponsibility to maintain correct tire pressure, even if under-inflation has not reached the level
to trigger illumination of the TPMS low tire pres
sure telltale.
Your vehicle has also been equipped with a TPMS malfunction indicator to indicate when the sys
tem is not operating properly. The TPMS mal
function indicator is combined with the low t ire
pressure tel ltale. When the system detects a
malfunction, the telltale will flash for approxi
mately one minute and then remain continuously
illuminated. This sequence will continue upon
subsequent vehicle start -ups as long as the ma l
function exists .
When the malfunction indicator is illuminated,
the system may not be able to detect or signal low tire pressure as intended. TPMS malfunctions
may occur for a variety of reasons, including the
installation of replacement or alternate tires or
wheels on the vehicle that prevent the TPMS
from functioning properly. Always check the
TPMS malfunction telltale after replacing one or
more t ires or wheels on your vehicle to ensure
that the replacement or alternate tires and
wheels allow the TPMS to continue to function
properly .
Page 235 of 282
....,
N
0 > co
rl I.O
"'
"'
"'
rl
If the Tire Pressure Monitoring System
indicator appears
Applies to vehicles: with t ire p ressure monitoring syste m
The tire pressure indicator in the instrument
cluster informs you if the tire pressure is too low
or if there is a system malfunction.
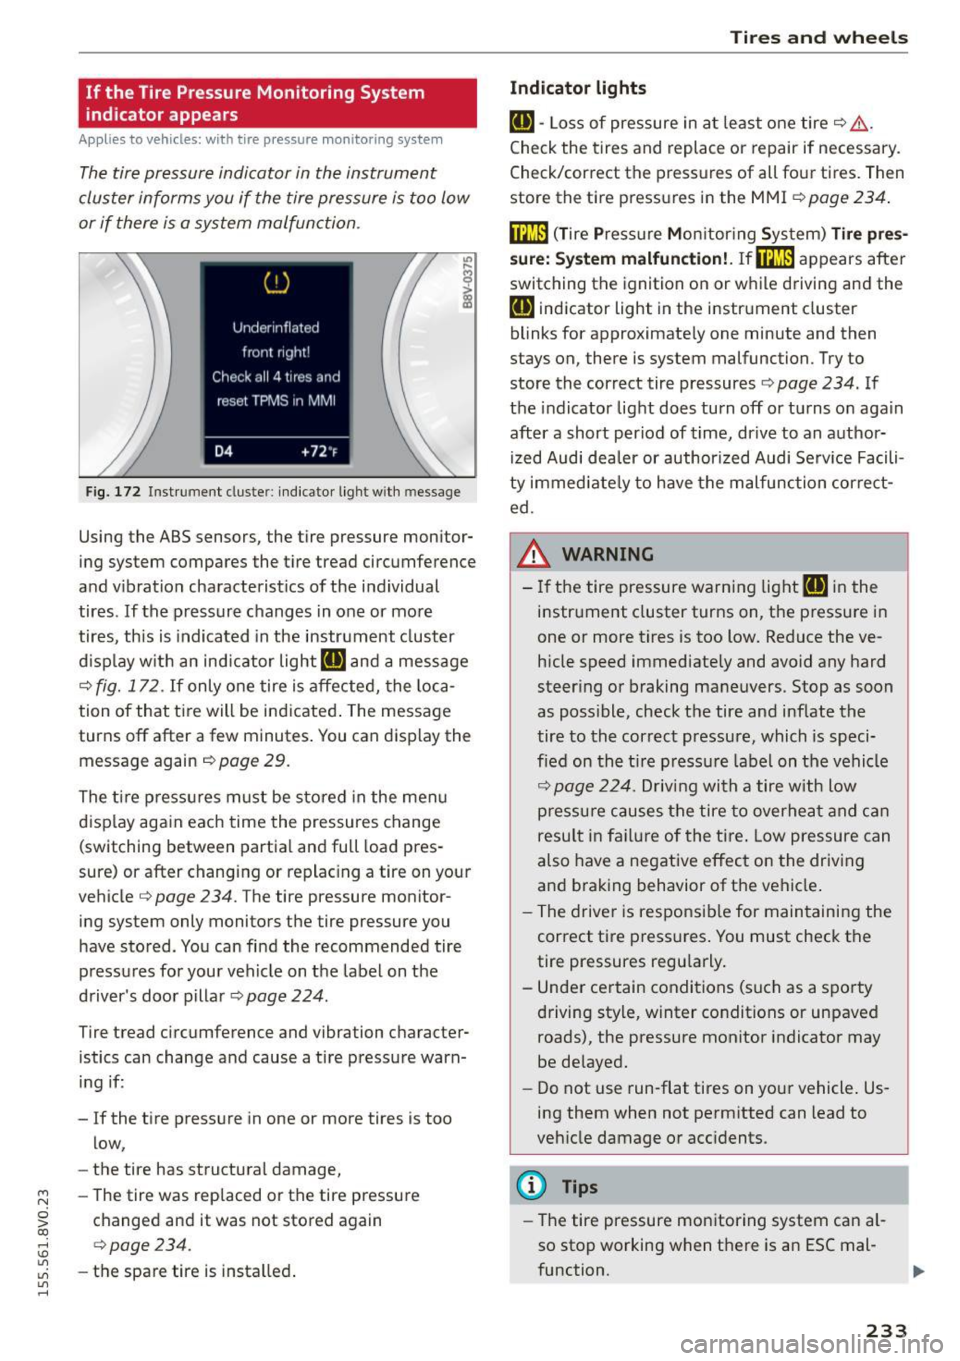
F ig. 172 Instrument cluster: in dicator light w ith message
Using the ABS sensors, the tire pressure monitor
ing system compares the tire tread circumference
and v ibration characterist ics of the ind ividual
tires.
If the pressure changes in one or mo re
tires, th is is indicated in the instrument cluster
d isp lay w ith an ind icator light
RE and a message
¢
fig. 172. If only o ne tire is affected, the loca
tion of that ti re will be indicated . The message
turns off after a few minutes . You can display the
message again
r::;,page 29.
The tire p ressu res m ust be stored in the menu
disp lay aga in each time the pressures change
(switching between partia l and full load pres
sure) or after changing or replac ing a tire on your
ve hicle¢
page 234. The tire pressure monitor
ing system only monitors the tire pressure you
have stored. You can find the recommended tire
pressures for your vehicle on the label on the
driver's door pillar¢
page 224.
Tire tread circumference and vibration character
istics can change and cause a tire pressure warn
in g if:
- If the tire pressure in one or more tires is too
low,
- the tire has structural damage,
- The tire was replaced or the tire pressure
changed and it was not stored again
¢ page 234.
-the spare tire is insta lled .
Tires and wheels
Indicator lights
RE -Loss of pressure in a t least one tire ¢ ,&.
Check the tires and replace or repair if necessary.
Check/correct the pressures of all four t ires. Then
store the tire p ressu res in the MMI ¢
page 234.
film (T ire Pressure Mon itor ing Sys tem) Tire pres
s ure: Sy stem malfunction!. If@m
appears after
switching the ignition on or while driving and the
RE ind icator light in the instr ument cluster
blinks for approximate ly one minute and then
stays on, there is system malfunction. Try to
store the correct tire pressures ¢
page 234. If
the indicator light does turn off or turns on aga in
after a short period of time, dr ive to an author
i zed Audi dea ler or author ized Audi Serv ice Facili
ty immed iate ly to have the malfunction corre ct
ed.
,&. WARNING
- If the tire pressure warning light RE in the
i n str ument cluster turns on, the pressure in
one or more tires is too low . Reduce the ve
h icle speed immediate ly and avoid any hard
steer ing or braking maneuvers. Stop as soon
as poss ible, check the tire and inf late the
tire to the correct pressure, which is speci
fied on the t ire p ress ure label on the vehicle
r::;, page 224. Driv ing with a tire with Low
p ressu re causes the tire to overhea t and c an
resul t in fa il ur e of the tire . Low pressure can
a lso have a negative effect on the driving
and b rak ing behavior of t he vehicle .
- T he drive r is respons ib le for main taining the
correct ti re press ures . You must check the
tire pressures regu larly .
- Under certain conditions (such as a sporty
driving style, winter conditions or unpaved
roads), the pressure monitor indicator may
be de layed.
- Do not use run-flat tires on yo ur vehicle . Us
ing them when not permitted can lead to
veh icle damage or acc idents.
(D Tips
- The tire pressure monitoring system can al
so stop working when t here is an ESC mal-
function. ..,.
233
Page 236 of 282
Tires and wheel s
-Using snow chains may result in a system
malfunction.
- The t ires wi th the ident ificat ion "AO" or
"RO"¢
page 221 have been matche d with
your A udi tire pressure monitoring system.
We recommend that you use these t ires.
- The tire pressure monitoring system can on
l y mon itor the ti re p ress ure of the dr iv ing
tires. Check the tire pressure of the spare
whee l in the luggage compartment so that
i f necessary it is ready for use.
Storing tire pressures
Applies to vehicles: w ith tire pressure monitoring system
A change in tire pressure or a change in tires
must be stored in the system .
The tire p ressu re is stored in the MMI.
.., Make sure befo re stori ng th at t he tire pressures
of all fo ur t ires meet the specified va lues and
are adapted to the load . Otherwise the system
cou ld ma lf u nction
¢ page 224 .
.., Switc h on the ignition .
.,. Se lect : the IMENU! button> Car> Systems *
control button > Service & control > Tire pres
sure monitor > Stor e tire pressure > Yes, store
now .
(]} Tips
Do not store the t ire press ures if snow cha ins
are i nstalled . Otherwise the system could
malf unct io n.
234
Page 237 of 282

M N
0 > co ,...., \!) 1.1"1
1.1"1
1.1"1
,....,
Care and cleaning
General information
Regular, proper care helps to maintain your vehi
cle's value.
It can a lso be a req uirement when
submitting warranty claims for corrosion damage
and paint defects on the body.
The necessary care products can be obtained
from an a uthorized Audi dea ler or authorized
Audi Service Faci lity . Read and fo llow the instruc
tions for use on the packaging.
A WARNING
- Us ing clean ing and care products incorrectly
can be dangerous to your health.
- Always store cleaning and care products out
of reach of children to reduce the r isk of po i
soning.
@ For the sake of the environment
- Preferably use environmentally-friendly products when buying cleaning agents.
- Do not d ispose of leftover cleaning and care
p roducts with household trash.
Car washes
The longer that depos its s uch as insects, bird
droppings, tree sap or road sa lt rema in on the ve
h icle, the more the surface can be damaged. High
temperatures such as those caused by sunlight
in crease the damaging effect.
Before washing, rinse off heavy depos its with
p le nty of water.
Stubborn deposits s uch as bird droppings or tree
sap are best removed w ith p lenty of water and a
m ic rofiber cloth.
Also, wash the underside of your vehi cle once
road salt stops being used for the season.
Pressure washers
W hen washi ng your ve hicles w ith a pressure
washer, always fo llow the oper ating instr uctions
p rov ided wi th the p ress ure washer. This is espe
cially importan t in rega rd to the p ress ure and
spraying distance . Do not aim the spray direct ly
Care and cleaning
at seals on side w indows, doors, t he hood, the
lu ggage compartment lid or the sunroof* or at
tires, rubber hoses, insulating material, sensors *
or camera lenses*. Keep a distance of at least 16
inches (40 cm).
Do not remove snow and ice with a pressure
washe r.
Neve r use rotary nozzles or high pressure no z
zles .
T he wate r temperature must not be above 140 °F
(60 °( ).
Automatic car washes
Sp ray off the veh icle before washing.
Make sure that the w indows and roo f* are closed
and the windsh ield wipers are off. Follow instruc
tions from the car wash operator, especially if
the re are accessor ies attached to you r vehicle .
If possible, use car washes that do not have
brushes .
Washing by hand
Clean the ve hicl e starting from the top and work
ing down using a soft sponge or cleani ng b rush.
U se solvent -free cleaning p rod ucts .
Washing vehicles with matte finish paint by
hand
To avoid damaging the paint when was hing, first
remove dust and large particles from yo ur vehi
cle. Insects, g rease spots and fingerprints are
best removed with a spec ia l cleaner for matte
finish pai nt.
Apply the p rod uct us ing a microfiber cloth . To
avo id damaging the paint surface, do not use too
much pressure.
Rinse the vehi cle thoro ughly with water . Then
clean usi ng a neutra l shampoo and a soft micro
fiber cloth.
Rinse the ve hicl e thoroughly again and le t it air
dry. Remove any wate r residue using a s ham my . .,.
235
Page 244 of 282
Emergency assistance
_& WARNING
Always read and follow all WARNINGS and in
formation
c:> & in Raising the vehicle on
page 244
and c:> page 245.
After changing a wheel
A wheel change is not complete without the do
ing the following .
.. Always store the vehicle tool kit, the jack* and
the replaced tire in the luggage compartment
c:> page 136 .
.. Check the tire pressure on the spare wheel im
med iate ly after mounting it .
.. As soon as possible, have the
tightening tor
ques
on all wheel bolts checked with a torque
wrench. The correct tightening torque is 90 ft
lb
(120 Nm) .
.. Have the flat tire
replaced as soon as possible.
@ Tips
-If you notice that the wheel bolts are cor
roded and difficult to turn while changing a
tire, they should be replaced before you
check the tightening torque.
- Drive at reduced speed until you have the
tightening torques checked.
- After changing a wheel, the tire pressure in
all four tires must be checked/corrected and
the tire pressure mon itoring indicator must
be stored in the MMI
c:> page 234.
Decorative wheel covers
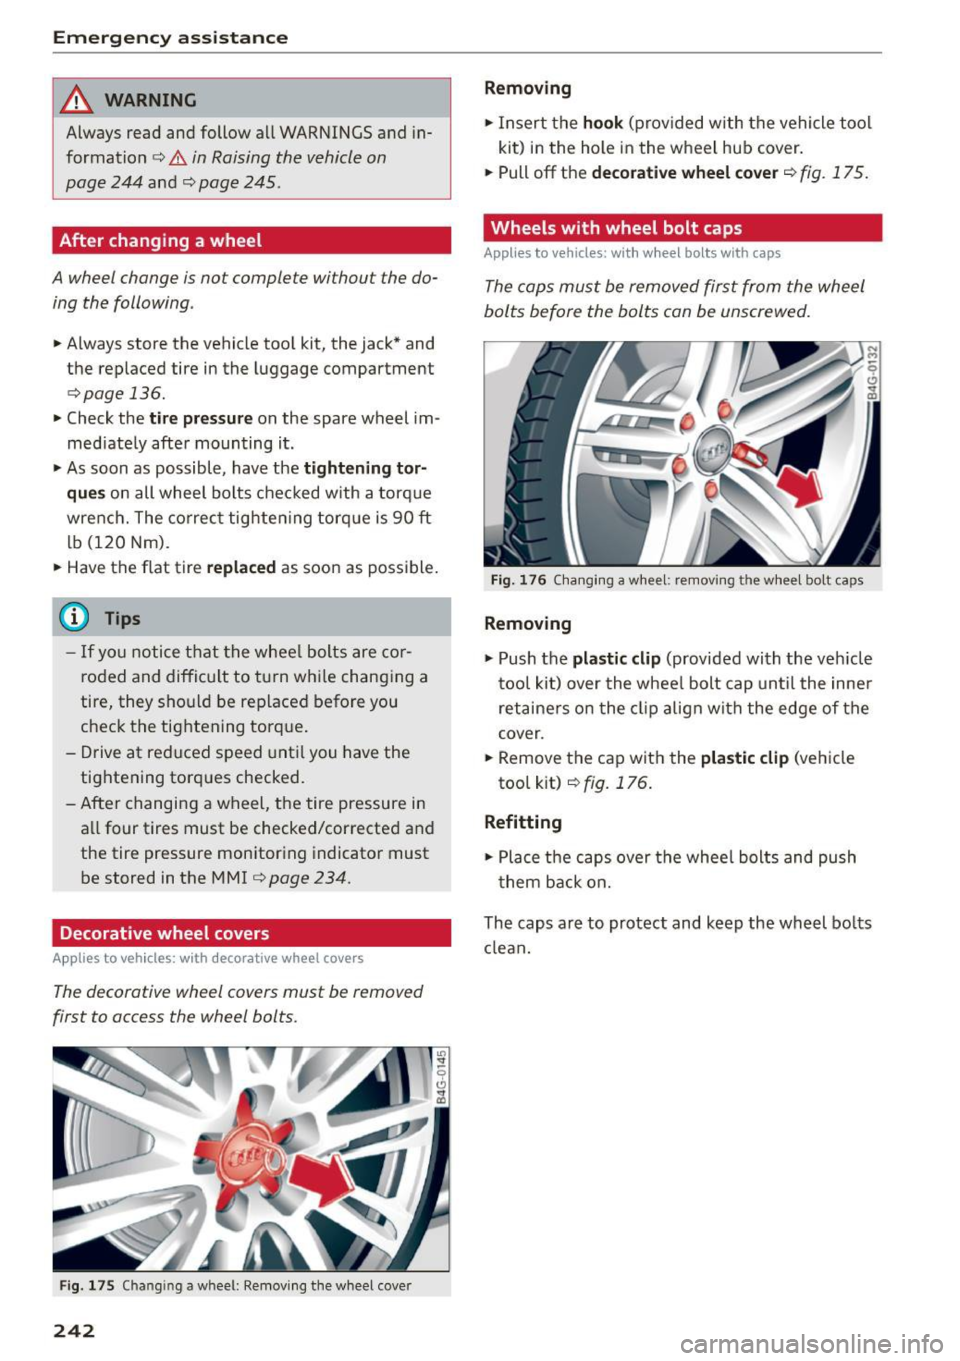
Applies to vehicles: with decorative wheel covers
The decorative wheel covers must be removed
first to access the wheel bolts .
Fig. 175 Chan gin g a w hee l: Removing the wheel cover
242
Removing
.. Insert the hook (provided with the vehicle tool
kit) in the hole in the wheel hub cover.
.. Pull off the
decorative wheel cover c:> fig. 175.
Wheels with wheel bolt caps
Applies to vehicles: with wheel bolts with caps
The cops must be removed first from the wheel
bolts before the bolts con be unscrewed .
Fig. 176 Changing a wheel: removing th e whee l b olt caps
Removing
.. Push the plastic clip (provided with the veh icle
tool kit) over the wheel bolt cap until the inner
retaine rs on the clip align with the edge of the
cover .
.. Remove the cap with the
plastic clip (vehicle
tool k it)
c:> fig. 176.
Refitting
.. Place the caps over the wheel bolts and push
them back on.
The caps are to protect and keep the wheel bolts
clean.