Page 209 of 310
 ..,.,
M ..,., ,....,
Care and cleanin g 207
Component Situ ation Solution
D eco ra ti ve
Deposits Mild soap solution a) if necessary a cleaning solution
part s/")
M N
0 > co ,...., \!) ..,.,
M ..,., ,....,
Care and cleanin g 207
Component Situ ation Solution
D eco ra ti ve
Deposits Mild soap solution a) if necessary a cleaning solution
part s/ suitable for stain less steel
t ri m
P ai nt
Paint damage Refer to the paint number on the vehicle data label, re-
pair with touch up paint¢
page 286
Spilled fuel Rinse with water immediately
Surface rust Rust remover, then protect with hard wax; for ques-
tions, refer to an authorized Audi dea ler .
Corrosion Have it removed by an authorized Audi dealer.
Water no longer Protect with hard wax (at least twice per year)
beads on the surface
of clean paint
No shine even Treat with suitable po lish; then app ly paint protectant if
though paint has the polish that
was used does not contain any protec-
been protected/ tant
paint looks poor
Deposits such as in- Dampen with water immediately and remove with a m i-
sects, bird drop- crofiber cloth
pings, tree sap and
road salt
Grease-based con -Remove ii mmediately with a mild soap solution al and a
taminants such as soft cloth
cosmetics or sun-
blo ck
C arb on p art s Deposits clean the same way as painted parts¢ page 205
Deco rati ve d ee-Deposits Soft sponge with
a m ild soap solutiona >
als
a) Mild soap solution: maximum two tablespoons of neu tral soap in 1 quart ( l lit er) of water
Int ernal cleaning
Component Situ ation Solution
Wind ows
Deposits Glass cleaner, then wipe dry
Deco ra tiv e Deposits Mild soap solutional
parts/
tri m
Pl as tic part s
Deposits Damp cloth
Heavier deposits Mild soap solution a>, detergent-free plastic clean ing
so lution, if necessary
D ispla ys Deposits Soft cloth with LCD cleaner
Cont rols Deposits Soft brush,
then a soft cloth with a mild soap sol utional
Saf ety b elt s Deposits Mild soap solution a), allow to dry before letting them
retract
...
•
•
•
Page 210 of 310

208 Care and cleaning
Component Situ ation Solution
Tex tile s,
Deposits adhering to Vacuum cleaner
art ifi cial l eather , the surface
Alcan ta ra Water-based depos- Absorbent cloth and m
ild soap so lution a>
its such as coffee,
tea, blood, etc.
Oil-based deposits Apply
a mild soap solut ion a>, blot away the dissolved oil
such as oil, make- or dye, treat afterward w ith water, if necessary
up, etc.
Special deposits Special stain remover, blot with absorbent material,
such as ink, nail pol-treat afterward with mild soap so lution, if necessary a)
ish, latex paint, shoe
polish, etc.
Natu ral leathe r Fresh stains Wool
cloth with a mi ld soap so lutiona >
Water-based depos- Fresh stains: absorbent cloth its such as coffee, Dr ied stains: stain remover suitable for leather
tea, blood, etc.
Oi l-based deposits Fresh stains: absorbent cloth and stain remover suitable
such as oil, make- for leather
up, etc . dried stains: Oil clean ing spray
Special deposits Spot remover suitable for leathe r
such as ink, nail po l-
ish, latex paint, shoe
polish, etc.
Ca re Regularly apply cond it io ni ng cream that protects from
light and penetrates into the mater ia l. Use spec ially-
co lored! conditioning cream, if necessary.
Carb on p art s Deposits clean th e same way as plastic parts
a) Mi ld soap solution: maximu m two tablespoons of neutral soap in 1 quart (l liter) of water
_& WARNING
The windsh ie ld may not be treated with
water-repelling windshield coating agents .
Unfavorab le conditions such as wetness,
darkness, or low sun can result in in
creased glare. Wiper blade chatter is also
possible .
([) Note
-Headlight s/tail li ght s
-Never clean headlights or tail lights
w ith a dry cloth or sponge.
- Do not use any cleaning product that
conta ins alcohol, because they could
cause cracks to form.
-
- Whee ls
- Never use any pa int polish or other
abrasive materials.
- Damage to the protective layer on the
rims s uch as stone chips or scratches
must be repaired immediately.
- Sen sors/ cam era len ses
-Never use warm or hot water to re-
move snow or ice from the camera
lens. This could cause the lens to crack.
- Never use abrasive cleaning mater ials
or alcohol to clean the camera lens.
This could cause scratches and cracks.
-Door windo ws
-Remove snow and ice on windows and
exter ior mirrors with a plastic scrape r.
Page 211 of 310
 1.11
M 1.11 ,....,
To avoid scratches, move the scraper only in one direction and not back and
forth.
- Never remove snow or ice from door
windows and mi")
M N
0 > co ,...., \!) 1.1'1
M 1.1'1 ,....,
To avoid scratches, move the scraper only in one direction and not back and
forth.
- Never remove snow or ice from door
windows and mirrors using warm or
hot water because this could cause
cracks to form.
- To avoid damage to the rear window
defogger, do not apply any stickers on
the heating wires on the inside of the
window.
- Decorative parts/trim
- Never use chrome care or cleaning
products.
-Paint
- To reduce the risk of scratches, the ve-
hicle must be free of dirt and dust be
fore polishing or waxing.
- To prevent paint damage, do not polish
or wax the vehicle in direct sunlight.
- To reduce the risk of paint damage, do
not polish away rust spots.
- Remove cosmetics and sunscreen im
mediately · these could damage the
paint.
- Displays
-To avoid scratches, do not use dry
cleaning methods on displays.
- Controls
- Make sure that no fluids enter the con-
trols, because this could cause dam
age.
- Safety belts
- Do not remove the safety belts to clean
them.
- Never clean safety belts or their com
ponents chemically or with corrosive
fluids or solvents and never allow sharp objects to come into contact
with the safety belts. This could cause damage to the belt webbing .
- If there is damage to the webbing, the
connections, the retractors or the buck
les, have them replaced by an author
ized dealer .
-Textiles/artificial leather/Alcantara
Care and cleaning 209
- Never treat artificial leather/Alcantara
with leather care products, solvents,
floor polish, shoe polish, spot remove
or similar products.
- Have a specialist remove stubborn
stains to prevent damage.
- Never use steam cleaners, brushes,
hard sponges, etc. when cleaning.
- Do not turn on the seat heating* to dry
the seat.
- Objects with sharp edges such as zip
pers, rivets on clothing or belts can
cause damage to the surface.
- Open hook and loop fasteners, for ex
ample on clothing, can damage seat
covers. Make sure hook and loop fas
teners are closed .
-Natural leather
- Never treat leather with solvents, floor
polish, shoe polish, spot remover or
similar products.
- Objects with sharp edges such as zip
pers, rivets on clothing or belts can
cause damage to the surface.
-Never use steam cleaners, brushes,
hard sponges, etc. when cleaning.
- Do not turn on the seat heating* to dry
the seat .
- To help prevent the leather from fad
ing, do not leave the vehicle in direct
sunlight for long periods of time.
If
leaving the vehicle parked for long pe
riods of time, you should cover the
leather to protect it from direct sun
light.
(D Tips
- Insects are easier to remove from paint
that has been freshly waxed.
- Regular waxing can prevent rust spots
from forming.
•
•
•
Page 212 of 310

210 Checking and Filling
Checking and Filling
Gasoline
Fuel supply
Applies to vehicles: with gasoline engine
Using the right fuel helps keep the environ
ment clean and prevents engine damage .
Fuel recommendation
The fuel recommended for your vehicle is un
leaded premium
grade gasoline . Audi recom
mends using TOP TIER Detergent Gasoline
with a minimum octane rating of91 AKI (95
RON) . For more information on TOP TIER De
tergent Gasol ine, please go to the official
website (www .toptiergas.com).
The recommended gasoline octane rating for
your engine can also be found on a label locat
ed on the ins ide of the fuel filler flap. This rat
ing may be specified as AKI or RON .
Your vehicle may also be operated using un
leaded regular gasoline with a minimum oc
tane rating of 87 AKI/91 RON . However, using
87 AKI/91 RON octane fuel w ill slightly re
duce engine performance.
Use unleaded gasoline only. Unleaded gaso
line is available throughout the USA, Canada,
and in most European countries. We recom
mend that you do not take your vehicle to
areas or countries where unleaded gasoline
may not be available.
For more information on refueling your vehi
cle, see
~ page 212.
Octane rating
Octane rating ind icates a gasoline's ability to
res ist engine damaging "knock" caused by
premature ign ition and detonation . Therefore,
buying the correct grade of gasoline is very
important to help prevent possible engine
damage and a loss of engine performance.
Gasoline most commonly used in the United
States and Canada has the following octane
r atings that can usually be found on the filler
pump : - Premium Grade: 91
-96 AKI
- Regular Grade: 87 -90 AKI
Explanation of the abbreviations:
AKI= Anti Knock Index= (R+M)/2 = (RON
+MON)/2
RON= Research Octane Number
MON = Motor Octane Number .
@ Note
-Do not use any fuel w ith octane ratings
lower than 87 AKI or 91 RON otherwise
expensive engine damage w ill occur.
- Do
not use leaded gasoline. The use of
leaded gasoline will severely damage
your vehicle's catalytic converter and its
ability to control exhaust emissions.
Blended gasoline
Applies to vehicles: with gasoline engine
Use of gasoline containing alcohol or
MTBE (methyl tertiary butyl ether)
You may use unleaded gasoline blended with
alcohol or MTBE (commonly referred to as
oxygenates) if the blended mixture meets the
following criteria:
Blend of gasoline methanol (wood alcohol or
methyl alcohol)
-Anti-knock index must be 87 AK I or higher.
- Blend must contain no more than 3% meth-
anol.
- Blend must contain more than 2% co-sol-
vents.
Blend of gasoline and ethanol (grain alcohol
or ethyl alcohol)
-Anti-knock index must be 87 AKI or higher.
- Blend must not contain more than 15%
ethanol.
Blend of gasoline and MTBE
-Anti-knoc k index must be 87 AK I or higher.
- Blend must contain not more than 15%
MTBE.
Seasonally adjusted gasoline
Page 213 of 310

Many gasoline grades are blended to perform
especially well for winter or summer driving. During seasonal change-over, we suggest that
you fill up at busy gas stations where the sea sonal adjustment is more likely to be made in
time.
Q;) Note
- Methanol fuels which do not meet these requirements may cause corrosion and
damage to plastic and rubber compo nents in the fuel system .
- Do not use fuels that fail to meet the
specified criteria in this chapter .
- If you are unable to determine whether
or not a particular fuel blend meets the
specificat ions, ask your service station or
i ts fuel supp lier.
- Do not use fuel for which the contents cannot be identified.
- Fuel system damage and performance
problems resulting from the use of fuels
different from those specified are not
the responsibility of Audi and are not
covered under the New Vehicle or the
Emission Control System Warranties.
- If you experience a loss of fuel economy
or driveability and performance prob
lems due to the use of one of these fuel
blends, we recommend that you switch
to unblended fuel.
Gasoline additives
A major concern among many auto manufac
turers is carbon deposit build-up caused by
the type of gasoline you use .
Although gasoline grades differ from one manufacturer to another, they have certain
things in common. All gasoline grades contain substances that can cause deposits to collect
on vital engine parts, such as fuel injectors
and intake valves. Although most gasoline
brands include additives to keep engine and
M
N fuel systems clean, they are not equally effec-o
iii tive. ,...., \!) ..,.,
M ..,., ,....,
Checking and Filling 211
Audi recommends using TOP TIER Detergent
Gasoline . For more information on TOP TIER
Detergent Gasoline, please go to the official
website (www.toptiergas .com).
After an extended period of using inadequate
fuels, carbon deposit build-ups can rob your engine of peak performance.
CJ) Note
Damage or malfunction due to poor fuel
quality is not covered by the Audi New Ve
hicle Limited Warranty.
Diesel fuel
App lies to vehicles : wit h diese l eng ine
Always use ULSD (Ultra Low Sulfur Diesel)
No. 2 . The ULSD No. 2 meets the ASTM D975.
Diesel fuel with concentrations of biodiesel
higher than 5
% such as B11, B2O or B1OO are
strictly prohibited.
Service station fuel pumps are labeled with
the correct fuel information for easy recogni
tion by the user.
If the diesel fuel pump is not
labeled ask the station operator what fuel is
being dispensed before filling up your vehicle.
ULSD No. 2 may not be available outside the
USA and Canada. Be sure to check before trav
eling to other countries.
ULSD No. 2 can become thicker in very cold
temperatures, and this can impair the en
gine's starting and running. Depending on the
season, gas stations provide ULSD No . 2 that
flows better in cold temperatures so that you
can continue operating your vehicle as usual.
(D Note
- Your vehicle's diesel engine was de
signed solely for use with ULSD No. 2.
Therefore, never use gasoline, heating
oil, other fuels or flow improvers. These
contain substances that will severely
damage the fuel system and the engine.
Such damage will not be covered by your
New Vehicle Limited Warranty.
ll>
•
•
•
Page 214 of 310

212 Checking and Fill in g
- If you put any amount of incorrect fue l in
the fue l tank, do not start the engine un
der any circumstances. Immediately con
tact the nearest authorized Audi dealer
or authorized Audi Service Facility for as
sistance. These fuels contain substances
that can severely damage the fuel sys
tem and the engine if the engine is start
ed.
- If the diesel fuel quality is poor, it may
be necessary to have the water drained
from the water sepa rator in the
f ue l fi l
te r
more often than specified in the
maintenance schedu le . This can help re
duce engine ma lfunctions
Q page 24.
Fuel tank
Fuel filler neck
The fuel filler neck is located on the right rear
side panel behind the fuel fi ller flap.
If the power locking system should fail, you
can st ill open the flap manually- for detailed
instructions
seer:::.> page 214.
You can find the fuel tank capacity of your ve
hicle in
Qpage 288.
The label on the inside of the fuel filler flap
tells you the correct fuel for your vehicle. For
more information about fuel specifications,
see
c;,page 210.
Your veh icle fuel tank has an onboard refue l
ling vapor recovery system . This feature helps
to prevent fuel vapors from escaping from the
tank and polluting the environment while you refuel your vehicle . In order to fill the tank
properly while protect ing the env ironment,
p lease follow t his refueling procedure careful
ly.
.&_ WARNING
Under norma l operating conditions, neve r
carry additiona l fuel containers in your car .
Gas can isters and other containers used to
transport fue l can be dangerous. Such con
tainers, full or empty, may leak and cou ld
cause a f ire in a collision. If you must transpo
rt fuel to use for your lawn mower,
snow b lower, etc., be very careful and al
ways observe local and state laws regard ing the use, transportation and storage of
such fuel containers. Make certa in the con
tainer meets industry standa rds (ANSI/
ASTM F8S2 -86).
(D Note
Neve r drive your veh icle until the fue l tank
i s completely empty. The irregular supply
of fue l can cause misfir ing. Gasoline cou ld
enter the exhaust system and damage the
catalytic converter.
Fueling procedure
F ig. 15 1 Righ t rear side of the vehicle: opening the
fuel filler flap
Fig . 1 52 Fue l filler door w ith attached fuel cap
Read and follow the information and warn
ings when filling Ad B lue
c;, page 215.
T he fue l filler door is u nlocked or locked by
the centra l locking sys tem.
Openin g the fuel c ap
" Press the left side of the fuel f iller door to
open it -arrow-
Q fig. 151.
"Unscrew the tank cap counterclockw ise .
-;:;
> a, a,
Page 215 of 310
 ..,.,
M ..,., ,....,
~ Place the cap from above on the open fuel
filler door
¢ fig. 152.
Closing the fuel cap
~ Turn the fuel cap clockwise until you hear")
M N
0 > co ,...., \!) ..,.,
M ..,., ,....,
~ Place the cap from above on the open fuel
filler door
¢ fig. 152.
Closing the fuel cap
~ Turn the fuel cap clockwise until you hear it
lock.
~ Close fuel filler door until it latches.
Once the pump nozzle switches off, the fuel
tank is "full". Do not fill the tank more. Other
wise the expansion space in the tank will be
filled.
The correct fuel type for your vehicle can be
found on a label located on the inside of the
fuel filler door. For additional information on
fuel, refer to ¢
page 210.
The fuel tank capacity of your vehicle is in the
Technical Data ¢ page 288.
To avoid fuel spilling or evaporating from the
fuel tank always close fuel filler cap properly
and completely. An improperly closed fuel fill
er cap may also cause the MIL lamp ¢
page 30
to come on .
A WARNING
Not paying attention when fueling or han
dling fuel incorrectly can lead to fires, ex
plosions or serious injuries.
- Fuel ignites easily and can cause serious
burns and other injuries.
- If you do not switch the engine off when
fueling and/or do not insert the fuel noz
zle completely into the tank opening,
fuel can leak out or run over. Leaked fuel
can ignite and start a fire.
- Do not use the telephone while fueling.
The electromagnetic rays can cause
sparks, which can ignite fuel vapors and
start a fire .
- Do not sit in your vehicle while fueling. If
you must make an exception and enter
your vehicle again while fueling, close
the door and touch metal to discharge
static electricity before touching the fuel
nozzle. Static electricity can create
sparks, which can ignite vapors when fu
eling.
Checking and Filling 213
- Do not smoke or have an open flame in
the area when fueling your vehicle or fill
ing a fuel container because this increas
es the risk of an explosion .
- For your safety, carrying fuel containers
in your vehicle is recommended. Wheth
er full or empty, the container can leak
and cause a fire in the event of an acci
dent.
- If you must make an exception and
transport a fuel container, note the fol lowing:
- Never fill the fuel container with fuel
while it is in or on the vehicle. Static
electricity is discharged when filling
which can cause the fuel vapors to ig nite and increases the risk of an explo
sion.
- Always place a fuel container on the
ground before filling.
- Always hold the fuel nozzle completely
in the fuel container when filling .
- If the fuel container is made of metal,
the fuel nozzle must always be in con
tact with the container when filling it
with fuel. This prevents static electrici
ty from discharging.
- Never spill fuel in the vehicle or the
luggage compartment. Evaporated fuel
is explosive and increases the risk of
serious injury or death.
- Follow legal requirements when using,
storing and transporting fuel contain
ers.
- Make sure the fuel container conforms
to industry standards (ANSI/ASTM
F8S2-86).
@ Note
- Remove spilled fuel from vehicle paint
immediately, because it can damage
paint.
- Never drive until the fuel tank is com
pletely empty . The irregular supply of
fuel that results from that can cause the
engine to misfire. Uncombusted fuel will
enter the exhaust system and increase
1111-
•
•
Page 216 of 310

214 Checking and Fill in g
the risk of damage to the catalytic con
verter .
- If the fuel tank runs comp letely empty in
a vehicle with a
die sel en gine , the igni
tion must remain switched on for at l east 30 seconds after refueling before
starting the engine.
It may take longer
than usual for the engine to start, even up to a minute . Th is is because the air
must fi rst b leed out of the fuel system
when starting the eng ine.
@) For the s ake of the environment
- If the fuel nozzle is used correctly , it will
indicate that the tank is full the first
time it switches off automatically. Do
not t ry to add more fuel, because it can
spill over. Also , the expansion space in
the tank will fill, which can resu lt in fuel
spilling out when it becomes warm and po lluting the environment .
@ Tips
-If the engine is runn ing whi le fueling, va
pors can escape or the fuel can spi ll over.
Because of this , the fuel nozz le switches
off before the tank is full.
- Do not fuel the vehicle when the ignition
is switched on. Otherwise, the fuel
gauge may not show the correct level af
ter fueling the vehicle.
- Diesel vehicles are equipped with a diesel misfueling guard
ll. It allows the vehicle
to be fueled only with a diese l fuel pump
nozzle.
- A worn or damaged nozzle or a nozz le
that is too small may not be able to open
the d iesel m isfueling protector . If this is
the case, try t urni ng the nozzle before
i nserting it in the f uel filler neck, use a
different fuel p ump or see you r a uthor
i zed Audi dealer or author ized repair fa
cility for assistance .
- The m isf ueli ng guard does not open
when adding fuel from a fuel container .
ll Market-sp ec ifi c
You can bypass it by adding the diesel
fuel s lowly.
- The fuel fi ller door on your vehicle does
not lock when you lock the vehicle from
the inside.
· Fuel filler door emergency release
If the central locking system is faulty, the
fuel filler door can be unlocked manually.
Fig. 153 Right re ar lugg age compa rtm ent : eme rgency
re lease
T he emergency release mechanism is located
behind the right side trim panel in the lug
gage compartment .
" Remove the cover i n the side pane l.
" Loosen the loop from the retaine r and then
pull on the loop carefu lly-arrow-
¢ (D . The
fue l filler door is released .
" To open the fue l filler door, press on the left
side
r=> page 212, fig. 151 .
(D Note
Only pull on the loop until yo u feel resist
ance. You w ill not hear it re lease. Other
wise you could damage the emergency re
lease mechanism.
 1
1 2
2 3
3 4
4 5
5 6
6 7
7 8
8 9
9 10
10 11
11 12
12 13
13 14
14 15
15 16
16 17
17 18
18 19
19 20
20 21
21 22
22 23
23 24
24 25
25 26
26 27
27 28
28 29
29 30
30 31
31 32
32 33
33 34
34 35
35 36
36 37
37 38
38 39
39 40
40 41
41 42
42 43
43 44
44 45
45 46
46 47
47 48
48 49
49 50
50 51
51 52
52 53
53 54
54 55
55 56
56 57
57 58
58 59
59 60
60 61
61 62
62 63
63 64
64 65
65 66
66 67
67 68
68 69
69 70
70 71
71 72
72 73
73 74
74 75
75 76
76 77
77 78
78 79
79 80
80 81
81 82
82 83
83 84
84 85
85 86
86 87
87 88
88 89
89 90
90 91
91 92
92 93
93 94
94 95
95 96
96 97
97 98
98 99
99 100
100 101
101 102
102 103
103 104
104 105
105 106
106 107
107 108
108 109
109 110
110 111
111 112
112 113
113 114
114 115
115 116
116 117
117 118
118 119
119 120
120 121
121 122
122 123
123 124
124 125
125 126
126 127
127 128
128 129
129 130
130 131
131 132
132 133
133 134
134 135
135 136
136 137
137 138
138 139
139 140
140 141
141 142
142 143
143 144
144 145
145 146
146 147
147 148
148 149
149 150
150 151
151 152
152 153
153 154
154 155
155 156
156 157
157 158
158 159
159 160
160 161
161 162
162 163
163 164
164 165
165 166
166 167
167 168
168 169
169 170
170 171
171 172
172 173
173 174
174 175
175 176
176 177
177 178
178 179
179 180
180 181
181 182
182 183
183 184
184 185
185 186
186 187
187 188
188 189
189 190
190 191
191 192
192 193
193 194
194 195
195 196
196 197
197 198
198 199
199 200
200 201
201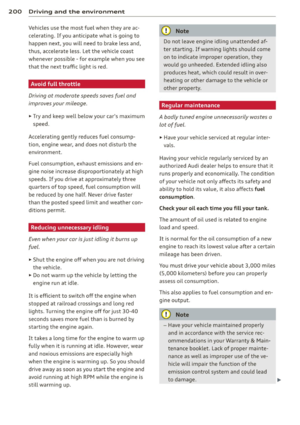 202
202 203
203 204
204 205
205 206
206 207
207 208
208 209
209 210
210 211
211 212
212 213
213 214
214 215
215 216
216 217
217 218
218 219
219 220
220 221
221 222
222 223
223 224
224 225
225 226
226 227
227 228
228 229
229 230
230 231
231 232
232 233
233 234
234 235
235 236
236 237
237 238
238 239
239 240
240 241
241 242
242 243
243 244
244 245
245 246
246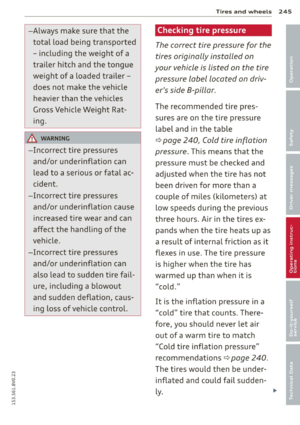 247
247 248
248 249
249 250
250 251
251 252
252 253
253 254
254 255
255 256
256 257
257 258
258 259
259 260
260 261
261 262
262 263
263 264
264 265
265 266
266 267
267 268
268 269
269 270
270 271
271 272
272 273
273 274
274 275
275 276
276 277
277 278
278 279
279 280
280 281
281 282
282 283
283 284
284 285
285 286
286 287
287 288
288 289
289 290
290 291
291 292
292 293
293 294
294 295
295 296
296 297
297 298
298 299
299 300
300 301
301 302
302 303
303 304
304 305
305 306
306 307
307 308
308 309
309