Page 65 of 254

"'
Enlarging the luggage compartment
Applies to vehicles: with fold ing rear seatback
The backrests can be folded forward separately
or together using the two release levers.
Fi g. 65 Luggage compartment: release lever
F ig. 66 Backrest: release lever, sec uring knob and latch
Release lever in luggage compartment
• Pull the release lever Q fig. 65 in the direction
of the arrow to fold the backrest forward.
Release handle on the backrest
• Pull the release lever@~ fig. 66 in the direc-
t io n of the arrow to fold the back rest forward.
Folding the backres t back into the upright
position
• Fold the backrest back up again until it latches
and the red mar king @ is no longer v isible
Q ,&. .
You can lock the backrest when it is latched in
p lace using the mechan ica l key
~page 32 ©
Q fig. 66. This prevents any acces s to the luggage
compartment from the veh icle in ter ior.
~ You can only enlarge the luggage compartment if
txi the backrest is not locked. rl I.O
"' N
"' rl
Seats and storage
A WARNING
-
-The backrest must always be secure ly latch-
ed so that the safety be lt of the center seat
ing position can wo rk properly to help pro
t e ct the occupant.
- The backrest must be securely latched in po
sition so that no items conta ined in the Lug
gage compartment can slide forward upon
sudden b rak ing.
- Always check whether the latch is fully en
gaged by p ulling the seatback fo rward.
- Never allow safety b elts to become dam
aged by be ing caught in door or seat ha rd
ware.
- Torn or frayed safety belts ca n tear qnd
damaged be lt hardware can b reak i n a crash.
I nspect the bel ts periodically. Belts show ing
damage to webbing, bind ings, b uckles, or
retractors mus t be replaced.
(D Note
- If you move the front seat back when t he
rea r seat b ackres t is folded forwa rd, you
co uld damage the head restraints on the
rear seat.
- Slide the be lt g uide on the o utside safety
bel t all the way up befo re fo ld ing the back
rest bac k forwa rd . Make sure the seat belt is
not pinched or damaged when the rear seat
backrest if folded back. Other objects
should be removed from the rear seat bench
to protect the seatback from damage.
63
Page 66 of 254

Seats and storag e
Tie-downs and cargo net
Applies to vehicles: with cargo net
The cargo net prevents small objects from slid
ing.
F ig . 67 Luggage compartment: cargo net stretc hed out
Fig . 68 Luggage compartment: cargo net at the top of the
luggage compar tment
Net stretched out
.,. To secure objects with the cargo net, hang the
front hooks on the net in the t ie-downs first
and then hang the rear hooks¢
fig. 67 .
.,. Read and heed all WARNINGS ¢page 117,
Storing cargo correctly.
Net at the top of the lug gage comp artm ent
.,. Hang the hooks on the cargo net in the tie
downs on the floor at the rear of the luggage
compartment ¢
fig. 68.
.,. Fold down the hooks at the upper area of the
luggage compar tment down, pull the net up
and hang the eyelets on the net on the hooks .
.,. Read and heed all WARNINGS
¢page 117,
Storing cargo correctly.
You can also use the hooks ¢ fig. 68 to hang bags
and other objects. If nothing is hung on the
hooks, they will fo ld back in by themselves.
64
A WARNING
Weak, damaged or improper straps used to
secure items to tie-downs can fail during hard
braking or in a coll is ion and cause serious per
sona l injury.
-Always use su itable retain ing straps and
prope rly secure items to the tie-downs in
the luggage compa rtment to help prevent
items from shifting o r flying forward.
- Never attach a child seat tether strap to a
tie-down.
- For strength-related reasons, the mounting
hooks can only be used to secure objects
weighi ng up to 10 lb. (5 kg). Heav ier obje cts
w ill not be adequa tely secured -there i s a
ris k of injury.
Ski sack
Applies to vehicles: with ski sack
Long objects such as skis or snowboards can be
transported in the ski sack.
Fig . 69 Backrest: pass-t hro ug h cover
.,. To load the ski sack in the vehicle, fold the rear
center armrest down .
.,. Fold the pass-through cover down¢
fig. 69.
.,. Slide the ski sack from the luggage compart
ment through the opening w ith the zipper at
the rear.
.,. Sec ure the ski sack¢
page 65.
A WARNING
Objects m ust only be transported in the ski
sack since the ski sack can be secured . Individ
ua l objects cannot be secured . There is a risk
of injury.
-
Page 67 of 254

"' N
0:: ICC
rl I.O
"' N
"' rl
@ Tips
- You can open the pass-through from the
luggage compartment. Push the release
button down and push the cover forward.
- You can lock or unlock the pass-through us
ing the mechanical key. This prevents any
access to the luggage compartment from
the vehicle interior.
Securing the ski sack
Applies to vehicles: with sk i sack
The ski sock must be secured in the luggage com
portment.
Fig. 70 Luggage compartment: Securing the ski sack
Fig. 71 Rear bench seat: securing the ski sack
There are two straps with hooks on the bottom
side of the ski sack~
fig. 70@. There is also a
securing strap®~
fig. 71 on the sack.
~ To secure the ski sack in the luggage compart
ment, hang the hooks in the rear tie-downs
C?fig. 70.
~ Tighten the strap on the ski sack to prevent the
objects in the sack from sliding
~ fig. 71.
Sea ts and sto rage
A WARNING
-- The ski sack is intended only for the trans-
portation of skis and other light objects . To
reduce the risk of serious personal injury,
never transport heavy or pointed objects in
the ski sack.
- When braking rapid ly or during an accident,
the load could be displaced and cause injury
to occupants.
- Sharp edges on the load must be covered for p rotection. Always fasten the belt tightly
around the sack and its contents~
fig. 71.
- For safety reasons, do not transport more
than two pairs of skis in the ski sack.
- You must secure the ski sack with the strap after loading.
- Make sure that all objects you are transport
ing in the pass-through are secured. Other
wise they could slide around during sudden b rak ing maneuvers and cause injuries.
(l} Tips
- Never stow the ski sack away when it is still
wet or damp (for example, snow melting
from skis). Allow it to dry completely before stowing it away.
- When transporting sk is or snowboards,
tighten the securing strap between the bindings.
- Pos ition skis in the sk i sack with the pointed
ends facing the front and ski poles with the
pointed ends facing the rear.
- You can lock or unlock the pass-through us
ing the mechan ical key. This prevents any
access to the luggage compartment from
the vehicle interior.
Parcel shelf
The parcel shelf behind the rear seatback can be
used to carry light items of clothing.
A WARNING
-
No heavy or hard objects should be placed on
the parcel shelf. They are a hazard to the vehi
cle occupants dur ing sudden braking. The is a
risk of injury.
~
65
Page 68 of 254
Seats and storage
CJ) Note
Please ma ke s ure that the heat ing wires for
the rear window defog ger are not damage by
abras ive objects.
@ Tips
To ensure problem-free vent ilation, t he vent i
lat io n slo ts between t he rear win dow and t he
parcel she lf m ust not be covered.
66
Page 69 of 254

M N
0:: loo ,...., \!) 1.1"1
N 1.1"1 ,....,
Warm and cold Climate control system
Description
The climate control system warms, cools and
adds humidity to the a ir in the veh icle inter io r.
It
is the most effect ive when the windows and sun
roof are closed. If there is a build-up of heat in
side the vehicle, ventilation can help to speed up
the cooling process.
I n all heating mode functions except
defrost, the
b lower only switches to a higher speed once the
engine coolant has reached a certain tempera
ture.
Condensat ion from the cooling system can drip
and form a puddle of water unde r the vehicle.
This is normal and does not mean there is a leak.
Pollutant filter
The pollutant filte r removes pollutants such as
dust and pollen from the ai r.
The air pollutants filter must be changed at the
intervals specified in your Warranty & Mainte
nance booklet, so that the a ir condit ioner can
properly work.
If you drive your vehicle in an area with high air
pollution, the filter may need to be changed
more frequently than spec ified in your Audi Wa r
ranty
& Maintenance booklet. If in doubt, ask
your authorized Audi Service Adv isor for advice.
Key coded settings
The climate control settings are automat ically
stored and assigned to the remote control key
that is in use.
_&. WARNING
Reduced visibility is dangerous and can cause
accidents .
- For safe dr iv ing it is very important that all
windows be free of ice, snow and condensa
tion .
Warm and cold
-Comp letely familiarize yourse lf with the
proper use and funct ion of the heating and
ventilation system and especially how to de
fog and defrost the windows.
- Never use the windshield wiper/washer sys
tem in freezing weather until you have
warmed the windshie ld first, using the heat
ing and vent ilation system. The washer solu
tion may freeze on the windsh ield and re
duce visibility.
(D Note
- If you suspect that the air conditioner has been damaged, sw itch the system off to
avoid further damage and have it inspected
by a qualified dealership.
- Repairs to the Audi air conditioner require
special techn ical knowledge and spec ial
tools. Contact an authorized Aud i dealer for
assistance.
@ For the sake of the environment
By reducing the amount of fuel you use, you
also reduce the amount of pollutants emitted
into the air.
(D Tips
- Keep the air intake slots (in front of the
w indshield) free from ice, snow and debris
in order to main tain the proper function of
the climate control system.
- T he energy management system may switch
the seat heating * or rear window defroster
off temporarily. These systems are avai lab le
again as soon as the energy balance has
been restored.
- Air escapes through vents under the rear
window. When placing items of cloth ing on
the luggage compartment cover, ensure
that the openings are not covered.
67
Page 70 of 254

Warm and cold
Operation
We recommend pressing the !AU TO ! button and setting the temperature to 72 °F (22 °C).
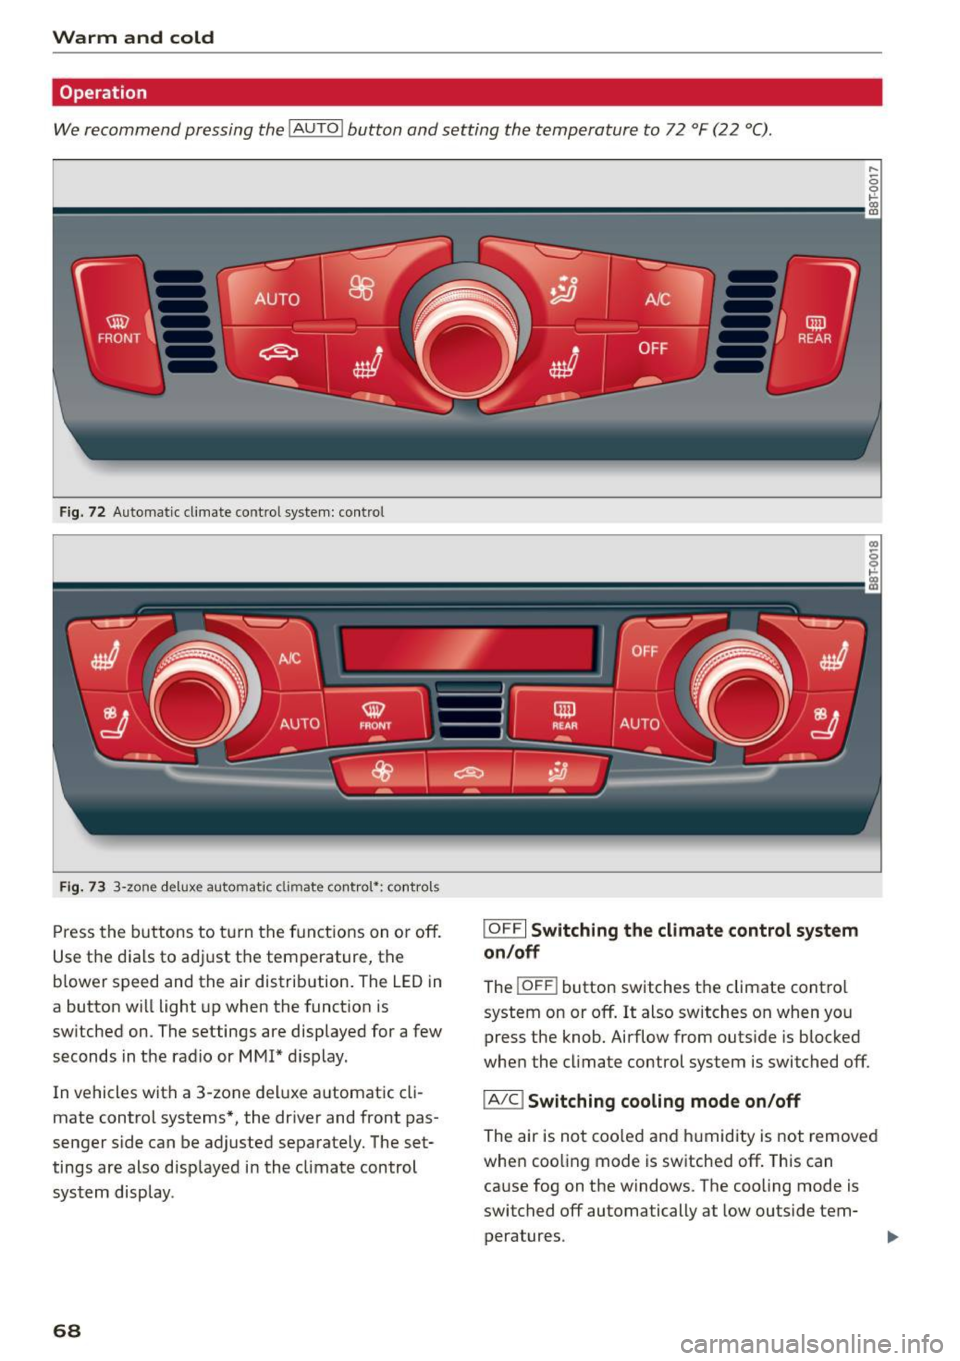
Fig . 72 Automatic climate control sys tem: control
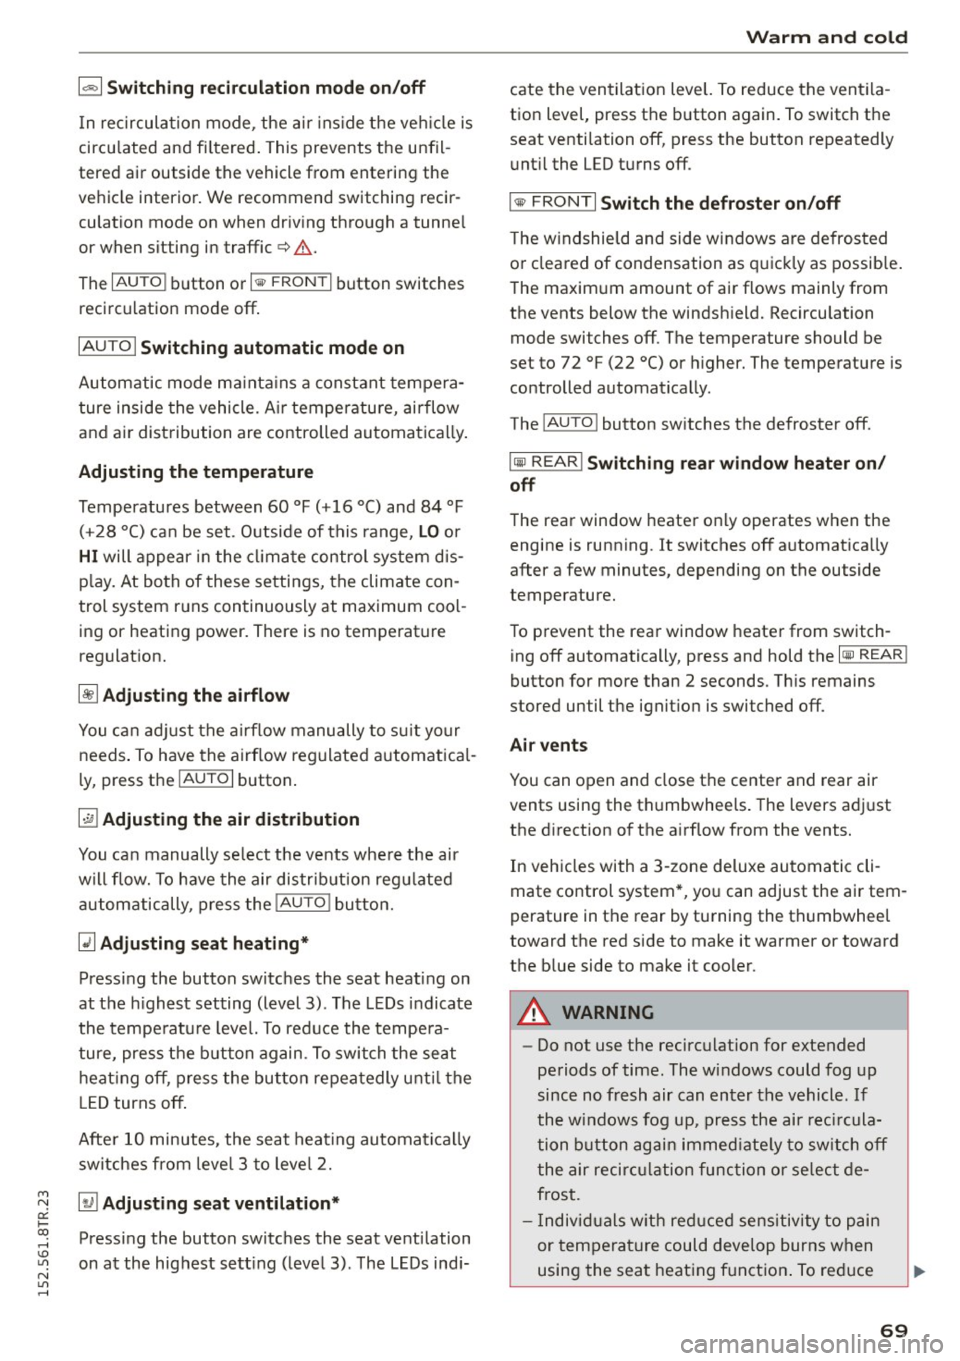
F ig . 73 3-zone del ux e automat ic climate controt•: controls
Press the buttons to turn the functions on or off.
Use the dials to adj ust the temperature, the
b lo wer speed and the air distribution. The LED in
a button will light up when the function is
switched on. The settings are displayed for a few
seconds in the radio or MMI* display.
In vehicles with a 3-zone deluxe automatic cli
mate control systems*, the driver and front pas
senger side can be adjusted sepa rately. The set
tings are also disp layed in the climate control
system display .
68
I OFFI Switching the climate control system
on/off
The ! OFF ! button switches the climate contro l
system on or off.
It also switches on when you
press the knob. Airflow from outside is blocked
when the cl imate control system is switched off.
IA/C l Switching cooling mode on/off
The air is not cooled and humidity is not removed
when coo ling mode is switched off. This can
cause fog on the windows. The cooling mode is
switched off automatically at low outside tem
peratures.
Page 71 of 254

M N
0:: loo ,...., \!) 1.1'1
N 1.1'1 ,....,
1- 1 Switching recirculation mode on /off
In re circul ation mode, the air inside the ve hicle is
circu lated and fi ltered . This prevents the unfil
tered air outside the vehicle from enteri ng the
ve hicle interio r. We recommend sw itching recir
culation mode on when dr iv ing through a tunne l
or when sitting in traffic
c> ,& .
The IAU TO I button o r I® FRONT I button switches
reci rc ul ation mode off .
IAUTO I Switching automatic mode on
Automatic mode m ainta ins a con stant tem pera
ture inside the vehicle. A ir tem per atu re, ai rflow
and a ir distribution are controlled automa tica lly .
Adjusting the temperature
Temperatures between 60 °F (+16 °C) and 84 °F
( + 28 °C) ca n be set. O utside of this range,
LO o r
HI will appear in the climat e control sys tem d is
p la y. At bo th of these setti ngs, the climate con
trol system r uns con tinuously at maximum cool
i ng or heating power. There is no tempe rat ure
regulat ion.
[!] Adjusting the airflow
You can a dju st the airflow manu ally to s uit your
needs . To have the airf low reg ulate d automatic al
l y, press the
IAUTOI button .
~ Adjusting the air distribution
You can manually se lect the vents whe re the air
will flow. To h ave the air distr ibution reg ulated
a utom atic ally, pres s the
!AUTO I bu tto n.
QJ Adjusting seat heating*
Press ing the button switches the seat heat ing on
at the highest set ting (level 3). The LEDs indicate
the tempe ratu re leve l. To red uce the tempe ra
ture, press the b utt on again . To swi tch the seat
h eat ing off, pres s the bu tto n repea tedly unt il th e
L ED turns off .
Afte r 10 minutes, the seat heat ing automatica lly
sw itches from leve l 3 to leve l 2.
[ill Adjusting seat ventilation*
Pressi ng the button switches the seat venti lation
on at the highest se tt ing ( leve l 3) . T he L EDs ind i-
Warm and cold
cate the ventilat ion leve l. To reduce the vent ila
t ion level , press t he b utton again. To switch the
seat venti lation off, press the button repeatedly
u nt il the LED t urns off.
I@ FRONT I Switch the defroster on /off
T he w indshield and side w indows are defros ted
o r cl eared of condensation as q uick ly as possib le .
The maxim um amount of air flows mainly from
the vents below the windsh ield. Recircu lation
mode switches off. The temperature should be
set to 72 °F (22 °C) or higher. The temperature is
controlled automatica lly .
The
! AUTO I button sw itches the defroster off.
lliil REAR I Switching rear window heater on/
off
T he rea r window heate r o nly operates w hen the
engine is running . It switches off a utomat ica lly
after a few minutes, dependi ng on the outside
temperature.
T o p revent the rea r window heate r from switch
ing off automatically, press and hold the
l oo REAR I
button f or more than 2 sec onds. T his re mains
stored until the ignit io n is switched off.
Air vents
You can open and close t he center and rear air
vents using the thumbwhee ls . T he levers ad just
the d irection of the a irflow from the vents.
In veh icles with a 3-zone deluxe au toma tic cli
mate control system *, yo u can adjust the air tem
perature in the rear by tu rning the th umbwheel
toward the red side to make it warmer or toward
t h e b lue side to make it cooler.
A WARNING
-
- Do not use the recirc ulation for extended
peri ods of time. The w indows could fog up
since no fresh air can en ter the vehicle. If
the windows fog up, pre ss the ai r rec ircula
tion button agai n immed iate ly to sw itch off
the air recir culation func tion or se lec t d e
frost.
- I ndivi duals w ith re duced s ensi tivi ty to p ain
or tem pera ture could deve lop burns when
using the sea t heat ing f unct ion . To re duce
69
Page 72 of 254

Warm and cold
th e risk of injury , these individua ls sho uld
not use seat heating.
(D Note
To avo id damage to the heating elemen ts in
the seats, do not kneel on the seats or place
heavy loads on a small a rea of the seat .
Setup
The basic climate control settings can be adjust
ed in the radio or MMI* .
... Se lect : I CAR I f u n ct ion bu tton > A/C con trol b ut
ton. Or
... Se lect : ICAR I f u nction button>
Car sy stems*
control b utton > AC.
Automatic recirculation*
When swi tched o n, a utom atic rec ircula tion con
t rols the recircu lation mode au toma tica lly.
If the
windows fog up, press the
l..i> F RONT I button .
Synchronization*
When sync hron ization is sw itched on, t he same
settings a re applied to bo th t he d river a nd front
p a ssenger, ex cep t fo r the se at hea ting/vent ila
tion *. Synchronization switches off when you ad
just the settings on the front passenger's side.
You ca n also switc h synch ron izat io n on by press
i n g and hold ing the knob on the dr iver' s side.
70