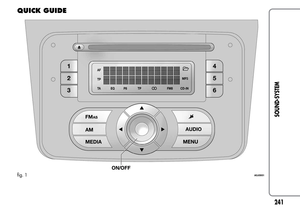
Page 257 of 280

PHONE FUNCTION
(telephone volume adjustment)
With Speech volume function present in Menu
This function makes it possible to adjust (settings from 1 to 40), by
turning the ON/OFF left knob/button or pressing the
/buttons, or mute (OFF setting) the volume of the telephone.
The display shows the current function status:
❒“Speech Off”: function deactivated.
❒“Speech volume 23”: function active with volume setting 23.
With Speech volume function not present
on the Menu
When a phone call is received, the audio passes to the car’s audio
system through the radio.
The telephone audio always arrives at a fixed volume, but it can be
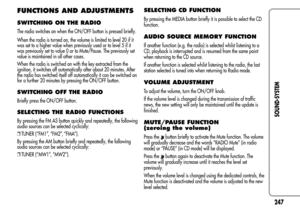
adjusted during a conversation using the ON/OFF button/knob.
AUX OFFSET function
(alignment of the portable device volume with that of
the other sources)
(for versions/markets, where provided)
This function enables the alignment of the volume of the AUX
source, depending on its own portable player, with that of the
other sources.
To activate the function, press the MENU button and select “AUX
offset”.
Press the
orbuttons to decrease or increase the volume value
(set from–6to+6).
RADIO OFF function
(on and off mode)
This function is used to set the radio switching-off mode to one of
two different settings.
To activate the function, use the
orbutton.
The selected mode will appear on the display:
❒“00 MIN”: the radio switches off automatically in connection
with the ignition key; the radio switches off automatically as
soon as the key is turned to STOP position;
❒“20 MIN”: the radio switches off independently of the ignition
key; the radio remains switched on for a maximum period of 20
minutes after the key has been turned to STOP position.
SYSTEM RESET function
This function is used to restore all settings to the factory values.
The options are:
❒NO: no restore intervention;
❒YES: the default parameters will be restored. During this
operation, the word “Resetting” appears on the display. At the
end of the operation, the source does not change and the
previous situation will be displayed.
253
SOUND-SYSTEM
Page 258 of 280

PHONE SET-UP
If a hands-free kit is installed on the car, when there is an incoming
phone call the radio audio will be connected to the telephone
output. The telephone audio always arrives at a fixed volume, but it
can be adjusted during a conversation using the ON/OFF
button/knob.
The fixed telephone audio volume can be adjusted using the
"SPEECH VOLUME" function in the Menu (where the function is
provided). The word "PHONE" will appear on the display during
the deactivation of the audio for the phone call.
ANTI-THEFT PROTECTION
The radio is equipped with an anti-theft protection system based on
the exchange of information between the radio and the electronic
control unit (Body Computer) on the car.
This system guarantees maximum safety and avoids the entry of
the secret code each time the radio power supply is disconnected.
If the check has a positive outcome, the radio will start to function,
whereas if the comparison codes are not the same or if the
electronic control unit (Body Computer) is replaced, the device will
ask the user to enter the secret code according to the procedure
described in the paragraph below.Entering the secret code
When the radio is switched on, if the code is requested, the display
will show “Radio code” for about 2 seconds followed by four
dashes “----”.
The code is made up of four numbers from 1 to 6, each
corresponding to one of the dashes.
To enter the first digit of the code, press the corresponding button
of the pre-selected stations (from 1 to 6). Enter the other code
numbers in the same way.
If the four digits are not entered within 20 seconds, the display will
show “Enter code----”.Ifthisoccurs, it is not considered an
incorrect code entry.
After entering the fourth digit (within 20 seconds), the radio will
start to operate.
If an incorrect code is entered, the radio will emit a sound and the
display shows the text "Radio blocked/wait" to notify the user of
the need to enter the correct code.
Each time the user enters an incorrect code, the waiting time will
gradually increase (1 min, 2 min, 4 min, 8 min, 16 min, 30 min, 1
h, 2 h, 4 h, 8 h, 16 h, 24 h) up to a maximum of 24 hours.
The waiting time will be shown on the display with the text “Radio
blocked/wait”. After the text has disappeared it is possible to start
the code entry procedure again.
254
SOUND-SYSTEM
Page 259 of 280

Car radio passport
This document certifies ownership of the radio. The car radio
passport shows the radio model, serial number and secret code.
NoteKeep this car radio passport in a safe place so that you can
give the information to the relevant authorities if the car radio is
stolen.
In case of loss of the car radio passport, contact the Alfa Romeo
Authorised Services, taking an ID document and the car ownership
documents.RADIO (TUNER)
INTRODUCTION
When the radio is switched on, the last function selected before it
was switched off is activated: Radio, CD, CD MP3 or AUX (only
with ) (for versions/markets, where provided).
To select the Radio function when another audio source is being
listened to, briefly press the FM AS or AM buttons depending on
the desired band.
Once the Radio mode has been activated, the display will show the
name (RDS stations only) and the frequency of the selected radio
station, the frequency band selected (e.g. FM1) and the preselect
button number (e.g. P1).
FREQUENCY BAND SELECTION
With the Radio mode active, press the FM AS or AM button briefly
and repeatedly to select the desired reception band.
Each time the button is pressed the following bands are selected
cyclically:
❒By pressing the FM AS button: “FM1”, “FM2” or “FMA”;
❒By pressing the AM button: “MW1, MW2”.
Each band is highlighted by the name in the display. The last
station selected on the respective frequency band will be tuned
into.
The FM band is divided into sections: FM1, FM2 or “FMA”; the
FMA reception band is reserved for broadcasters stored
automatically using the AutoSTore function.
255
SOUND-SYSTEM
Page 260 of 280

PRESET BUTTONS
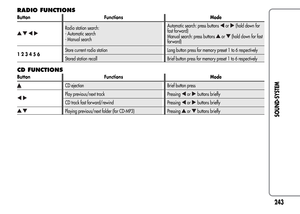
The buttons numbered from 1 to 6 are used to set the following
preset stations:
❒18 in the FM band (6 in FM1, 6 in FM2, 6 in FMT or “FMA” (on
some versions));
❒12 in the MW band (6 in MW1, 6 in MW2).
To listen to a preset station, select the desired frequency band and
then briefly press the corresponding preset button (from 1 to 6).
By pressing the preset button for more than 2 seconds, the current
station will be stored.
The storing phase is confirmed by an acoustic signal.
STORING THE LAST STATION LISTENED
TO
The radio automatically stores the last station that was selected for
each reception band, which is then tuned into when the radio is
turned on or when the reception band is changed.
AUTOMATIC TUNING
Briefly press theorbutton to start the automatic tuning
search for the next station that can be received in the selected
direction.
If the
orbutton is pressed down longer, the fast search starts.
When the button is released, the tuner will stop on the next station
that can be received.
If the TA function (traffic alerts) is on, the tuner will only search for
stations that broadcast traffic news and alerts.
MANUAL TUNING
This is used to manually search for stations in the preselected band.
Select the desired frequency band and then press the
or
button briefly and repeatedly to start to the search in the desired
direction.
If the
orbuttons are pressed longer, the fast search will start
and then stop when the button is released.
AUTOSTORE FUNCTION
(automatic station storing)
To activate the AutoSTore function, hold the FM AS button down
until an acoustic signal is heard. With this function, the radio
automatically stores the 6 stations with the strongest signal in
decreasing order on the FMA frequency band.
During the automatic storing process, the word “Autostore” flashes
on the display.
Press the FM AS button again to interrupt the AutoSTore function:
the radio will again tune into the station listened to before the
activation of the function.
When the AutoSTore function has finished, the radio will
automatically tune into the first preset station on the FMA band
stored on the preset side 1.
The stations that have a strong signal in the preselected band at
that moment, are then automatically stored on the buttons
numbered from 1 to 6.
256
SOUND-SYSTEM
Page 261 of 280

When the AutoSTore function is activated within the MW band, the
FMA band is automatically selected and the function is performed
there.
NoteSometimes the AutoSTore function is not able to find 6
stations with a strong signal. In this case, the strongest stations will
be duplicated in the free preset buttons.
NoteWhen the AutoSTore function is activated, the stations that
were previously stored in the FMA band are deleted.
EMERGENCY ALARM RECEPTION
The radio is configured to receive emergency alerts in RDS mode in
exceptional circumstances or where dangerous situations are
present (earthquakes, floods, etc.) if these are being transmitted by
the current broadcaster.
This function is activated automatically and cannot be turned off.
The word “Alarm” will be shown in the display during the
transmission of an emergency announcement. The volume of the
radio will change during this announcement in the same way as
during a traffic bulletin.
EON FUNCTION
(Enhanced Other Network)
In some countries, there are circuits that group multiple
broadcasters that transmit traffic information together. In this case,
the programme of the station that is being listened to will be
temporarily interrupted to:
❒receive traffic alerts (only with the TA function activated);
❒listen to regional transmissions each time these are broadcast by
one of the broadcasters on the same circuit.
STEREOPHONIC BROADCASTERS
If the incoming signal is weak, playback is automatically switched
from Stereo to Mono.
257
SOUND-SYSTEM
Page 262 of 280

CD PLAYER
INTRODUCTION
This section describes the variants regarding the operation of the
CD player: as far as the operation of the radio is concerned, refer
to the description in the “Functions and Adjustments” chapter.
SELECTING THE CD PLAYER
To activate the CD player built into the equipment, proceed as
follows:
❒insert a CD with the equipment switched on: the first track will
start to play;
or
❒if a CD has already been loaded, switch on the radio and then
briefly press the CD button to select the “CD” operating mode:
the last track listened to will start to play.
It is advisable to use original CDs to ensure optimum playback. If
CD-R/RWs are used, we recommend using good quality media
mastered at the slowest speed possible.
LOADING/EJECTING A CD
To load the CD, insert it gently into the slot to activate the motorised
loading system, which will position it correctly.
The CD can be loaded with radio off and the ignition key turned to
MAR: in this case the radio will remain off. When the radio is
turned on, the last source listened to prior to switching off will be
activated.When a CD is inserted the display will show the symbol “CD-IN”
and the text “CD Reading”. They will remain displayed for the
entire time required for the radio to read the CD tracks. When this
time has elapsed the radio will automatically start to play the first
track.
Press the
button with the radio on to activate the motorised
ejection of the CD. After ejection, the last audio source listened to
before playing the CD will be heard.
If the CD is not removed from the radio, it will automatically be
reloaded about 20 seconds later and the Tuner mode will be
activated (Radio).
The CD cannot be ejected if the radio is off.
If the ejected CD is reloaded without having removed it completely
from the slot, the radio will not switch to the CD source.
Possible error messages
If the CD loaded cannot be read (e.g. a CD ROM has been
inserted or the CD is inserted upside down or there is reading
error) the display will show the text “CD Disc error”.
The CD will then be ejected and the audio source activated prior to
the CD mode selection will be heard.
With an external audio source activated (“TA”, “ALARM” or
“Phone”), the CD that cannot be read will not be ejected until these
functions have ended. At the end, with the CD mode activated, the
display will show the text “CD Disc error” for a few seconds and
then the CD will be ejected.
258
SOUND-SYSTEM
Page 263 of 280

DISPLAY INFORMATION
When the CD player is working, the display will show the
following information:
❒“CD Track 5”: indicates the number of the CD track;
❒“03:42”: indicates the time elapsed since the start of the track (if
the relevant Menu function is activated).
TRACK SELECTION (forward/back)
Briefly press thebutton to play the previous CD track and the
button to play the next track.
The tracks are selected cyclically: the first track is selected after the
last track and vice versa.
If the track has been played for more than 3 seconds, pressing the
button will cause the track to be started again from the
beginning.
In this case, if you want to play the previous track, press the button
twice consecutively.
TRACK FAST FORWARD/REWIND
The fast forward/rewind will stop once the button is released.
PAUSE FUNCTION
To pause the CD player, press thebutton. The text “CD Pause”
appears on the display.
To resume listening to the track, press the
button again.
If another audio source is selected, the pause function is
deactivated.
259
SOUND-SYSTEM
Page 264 of 280

MP3 CD PLAYER
INTRODUCTION
This section only describes the variants regarding the operation of
the CD MP3 player: as far as the operation of the radio is
concerned, refer to the description in the “Radio” and “CD MP3
Player” sections.
NOTE MPEG Layer-3 audio decoding technology licensed from
Fraunhofer IIS and Thomson multimedia.
MP3 MODE
In addition to playing regular audio CDs, the radio is also able to
play CD-ROMs on which audio files have been stored using the
MP3 compression format. The radio operates as described in the
“CD Player” section when an ordinary audio CD is inserted.
To guarantee optimal playback quality it is advisable to use good
quality CDs mastered at the lowest speed possible.
The files on an MP3 CD are structured by folder, creating lists of all
the folders containing MP3 tracks (folders and subfolders are all
displayed on the same level); the folders that do not contain MP3
tracks cannot be selected.The operating conditions and specifications for playing MP3 files
are as follows:
❒the CD-ROMs used should be burnt according to the ISO 9660
standard;
❒the music files must have an “.mp3” extension: files with a
different extension cannot be played;
❒the following sampling frequencies can be played: 44.1 kHz,
stereo (96 to 320 kbit/s) - 22.05 kHz, mono or stereo (32 to 80
kbit/s);
❒tracks with a variable bit-rate can be reproduced.
NoteThe names of tracks must not contain the following
characters: spaces, ' (apostrophes), ( and ) (open and close
brackets). When burning an MP3 CD, make sure that the names of
the files do not contain these characters; if they do, the radio will
not be able to play the tracks involved.
SELECTING MP3 SESSIONS
ON HYBRID DISCS
If a hybrid disc is inserted (Mixed Mode, Enhanced, CD-Extra) also
containing MP3 files, the radio automatically starts playing the
audio session. It is possible to switch to the MP3 session whilst
playing by holding the MEDIA button down for more than 2
seconds.
NoteWhen the function is activated the radio may take a few
seconds to start playing. Whilst checking the disc the display will
show “CD READING”. If no MP3 files are detected, the radio will
resume playing the audio session from the point where it was
interrupted.
260
SOUND-SYSTEM