2015 Alfa Romeo Giulietta ESP
[x] Cancel search: ESPPage 144 of 288

FRONT AIRBAGS
“SMART BAG” SYSTEM
(MULTISTAGE FRONT
AIRBAGS)
The car features multistage front
airbags (“Smart bag”) for driver and
passenger.
The front (driver and passenger) airbags
protect occupants in the event of
head-on crashes of medium-high
severity, by placing the a cushion
between the occupant and the steering
wheel or dashboard.
Therefore non-deployment in other
types of impacts (side impacts, rear
shunts, roll-overs, etc.) does not
indicate a system malfunction.
Airbags are not a replacement of but
complementary to the seat belts, which
you are recommended to always wear.
In the event of impact, those not
wearing a seat belt are projected
forwards and may come into contact
with the bag which is still inflating. The
protection offered by the bag is
compromised in these circumstances.
85) 86) 88)
Front airbags may not activate in the
following situations:❒frontal impacts against highly
deformable objects not involving the
front surface of the car (e.g. wing
collision against guard rail, etc.);
❒jamming of the car underneath other
vehicles or protective barriers (e.g.
underneath a truck or a guard rail) as,
in this case, the bags would offer no
additional protection with respect
to the seat belt and their deployment
would be inappropriate. In these
cases, non-deployment does not
indicate a system malfunction.
FRONT DRIVER SIDE
AIRBAG
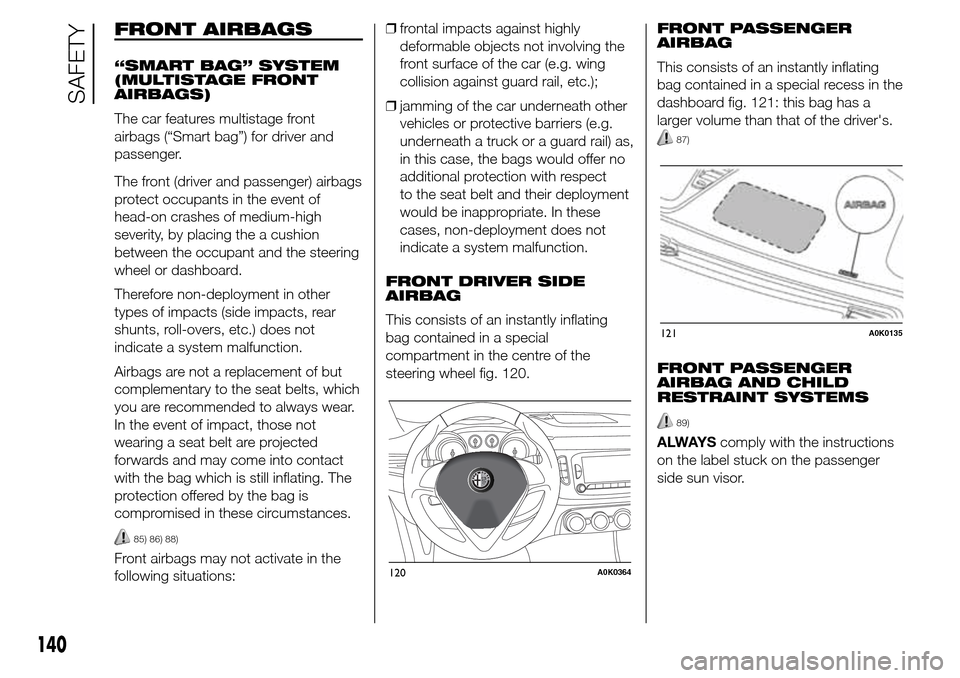
This consists of an instantly inflating
bag contained in a special
compartment in the centre of the
steering wheel fig. 120.FRONT PASSENGER
AIRBAG
This consists of an instantly inflating
bag contained in a special recess in the
dashboard fig. 121: this bag has a
larger volume than that of the driver's.
87)
FRONT PASSENGER
AIRBAG AND CHILD
RESTRAINT SYSTEMS
89)
ALWAYScomply with the instructions
on the label stuck on the passenger
side sun visor.
120A0K0364
121A0K0135
140
SAFETY
Page 153 of 288

IMPORTANT
16) In the first period of use, we
recommend not to demand
maximum performance from the
car (for instance excessive
accelerations, extended travel at
maximum speed, sudden braking,
etc.).
17) With the engine off, do not leave
the key in the ignition switch on
MAR-ON to prevent draining
the battery.
18) A quick burst on the accelerator
before turning off the engine
serves absolutely no practical
purpose; it wastes fuel and is
especially damaging to
turbocharged engines.
19) If the
warning light flashes
for about 1 minute after starting
or during prolonged cranking, this
indicates a fault in the glow plug
preheating system. If the engine
starts, you may use the car
normally, but should contact an
Alfa Romeo Dealership as soon as
possible.
PARKING
Always remove the ignition key when
leaving the car.
When parking and leaving the car,
proceed as follows:
❒engage a gear (1st gear if parked
uphill or reverse if facing downhill)
and leave the wheels turned;
❒stop the engine and engage the
handbrake.
Block the wheels with a wedge or a
stone if the car is parked on a steep
slope.
On versions equipped with Alfa TCT
transmission, before releasing the brake
pedal, wait for letter P to be displayed.
IMPORTANTNEVERleave the car
with the gearbox in neutral (or, on
versions equipped with Alfa TCT
transmission, before placing the gear
lever at P).
HANDBRAKE
To engage it, pull lever A fig. 126
upwards until the car is secured.
When the handbrake is engaged and
the ignition key is at MAR-ON, the
warning light will switch on in the
instrument panel.To release it, raise lever A slightly, hold
down button B and lower the lever:
the
warning light on the instrument
panel switches off.
103) 104)
IMPORTANT Carry out these
manoeuvres with the brake pedal
pressed.
IMPORTANT For cars equipped with a
front armrest, lift it up to ensure that
it does not interfere with the action of
the handbrake.
126A0K0615
149
Page 156 of 288

POSITIONS OF THE
LEVER
Park (P)
Position P corresponds to the neutral
position of the transmission and locks
drive wheels mechanically.
It should only be engaged with the car
stationary and the handbrake should be
applied, if necessary.
With the ignition key at MAR-ON or with
engine running, or when the engine
switches off, if the gear lever is not
correctly positioned in P, letter P starts
flashing on the gear lever trim.
In this case, move the lever correctly to
position P.
21)
The ignition key can be removed only
when the lever is in position P. Moving
the lever from P to D must be
performed only when the car is
stationary and the engine at idling
speed.
Shifting from P to any other position of
the selector lever, with ignition key in
MAR-ON position, must be made
pressing the brake pedal and using the
button on the gear lever (see paragraph
"Selector lever").
If the battery is flat, to release the lever
you need to remove the gaiter and
operate the lever A fig. 132.IMPORTANT NEVER leave the car
before having positioned the selector
lever in P.
Reverse (R)
The engine cannot be started with the
lever in position R.
Shifting from R to N or D is free, while
shifting from R to P can be made by the
button on the gear lever, with engine
at idling speed.
22)
Neutral (N)
It corresponds to neutral for a standard
manual gearbox. The engine can be
started with the lever in position N.
Engage N in case of prolonged stops.
To move the lever from position N,
release the accelerator and make sure
the engine is stable at idling speed.Shifting from N to D is free, while
shifting from N to R or P can only be
made by the button on the gear lever.
Drive (D) - Automatic
forward gear
It is the lever position in standard
running conditions.
Shifting from D to N is free, while
shifting from D to R or P can only be
made by the button on the gear lever.
Sequential mode (+ / –)
Shifting the lever from position D on
side in stable position, the transmission
is used in sequential mode.
Shifting the lever in unstable position (+
or −) gears are changed.
Important information
IMPORTANT All movements of the gear
lever must be performed with car
stationary and engine idling only.
The drive wheels are mechanically
locked in position P.
Shifting from P to R is possible with
brake pedal pressed and button on
gear lever pressed.
Shifting from R to N and from N to D is
free.
132A0K0619
152
STARTING AND DRIVING
Page 158 of 288

In both cases, if the described
conditions and times are not respected,
the ignition key will be automatically
locked.
To remove the key, turn it to MAR-ON
and then to STOP.
IMPORTANT If the battery is flat and the
ignition key is engaged, the latter is
locked in position. To remove the key
manually, pull up the handbrake and
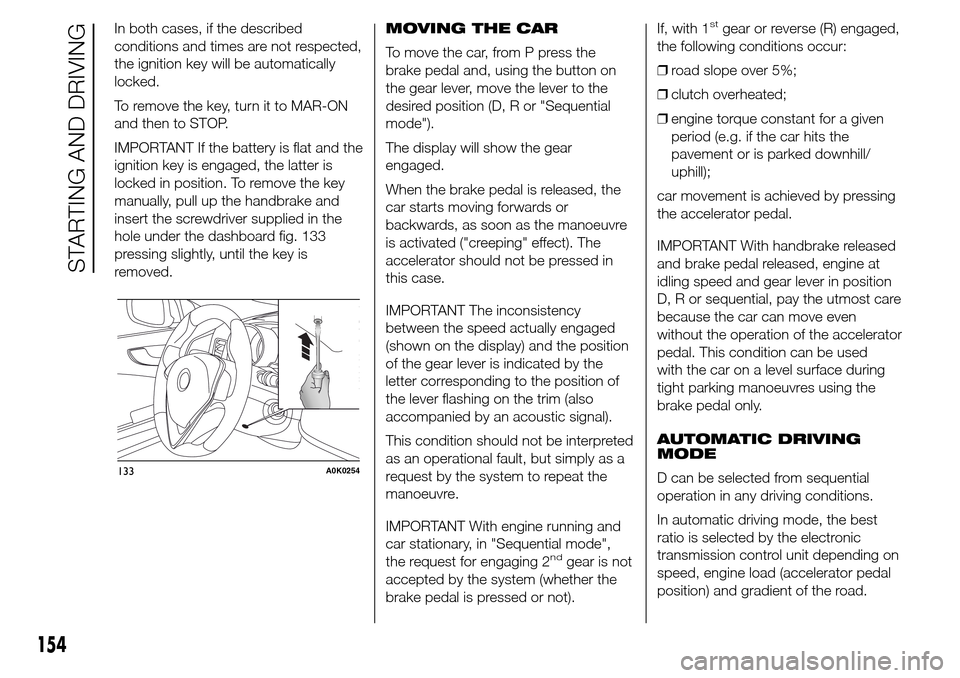
insert the screwdriver supplied in the
hole under the dashboard fig. 133
pressing slightly, until the key is
removed.MOVING THE CAR
To move the car, from P press the
brake pedal and, using the button on
the gear lever, move the lever to the
desired position (D, R or "Sequential
mode").
The display will show the gear
engaged.
When the brake pedal is released, the
car starts moving forwards or
backwards, as soon as the manoeuvre
is activated ("creeping" effect). The
accelerator should not be pressed in
this case.
IMPORTANT The inconsistency
between the speed actually engaged
(shown on the display) and the position
of the gear lever is indicated by the
letter corresponding to the position of
the lever flashing on the trim (also
accompanied by an acoustic signal).
This condition should not be interpreted
as an operational fault, but simply as a
request by the system to repeat the
manoeuvre.
IMPORTANT With engine running and
car stationary, in "Sequential mode",
the request for engaging 2
ndgear is not
accepted by the system (whether the
brake pedal is pressed or not).If, with 1
stgear or reverse (R) engaged,
the following conditions occur:
❒road slope over 5%;
❒clutch overheated;
❒engine torque constant for a given
period (e.g. if the car hits the
pavement or is parked downhill/
uphill);
car movement is achieved by pressing
the accelerator pedal.
IMPORTANT With handbrake released
and brake pedal released, engine at
idling speed and gear lever in position
D, R or sequential, pay the utmost care
because the car can move even
without the operation of the accelerator
pedal. This condition can be used
with the car on a level surface during
tight parking manoeuvres using the
brake pedal only.
AUTOMATIC DRIVING
MODE
D can be selected from sequential
operation in any driving conditions.
In automatic driving mode, the best
ratio is selected by the electronic
transmission control unit depending on
speed, engine load (accelerator pedal
position) and gradient of the road.
133A0K0254
154
STARTING AND DRIVING
Page 160 of 288

To use the paddles on the steering
wheel, the gear lever must be in
"Sequential mode" or in D:
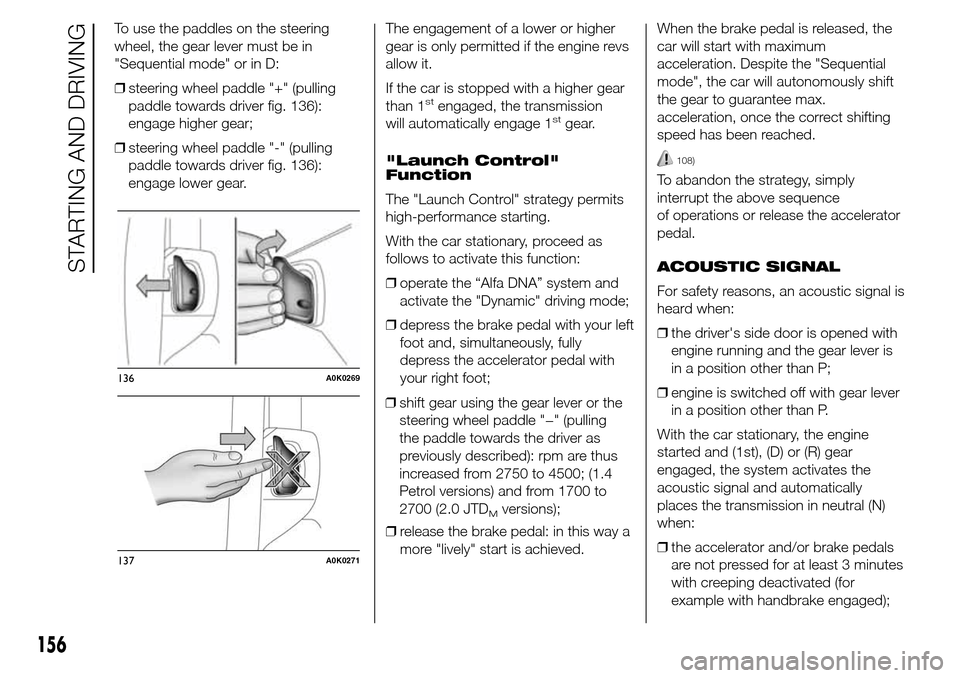
❒steering wheel paddle "+" (pulling
paddle towards driver fig. 136):
engage higher gear;
❒steering wheel paddle "-" (pulling
paddle towards driver fig. 136):
engage lower gear.The engagement of a lower or higher
gear is only permitted if the engine revs
allow it.
If the car is stopped with a higher gear
than 1
stengaged, the transmission
will automatically engage 1stgear.
"Launch Control"
Function
The "Launch Control" strategy permits
high-performance starting.
With the car stationary, proceed as
follows to activate this function:
❒operate the “Alfa DNA” system and
activate the "Dynamic" driving mode;
❒depress the brake pedal with your left
foot and, simultaneously, fully
depress the accelerator pedal with
your right foot;
❒release the brake pedal: in this way a
more "lively" start is achieved.When the brake pedal is released, the
car will start with maximum
acceleration. Despite the "Sequential
mode", the car will autonomously shift
the gear to guarantee max.
acceleration, once the correct shifting
speed has been reached.
108)
To abandon the strategy, simply
interrupt the above sequence
of operations or release the accelerator
pedal.
ACOUSTIC SIGNAL
For safety reasons, an acoustic signal is
heard when:
❒the driver's side door is opened with
engine running and the gear lever is
in a position other than P;
❒engine is switched off with gear lever
in a position other than P.
With the car stationary, the engine
started and (1st), (D) or (R) gear
engaged, the system activates the
acoustic signal and automatically
places the transmission in neutral (N)
when:
❒the accelerator and/or brake pedals
are not pressed for at least 3 minutes
with creeping deactivated (for
example with handbrake engaged);
136A0K0269
137A0K0271
156
STARTING AND DRIVING
❒shift gear using the gear lever or the
steering wheel paddle "−" (pulling
the paddle towards the driver as
previously described): rpm are thus
increased from 2750 to 4500; (1.4
Petrol versions) and from 1700 to
2700 (2.0 JTD
Mversions);
Page 162 of 288

WARNING
106) Using the levers incorrectly
(levers pushed towards the
dashboard, see fig. 137) could
break them.
107) Never leave children
unattended in the car. Always
remove the ignition key when
leaving the car and take the key
with you.
108) The Launch control function is
only available in Dynamic mode.
Regardless of what is explicitly
indicated in the description of
these modes, the ESC and ASR
systems are deactivated during
operation of the Launch Control
function. This means that vehicle
dynamic control is the sole
responsibility of the driver.
Therefore pay the utmost
attention when using the Launch
Control. Take into account traffic
and road surface conditions and
during manoeuvres make sure
there is enough room in the area
concerned.
SAVING FUEL
Here are some suggestions which can
help you to save fuel and lower harmful
emissions.
GENERAL
CONSIDERATIONS
Car maintenance
Checks and adjustments should be
carried out in accordance with the
“Scheduled Servicing Plan” (see
chapter “Maintenance and care”).
Tyres
Check the tyre pressures at least once
every four weeks: if the pressure is
too low, consumption levels increase as
resistance to rolling is higher.
Unnecessary loads
Do not travel with an overloaded boot.
The weight of the car and its
arrangement greatly affect fuel
consumption and stability.Roof rack/ski rack
Remove the roof rack or the ski rack
from the roof after use. These
accessories lower aerodynamic
penetration and adversely affect
consumption levels. When transporting
particularly large objects, use a trailer
if possible.
Electrical devices
Use the electrical devices only for the
necessary amount of time. The heated
rear window, additional headlights,
screen wipers and heater fan require a
considerable amount of energy;
increasing the current uptake increases
fuel consumption (by up to +25% in
an urban cycle).
Climate control system
Using the climate control system will
increase consumption: use the air vents
when the temperature outside permits.
Devices for
aerodynamic control
The use of non-certified devices for
aerodynamic control may adversely
affect air drag and fuel consumption.
158
STARTING AND DRIVING
Page 164 of 288

TOWING TRAILERS
IMPORTANT
The vehicle must be provided with a
type-approved tow hook and adequate
electrical system to tow caravans or
trailers. Installation must be carried out
by a specialist.
Fit any specific and/or additional rear
view mirrors as specified by the
Highway Code.
Remember that when towing a trailer,
steep hills are harder to climb, the
braking spaces increase and overtaking
takes longer depending on the overall
weight.
Engage a low gear when driving
downhill, rather than constantly using
the brake.
The weight of the trailer reduces the
load capacity of the car by the same
amount. Consider the weight at full
load, including accessories and
luggage, to make sure you do not
exceed the maximum towable weight
(shown in the registration document).
Do not exceed the speed limits specific
to each country you are driving in, in
the case of vehicles towing trailers.
In any case do not exceed 100 km/h.INSTALLING A TOW
HOOK
Contact an Alfa Romeo Dealership to
install a tow hook.
109) 110)
WARNING
109) The ABS with which the car is
equipped will not control the
braking system of the trailer.
Particular caution is therefore
required when travelling on
slippery roads.
110) Never modify the braking
system of the car to control the
trailer brake. The trailer braking
system must be fully independent
from the hydraulic system of the
car.
SNOW TYRES
Use snow tyres of the same size as the
normal tyres provided with the car:
the Alfa Romeo Dealership will be able
to advise you on the most appropriate
tyre to use.
Only use these tyres in the event of ice
or snow on the roads.
111)
For the type of tyre to be used, inflation
pressures and the specifications of
snow tyres, follow the instructions given
in the "Wheels" paragraph in the
"Technical specifications" chapter.
The winter performance of these tyres
is considerably reduced when the tread
thickness is less than 4 mm. Replace
them in this case.
Due to the specific characteristics of
snow tyres, in normal weather
conditions or on long motorway
journeys, the performance of these
tyres is lower than that of standard
tyres. Their usage should therefore be
restricted in accordance with their
type approval.
All four tyres should be the same (brand
and track) to ensure greater safety
when driving and braking as well as
making the car more responsive. It is
inadvisable to change the rotation
direction of tyres.
160
STARTING AND DRIVING
Page 177 of 288

123) Always indicate that the tyre
was repaired using the quick
tyre repair kit. Give the booklet to
the technicians who will be
handling the tyre that was treated
using the kit.
124) Repair is not possible if the
wheel rim is damaged (groove
is deformed, causing air to
escape). Do not remove foreign
bodies (screws or nails) from the
tyre.
125) Do not operate the compressor
for longer than 20 minutes
consecutively. Risk of
overheating. The kit is not suitable
for definitive repairs, so the
repaired tyres may only be used
temporarily.126) The bottle contains ethylene
glycol and latex: it may cause
an allergic reaction. It is harmful if
swallowed. It is irritant for the
eyes. It may cause sensitisation if
inhaled or on contact. Avoid
contact with eyes, skin and
clothes. In the event of contact,
rinse immediately with plenty
of water. If ingested, do not
induce vomiting. Rinse out your
mouth, drink large quantities
of water and seek immediate
medical attention. Keep out of the
reach of children. The product
must not be used by asthmatics.
Do not inhale the vapours during
insertion and suction. Call a
doctor immediately if allergic
reactions are noted. Store the
bottle in its proper compartment,
away from sources of heat. The
sealant fluid has an expiry date.
Replace the bottle containing
out-of-date sealant fluid.CHANGING A BULB
28)
127) 128) 129)
GENERAL
INSTRUCTIONS
❒Before changing a bulb check the
contacts for oxidation;
❒replace blown bulbs with others of
the same type and power;
❒after replacing a headlight bulb,
always check its alignment;
❒when a light is not working, check
that the corresponding fuse is intact
before changing the bulb. For the
location of fuses, refer to the
paragraph “If a fuse blows” in this
chapter.
173