Page 210 of 341
209
Bluetooth® HandsFreeLink®Using HFL
Bluetooth ® HandsFreeLink®
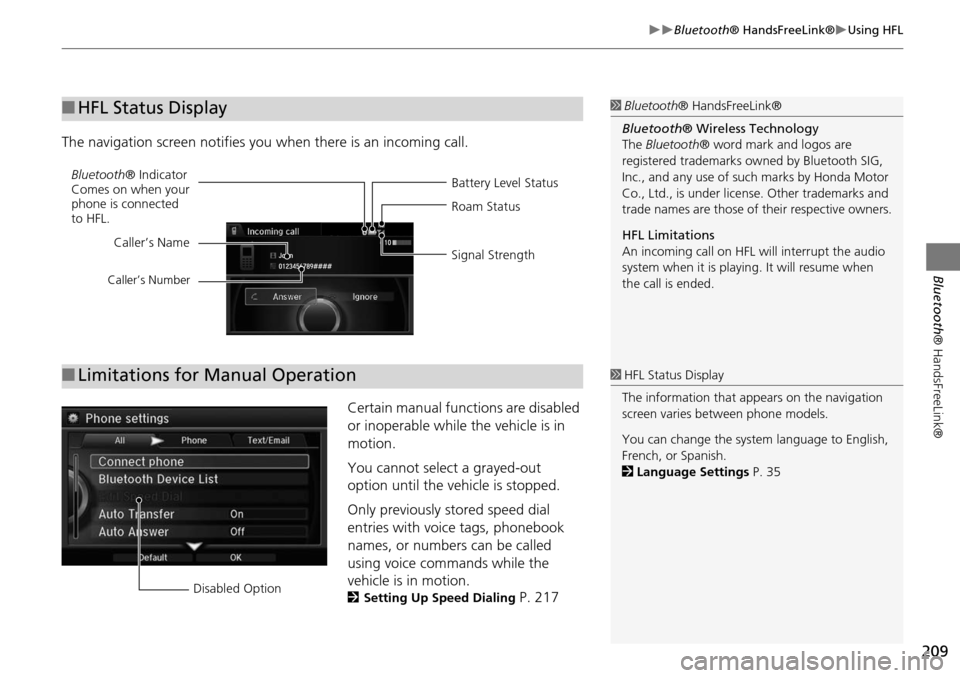
The navigation screen notifies you when there is an incoming call.
Certain manual functions are disabled
or inoperable while the vehicle is in
motion.
You cannot select a grayed-out
option until the vehicle is stopped.
Only previously stored speed dial
entries with voice tags, phonebook
names, or numbers can be called
using voice commands while the
vehicle is in motion.
2Setting Up Speed Dialing P. 217
■HFL Status Display1 Bluetooth ® HandsFreeLink®
Bluetooth ® Wireless Technology
The Bluetooth ® word mark and logos are
registered trademarks ow ned by Bluetooth SIG,
Inc., and any use of such marks by Honda Motor
Co., Ltd., is under license. Other trademarks and
trade names are those of their respective owners.
HFL Limitations
An incoming call on HFL will interrupt the audio
system when it is playing. It will resume when
the call is ended.
Battery Level Status
Bluetooth
® Indicator
Comes on when your
phone is connected
to HFL. Roam Status
Signal Strength
Caller’s Name
Caller’s Number
■
Limitations for Manual Operation1 HFL Status Display
The information that a ppears on the navigation
screen varies between phone models.
You can change the system language to English,
French, or Spanish.
2 Language Settings P. 35
Disabled Option
Page 211 of 341
210
Bluetooth® HandsFreeLink®Pairing a Phone
Bluetooth ® HandsFreeLink®
Pairing a Phone
HPHONE button
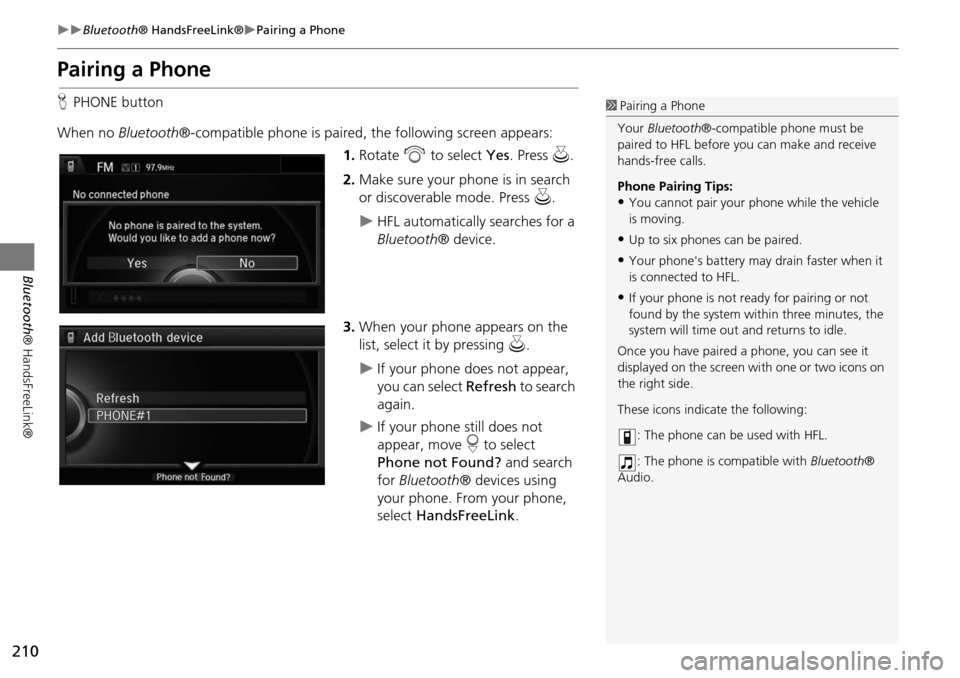
When no Bluetooth®-compatible phone is paired, the following screen appears:
1. Rotate i to select Yes. Press u.
2. Make sure your phone is in search
or discoverable mode. Press u.
HFL automatically searches for a
Bluetooth ® device.
3. When your phone appears on the
list, select it by pressing u.
If your phone does not appear,
you can select Refresh to search
again.
If your phone still does not
appear, move r to select
Phone not Found? and search
for Bluetooth ® devices using
your phone. From your phone,
select HandsFreeLink .
1Pairing a Phone
Your Bluetooth®-compatible phone must be
paired to HFL before you can make and receive
hands-free calls.
Phone Pairing Tips:
•You cannot pair your phone while the vehicle
is moving.
•Up to six phones can be paired.
•Your phone's battery may drain faster when it
is connected to HFL.
•If your phone is not r eady for pairing or not
found by the system within three minutes, the
system will time out and returns to idle.
Once you have paired a phone, you can see it
displayed on the screen wi th one or two icons on
the right side.
These icons indicate the following:
: The phone can be used with HFL.
: The phone is compatible with Bluetooth®
Audio.
Page 234 of 341
233
Bluetooth® HandsFreeLink®Making a Call
Bluetooth® HandsFreeLink®
Making a Call
You can make calls by inpu tting any phone number, or by using the imported
phonebook, call history, speed dial entries, or redial.1 Making a Call
Any voice-tagged speed dial entry, phonebook
name, or number can be dialed by voice from
most screens. Press the d button and say ”Call“
and the voice tag name, ”Call by name“ and the
phonebook name, or ”Call“ and the phone
number.
The maximum range be tween your phone and
vehicles is 30 fe et (10 meters).
Once a call is connected, you can hear the voice
of the person you are calling through the audio
speakers.
Page 262 of 341
261
Rear Entertainment System
Rear seat passengers can enjoy a completely separate entertainment
source than front passengers, including movies, games, and other audio choices.
Rear Entertainment System..................262
Auxiliary Console Panel .........................262
HDMI Input Jack (Ultrawide RES only) ....263
Playable Discs ........................................264
Rear Control Panel Operation ...............265
Selecting the Audio Source ...................265
Rear DVD Menu ....................................266
Screen and Surround Settings ...............269
DVD Initial Settings (RES only) ...............272
Dual Screen Mode (U ltrawide RES only) .273
Replacing the Batteries ..........................275
Front Control Panel Operation .............276
Selecting the Audio Source using front
control panel .......................................276 Rear System Setup ............................... 277
Setting the DVD Menu ......................... 278
Wireless Headphones ........................... 280
Using the Wireless Headphones ........... 280
Changing the Sound Sour ce (Ultrawide RES
only)................................................... 281
Replacing the Batteries ......................... 282
Page 263 of 341
262
Rear Entertainment System
Rear Entertainment System
The Rear Entertainment System (RES) is operable from both the front control panel
and the rear control panel.
2Front Control Panel Operation P. 276
2Rear Control Panel Operation P. 265
Auxiliary Console Panel
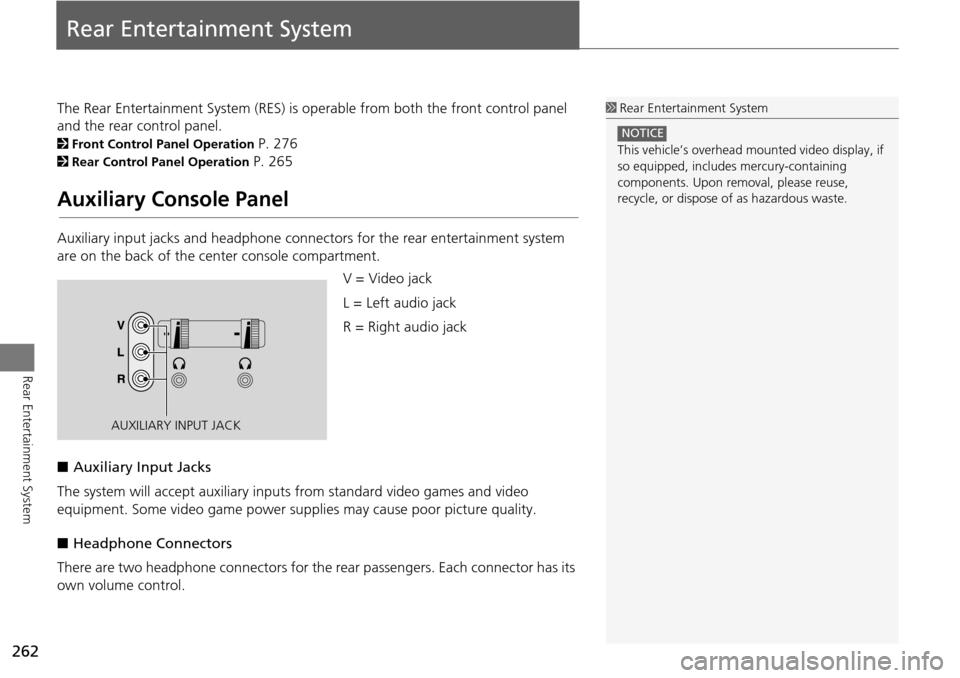
Auxiliary input jacks and headphone connectors for the rear entertainment system
are on the back of the center console compartment.
V = Video jack
L = Left audio jack
R = Right audio jack
■ Auxiliary Input Jacks
The system will accept auxiliary input s from standard video games and video
equipment. Some video game power su pplies may cause poor picture quality.
■ Headphone Connectors
There are two headphone connectors for th e rear passengers. Each connector has its
own volume control.
1 Rear Entertainment System
This vehicle’s overhead m ounted video display, if
so equipped, include s mercury-containing
components. Upon removal, please reuse,
recycle, or dispose of as hazardous waste.
NOTICE
AUXILIARY INPUT JACK
Page 266 of 341
265
Rear Entertainment System
Rear Control Panel Operation
Selecting the Audio Source
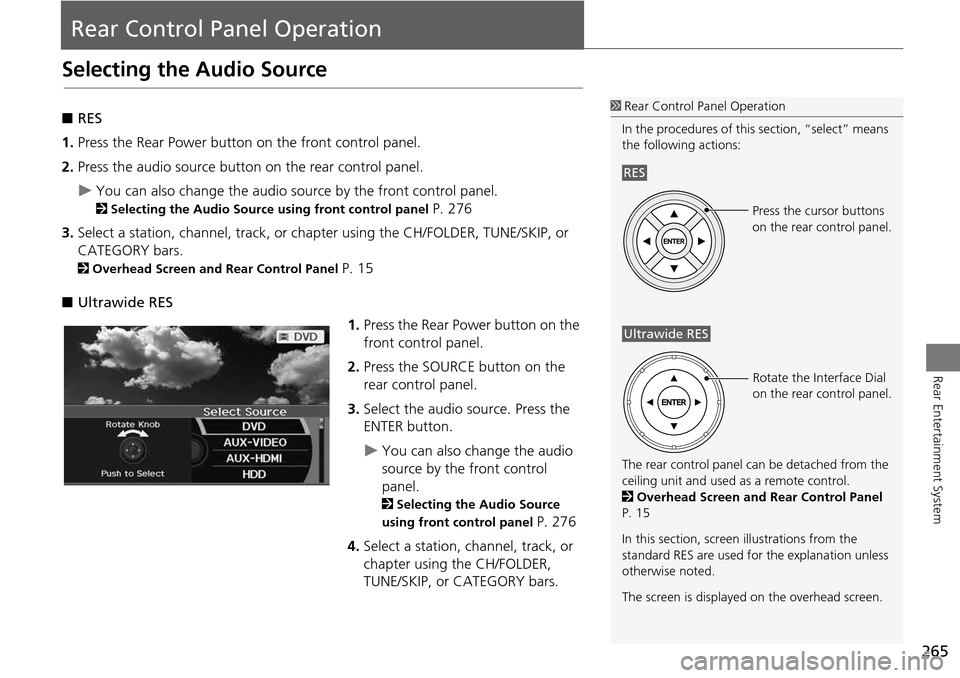
■RES
1. Press the Rear Power button on the front control panel.
2. Press the audio source button on the rear control panel.
You can also change the audio source by the front control panel.
2 Selecting the Audio Source using front control panel P. 276
3. Select a station, channel, track, or chapter using the CH/FOLDER, TUNE/SKIP, or
CATEGORY bars.
2 Overhead Screen and Rear Control Panel P. 15
■ Ultrawide RES
1.Press the Rear Power button on the
front control panel.
2. Press the SOURCE button on the
rear control panel.
3. Select the audio source. Press the
ENTER button.
You can also change the audio
source by the front control
panel.
2 Selecting the Audio Source
using front control panel
P. 276
4. Select a station, channel, track, or
chapter using the CH/FOLDER,
TUNE/SKIP, or CATEGORY bars.
1Rear Control Panel Operation
In the procedures of this section, “select” means
the following actions:
The rear control panel ca n be detached from the
ceiling unit and used as a remote control.
2 Overhead Screen and Rear Control Panel
P. 15
In this section, screen illustrations from the
standard RES are used for the explanation unless
otherwise noted.
The screen is displayed on the overhead screen.
RES
Press the cursor buttons
on the rear control panel.
Ultrawide RES
Rotate the Interface Dial
on the rear control panel.
Page 267 of 341
266
Rear Control Panel OperationRear DVD Menu
Rear Entertainment System
Rear DVD Menu
HMENU button (in the DVD mode)
Select an item. Press the ENTER
button.
The following item s are available:
• Top Menu : Displays the top menu of the DVD.
• Menu : Displays the menu of the DVD.
• Play Mode: Displays while a DVD is playing and changes the DVD’s audio,
subtitle, or angle settings.
2 Setting the Play Mode P. 267
• Initial Settings : Displays while a DVD is not playing and changes the DVD
preferences.
2 DVD Initial Settings (RES only) P. 272
• Search/NumInput : Skips to a title or chapter by entering the number.
2Searching a Title/Chapter P. 268
• Repeat :
o TITLE REPEAT: Repeats the current title.
p CHAPTER REPEAT: Repeats the current chapter.
• Pause/Play : Pauses or resume the playback
• Stop : Stops the playback.
• Return : Hides the rear audio menu.
Page 268 of 341
267
Rear Control Panel OperationRear DVD Menu
Rear Entertainment System
HMENU button (in the DVD mode) Play Mode
1.Select an item. Press the ENTER
button.
2. Select an option. Press the ENTER
button.
The following items are available:
• Audio : Selects the language of the DVD audio.
• Subtitle : Selects the language of the DVD subtitle.
• Angle : Selects the angle of a scene shot with multiple cameras.
■Setting the Play Mode