Page 274 of 341
273
Rear Control Panel OperationDual Screen Mode (Ultrawide RES only)
Rear Entertainment System
HMENU button (in the DVD mode) Initial Settings Language Settings
1. Select an item. Press the ENTER
button.
2. Select a language. Press the ENTER
button.
Dual Screen Mode (Ultrawide RES only)
Select between the two scre en modes, single or dual.
■ Single Mode
The selected source is displaye d in the center of the screen.
■ Dual Mode
Two separate screens are displayed side by side. You can only select one output
source from the front audio system. Th e other source must come from “AUX-
VIDEO” or “AUX-HDMI.”
■ Selecting the DVD Menu Language1 Selecting the DVD Menu Language
When you select Other, enter a 4-digit language
code.
2 List of Language Codes P. 335
Page 277 of 341
276
Rear Entertainment System
Front Control Panel Operation
Operate the Rear Entertainment System (RES) from the front control panel.
Selecting the Audio Source using front control panel
1.Press the Rear 9 (Power) button
on the front control panel.
2. Press the REAR AUDIO button.
The rear source is displayed on
the front audio screen and the
On Demand Multi-Use
Display™.
The rear source is heard from
the front speakers.
3. Select Rear Audio Source on the
On Demand Multi-Use Display™.
4. Select the audio source icon on the
On Demand Multi-Use Display™.
5. Select a station, channel, track, or
chapter in the same way as the
front audio system.
2 Audio P. 139
Page 278 of 341

277
Front Control Panel OperationRear System Setup
Rear Entertainment System
Rear System Setup
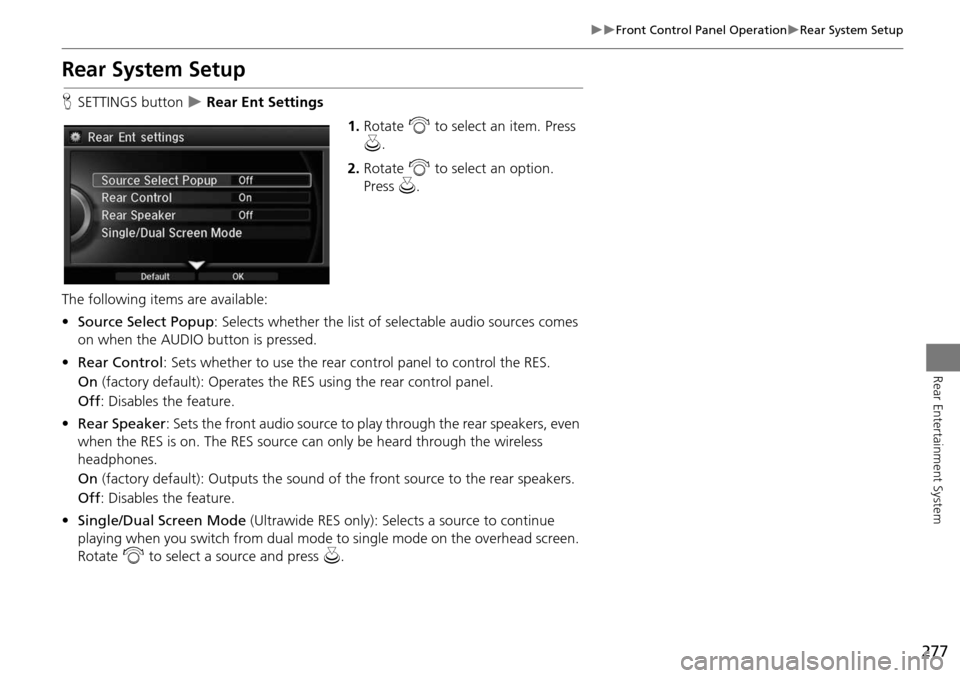
HSETTINGS button Rear Ent Settings
1.Rotate i to select an item. Press
u .
2. Rotate i to select an option.
Press u.
The following items are available:
• Source Select Popup : Selects whether the list of selectable audio sources comes
on when the AUDIO button is pressed.
• Rear Control: Sets whether to use the rear control panel to control the RES.
On (factory default): Operates the RES using the rear control panel.
Off : Disables the feature.
• Rear Speaker : Sets the front audio source to pl ay through the rear speakers, even
when the RES is on. The RES source can only be heard through the wireless
headphones.
On (factory default): Output s the sound of the front source to the rear speakers.
Off : Disables the feature.
• Single/Dual Screen Mode (Ultrawide RES only): Selects a source to continue
playing when you switch from dual mode to single mode on the overhead screen.
Rotate i to select a source and press u.
Page 279 of 341
278
Front Control Panel OperationSetting the DVD Menu
Rear Entertainment System
Setting the DVD Menu
HMENU button (in DVD mode)
1.Rotate i to select an item. Press
u .
Select Other Function to
display additional menu entries.
2. Rotate i to select an option.
Press u.
The following item s are available:
• Top Menu : Displays the top menu of the DVD.
• Menu : Displays the menu of the DVD.
• Repeat :
Repeat Title : Repeats the current title.
Repeat Chapter : Repeats the current chapter.
• Change Source : Changes the audio source mode.
Interface Dial
Page 280 of 341
279
Front Control Panel OperationSetting the DVD Menu
Rear Entertainment System
•Play/Pause: Pauses or resume the playback.
• Stop : Stops the playback.
• Audio/Subtitle : Selects the language of the DVD audio and the DVD subtitle.
• Angle : Selects the angle of a scene shot with multiple cameras.
• Back : Hides the DVD menu.
• Number Input : Enters a number of a title or chapter to skip.
• Search : Skips to a title or chapter by Interface Dial.
1.Select More.
2. Select a setting item.
The following items are available:
• Sound Settings : Displays the sound preferences screen.
2Adjusting the Sound P. 149
• Stop : Stops the playback.
• Repeat :
Repeat Title : Repeats the current title.
Repeat Chapter : Repeats the current chapter.
• Screen Settings : Displays the screen preferences screen.
2Changing the Screen Settings P. 86
On Demand Multi-Use Display™
Page 281 of 341
280
Rear Entertainment System
Wireless Headphones
Using the Wireless Headphones
Audio for the Rear Entertainment System is sent to the wireless headphones that
come with the system.
1.Pivot the earpieces outward.
2. Adjust the volume by turning the
dial on the bottom of the right
earpiece.
3. Wear the headphones correctly
with the left and right earpieces on
the correct sides.
L (left) and R (right) are marked
on the sides of the frame.
1Using the Wireless Headphones
When you remove the headphones, the
earpieces automatically pivot inward, and the
headphones turn off. When not in use, store the
headphones in the back pocket of either front
seat.
Some state and local government agencies
prohibit the use of headphones by the driver of a
motor vehicle. Always obey applicable laws and
regulations.
You can use wired headphones through the
auxiliary input jacks.
2 Auxiliary Console Panel P. 262
Volume Dial
Page 292 of 341
291
Troubleshooting
Troubleshooting................................... 292
Map, Voice, Entering Destinations ........ 292
Traffic .................................................. 294
Guidance, Routing ............................... 295
Update, Coverage, Map Errors ............. 297
Display, Accessories.............................. 297
Miscellaneous Questions ...................... 297
Error Messages ...................................... 298
Navigation System ................................ 298
CD Player ............................................. 299
Hard Disc Drive (HDD) Audio ................ 300
iPod®/USB Flash Drive .......................... 301
Pandora® ............................................ 302
Aha
TM Radio ......................................... 303
Page 300 of 341

299
Error MessagesCD Player
Troubleshooting
CD Player
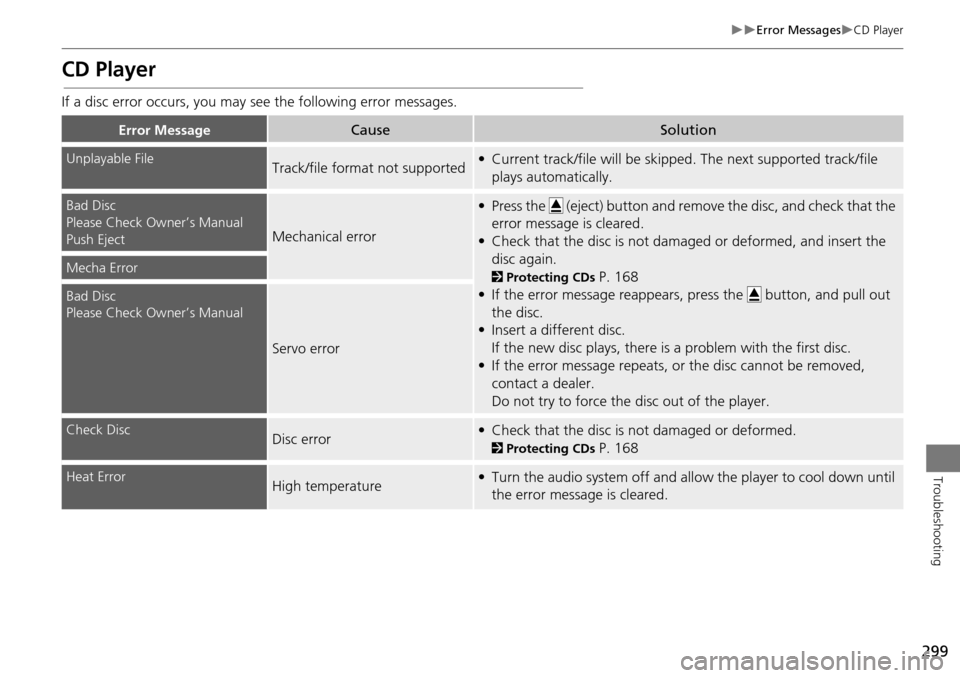
If a disc error occurs, you may see the following error messages.
Error MessageCauseSolution
Unplayable FileTrack/file format not supported• Current track/file will be skipped. The next supported track/file
plays automatically.
Bad Disc
Please Check Owner’s Manual
Push Eject
Mechanical error
• Press the (eject) button and remo ve the disc, and check that the
error message is cleared.
• Check that the disc is not damaged or deformed, and insert the disc again.
2 Protecting CDs P. 168
• If the error message reappears, press the button, and pull out
the disc.
• Insert a different disc.
If the new disc plays, there is a problem with the first disc.
• If the error message repeats, or the disc cannot be removed, contact a dealer.
Do not try to force the disc out of the player.Mecha Error
Bad Disc
Please Check Owner’s Manual
Servo error
Check DiscDisc error• Check that the disc is not damaged or deformed.
2Protecting CDs P. 168
Heat ErrorHigh temperature• Turn the audio system off and allow the player to cool down until
the error message is cleared.