Page 131 of 400
129
With the touch screen
F Press this button to select the "dr iving" menu.
F
P
ress " Speed settings ".
F
S
elect the system for which you want to
memorise new speed settings:
F
C
hoose the speed setting to be modified. F
E
nter the new value using the numerical
keypad and confirm.
F
C
onfirm to save the modification and quit
the menu.
"MEM" button
This button allows you to select a speed setting
to be used with the speed limiter or cruise
control.
Refer to the corresponding section.
Modifying a speed setting
● speed limiter
or
●
c
ruise control
driving
Page 133 of 400

131
F Turn the wheel 1 to the "LIMIT" position
to select the speed limiter; the function is
paused.
F
I
f the speed setting is suitable (last speed
setting programmed in the system) press
button 4 to switch the speed limiter on.
Switching on Adjusting the limit speed
setting
F Pressing button 4 temporarily interrupts the
function (pause). You do not have to switch the speed limiter on
in order to set the speed.
To modify the limit speed setting from the
current speed of the vehicle:
F
i
n steps of +/- 1 mph (km/h), make
successive short presses on button 2 or 3 ,
F
c
ontinuously, in steps of +/- 5 mph (km/h),
press and hold button 2 or 3 .
To modify the limit speed setting using
memorised speeds and from your Audio
system:
F
w
ith the system first activated.
For more information on memorising speeds,
refer to the corresponding section.
F
m
ake a long press on button 2 or 3
, the
system displays the memorised speed
closest to the actual speed of the vehicle;
this setting becomes the new limit speed,
F
t
o choose another memorised speed, make
another long press on button 2 or 3.
To modify the limit speed setting using
memorised speeds and from the touch screen:
F
p
ress button 5 to display the six memorised
speed settings,
F
p
ress the button for the desired speed
setting.
This setting becomes the new limit speed.
driving
Page 136 of 400

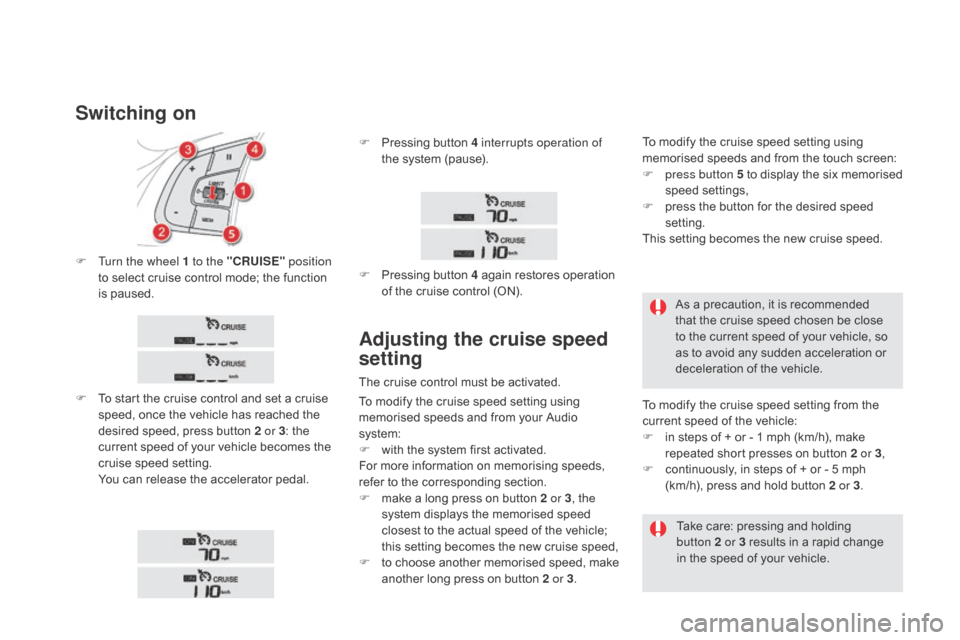
F Turn the wheel 1 to the "cRUISE" position
to select cruise control mode; the function
is paused.
F
T
o start the cruise control and set a cruise
speed, once the vehicle has reached the
desired speed, press button 2 or 3 : the
current speed of your vehicle becomes the
cruise speed setting.
Y
ou can release the accelerator pedal.
Switching on
F Pressing button 4 interrupts operation of the system (pause).
F
P
ressing button 4 again restores operation
of the cruise control (ON).
Adjusting the cruise speed
setting
The cruise control must be activated. As a precaution, it is recommended
that the cruise speed chosen be close
to the current speed of your vehicle, so
as to avoid any sudden acceleration or
deceleration of the vehicle.
To modify the cruise speed setting from the
current speed of the vehicle:
F
i
n steps of + or - 1 mph (km/h), make
repeated short presses on button 2 or 3 ,
F
c
ontinuously, in steps of + or - 5 mph
(km/h), press and hold button 2 or 3 .
Take care: pressing and holding
button
2 or 3 results in a rapid change
in the speed of your vehicle.
To modify the cruise speed setting using
memorised speeds and from your Audio
system:
F
w
ith the system first activated.
For more information on memorising speeds,
refer to the corresponding section.
F
m
ake a long press on button 2 or 3 , the
system displays the memorised speed
closest to the actual speed of the vehicle;
this setting becomes the new cruise speed,
F
t
o choose another memorised speed, make
another long press on button 2 or 3. To modify the cruise speed setting using
memorised speeds and from the touch screen:
F
p
ress button 5 to display the six memorised
speed settings,
F
p
ress the button for the desired speed
setting.
This setting becomes the new cruise speed.
Page 140 of 400

Reversing camera
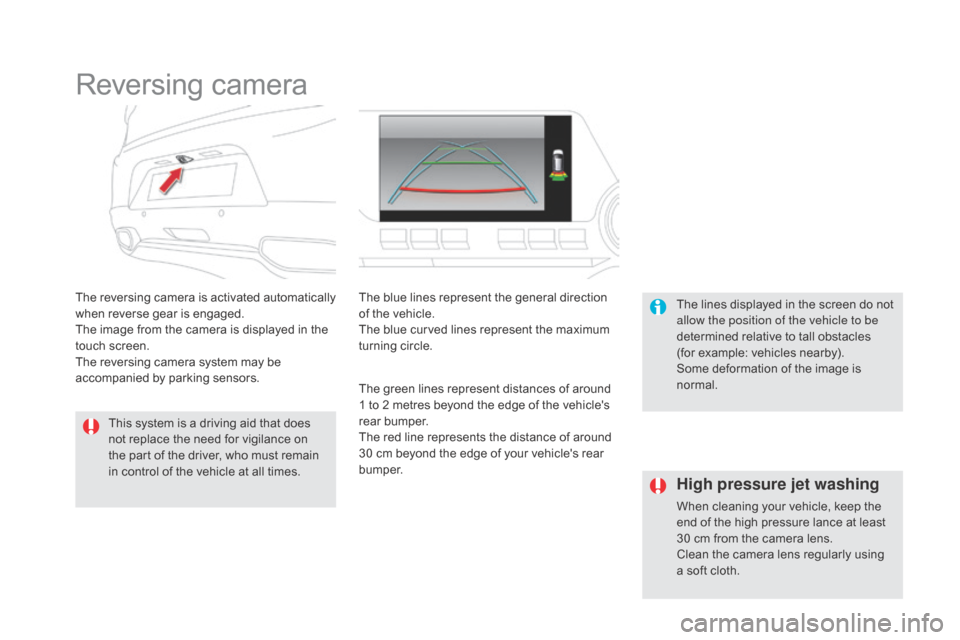
The reversing camera is activated automatically
when reverse gear is engaged.
The image from the camera is displayed in the
touch screen.
The reversing camera system may be
accompanied by parking sensors.The blue lines represent the general direction
of the vehicle.
The blue curved lines represent the maximum
turning circle.
The green lines represent distances of around
1 to 2 metres beyond the edge of the vehicle's
rear bumper.
The red line represents the distance of around
30 cm beyond the edge of your vehicle's rear
b u m p e r. The lines displayed in the screen do not
allow the position of the vehicle to be
determined relative to tall obstacles
(for example: vehicles nearby).
Some deformation of the image is
normal.
This system is a driving aid that does
not replace the need for vigilance on
the part of the driver, who must remain
in control of the vehicle at all times.
High pressure jet washing
When cleaning your vehicle, keep the
end of the high pressure lance at least
30 cm from the camera lens.
Clean the camera lens regularly using
a soft cloth.
Page 152 of 400

Manual adjustment of
halogen headlampsAutomatic adjustment of
xenon headlamps
To avoid causing a nuisance to other road
users, the height of the halogen headlamps
should be adjusted according to the load in the
vehicle.
0.
1 o
r 2 people in the front seats.
-.
I
ntermediate setting.
1.
5 p
eople + maximum authorised load.
-.
I
ntermediate setting.
2.
D
river + maximum authorised load.
-.
I
ntermediate setting.
3.
5 p
eople + maximum load in the boot. If a fault occurs, this warning lamp
is displayed in the instrument panel,
accompanied by an audible signal
and a message in the instrument
panel screen.
In order to avoid causing a nuisance to other
road users, this system corrects the height of the
xenon headlamps beam automatically and when
stationary, in relation to the load in the vehicle.
If a fault occurs, do not touch the xenon
bulbs.
Contact a CITROËN dealer or a
qualified workshop.
The system then places your headlamps in the
lowest position.
Headlamp beam height adjustment
The initial setting is position "0" .
Page 237 of 400

235
The fitting of electrical equipment or
accessories which are not recommended
by CITROËN may result in a failure of
your vehicle's electronic system and
excessive electrical consumption.
Contact a CITROËN dealer
for information on the range of
recommended equipment and
accessories.Installation of radio
communication
transmitters
Before installing any after-market radio
communication transmitter, you can
contact a CITROËN dealer for the
specification of transmitters which can
be fitted (frequency, maximum power,
aerial position, specific installation
requirements), in line with the Vehicle
Electromagnetic Compatibility
Directive (2004/104/EC). Depending on the legislation in force in
the country, certain safety equipment
may be compulsory: high visibility
safety vests, warning triangles,
breathalyzers, spare bulbs, spare fuses,
fire extinguisher, first aid kit, mud flaps
at the rear of the vehicle.
By visiting a CITROËN
dealer you can also
obtain cleaning and maintenance products
(interior and exterior) - including ecological
products in the "TECHNATURE" range,
products for topping up (screenwash...), paint
touch-up pens and aerosols for the exact
colour of your vehicle, refills (sealant cartridge
for the temporary puncture repair kit...), ...
"Multimedia":
Bluetooth hands-free system, portable satellite
navigation system, mapping update CD, driving
assistance systems, portable video screen,
portable video support bracket, multimedia
system support, 230 V/50 Hz socket,
230
V/12 V adaptor, mobile phone charger
compatible with iPhone
®, Wi-Fi on board, ...
Practical information
Page 325 of 400
SUPPLEMENT
7 inch Touch screen tablet
Page 327 of 400
1 Audio and Telematics
7-inch touch screen tablet
GPS satellite navigation - Multimedia audio - Bluetooth ®
telephone
Contents
First steps 2
Steering mounted controls 4
Menus 5
Navigation 6
Navigation - Guidance 14
Tr a ffi c 18
Radio Media 20
Radio 26
DAB (Digital Audio Broadcasting) radio 28
Media 30
Settings 34
Connected services 42
Internet browser 43
MirrorLink
TM 46
CarPlay® 50
Te l e p h o n e 5 4
Frequently asked questions 62
The system is protected in such a way that it will only operate in
your vehicle.
As a safety measure, the driver should only carry out operations
which require prolonged attention while the vehicle is stationary.
The display of the energy economy mode message signals
that the electrical equipment currently operating is going into
standby.
Refer to the energy economy mode section of your vehicle's
handbook.