2014 YAMAHA TRICITY Lever
[x] Cancel search: LeverPage 6 of 84

TABLE OF CONTENTSSAFETY INFORMATION.................. 1-1
Further safe-riding points ............... 1-5
DESCRIPTION .................................. 2-1
Left view ......................................... 2-1
Right view ....................................... 2-2
Controls and instruments ............... 2-3
INSTRUMENT AND CONTROL
FUNCTIONS ...................................... 3-1
Main switch/steering lock............... 3-1
Keyhole shutter .............................. 3-2
Indicator lights and warning lights............................................ 3-2
Self-diagnosis device ..................... 3-3
Multi-function meter unit ................ 3-4
Handlebar switches ........................ 3-8
Front brake lever ............................ 3-8
Rear brake lever ............................. 3-9
Fuel tank cap .................................. 3-9
Fuel ............................................... 3-10
Catalytic converter ....................... 3-11
Seat .............................................. 3-12
Passenger footrest ....................... 3-13
Storage compartment .................. 3-13
Luggage hook............................... 3-14
Sidestand ..................................... 3-14
Ignition circuit cut-off system ....... 3-15
Auxiliary DC connector ................. 3-17 FOR YOUR SAFETY –
PRE-OPERATION CHECKS
............. 4-1
OPERATION AND IMPORTANT
RIDING POINTS ................................ 5-1
Starting the engine .......................... 5-1
Starting off ...................................... 5-2
Acceleration and deceleration ........ 5-2
Braking ............................................ 5-3
Tips for reducing fuel consumption ................................ 5-3
Engine break-in ............................... 5-3
Parking ............................................ 5-4
PERIODIC MAINTENANCE AND
ADJUSTMENT ................................... 6-1
Owner’s tool kit ............................... 6-2
Periodic maintenance chart for the
emission control system .............. 6-3
General maintenance and
lubrication chart ........................... 6-4
Removing and installing the panel ............................................ 6-8
Checking the spark plug ................. 6-8
Engine oil and oil strainer .............. 6-10
Final transmission oil..................... 6-12
Coolant.......................................... 6-13
Air filter and V-belt case air filter elements .................................... 6-14
Checking the throttle grip free play ............................................ 6-16 Valve clearance............................. 6-16
Tires .............................................. 6-17
Cast wheels .................................. 6-18
Checking the front brake lever
free play..................................... 6-19
Checking the rear brake lever free play..................................... 6-19
Checking the front and rear
brake pads ................................ 6-20
Checking the brake fluid level ...... 6-20
Changing the brake fluid .............. 6-22
Checking and lubricating the cables ........................................ 6-22
Checking and lubricating the
throttle grip and cable ............... 6-22
Lubricating the front and rear brake levers ............................... 6-23
Checking and lubricating the centerstand and sidestand........ 6-23
Checking the front fork ................. 6-24
Checking the steering................... 6-25
Checking the wheel bearings ....... 6-25
Checking the steering tie rod ....... 6-25
Checking the leaning system ....... 6-26
Battery .......................................... 6-26
Replacing the fuses ...................... 6-27
Replacing the headlight bulb ........ 6-29
Tail/brake light .............................. 6-30
Turn signal light bulb .................... 6-30
Auxiliary light ................................ 6-30
Troubleshooting............................ 6-31U2CME0E0.book Page 1 Friday, May 2, 2014 2:55 PM
Page 9 of 84

SAFETY INFORMATION
1-2
1
• Know your skills and limits.
Staying within your limits may
help you to avoid an accident.
• We recommend that you prac- tice riding your vehicle where
there is no traffic until you have
become thoroughly familiar with
the vehicle and all of its con-
trols.
Many accidents have been
caused by error of the vehicle op-
erator. A typical error made by the
operator is veering wide on a turn
due to excessive speed or under-
cornering (insufficient lean angle
for the speed).
• Always obey the speed limit and never travel faster than warrant-
ed by road and traffic condi-
tions.
• Always signal before turning or changing lanes. Make sure that
other motorists can see you.
The posture of the operator and
passenger is important for proper
control.
• The operator should keep both hands on the handlebar and
both feet on the operator foot-
rests during operation to main-
tain control of the vehicle.
• The passenger should always hold onto the operator, the seat
strap or grab bar, if equipped,
with both hands and keep both
feet on the passenger footrests.
Never carry a passenger unless
he or she can firmly place both
feet on the passenger footrests.
Never ride under the influence of
alcohol or other drugs.
This vehicle is designed for on-
road use only. It is not suitable for
off-road use.
Protective Apparel
The majority of fatalities from scooter
and motorcycle accidents are the re-
sult of head injuries. The use of a safety
helmet is the single most critical factor
in the prevention or reduction of head
injuries.
Always wear an approved helmet.
Wear a face shield or goggles.
Wind in your unprotected eyes
could contribute to an impairment
of vision that could delay seeing a
hazard.
The use of a jacket, substantial
shoes, trousers, gloves, etc., is ef-
fective in preventing or reducing
abrasions or lacerations.
Never wear loose-fitting clothes,
otherwise they could catch on the
control levers or wheels and cause
injury or an accident.
Always wear protective clothing
that covers your legs, ankles, and
feet. The engine or exhaust sys-
tem become very hot during or af-
ter operation and can cause
burns.
A passenger should also observe
the above precautions.
Avoi d Car bon Monoxi de Poisonin g
All engine exhaust contains carbon
monoxide, a deadly gas. Breathing
carbon monoxide can cause head-
aches, dizziness, drowsiness, nausea,
confusion, and eventually death.
U2CME0E0.book Page 2 Friday, May 2, 2014 2:55 PM
Page 16 of 84
DESCRIPTION
2-3
2
EAU10431
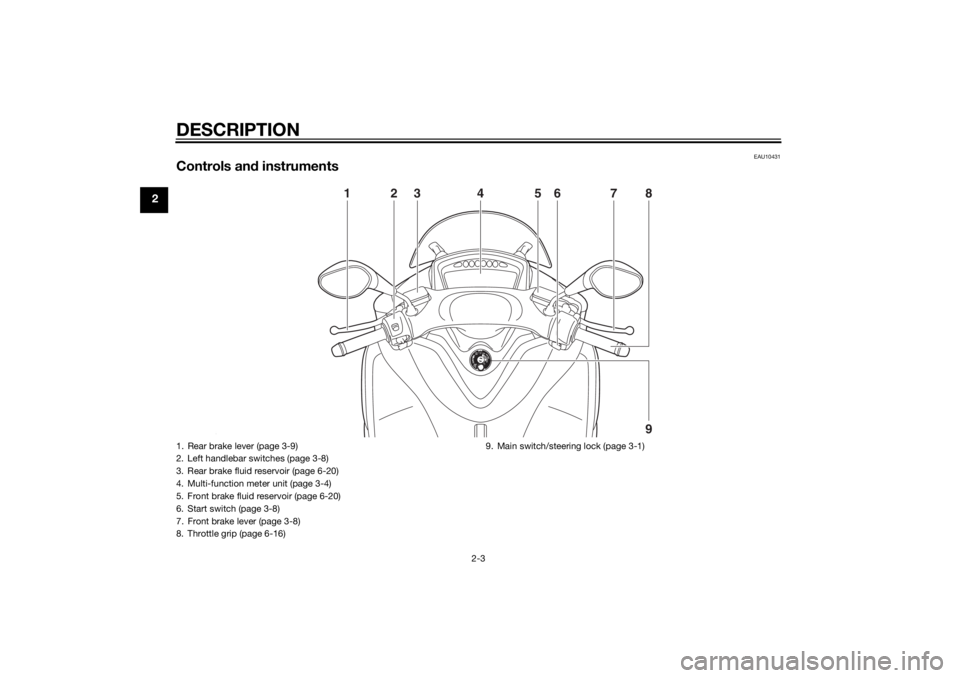
Controls and instruments
2
1
9 87
3
26 5
4
ZAU0E0631. Rear brake lever (page 3-9)
2. Left handlebar switches (page 3-8)
3. Rear brake fluid reservoir (page 6-20)
4. Multi-function meter unit (page 3-4)
5. Front brake fluid reservoir (page 6-20)
6. Start switch (page 3-8)
7. Front brake lever (page 3-8)
8. Throttle grip (page 6-16) 9. Main switch/steering lock (page 3-1)U2CME0E0.book Page 3 Friday, May 2, 2014 2:55 PM
Page 24 of 84
INSTRUMENT AND CONTROL FUNCTIONS
3-8
3
EAU1234H
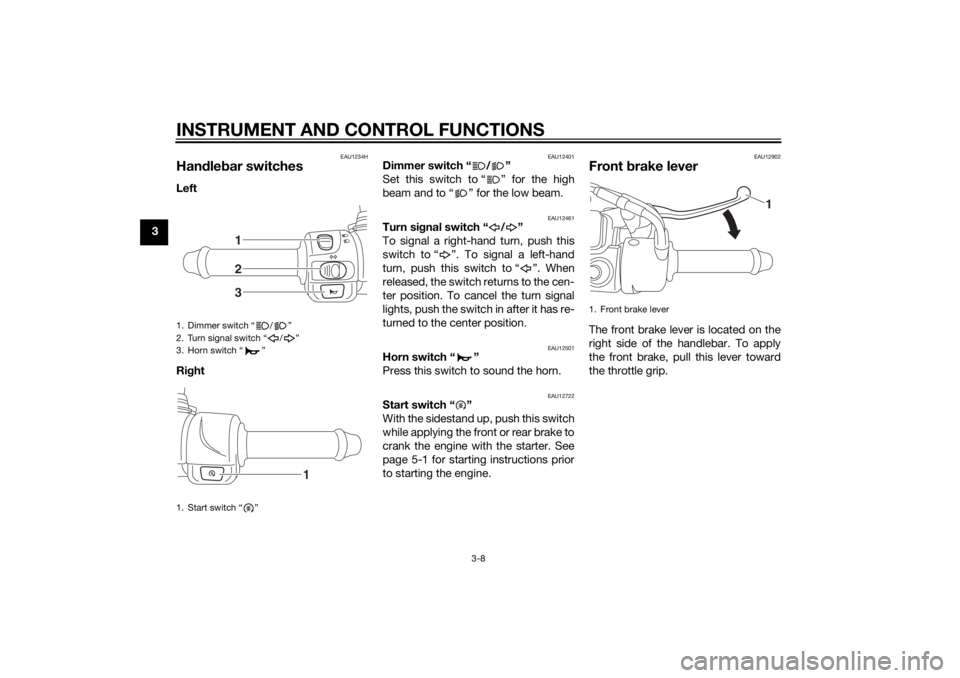
Handle bar switchesLeft
Ri ght
EAU12401
Dimmer switch “ / ”
Set this switch to “ ” for the high
beam and to “ ” for the low beam.
EAU12461
Turn si gnal switch “ / ”
To signal a right-hand turn, push this
switch to “ ”. To signal a left-hand
turn, push this switch to “ ”. When
released, the switch returns to the cen-
ter position. To cancel the turn signal
lights, push the switch in after it has re-
turned to the center position.
EAU12501
Horn switch “ ”
Press this switch to sound the horn.
EAU12722
Start switch “ ”
With the sidestand up, push this switch
while applying the front or rear brake to
crank the engine with the starter. See
page 5-1 for starting instructions prior
to starting the engine.
EAU12902
Front brake leverThe front brake lever is located on the
right side of the handlebar. To apply
the front brake, pull this lever toward
the throttle grip.
1. Dimmer switch “ / ”
2. Turn signal switch “ / ”
3. Horn switch “ ”
1. Start switch “ ”
123
1
1. Front brake lever
1
U2CME0E0.book Page 8 Friday, May 2, 2014 2:55 PM
Page 25 of 84
INSTRUMENT AND CONTROL FUNCTIONS
3-9
3
EAUS1963
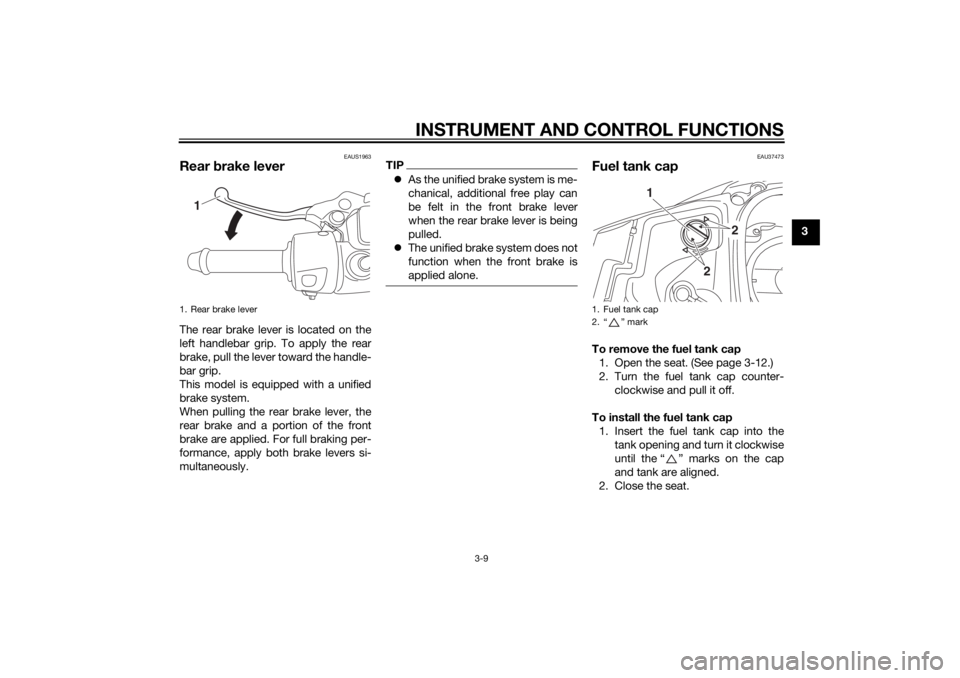
Rear brake leverThe rear brake lever is located on the
left handlebar grip. To apply the rear
brake, pull the lever toward the handle-
bar grip.
This model is equipped with a unified
brake system.
When pulling the rear brake lever, the
rear brake and a portion of the front
brake are applied. For full braking per-
formance, apply both brake levers si-
multaneously.
TIP As the unified brake system is me-
chanical, additional free play can
be felt in the front brake lever
when the rear brake lever is being
pulled.
The unified brake system does not
function when the front brake is
applied alone.
EAU37473
Fuel tank capTo remove the fuel tank cap
1. Open the seat. (See page 3-12.)
2. Turn the fuel tank cap counter- clockwise and pull it off.
To install the fuel tank cap 1. Insert the fuel tank cap into the tank opening and turn it clockwise
until the “ ” marks on the cap
and tank are aligned.
2. Close the seat.
1. Rear brake lever
1
1. Fuel tank cap
2. “ ” mark
2
2
1
U2CME0E0.book Page 9 Friday, May 2, 2014 2:55 PM
Page 32 of 84
INSTRUMENT AND CONTROL FUNCTIONS
3-16
3
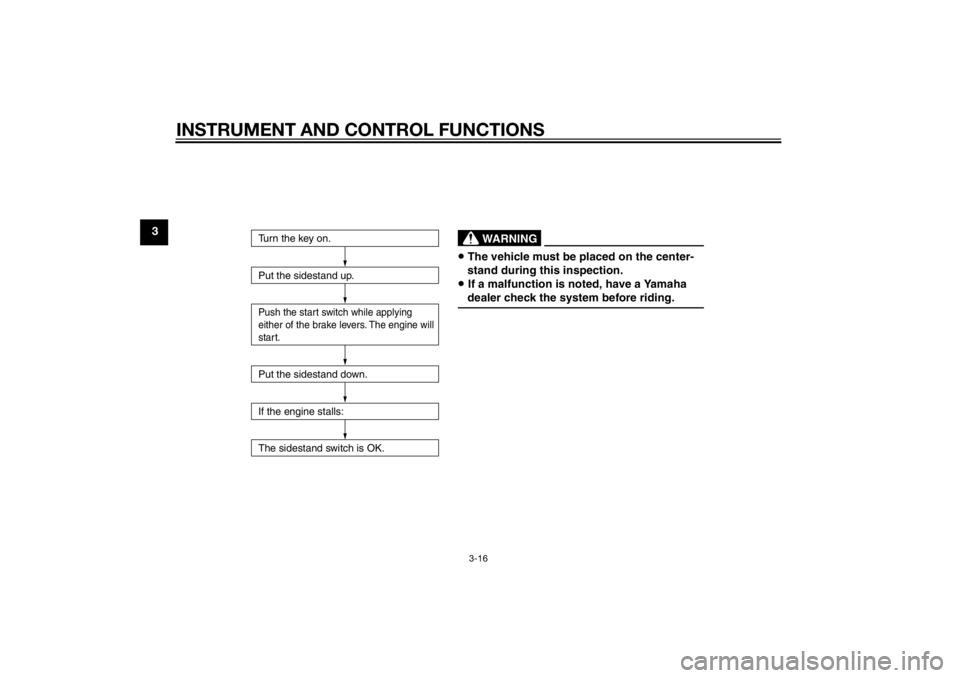
Turn the key on.
Put the sidestand up.Push the start switch while applying
either of the brake levers. The engine will
start.Put the sidestand down.
If the engine stalls:
The sidestand switch is OK.
• The vehicle must be placed on the center-
stand during this inspection.• If a malfunction is noted, have a Yamaha
dealer check the system before riding.
WARNING
U2CME0E0.book Page 16 Friday, May 2, 2014 2:55 PM
Page 35 of 84

FOR YOUR SAFETY – PRE-OPERATION CHECKS
4-2
4
Rear brake • Check operation.
• If soft or spongy, have Yamaha dealer bleed hydraulic system.
• Check brake pads for wear.
• Replace if necessary.
• Check fluid level in reservoir.
• If necessary, add specified brake fluid to specified level.
• Check hydraulic system for leakage. 6-20, 6-20
Throttle grip • Make sure that operation is smooth.
• Check throttle grip free play.
• If necessary, have Yamaha dealer adjust throttle grip free play and lubricate ca-
ble and grip housing. 6-16, 6-22
Control ca bles • Make sure that operation is smooth.
• Lubricate if necessary. 6-22
Wheels an d tires • Check for damage.
• Check tire condition and tread depth.
• Check air pressure.
• Correct if necessary. 6-17, 6-18
Brake levers • Make sure that operation is smooth.
• Lubricate lever pivoting points if necessary.
6-23
Centerstan d, si destan d • Make sure that operation is smooth.
• Lubricate pivots if necessary.
6-23
Chassis fasteners • Make sure that all nuts, bolts and screws are properly tightened.
• Tighten if necessary. —
Instruments, li ghts, si gnals
an d switches • Check operation.
• Correct if necessary.
—
Si destan d switch • Check operation of ignition circuit cut-off system.
• If system is not working correctly, have Yamaha dealer check vehicle.
3-14
ITEM CHECKS PAGE
U2CME0E0.book Page 2 Friday, May 2, 2014 2:55 PM
Page 37 of 84
OPERATION AND IMPORTANT RIDING POINTS
5-2
5
3. Start the engine by pushing the
start switch while applying the
front or rear brake.
If the engine fails to start, release
the start switch, wait a few sec-
onds, and then try again. Each
starting attempt should be as
short as possible to preserve the
battery. Do not crank the engine
more than 10 seconds on any one
attempt.
NOTICE
ECA11043
For maximum en gine life, never ac-
celerate har d when the en gine is
col d!
EAU60640
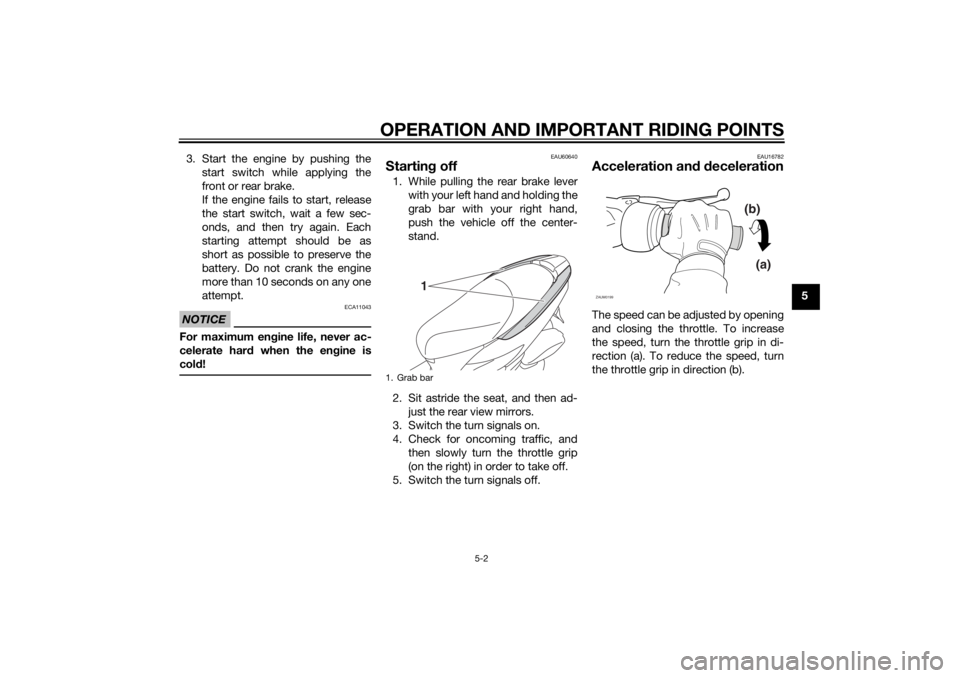
Startin g off1. While pulling the rear brake lever
with your left hand and holding the
grab bar with your right hand,
push the vehicle off the center-
stand.
2. Sit astride the seat, and then ad- just the rear view mirrors.
3. Switch the turn signals on.
4. Check for oncoming traffic, and then slowly turn the throttle grip
(on the right) in order to take off.
5. Switch the turn signals off.
EAU16782
Acceleration an d d ecelerationThe speed can be adjusted by opening
and closing the throttle. To increase
the speed, turn the throttle grip in di-
rection (a). To reduce the speed, turn
the throttle grip in direction (b).
1. Grab bar
1
(b)
(a)
ZAUM0199
U2CME0E0.book Page 2 Friday, May 2, 2014 2:55 PM