Page 161 of 217
Vehicle care159
2. Remove protective cover 2.
3. Rotate bulb holder anti-clockwise
to disengage. Withdraw the bulb
holder from the reflector.
4. Detach bulb from bulb holder and renew the bulb.
5. Insert the bulb holder, engaging the two lugs into the reflector androtate clockwise to secure.
6. Rotate bulb carrier to right as far as it will go.
7. Install protective cover.
8. Close the opening in the wheel housing with the cover.
High beam 1. Access to the bulbs is through the
engine compartment.2. Remove protective cover 1.
3. Detach wiring plug from bulb.
Page 162 of 217
160Vehicle care
4. Disengage spring clip fromretainer by pressing forward and
then swing downwards.
5. Withdraw bulb from reflector housing.
6. When installing the new bulb, insert lugs in the reflector
recesses and engage the spring
clip.
7. Install the wiring plug onto bulb. 8. Install protective cover.
Side lights 1. Access to the bulbs is through the
engine compartment.2. Remove protective cover 1.
3. Withdraw parking light bulb holder
from reflector.
4. Remove bulb from socket and renew bulb.
5. Insert holder in reflector. Install the headlamp protective cover.
Front turn signal 1. Replace bulbs through the opening in the wheel housing.
2. Remove protective cover.
Page 163 of 217
Vehicle care161
3. Rotate bulb holder anti-clockwiseto disengage.
4. Push bulb into socket slightly, rotate anti-clockwise, remove and
renew bulb.
5. Insert bulb holder in reflector, rotate clockwise to engage.
6. Install protective cover.
7. Close the opening in the wheel housing with the cover.
Xenon headlights9 Danger
Xenon headlights work under
extremely high electrical voltage.
Do not touch. Except for the turn
signal bulbs, bulbs should be
replaced by a workshop.
Front turn signal
1. Access to the bulbs is through the
engine compartment.
2. Rotate bulb holder anti-clockwise to disengage.
3. Push bulb into socket slightly,rotate anti-clockwise, remove and
renew bulb.
4. Insert bulb holder in reflector, rotate clockwise to engage.
Fog lights
Have bulbs replaced by a workshop.
Page 164 of 217
162Vehicle careTail lights
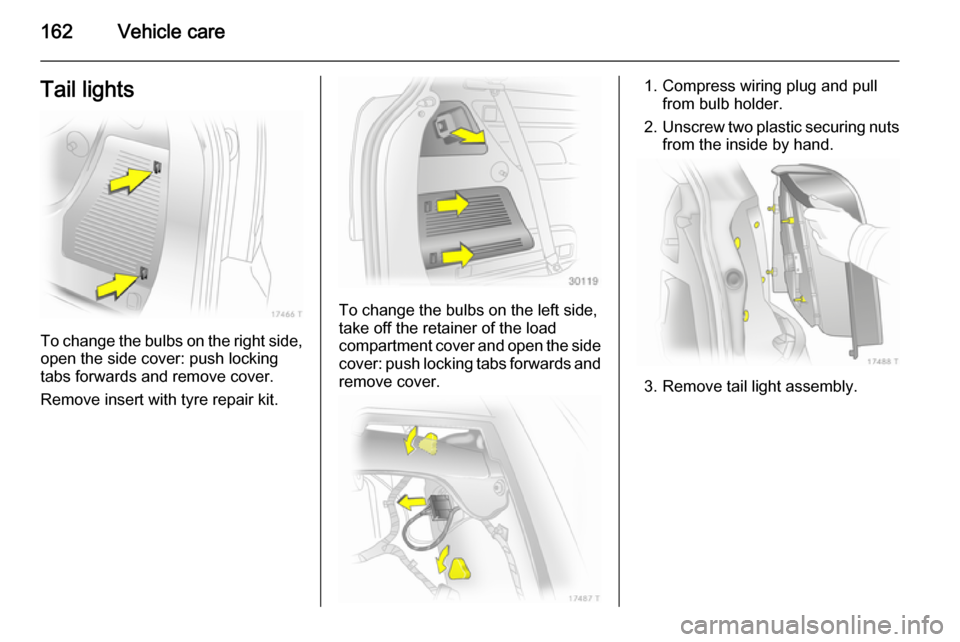
To change the bulbs on the right side,
open the side cover: push locking
tabs forwards and remove cover.
Remove insert with tyre repair kit.
To change the bulbs on the left side, take off the retainer of the load
compartment cover and open the side cover: push locking tabs forwards andremove cover.
1. Compress wiring plug and pull from bulb holder.
2. Unscrew two plastic securing nuts
from the inside by hand.
3. Remove tail light assembly.
Page 165 of 217
Vehicle care163
4. Disengage locking tabs andremove bulb holder.
5. Push bulb into socket slightly,rotate anti-clockwise, remove and
renew bulb.
Tail light/brake light ( 1)
Turn signal light ( 2)
Rear fog light, may be only on one side ( 3)
Reverse light ( 4)
6. Engage bulb holder into the tail light assembly. Connect wiring
plug. Install tail light assembly in
body and tighten securing nuts.
On the right side, fit the insert with
tyre repair kit. Engage side cover.
On the left side engage retainer of the load compartment cover.
7. After bulb replacement, check the
tail lights for proper functionality:
switch on the ignition, operate the brake, switch on the sidelights.
Side turn signal lights
Have bulbs replaced by a workshop.Number plate light
1. Insert screwdriver in bulb housing, press to the side and
release spring.
Page 166 of 217
164Vehicle care
2. Remove bulb housingdownwards, taking care not to pullon the cable.
3. Lift flap and disconnect wiring plug from bulb holder.
4. Rotate bulb holder anti-clockwise to disengage.
5. Remove bulb from holder and renew bulb.
6. Insert bulb holder in bulb housing and rotate clockwise.
7. Connect wiring plug to bulb holder.
8. Insert and engage bulb housing.
Interior lights
Front courtesy light, reading
lights
1. Disengage lens, press it downward slightly and remove at
a downward angle.
2. Remove bulb and renew.
3. Engage lens.
Rear courtesy light and reading
lights
Have bulbs replaced by a workshop.
Glovebox light, foot well light
1. Prise the lamp out with a screwdriver.
Page 167 of 217
Vehicle care165
2.Press bulb slightly towards spring
clip and remove.
3. Insert new bulb.
4. Install lamp.
Instrument panel
illumination
Have bulbs replaced by a workshop.Electrical system
Fuses
Data on the replacement fuse must
match the data on the defective fuse.
The vehicle has two fuse boxes: one
behind a cover on the left side of the
load compartment and one in the front
left of the engine compartment.
Store spare fuses in the load
compartment fuse box version B.
Open the cover 3 169.
Before replacing a fuse, turn off the
respective switch and the ignition.
A blown fuse can be recognised by its melted wire. Do not replace the fuse
until the cause of the fault has been
remedied.
Some functions are protected by
several fuses.
Fuses may also be inserted without existence of a function.
Page 168 of 217
166Vehicle care
Fuse extractorA fuse extractor may be located in the fuse box in the load compartment.
Place the fuse extractor on the
various types of fuse from the top or
side, and withdraw fuse.
Engine compartment fuse
box
Insert a screwdriver into the opening
as far as it will go and tilt it sideways.
Open the cover upwards and remove.
When refitting the cover, first attach
the cover on the left side and then fold
down. Take care that the cover
engages audibly.
The fuse box has two different fuse
assignments depending on the load
compartment fuse box variant,
3 169.