Page 73 of 217

Storage71
belts unhooked from the vehicle floor.Secure released seat belt hooks to
belt holder magnets 3 55.
Lashing eyes
The lashing eyes are designed to
secure items against slippage, e.g.
using lashing straps, load net or
safety net.
The eyes for securing the removable
seat belts must not be used as lashing
eyes.
The seat belts in the third seat row
must never be used for securing
loads.
Cargo management
system The FlexOrganizer is a flexible
system for dividing the load
compartment or securing loads.
The system consists of
■ adapters,
■ variable partition net,
■ mesh pockets,
■ hooks.
The components are fitted in two rails
in the side panels using adapters and hooks. The partitioning net can alsobe fitted directly in front of the tailgate.
Variable partition net
Insert an adapter into each rail: fold
open the handle plate, insert adapter
into upper and lower groove of rail
and move to required position. Turn
handle plate upwards to lock the
adapter. The rods of the net must be
extended before inserting into the
adapters: pull out all of the end pieces and lock by rotating clockwise.
To install, push rods together a little
and insert into the relevant openings
in the adapters. The longer rod must
be inserted into the upper adapter.
Page 74 of 217

72Storage
To remove, press the net rod together
and remove from the adapters. Fold
open the adapter handle plate,
disengage from lower groove and
then from upper groove.
Hooks and net pocket
Net pocket can be suspended from
the luggage hooks.
Partitioning net in front of
tailgate
The partitioning net can be installed
directly in front of the tailgate,
preventing the load from falling out
when the tailgate is opened.
The four end pieces of the net rod
must be pushed in before installation by rotating each end piece
anticlockwise and pushing in.
To install, push the net rods together
a little and insert into the openings.
The longer rod must be inserted at the
top.
To remove, push the net rods
together and remove.
For easier loading with the third seat
row upright, first insert the rod, place the load in the load compartment and then insert the upper rod.
Safety net The safety net can be installed behind the second seat row or the front seats.
Passengers must not be transported
behind the safety net.
Installation
Page 75 of 217
Storage73
There are two installation openings inthe roof frame: suspend and engagerod of net at one side, compress rod
and suspend and engage at other
side.
Behind the second seat row
Suspend hooks of net tensioning
belts in lashing eyes in floor and
tension.
Behind front seats
Suspend hooks of net tensioning
belts in slots and tension.
Removal
Tilt length adjuster of the net
tensioning belt upwards and detach
the belt. Disengage the upper rod on
one side, compress, disengage other side and remove from the openings.
Stowage
Place tensioning straps as shown in
figure and align to net.
Page 76 of 217
74Storage
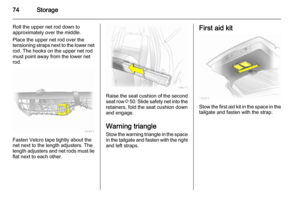
Roll the upper net rod down to
approximately over the middle.
Place the upper net rod over the
tensioning straps next to the lower net
rod. The hooks on the upper net rod
must point away from the lower net
rod.
Fasten Velcro tape tightly about the
net next to the length adjusters. The
length adjusters and net rods must lie flat next to each other.
Raise the seat cushion of the second
seat row 3 50 . Slide safety net into the
retainers, fold the seat cushion down
and engage.
Warning triangle
Stow the warning triangle in the space
in the tailgate and fasten with the right and left straps.
First aid kit
Stow the first aid kit in the space in thetailgate and fasten with the strap.
Page 77 of 217
Storage75Roof rack system
Roof rack For safety reasons and to avoiddamage to the roof, the vehicle
approved roof rack system is
recommended.
Follow the installation instructions and remove the roof rack when not in
use.
Version without roof railing
Lift the covers from the fitting
openings.
Fasten the roof rack at the fastening
points.
Version with roof railing
To fasten the roof rack, insert the
mounting bolts in the holes indicated
in the figure.
Loading information
■ Heavy objects in the load compartment should be placedagainst the seat backrests. Ensure
the backrests are securely
engaged. If objects can be stacked, the heavier objects should be
placed at the bottom.
■ Secure objects with lashing straps attached to lashing eyes 3 71.
■ Secure loose objects in load compartment to prevent sliding.
Page 78 of 217

76Storage
■ When transporting objects in theload compartment, the backrests of
the second row must not be angled forward.
■ Do not allow the load to protrude above the upper edge of the
backrests.
■ Do not place any objects on the load compartment cover or theinstrument panel.
■ The load must not obstruct the operation of the pedals, parking
brake and gear selector, or hinder
the freedom of movement of the
driver. Do not place any unsecured
objects in the interior.
■ Do not drive with an open load compartment.9 Warning
Always make sure that the load in
the vehicle is securely stowed.
Otherwise objects can be thrown
around inside the vehicle and
cause personal injury or damage
to the load or car.
■ The payload is the difference between the permitted gross
vehicle weight (see identification
plate 3 196) and the EC kerb
weight.
To calculate the payload, enter the
data for your vehicle in the Weights
table at the front of this manual.
The EC kerb weight includes
weights for the driver (68 kg),
luggage (7 kg) and all fluids (tank
90 % full).
Optional equipment and
accessories increase the kerb
weight.
■ Driving with a roof load increases the sensitivity of the vehicle to
cross-winds and has a detrimental
effect on vehicle handling due to
the vehicle's higher centre of
gravity. Distribute the load evenly
and secure it properly with retaining
straps. Adjust the tyre pressure and vehicle speed according to the load
conditions. Check and retighten the
straps frequently.
Do not drive faster than 75 mph.The permissible roof load is 75 kg and 100 kg for vehicles with roof
railing. The roof load is the
combined weight of the roof rack
and the load.
Page 79 of 217
Instruments and controls77Instruments and
controlsControls ....................................... 77
Warning lights, gauges and indi‐ cators ........................................... 83
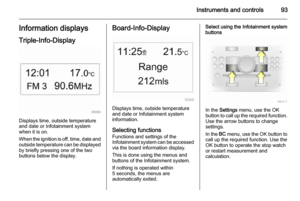
Information displays .....................93
Vehicle messages ...................... 100
Trip computer ............................. 102Controls
Steering wheel adjustment
Unlock lever, adjust steering wheel,
then engage lever and ensure it is fully locked.
Do not adjust steering wheel unless
vehicle is stationary and steering
wheel lock has been released.
Steering wheel controls
The Infotainment system and the
Info-Display can be operated via the
controls on the steering wheel.
Further information is available in the
Infotainment system manual.
Page 80 of 217
78Instruments and controlsHorn
Press j.
Windscreen wiper/washer
Windscreen wiper
The lever always springs back to its
original position.
&=fast%=slow$=interval wiping§=Off
For a single wipe when the
windscreen wiper is off, press the
lever down.
Run through the windscreen wiper
stages by pushing the lever past the
resistance point and holding. An
acoustic signal sounds at §.
Do not use if the windscreen is frozen.
Switch off in car washes.
Adjustable wiper interval
To set the wiper interval to a value
between 2 and 15 seconds: Switch on
ignition, move lever down from
position §, wait desired time interval
and raise lever to $.
After turning on the ignition and
setting the lever to $, the interval is
set to 6 seconds.