Page 241 of 576

2414-6. Driving tips
4
Driving
Park the vehicle and move the shift lever to P without setting the park-
ing brake. The parking brake may freeze up, preventing it from being
released. If necessary, block the wheels to prev ent inadvertent sliding
or creeping.
Observe the following precautions when switching fuels, in order to
maintain starting and driving performance.
● Do not change fuels when the fuel level is 1/4 or less.
● Always add at least 2.6 gal. (10 L) of fuel.
● After filling up with fuel, warm up the engine or drive the vehicle for
at least 5 minutes or 7 miles (11 km).
● Do not accelerate rapidly immediately after refueling.
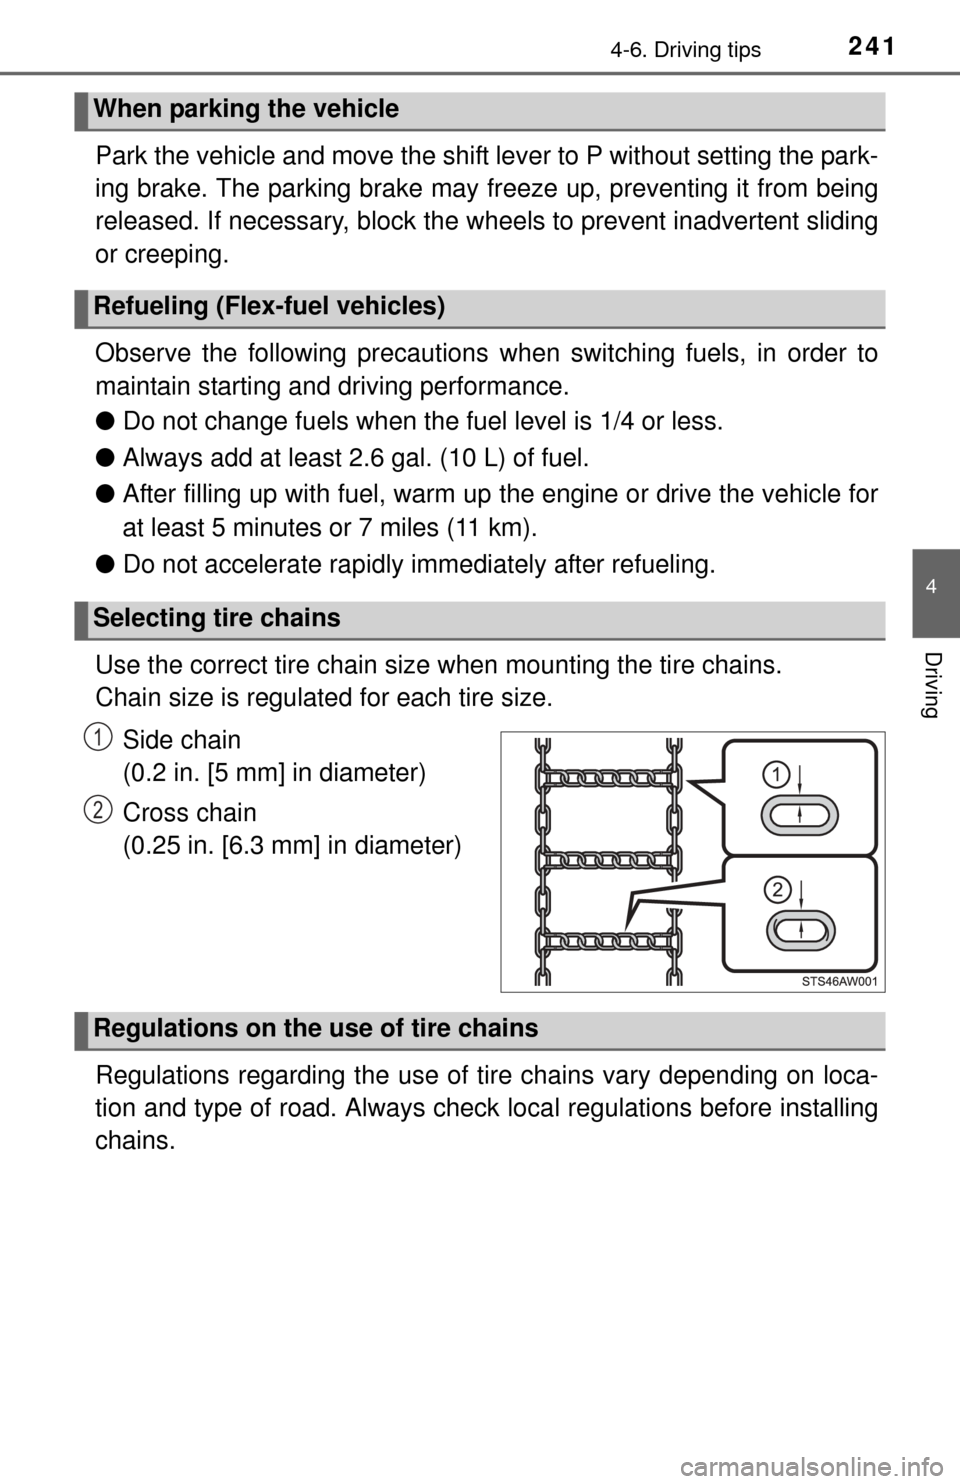
Use the correct tire chain size when mounting the tire chains.
Chain size is regulated for each tire size.
Side chain
(0.2 in. [5 mm] in diameter)
Cross chain
(0.25 in. [6.3 mm] in diameter)
Regulations regarding the use of tire chains vary depending on loca-
tion and type of road. Al ways check local regulations before installing
chains.
When parking the vehicle
Refueling (Flex-fuel vehicles)
Selecting tire chains
1
2
Regulations on the use of tire chains
Page 247 of 576

2474-6. Driving tips
4
Driving
NOTICE
■To prevent the water damage
Take all necessary safety measures to ensure that water damage to the
engine or other components does not occur.
● Water entering the engine air intake will cause severe engine damage.
● Water entering the automatic transmission will cause deterioration in shift
quality, locking up of your transmission accompanied by vibration, and ulti-
mately damage.
● Water can wash the grease from wheel bearings, causing rusting and pre-
mature failure, and may also enter the differentials, transmission and
transfer case, reducing the gear oil’s lubricating qualities.
■ When you drive through water
If driving through water, such as when crossing shallow streams, first check
the depth of the water and the bottom of the river bed for firmness. Drive
slowly and avoid deep water.
■ Inspection after off-road driving
● Sand and mud that has accumulated in brake drums and around brake
discs may affect braking efficiency and may damage brake system compo-
nents.
● Always perform a maintenance inspection after each day of off-road driv-
ing that has taken you through rough terrain, sand, mud, or water. For
scheduled maintenance information, refer to the “Scheduled Maintenance
Guide” or “Owner’s Manual Supplement”.
Page 257 of 576
2575-2. Setup
5
Multimedia
General settings
Press the “SETUP” button.
Select “General” on the “Setup”
screen.Select to adjust the clock.
( P. 258)
“English”, “Français” or
“Español” can be selected.
On/off can be selected to
sound beeps.
Select to change the screen
color.
Select to change the key-
board layout.
The animation effect for the
screen can be set to on/off.
Select to delete personal
data ( P. 258)
Select to update program versions. For details, contact your Toy-
ota dealer.
Select to display the software info rmation. Notices related to third
party software used in this pr oduct are enlisted. (This includes
instructions for obtaining such software, where applicable.)
■ To return to the default settings
Select “Default”, and then “Yes”.
Settings are available for adjusting the operation sounds,
screen animation, etc.
Screen for general settings
1
2
1
2
3
4
5
6
7
8
9
Page 258 of 576
2585-2. Setup
Select “Clock” on the “General Settings” screen.
Adjust the time, then select “OK”.
Select “Delete Personal Data” on the “General Settings” screen.
Select “Delete”.
Check carefully beforehand, as data cannot be retrieved once deleted.
A confirmation screen will be displayed. Select “Yes”.
The following personal data will be deleted or changed to its default
settings.
• General settings
• Audio settings
• Phone settings
Setting the clock
1
2
Delete personal data
1
2
3
Page 335 of 576

335
6Interior features
6-1. Using the air conditioning system
Manual air conditioning system............................. 336
Automatic air conditioning system............................. 343
Seat heaters/ seat ventilators ................ 350
6-2. Using the interior lights Interior lights list ................ 353• Personal/interior lightsmain switch ................... 354
• Personal/interior
lights ............................. 354
• Cargo lamp main switch ............................ 355 6-3. Using the storage features
List of storage features ..... 356• Glove box...................... 358
• Console box (front separated type seat) ..... 359
• Card holder ................... 360
• Map holder (front bench type seat) ........... 362
• Pen holder .................... 363
• Tissue pocket................ 364
• Overhead console......... 365
• Cup holders .................. 366
• Bottle holders ................ 368
• Auxiliary boxes (front bench type seat) ........... 369
• Storage box .................. 371
Luggage compartment features ........................... 373
6-4. Other interior features Other interior features ....... 374• Sun visors ..................... 374
• Vanity mirrors................ 374
• Clock ............................. 375
• Outside temperature display........................... 376
• Power outlets ................ 377
• Armrest ......................... 379
• Assist grips ................... 380
Garage door opener.......... 381
Compass ........................... 387
Page 336 of 576
3366-1. Using the air conditioning system
Manual air conditioning system
■Adjusting the temperature setting
To adjust the temperature set-
ting, turn the temperature con-
trol dial clockwise (warm) or
counterclockwise (cool).
If is not pressed, the
system will blow ambient tem-
perature air or heated air.
For quick cooling, turn the tem-
perature control dial to the “MAX
A/C” position.
The air conditioning will automatically turn on and the air intake selector
will be set to recirculated air mode.
: If equipped
Air conditioning controls
Page 337 of 576
3376-1. Using the air conditioning system
6
Interior features
■Fan speed setting
To adjust the fan speed, turn
the fan speed control dial clock-
wise (increase) or counterclock-
wise (decrease).
Turning the dial to “OFF” turns
off the fan.
■
Change the airflow mode
To select the airflow, set the air
outlet selector dial to the
desired position.
The positions between the air
outlet selections shown below
can also be selected for more
delicate adjustment.
■
Other functions
● Switching between outside air and recirculated air modes
( P. 338)
● Defogging the windshield ( P. 338)
● Defogging the back window (CrewMax models) ( P. 338)
● Defogging the outside rear view mirrors (if equipped) ( P. 338)
● Windshield wiper de-icer (if equipped) ( P. 339)
Page 342 of 576
3426-1. Using the air conditioning system
CAUTION
■To prevent the windshield from fogging up
● Do not use
during cool air operation in extremely humid weather. The
difference between the temperature of the outside air and that of the wind-
shield can cause the outer surface of the windshield to fog up, blocking
your vision.
■ To prevent burns (vehicles with rear view mirror defoggers and wind-
shield wiper de-icer)
● Do not touch the rear view mirror surfaces when the outside rear view mir-
ror defoggers are on.
● Do not touch the glass at lower part of the windshield or to the side of the
front pillars, when the windshield wiper de-icer is on.
NOTICE
■To prevent battery discharge
Do not leave the air conditioning system on longer than necessary when the
engine is stopped.
● Do not place anything on the instrument
panel which may cover the air outlets.
Otherwise, air flow may be obstructed,
preventing the windshield defoggers to
defog.