Page 173 of 276
173
2. SETUP
7
PHONE
1Display the phone top screen.
(P.148)
2Select .
3Select “Settings”.
1Display the “Phone/Message Settings”
screen. (P.162)
2Select “Phone Display Settings”.
3Select the desired item to be set.
INFORMATION
●Depending on the phone, these func-
tions may not be available.
DISPLAYING THE “Messaging
Settings” SCREEN IN A
DIFFERENT WAY
“Phone Display Settings”
SCREEN
No.Function
Select to change the incoming call
display.
“Full Screen”: When a call is re-
ceived, the hands-free screen is dis-
played and can be operated on the
screen.
“Drop-down”: A message is dis-
played on the upper side of the
screen.
Select to set display of the contact/
history transfer completion message
on/off.
Select to reset all setup items.
INFORMATION
●Depending on the phone, these func-
tions may not be available.
Page 178 of 276

178
3. WHAT TO DO IF...
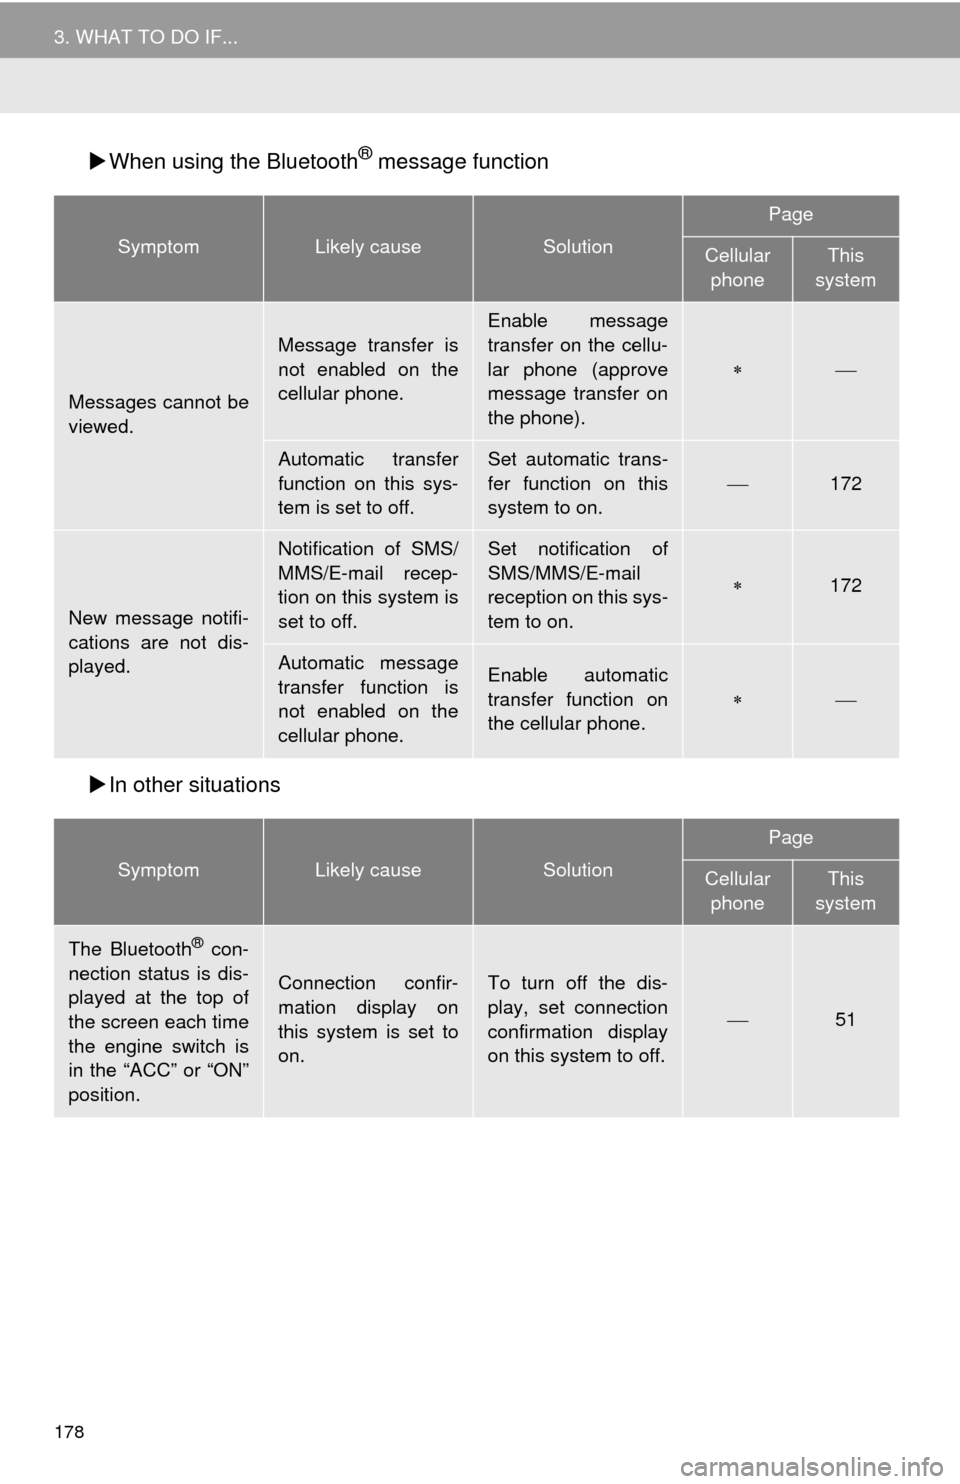
When using the Bluetooth® message function
In other situations
SymptomLikely causeSolution
Page
Cellular
phoneThis
system
Messages cannot be
viewed.
Message transfer is
not enabled on the
cellular phone.
Enable message
transfer on the cellu-
lar phone (approve
message transfer on
the phone).
Automatic transfer
function on this sys-
tem is set to off.Set automatic trans-
fer function on this
system to on.
172
New message notifi-
cations are not dis-
played.
Notification of SMS/
MMS/E-mail recep-
tion on this system is
set to off.Set notification of
SMS/MMS/E-mail
reception on this sys-
tem to on.
172
Automatic message
transfer function is
not enabled on the
cellular phone.Enable automatic
transfer function on
the cellular phone.
SymptomLikely causeSolution
Page
Cellular
phoneThis
system
The Bluetooth® con-
nection status is dis-
played at the top of
the screen each time
the engine switch is
in the “ACC” or “ON”
position.
Connection confir-
mation display on
this system is set to
on.To turn off the dis-
play, set connection
confirmation display
on this system to off.
51
Page 180 of 276

180
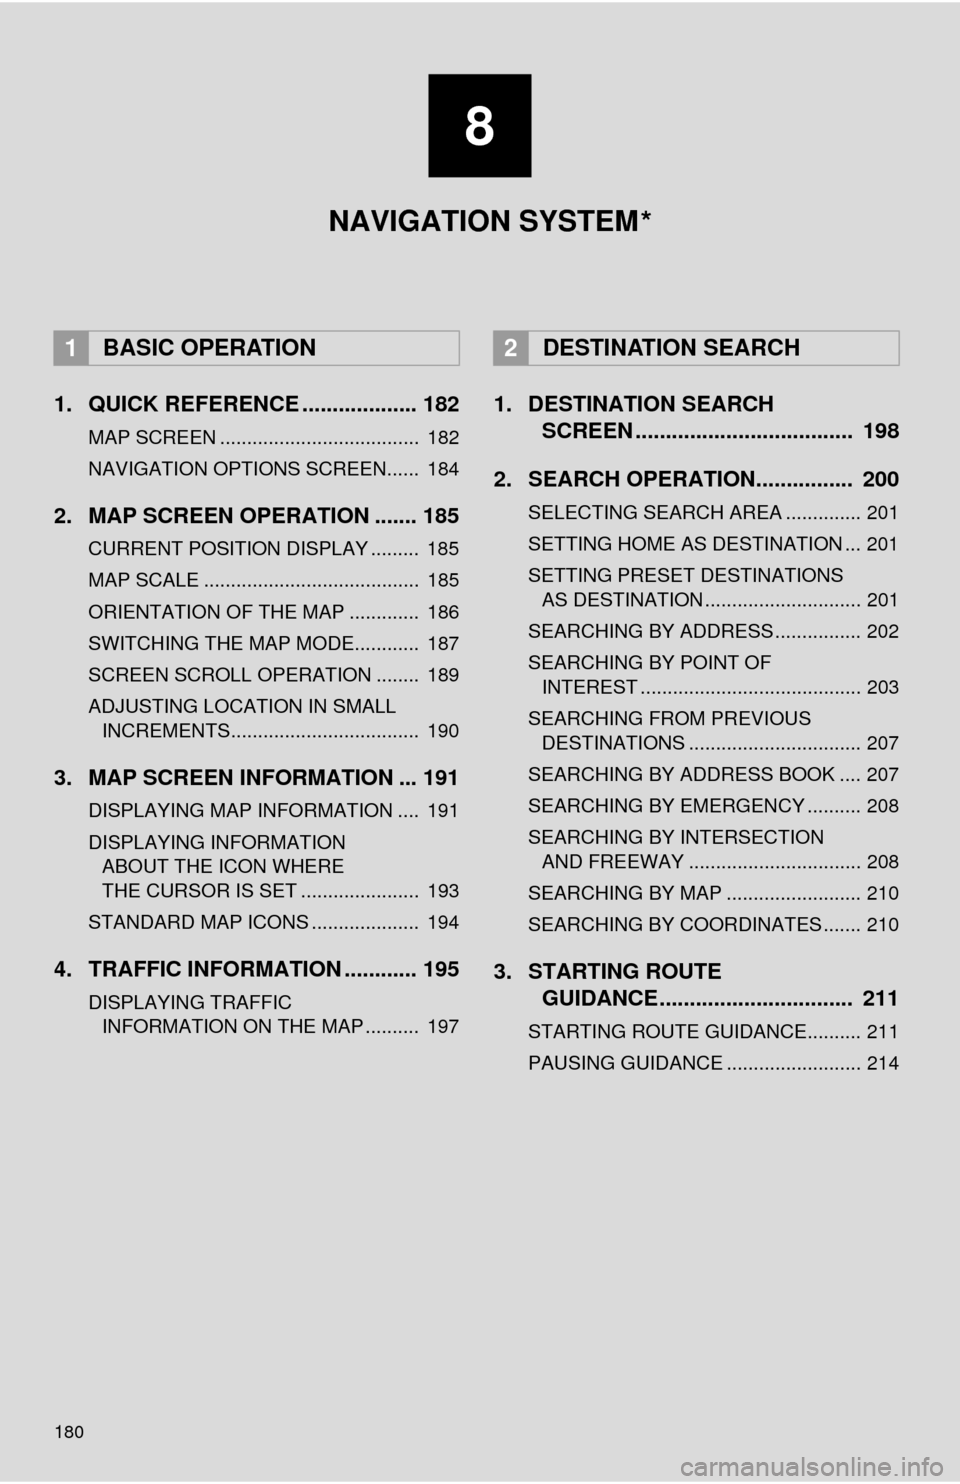
1. QUICK REFERENCE ................... 182
MAP SCREEN ..................................... 182
NAVIGATION OPTIONS SCREEN...... 184
2. MAP SCREEN OPERATION ....... 185
CURRENT POSITION DISPLAY ......... 185
MAP SCALE ........................................ 185
ORIENTATION OF THE MAP ............. 186
SWITCHING THE MAP MODE............ 187
SCREEN SCROLL OPERATION ........ 189
ADJUSTING LOCATION IN SMALL INCREMENTS................................... 190
3. MAP SCREEN INFORMATION ... 191
DISPLAYING MAP INFORMATION .... 191
DISPLAYING INFORMATION ABOUT THE ICON WHERE
THE CURSOR IS SET ...................... 193
STANDARD MAP ICONS .................... 194
4. TRAFFIC INFORMATION ............ 195
DISPLAYING TRAFFIC INFORMATION ON THE MAP .......... 197
1. DESTINATION SEARCH SCREEN .................................... 198
2. SEARCH OPERATION.. .............. 200
SELECTING SEARCH AREA .............. 201
SETTING HOME AS DESTINATION ... 201
SETTING PRESET DESTINATIONS
AS DESTINATION ............................. 201
SEARCHING BY ADDRESS ................ 202
SEARCHING BY POINT OF INTEREST ......................................... 203
SEARCHING FROM PREVIOUS DESTINATIONS ................................ 207
SEARCHING BY ADDRESS BOOK .... 207
SEARCHING BY EMERGENCY .......... 208
SEARCHING BY INTERSECTION AND FREEWAY ................................ 208
SEARCHING BY MAP ......................... 210
SEARCHING BY COORDINATES ....... 210
3. STARTING ROUTE GUIDANCE ....... ......................... 211
STARTING ROUTE GUIDANCE.......... 211
PAUSING GUIDANCE ......................... 214
1BASIC OPERATION2DESTINATION SEARCH
8
NAVIGATION SYSTEM
*
Page 182 of 276
182
1. BASIC OPERATION
1. QUICK REFERENCE
MAP SCREEN
To display this screen, press the “APPS” button, then select “Navigation” on the
“Apps” screen.
No.NameFunctionPage
2D North-up, 2D
heading-up or 3D
heading-up sym-
bolIndicates whether the map orientation is set to
north-up or heading-up. The letter(s) beside this
symbol indicate the vehicle’s heading direction
(e.g. N for north). In 3D map, only a heading-up
view is available.
186
Options buttonSelect to display the “Navigation Options” screen.184
“GPS” mark
(Global Position-
ing System)Shows that the vehicle is receiving signals from
the GPS.244
Traffic indicator
Shows that traffic information is received. Select
to start voice guidance for traffic information.
When traffic information is received via HD, HD
mark is displayed on the right.
195
Scale indicatorThis figure indicates the map scale.185
Page 183 of 276
183
1. BASIC OPERATION
8
NAVIGATION SYSTEM
Zoom in/out but-
tonSelect to magnify or reduce the map scale. When
either button is selected, the map scale indicator
bar appears at the bottom of the screen.
185
Footprint map
buttonSelect to display the footprint map screen.186
Current position
button/voice
guidance buttonSelect to display the current position address.
Select to repeat voice guidance.185
Destination but-
tonSelect to display the “Destination” screen.198
Route informa-
tion bar
Displays the current street name, or the distance
with the estimated travel time/arrival time to the
destination. The route information bar fills from
left to right as the vehicle progresses on the
route.
215
Route informa-
tion buttonSelect to change the display between the current
street name and the distance with the estimated
travel/arrival time.
216
No.NameFunctionPage
Page 184 of 276
184
1. BASIC OPERATION
NAVIGATION OPTIONS SCREEN
The navigation options allow you to change map configurations, display/hide POI
icons, and edit the navigation routes. To display the “Navigation Options” screen,
press the “APPS” button, select “Navigation” on the “Apps” screen, and select
“Options” on the map screen.
No.FunctionPage
Select to display the desired map configuration.187
Select to set display of the map information such as POI icons, route
trace, speed limit, etc.191
Select to display the map version and coverage area.246
Select to edit the set route.221
Select to pause or resume route guidance.214
Select to display the overview of the entire route.216
Page 185 of 276

185
1. BASIC OPERATION
8
NAVIGATION SYSTEM
2. MAP SCREEN OPERATION
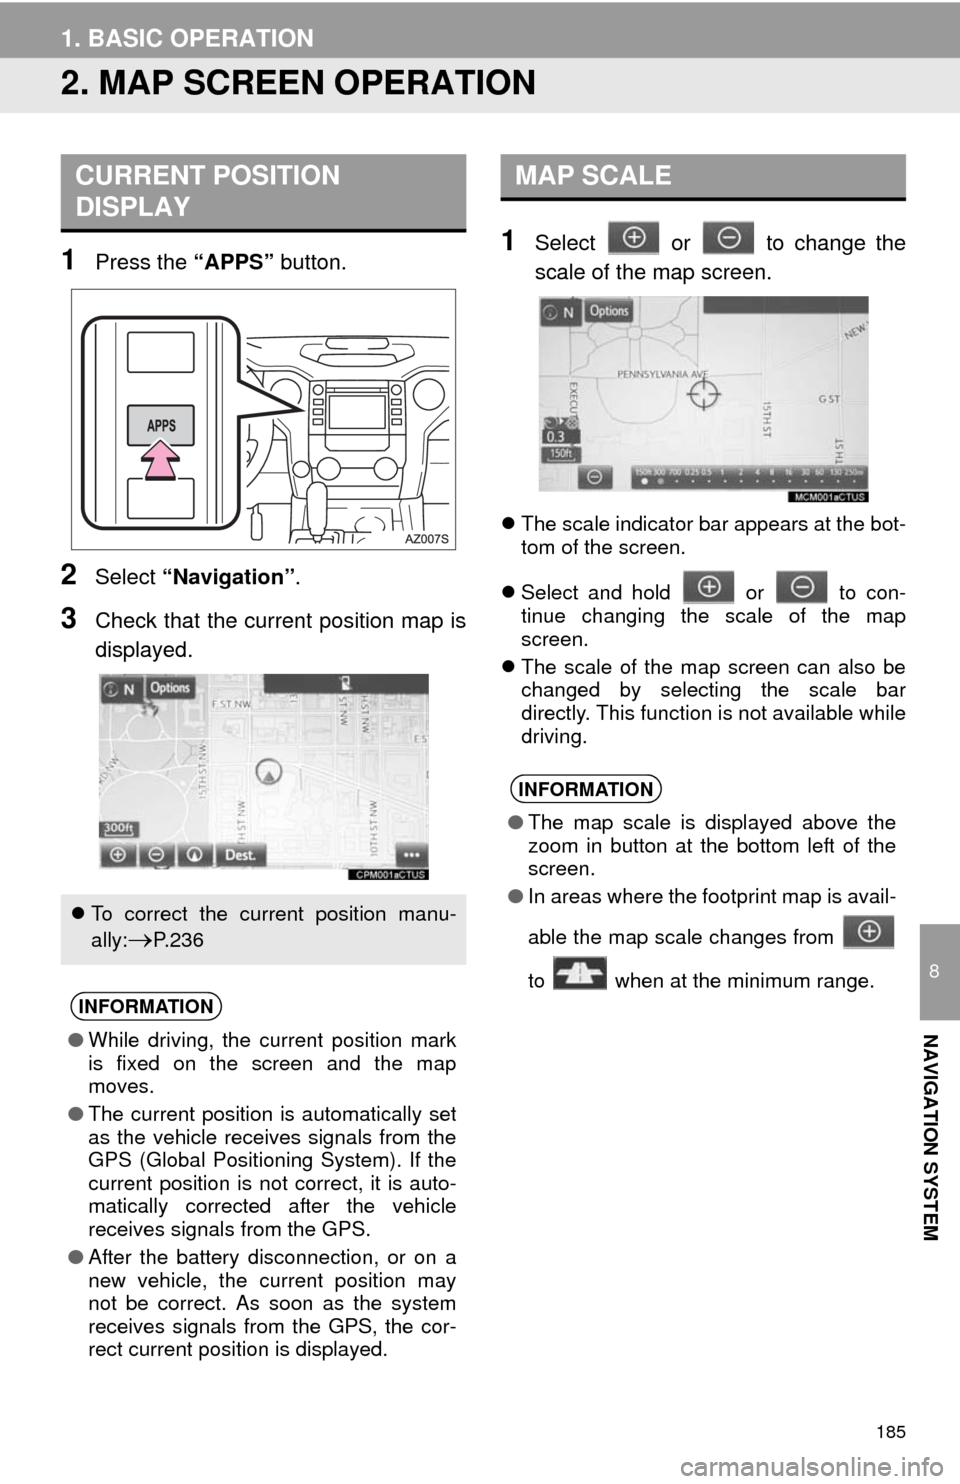
1Press the “APPS” button.
2Select “Navigation”.
3Check that the current position map is
displayed.
1Select or to change the
scale of the map screen.
The scale indicator bar appears at the bot-
tom of the screen.
Select and hold or to con-
tinue changing the scale of the map
screen.
The scale of the map screen can also be
changed by selecting the scale bar
directly. This function is not available while
driving.
CURRENT POSITION
DISPLAY
To correct the current position manu-
ally:
P. 2 3 6
INFORMATION
●While driving, the current position mark
is fixed on the screen and the map
moves.
●The current position is automatically set
as the vehicle receives signals from the
GPS (Global Positioning System). If the
current position is not correct, it is auto-
matically corrected after the vehicle
receives signals from the GPS.
●After the battery disconnection, or on a
new vehicle, the current position may
not be correct. As soon as the system
receives signals from the GPS, the cor-
rect current position is displayed.
MAP SCALE
INFORMATION
●The map scale is displayed above the
zoom in button at the bottom left of the
screen.
●In areas where the footprint map is avail-
able the map scale changes from
to when at the minimum range.
Page 186 of 276

186
1. BASIC OPERATION
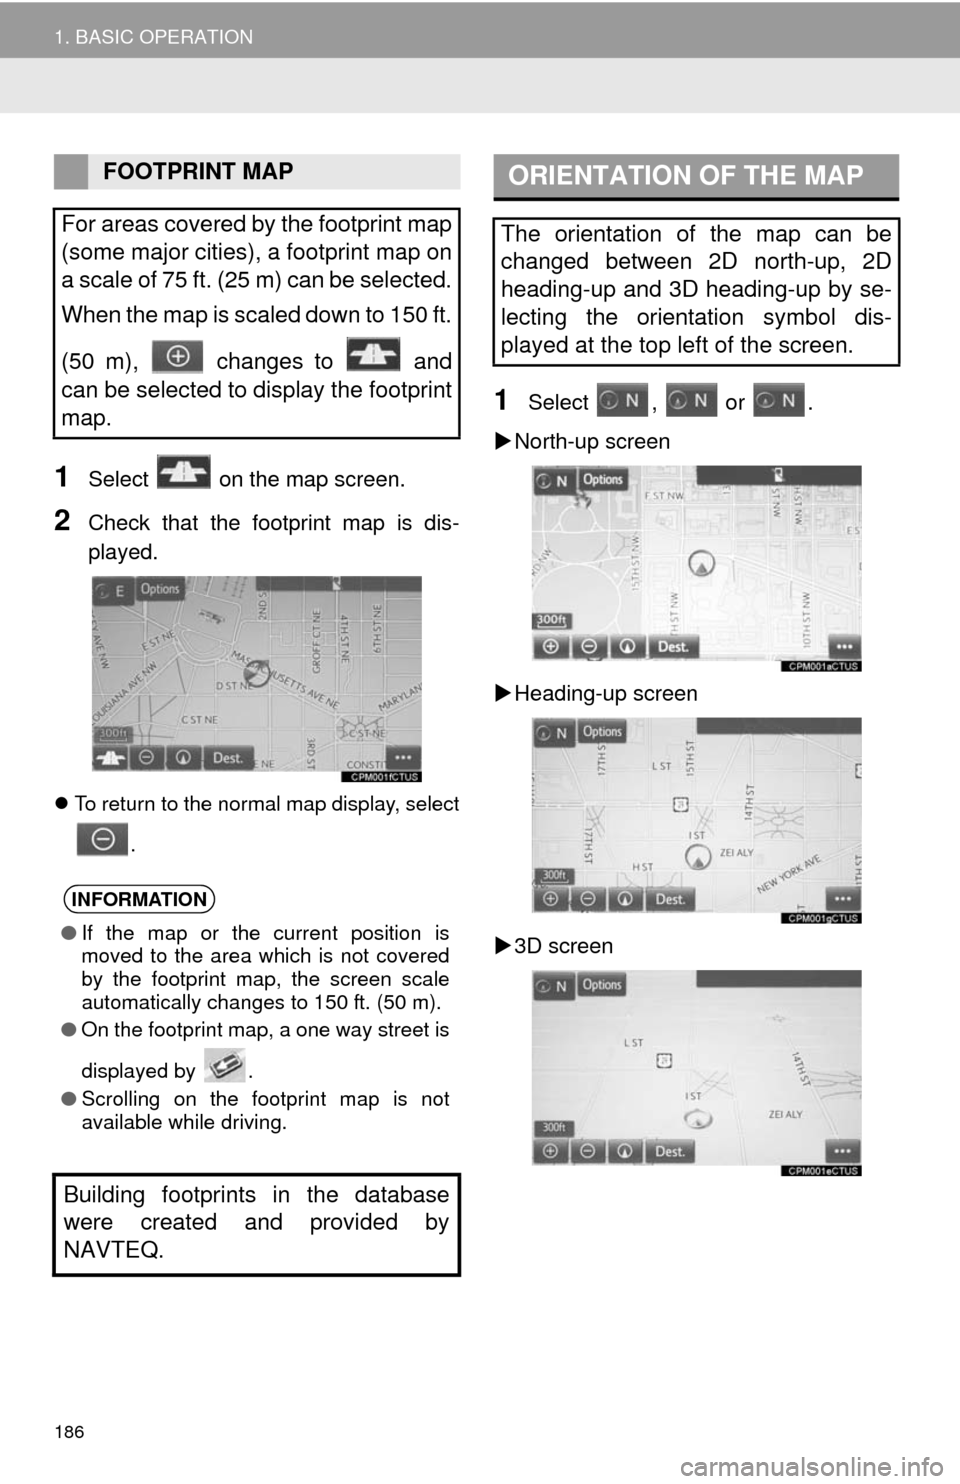
1Select on the map screen.
2Check that the footprint map is dis-
played.
To return to the normal map display, select
.
1Select , or .
North-up screen
Heading-up screen
3D screen
FOOTPRINT MAP
For areas covered by the footprint map
(some major cities), a footprint map on
a scale of 75 ft. (25 m) can be selected.
When the map is scaled down to 150 ft.
(50 m), changes to and
can be selected to display the footprint
map.
INFORMATION
●If the map or the current position is
moved to the area which is not covered
by the footprint map, the screen scale
automatically changes to 150 ft. (50 m).
●On the footprint map, a one way street is
displayed by .
●Scrolling on the footprint map is not
available while driving.
Building footprints in the database
were created and provided by
NAVTEQ.
ORIENTATION OF THE MAP
The orientation of the map can be
changed between 2D north-up, 2D
heading-up and 3D heading-up by se-
lecting the orientation symbol dis-
played at the top left of the screen.