Page 5 of 232

v
Table of contents
1 OPERATION OF INSTRUMENTS AND CONTROLSPage
1 Overview of instruments and controls
1 .......................
2 Keys and Doors11 ......................................
3 Seats, Seat belts, Steering wheel and Mirrors23 ...............
4 Lights and Wipers61 .....................................
5 Gauges, Meters and Service reminder indicators67 .............
6 Engine (ignition) switch, Transmission and Parking brake79 ......
7 Air conditioning system83 .................................
8 Other equipment99 ......................................
2 INFORMATION BEFORE DRIVING YOUR TOYOTA 107........
3 STARTING AND DRIVING 123...............................
4 IN CASE OF AN EMERGENCY 141..........................
5 CORROSION PREVENTION AND APPEARANCE CARE 169...
6 MAINTENANCE REQUIREMENTS 175.......................
7DO−IT−YOURSELF MAINTENANCE
1 Introduction179 .........................................
2 Engine and Chassis187 ..................................
3 Electrical components199 .................................
8 SPECIFICATIONS 211......................................
9 INDEX 221................................................
Dyna100/150_EE
Page 12 of 232
6OVERVIEW OF INSTRUMENTS AND CONTROLS
1. Service reminder indicators and
indicator lights
2. Speedometer
3. Trip meter reset knob4. Odometer and two trip meters
5. Fuel gauge
6. Engine coolant temperature gauge
Dyna100/150_EE
Instrument cluster overview
"Without tachometer
Page 13 of 232
OVERVIEW OF INSTRUMENTS AND CONTROLS7
1. Service reminder indicators and
indicator lights
2. Speedometer
3. Tachometer4. Trip meter reset knob
5. Odometer and two trip meters
6. Fuel gauge
7. Engine coolant temperature gauge
Dyna100/150_EE
"With tachometer
Page 15 of 232
OVERVIEW OF INSTRUMENTS AND CONTROLS9
Turn signal indicator lights
Engine preheating indicator light
The indicators marked with�are service reminder indicators. For
details, see “Service reminder indicators and warning buzzer” on
page 73 in Section 1−5.
Dyna100/150_EE
Page 22 of 232
16KEYS AND DOORS
Tailgate—single cab models�
Tailgate—double cab models�
Side gates—single cab models�only
To lower the tailgate and side gates,
unlock the latches as shown.
On some models, the chains will hold the
tailgate in a straight open position.
See “Luggage stowage precautions” on
page 119 in Section 2 for precautions
when loading luggage.
When closing the gate, make sure it is
securely latched.
CAUTION
If the open tailgate hides the stop/tail
lights, back−up lights, rear retro re-
flectors, rear fog light or rear turn
signal lights while you are parked,
other road users must be warned of
the presence of your vehicle by a
warning triangle or other device.
NOTICE
Avoid driving with the tailgate or side
gates open.
�: See “Model code” on page vi in the
beginning of this manual if you are not
sure of your vehicle model.
Dyna100/150_EE
Tailgate and side gates
Page 67 of 232
LIGHTS AND WIPERS61
Section 1−4
OPERATION OF INSTRUMENTS AND
CONTROLS
Lights and Wipers
DHeadlights and turn signals 62..........................
DHeadlight beam level control 63.........................
DEmergency flashers 64.................................
DRear fog light 64.......................................
DInterior light 65........................................
DWindshield wipers and washer 65.......................
Dyna100/150_EE
Page 68 of 232

62LIGHTS AND WIPERS
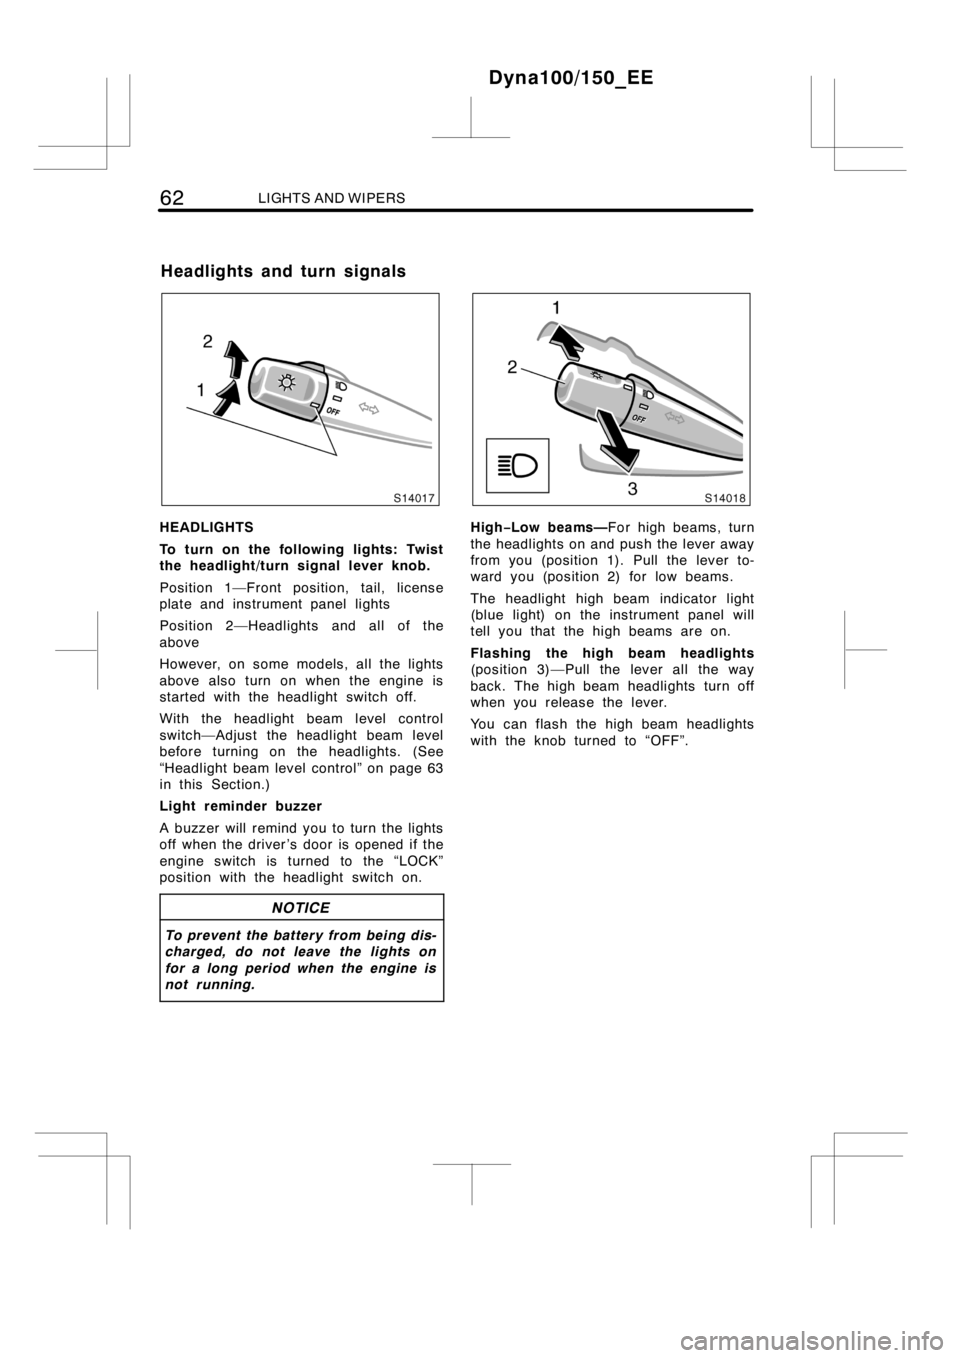
HEADLIGHTS
To turn on the following lights: Twist
the headlight/turn signal lever knob.
Position 1—Front position, tail, license
plate and instrument panel lights
Position 2—Headlights and all of the
above
However, on some models, all the lights
above also turn on when the engine is
started with the headlight switch off.
With the headlight beam level control
switch—Adjust the headlight beam level
before turning on the headlights. (See
“Headlight beam level control” on page 63
in this Section.)
Light reminder buzzer
A buzzer will remind you to turn the lights
off when the driver ’s door is opened if the
engine switch is turned to the “LOCK”
position with the headlight switch on.
NOTICE
To prevent the battery from being dis-
charged, do not leave the lights on
for a long period when the engine is
not running.
High−Low beams—For high beams, turn
the headlights on and push the lever away
from you (position 1). Pull the lever to-
ward you (position 2) for low beams.
The headlight high beam indicator light
(blue light) on the instrument panel will
tell you that the high beams are on.
Flashing the high beam headlights
(position 3)—Pull the lever all the way
back. The high beam headlights turn off
when you release the lever.
You can flash the high beam headlights
with the knob turned to “OFF”.
Dyna100/150_EE
Headlights and turn signals
Page 69 of 232

LIGHTS AND WIPERS63
TURN SIGNALS
To signal a turn, push the headlight/
turn signal lever up or down to position
1.
The engine switch must be in the “ON”
position.
The lever automatically returns after you
make a turn, but you may have to return
it by hand after you change lanes.
To signal a lane change, move the lever
up or down to the pressure point (position
2) and hold it.
If the turn signal indicator lights (green
lights) on the instrument panel flash faster
than normal, a front or rear turn signal
bulb is burned out. See “Replacing light
bulbs” on page 205 in Section 7−3.To adjust the headlight beam level, turn
the dial.
The following list shows examples of prop-
er dial settings. For loading conditions oth-
er than those listed, adjust the dial posi-
tion so that the beam level is the same
as the one obtained according to the list
when only the driver is in the vehicle. The
higher the number of the dial position, the
lower the headlight beam level.
Always keep the headlight beam at the
proper level, or your headlights may
dazzle other road users.
Loading condition and dial position
No luggage loading (driver only) 0
Driver + full luggage loading 3
Dyna100/150_EE
Headlight beam level control