Page 142 of 294
142
1. USEFUL INFORMATION
2. RECEIVING TRAFFIC MAP INFORMATION*
1Press the “APPS” button.
2Select “Traffic”.
3Check that the “Traffic Map” screen is
displayed.Traffic map information can be re-
ceived via HD Radio broadcast.
DISPLAYING TRAFFIC MAP
INFORMATION
*: Without navigation function
No.Function
Current position of your car
Traffic information line
The line color means the following:
Red: Heavy congestion
Yellow: Moderate traffic
Green: Freely flowing traffic
INFORMATION
●Traffic map information is available in
the 48 states, D.C. and Alaska of the
United States.
Page 145 of 294
6
145
1
2
3
4
5
7
6
8
9
1. REAR VIEW MONITOR
SYSTEM .................................... 146
DRIVING PRECAUTIONS ................... 146
SCREEN DESCRIPTION .................... 147
2. REAR VIEW MONITOR
SYSTEM PRECAUTIONS ......... 148
AREA DISPLAYED ON SCREEN........ 148
THE CAMERA ..................................... 148
DIFFERENCES BETWEEN
THE SCREEN AND
THE ACTUAL ROAD ......................... 149
WHEN APPROACHING
THREE-DIMENSIONAL
OBJECTS .......................................... 151
3. THINGS YOU SHOULD
KNOW ....................................... 153
IF YOU NOTICE ANY SYMPTOMS .... 153
1REAR VIEW MONITOR
SYSTEM
PERIPHERAL MONITORING SYSTEM
Page 146 of 294

146
1. REAR VIEW MONITOR SYSTEM
1. REAR VIEW MONITOR SYSTEM
The rear view monitor system assists
the driver by displaying an image of the
view behind the vehicle while backing
up, for example while parking.
INFORMATION
●The screen illustrations used in this text
are intended as examples, and may dif-
fer from the image that is actually dis-
played on the screen.
DRIVING PRECAUTIONS
The rear view monitor system is a sup-
plemental device intended to assist the
driver when backing up. When backing
up, be sure to visually check all around
the vehicle both directly and using the
mirrors before proceeding. If you do
not, you may hit another vehicle, and
could possibly cause an accident.
Pay attention to the following precau-
tions when using the rear view monitor
system.
CAUTION
●Never depend on the rear view monitor
system entirely when backing up. The
image and the position of the guide lines
displayed on the screen may differ from
the actual state.
Use caution, just as you would when
backing up any vehicle.
●Be sure to back up slowly, depressing
the brake pedal to control vehicle speed.
●When parking, be sure to check that the
parking space will accommodate your
vehicle before maneuvering into it.
●In low temperatures, the screen may
darken or the image may become faint.
The image could distort when the vehi-
cle is moving, or you may become
unable to see the image on the screen.
Be sure to visually check all around the
vehicle both directly and using the mir-
rors before proceeding.
●If the tire sizes are changed, the position
of the fixed guide lines displayed on the
screen may change.
●The camera uses a special lens. The
distances between objects and pedestri-
ans that appear in the image displayed
on the screen will differ from the actual
distances.(P.149)
Page 147 of 294

147
1. REAR VIEW MONITOR SYSTEM
6
PERIPHERAL MONITORING SYSTEM
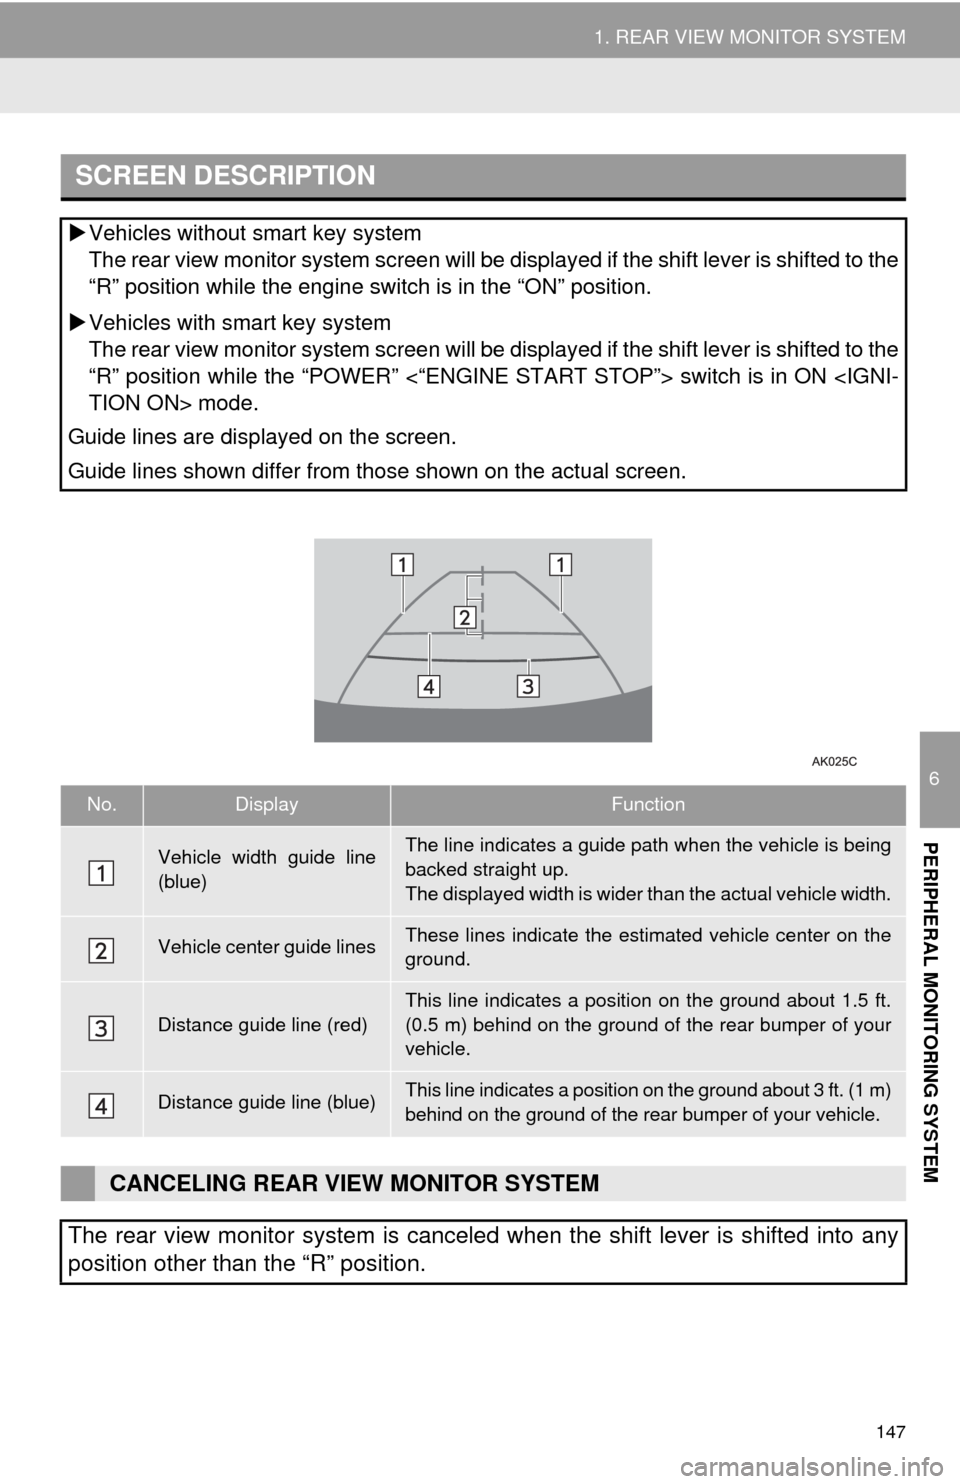
SCREEN DESCRIPTION
Vehicles without smart key system
The rear view monitor system screen will be displayed if the shift lever is shifted to the
“R” position while the engine switch is in the “ON” position.
Vehicles with smart key system
The rear view monitor system screen will be displayed if the shift lever is shifted to the
“R” position while the “POWER” <“ENGINE START STOP”> switch is in ON
TION ON> mode.
Guide lines are displayed on the screen.
Guide lines shown differ from those shown on the actual screen.
No.DisplayFunction
Vehicle width guide line
(blue)The line indicates a guide path when the vehicle is being
backed straight up.
The displayed width is wider than the actual vehicle width.
Vehicle center guide linesThese lines indicate the estimated vehicle center on the
ground.
Distance guide line (red)
This line indicates a position on the ground about 1.5 ft.
(0.5 m) behind on the ground of the rear bumper of your
vehicle.
Distance guide line (blue)This line indicates a position on the ground about 3 ft. (1 m)
behind on the ground of the rear bumper of your vehicle.
CANCELING REAR VIEW MONITOR SYSTEM
The rear view monitor system is canceled when the shift lever is shifted into any
position other than the “R” position.
Page 148 of 294

148
1. REAR VIEW MONITOR SYSTEM
2. REAR VIEW MONITOR SYSTEM PRECAUTIONS
The image adjustment procedure for the
rear view monitor system screen is the
same as the procedure for adjusting the
screen. (P. 4 0 )
AREA DISPLAYED ON
SCREEN
The rear view monitor system displays
an image of the view from the bumper
of the rear area of the vehicle.
INFORMATION
●The area displayed on the screen may
vary according to vehicle orientation
conditions.
●Objects which are close to either corner
of the bumper or under the bumper can-
not be displayed.
●The camera uses a special lens. The
distance of the image that appears on
the screen differs from the actual dis-
tance.
●Items which are located higher than the
camera may not be displayed on the
monitor.
Screen Displayed area
Corners of bumper
THE CAMERA
The camera for the rear view monitor
system is located as shown in the illus-
tration.
USING THE CAMERA
If the camera lens becomes dirty, it
cannot transmit a clear image. If water
droplets, snow or mud adhere to the
lens, rinse with water and wipe with a
soft cloth. If the lens is extremely dirty,
wash it with a mild cleanser and rinse.
Page 155 of 294

7
155
1
2
3
4
5
6
8
7
9
1. QUICK REFERENCE ................... 156
2. SOME BASICS ............................ 157
REGISTERING/CONNECTING
A Bluetooth® PHONE........................ 157
USING THE PHONE SWITCH/
MICROPHONE ................................. 158
VOICE COMMAND SYSTEM .............. 158
ABOUT THE CONTACTS IN
THE CONTACT LIST ........................ 159
WHEN SELLING OR
DISPOSING OF THE VEHICLE........ 159
3. CALLING ON THE
Bluetooth® PHONE................... 160
BY FAVORITES LIST .......................... 161
BY CALL HISTORY ............................. 161
BY CONTACTS LIST .......................... 162
BY DIAL PAD ...................................... 164
BY OFF HOOK SWITCH ..................... 164
BY “Home” SCREEN ........................... 164
4. RECEIVING ON THE
Bluetooth® PHONE................... 165
INCOMING CALLS .............................. 165
5. TALKING ON THE
Bluetooth® PHONE .................. 166
INCOMING CALL WAITING ................ 168
6. Bluetooth® PHONE
MESSAGE FUNCTION ............. 169
RECEIVING A MESSAGE ................... 170
CHECKING MESSAGES ..................... 170
REPLYING TO A MESSAGE
(QUICK REPLY) ................................ 171
CALLING THE MESSAGE
SENDER ........................................... 172
1. PHONE/MESSAGE
SETTINGS ................................. 174
PHONE/MESSAGE SETTINGS
SCREEN ........................................... 174
“Sound Settings” SCREEN .................. 175
“Contact/Call History Settings”
SCREEN ........................................... 176
“Messaging Settings” SCREEN ........... 184
“Phone Display Settings” SCREEN ..... 185
1. TROUBLESHOOTING ................ 186
1
PHONE OPERATION (HANDS-
FREE SYSTEM FOR
CELLULAR PHONES)
2SETUP
3WHAT TO DO IF...
PHONE
Page 156 of 294
156
1. PHONE OPERATION (HANDS-FREE SYSTEM FOR CELLULAR PHONES)
1. QUICK REFERENCE
The phone top screen can be used to make a phone call. To display the hands-free
operation screen, press the “APPS” button and select “Phone”, the switch on
the steering wheel or switch on the instrument panel.
Several functions are available to operate on each screen that is displayed by se-
lecting the 4 tabs.
FunctionPage
Phone operation
Registering/connecting Bluetooth® phone42
Calling on the Bluetooth® phone160
Receiving on the Bluetooth® phone165
Talking on the Bluetooth® phone166
Message functionUsing the Bluetooth® phone message function169
Setting up a phonePhone settings174
Bluetooth® settings49
Page 157 of 294

157
1. PHONE OPERATION (HANDS-FREE SYSTEM FOR CELLULAR PHONES)
7
PHONE
2. SOME BASICS
The hands-free system enables calls
to be made and received without hav-
ing to take your hands off the steering
wheel.
This system supports Bluetooth
®.
Bluetooth® is a wireless data system
that enables cellular phones to be used
without being connected by a cable or
placed in a cradle.
The operating procedure of the phone
is explained here.
CAUTION
●While driving, do not use a cellular
phone or connect the Bluetooth® phone.
●Your audio unit is fitted with Bluetooth
®
antennas. People with implantable car-
diac pacemakers, cardiac resynchroni-
zation therapy-pacemakers or
implantable cardioverter defibrillators
should maintain a reasonable distance
between themselves and the Bluetooth
®
antennas. The radio waves may affect
the operation of such devices.
●Before using Bluetooth
® devices, users
of any electrical medical device other
than implantable cardiac pacemakers,
cardiac resynchronization therapy-pace-
makers or implantable cardioverter
defibrillators should consult the manu-
facturer of the device for information
about its operation under the influence
of radio waves. Radio waves could have
unexpected effects on the operation of
such medical devices.
NOTICE
●Do not leave your cellular phone in the
vehicle. The temperature inside may rise
to a level that could damage the phone.
INFORMATION
●If your cellular phone does not support
Bluetooth®, this system cannot function.
●In the following conditions, the system
may not function:
• The cellular phone is turned off.
• The current position is outside the
communication area.
• The cellular phone is not connected.
• The cellular phone has a low battery.
●When using Bluetooth
® audio and
hands-free at the same time, the follow-
ing problems may occur:
• The Bluetooth
® connection may be
cut.
• Noise may be heard on the Bluetooth
®
audio playback.
REGISTERING/CONNECTING
A Bluetooth® PHONE
To use the hands-free system for cellu-
lar phones, it is necessary to register a
cellular phone with the system.
(P.42)
Bluetooth® PHONE CONDITION
DISPLAY
The condition of the Bluetooth
® phone
appears on the upper right side of the
screen. (P.18)