Page 136 of 346
136
1. PHONE OPERATION
■INTERNATIONAL CALL
1Go to the “Main Menu” screen by
pressing the talk switch on the steering
wheel and saying “Main menu” or
touch the “Main Menu” screen button.
2Say “Use a phone” .
3Say “International call” .
Up to 24 digits can be recognized when
using the international call function. The
number can also be divided into multiple
groups and recognized.
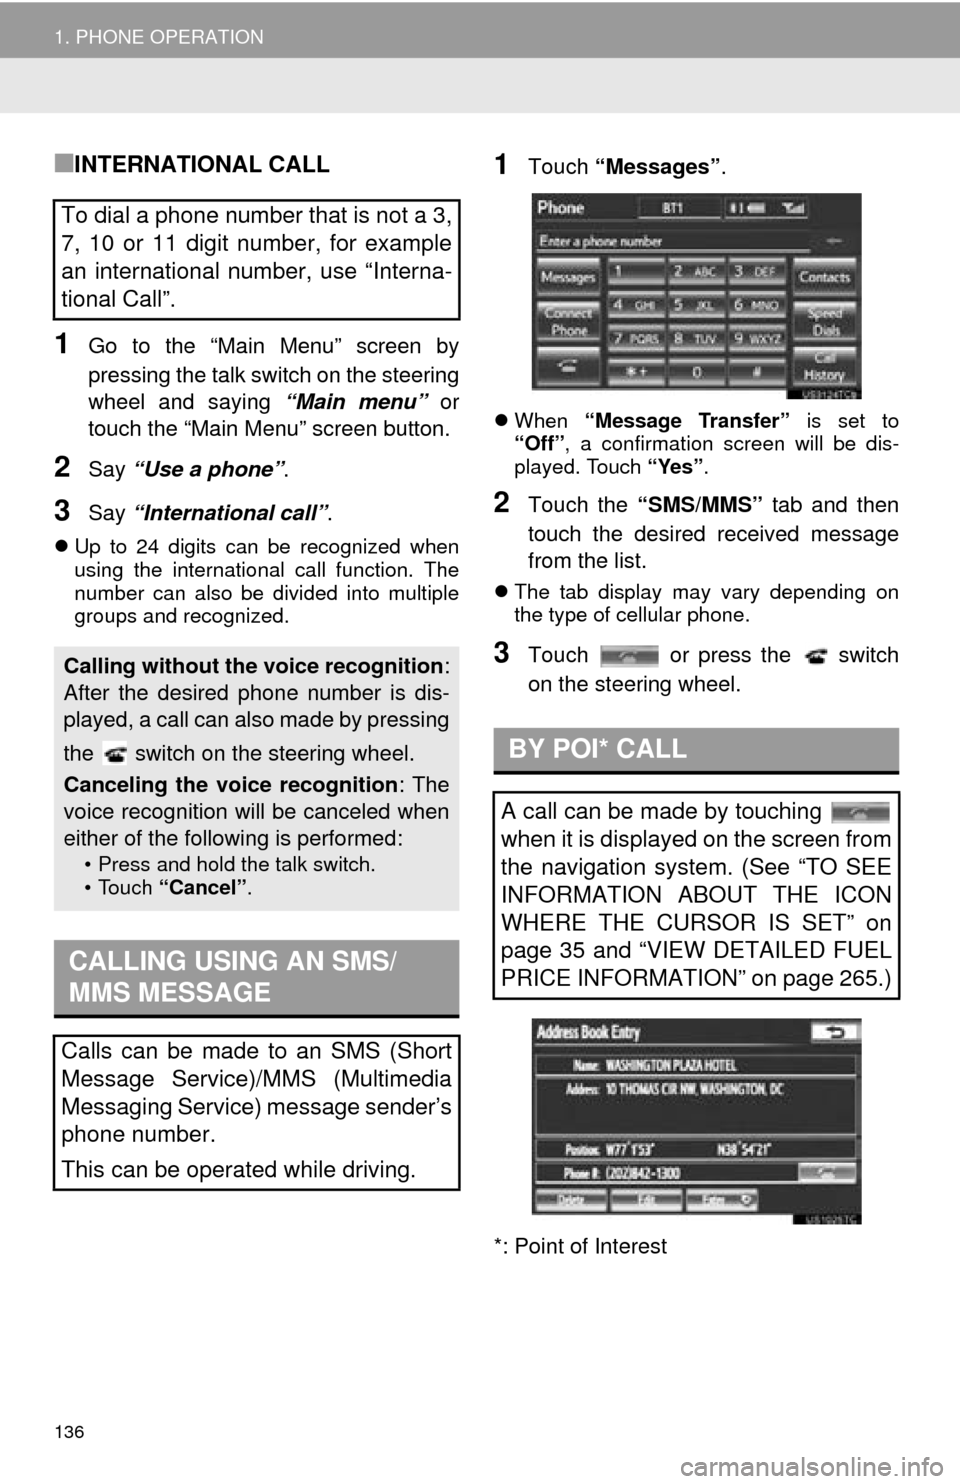
1Touch “Messages” .
When “Message Transfer” is set to
“Off” , a confirmation screen will be dis-
played. Touch “Yes”.
2Touch the “SMS/MMS” tab and then
touch the desired received message
from the list.
The tab display may vary depending on
the type of cellular phone.
3Touch or press the switch
on the steering wheel.
*: Point of Interest
To dial a phone number that is not a 3,
7, 10 or 11 digit number, for example
an international number, use “Interna-
tional Call”.
Calling without the voice recognition :
After the desired phone number is dis-
played, a call can also made by pressing
the switch on the steering wheel.
Canceling the voice recognition : The
voice recognition will be canceled when
either of the following is performed:
• Press and hold the talk switch.
• Touch “Cancel”.
CALLING USING AN SMS/
MMS MESSAGE
Calls can be made to an SMS (Short
Message Service)/MMS (Multimedia
Messaging Service) message sender’s
phone number.
This can be operated while driving.
BY POI* CALL
A call can be made by touching
when it is displayed on the screen from
the navigation system. (See “TO SEE
INFORMATION ABOUT THE ICON
WHERE THE CURSOR IS SET” on
page 35 and “VIEW DETAILED FUEL
PRICE INFORMATION” on page 265.)
Page 141 of 346
141
1. PHONE OPERATION
4
TELEPHONE
7. Bluetooth® PHONE MESSAGE FUNCTION
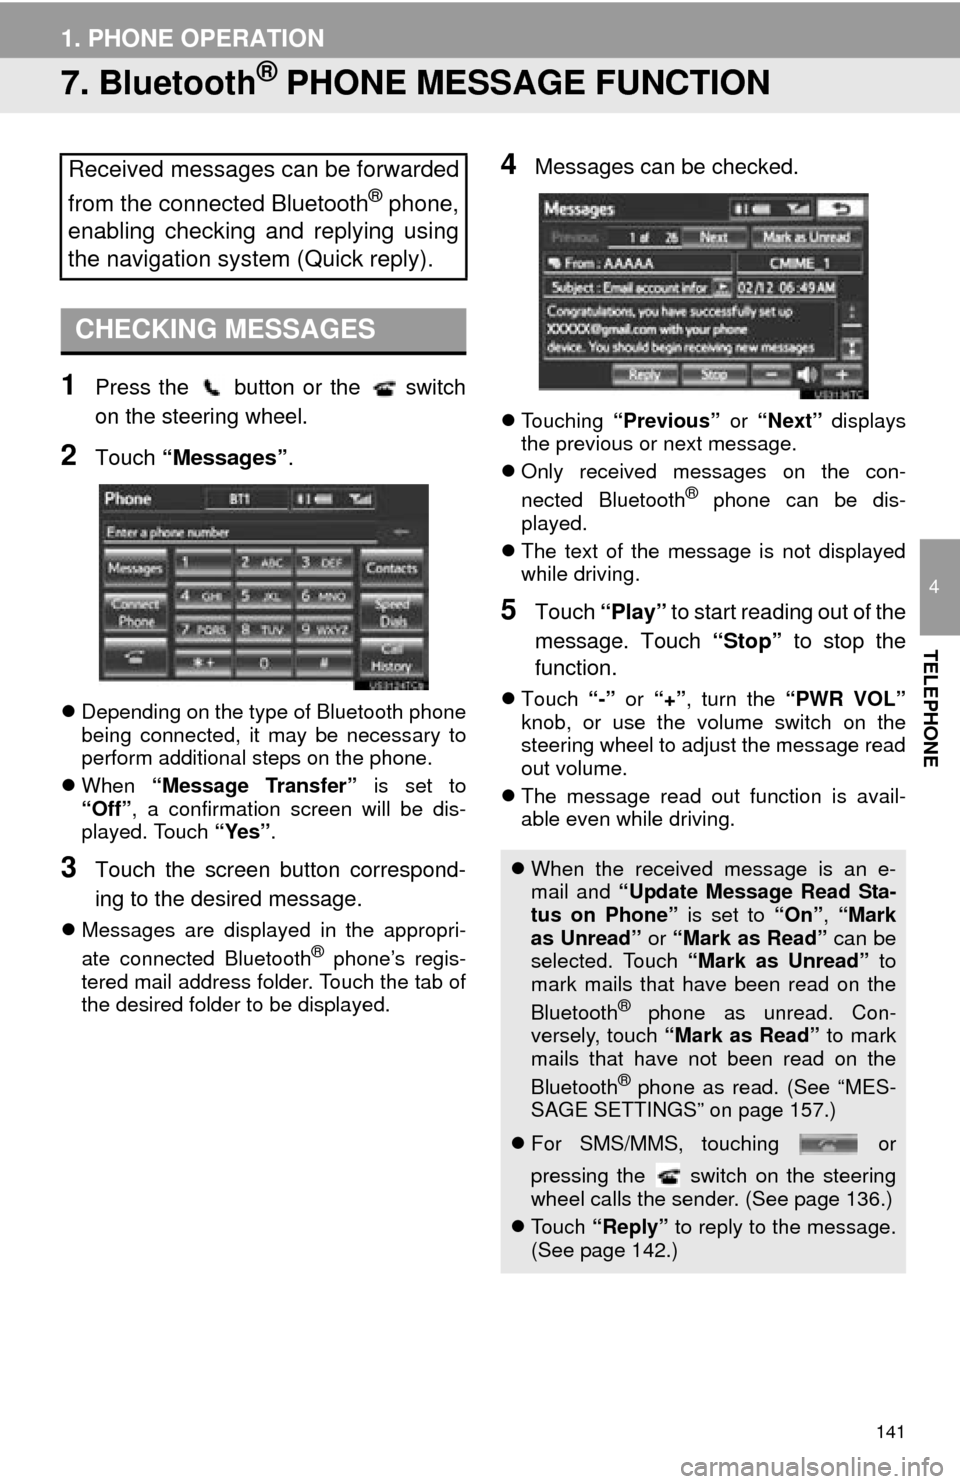
1Press the button or the switch
on the steering wheel.
2Touch “Messages” .
Depending on the type of Bluetooth phone
being connected, it may be necessary to
perform additional steps on the phone.
When “Message Transfer” is set to
“Off” , a confirmation screen will be dis-
played. Touch “Yes”.
3Touch the screen button correspond-
ing to the desired message.
Messages are displayed in the appropri-
ate connected Bluetooth® phone’s regis-
tered mail address folder. Touch the tab of
the desired folder to be displayed.
4Messages can be checked.
Touching “Previous” or “Next” displays
the previous or next message.
Only received messages on the con-
nected Bluetooth
® phone can be dis-
played.
The text of the message is not displayed
while driving.
5Touch “Play” to start reading out of the
message. Touch “Stop” to stop the
function.
Touch “-” or “+” , turn the “PWR VOL”
knob, or use the volume switch on the
steering wheel to adjust the message read
out volume.
The message read out function is avail-
able even while driving.
Received messages can be forwarded
from the connected Bluetooth
® phone,
enabling checking and replying using
the navigation system (Quick reply).
CHECKING MESSAGES
When the received message is an e-
mail and “Update Message Read Sta-
tus on Phone” is set to “On”, “Mark
as Unread” or “Mark as Read” can be
selected. Touch “Mark as Unread” to
mark mails that have been read on the
Bluetooth
® phone as unread. Con-
versely, touch “Mark as Read” to mark
mails that have not been read on the
Bluetooth
® phone as read. (See “MES-
SAGE SETTINGS” on page 157.)
For SMS/MMS, touching or
pressing the switch on the steering
wheel calls the sender. (See page 136.)
To u c h “Reply” to reply to the message.
(See page 142.)
Page 151 of 346
151
2. SETUP
4
TELEPHONE
■THE “Edit Contact” SCREEN CAN
ALSO BE DISPLAYED
From the “Contact” screen
1Press the button or the switch
on the steering wheel.
2Touch “Contacts” on the “Phone”
screen.
3Touch the desired data from the list on
the “Contacts” screen.
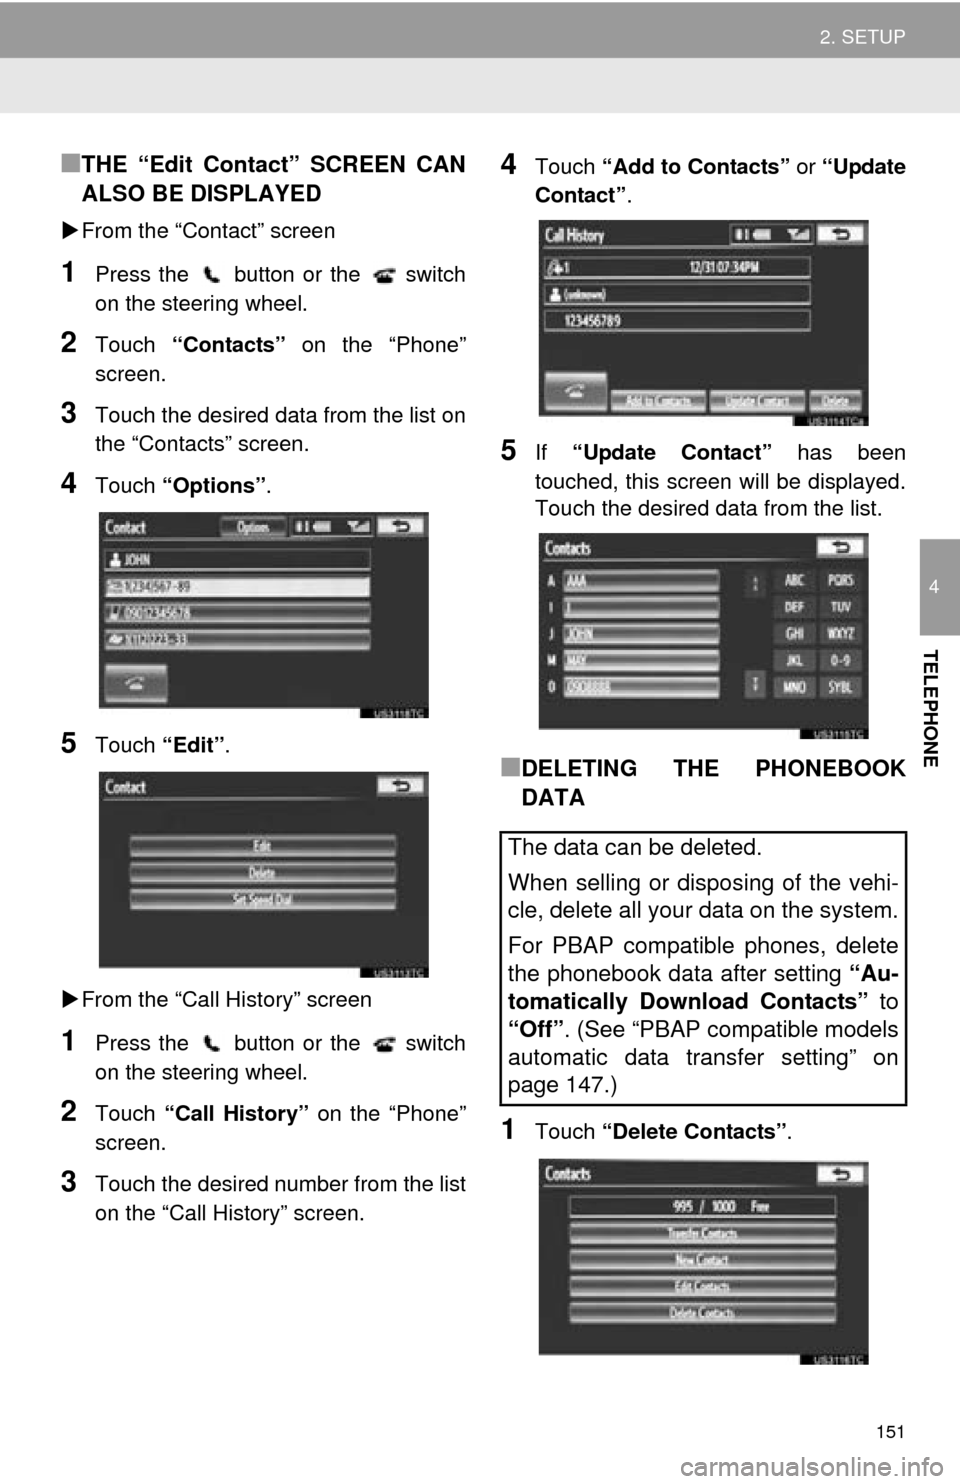
4Touch “Options”.
5Touch “Edit”.
From the “Call History” screen
1Press the button or the switch
on the steering wheel.
2Touch “Call History” on the “Phone”
screen.
3Touch the desired number from the list
on the “Call History” screen.
4Touch “Add to Contacts” or “Update
Contact” .
5If “Update Contact” has been
touched, this screen will be displayed.
Touch the desired data from the list.
■DELETING THE PHONEBOOK
DATA
1Touch “Delete Contacts” .
The data can be deleted.
When selling or disposing of the vehi-
cle, delete all your data on the system.
For PBAP compatible phones, delete
the phonebook data after setting “Au-
tomatically Download Contacts” to
“Off”. (See “PBAP compatible models
automatic data transfer setting” on
page 147.)
Page 155 of 346
155
2. SETUP
4
TELEPHONE
4Touch “Options”.
5Touch “Set Speed Dial” .
6This screen is displayed.
The following operations are performed in
the same manner as when they are per-
formed from the “Setup” screen.
■DELETING THE SPEED DIAL
1Touch “Delete” .
2Touch the desired data, or to delete all
the data touch “Select All”, then touch
“Delete” .
Multiple data can be selected and deleted
at the same time.
3Touch “Yes”.
1Press the “SETUP” button.
2Touch “Phone” on the “Setup” screen.
3Touch “Phonebook” on the “Phone
Settings” screen.
4Touch “Delete Call History” .
The speed dial can be deleted.
DELETING CALL HISTORY
The call history can be deleted.
For PBAP compatible phones, delete
the call history after setting “Automat-
ically Download Call History” to
“Off”. (See “PBAP compatible models
automatic data transfer setting” on
page 147.)
Page 158 of 346
158
2. SETUP
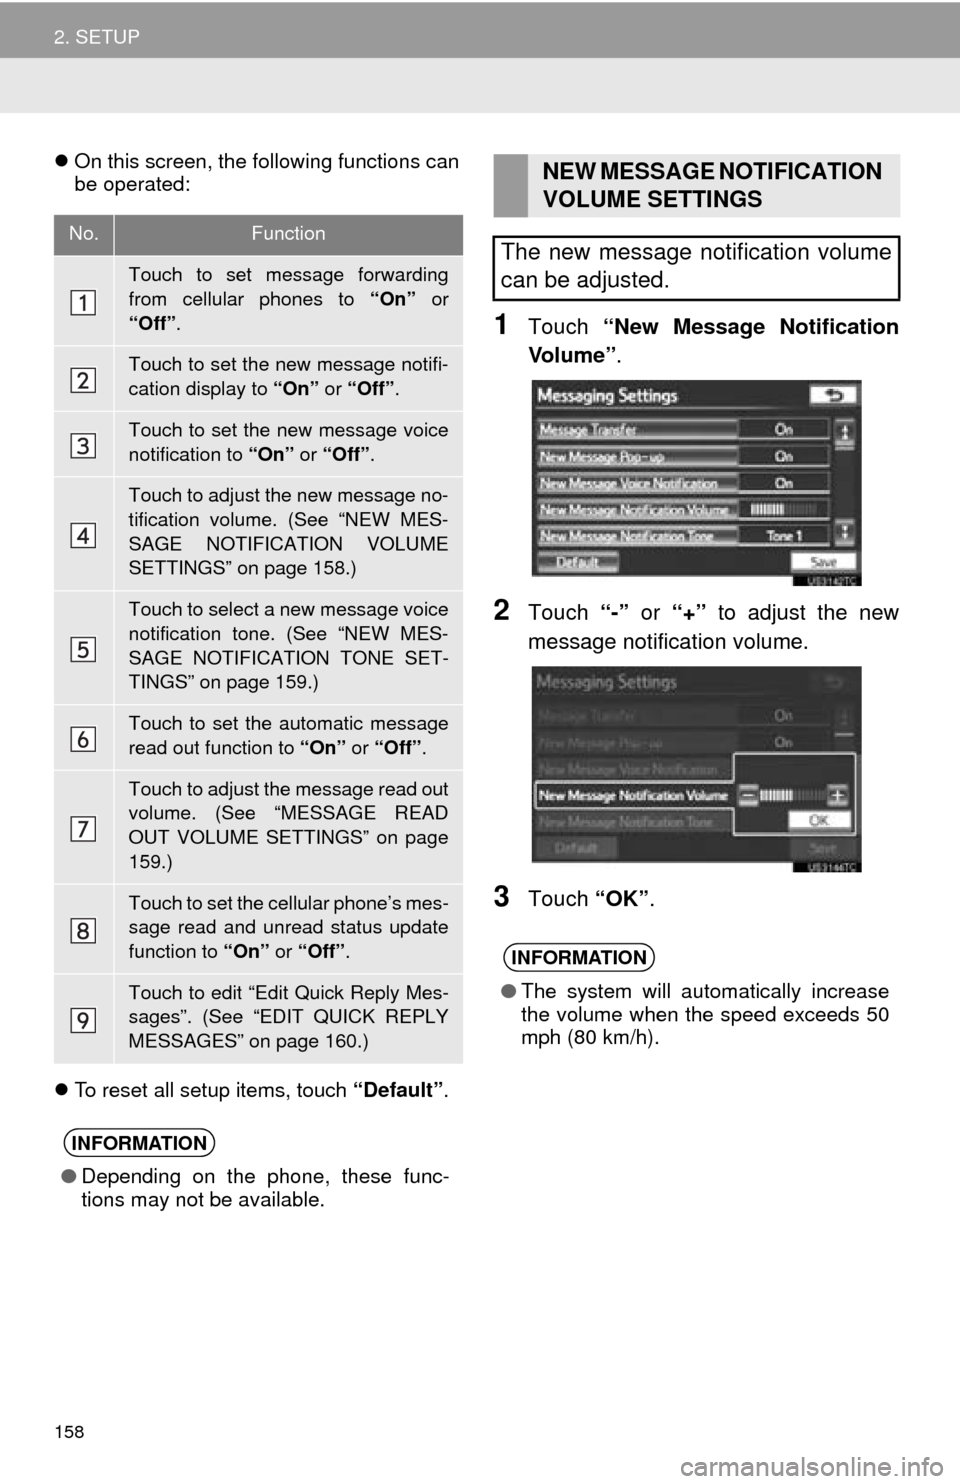
On this screen, the following functions can
be operated:
To reset all setup items, touch “Default”.
1Touch “New Message Notification
Vo l u m e ” .
2Touch “-” or “+” to adjust the new
message notification volume.
3Touch “OK”.
No.Function
Touch to set message forwarding
from cellular phones to “On” or
“Off” .
Touch to set the new message notifi-
cation display to “On” or “Off” .
Touch to set the new message voice
notification to “On” or “Off” .
Touch to adjust the new message no-
tification volume. (See “NEW MES-
SAGE NOTIFICATION VOLUME
SETTINGS” on page 158.)
Touch to select a new message voice
notification tone. (See “NEW MES-
SAGE NOTIFICATION TONE SET-
TINGS” on page 159.)
Touch to set the automatic message
read out function to “On” or “Off” .
Touch to adjust the message read out
volume. (See “MESSAGE READ
OUT VOLUME SETTINGS” on page
159.)
Touch to set the cellular phone’s mes-
sage read and unread status update
function to “On” or “Off” .
Touch to edit “Edit Quick Reply Mes-
sages”. (See “EDIT QUICK REPLY
MESSAGES” on page 160.)
INFORMATION
●Depending on the phone, these func-
tions may not be available.
NEW MESSAGE NOTIFICATION
VOLUME SETTINGS
The new message notification volume
can be adjusted.
INFORMATION
● The system will automatically increase
the volume when the speed exceeds 50
mph (80 km/h).
Page 161 of 346
161
2. SETUP
4
TELEPHONE
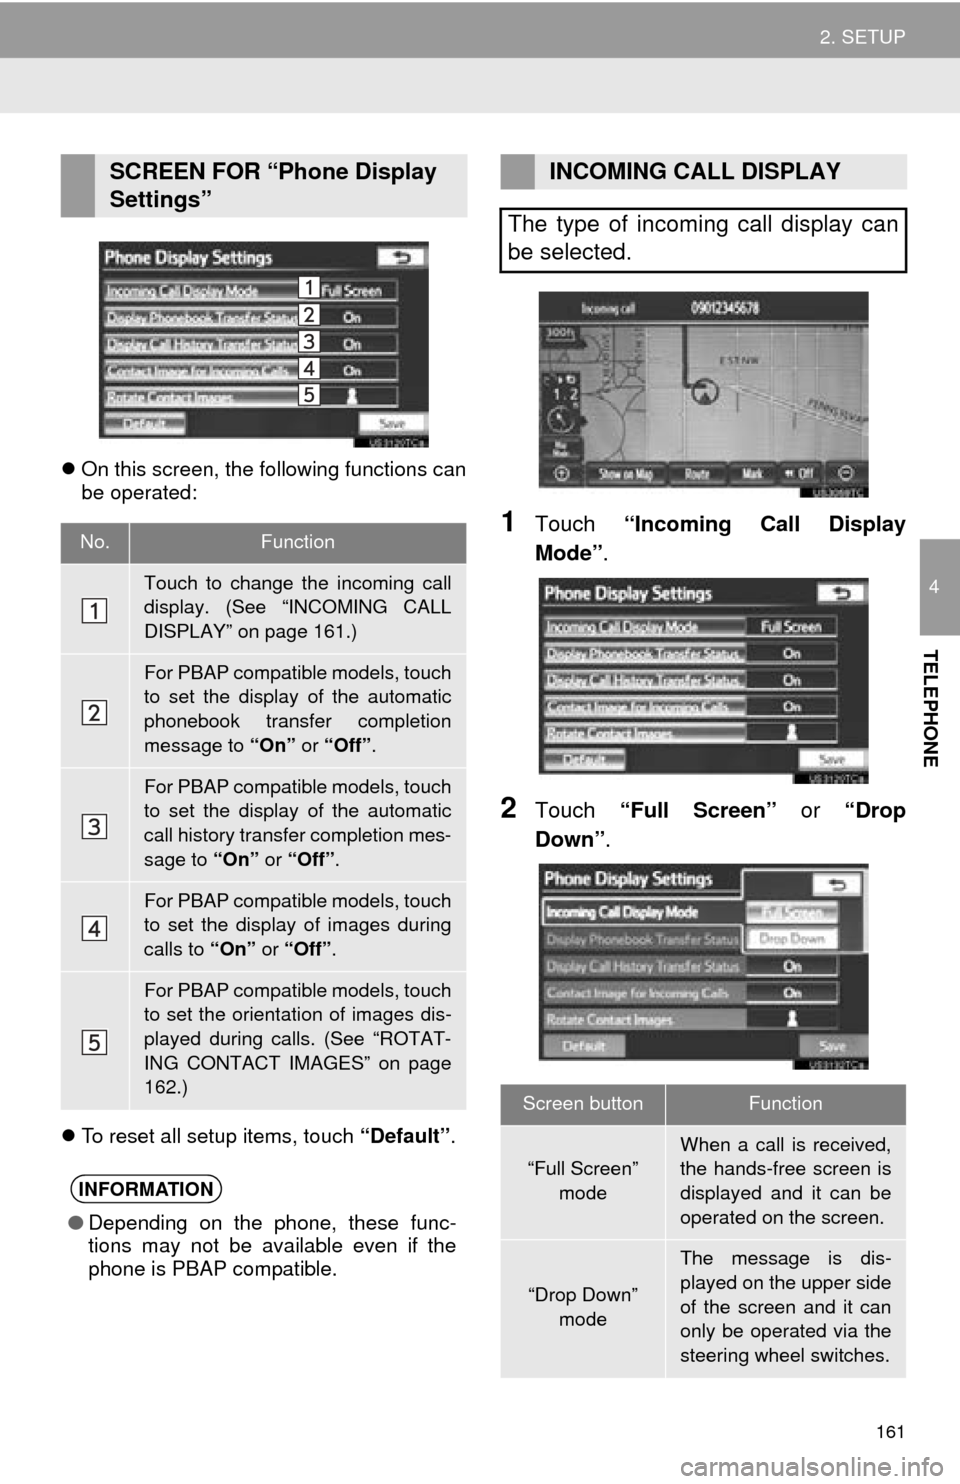
On this screen, the following functions can
be operated:
To reset all setup items, touch “Default”.
1Touch “Incoming Call Display
Mode” .
2Touch “Full Screen” or “Drop
Down”.
SCREEN FOR “Phone Display
Settings”
No.Function
Touch to change the incoming call
display. (See “INCOMING CALL
DISPLAY” on page 161.)
For PBAP compatible models, touch
to set the display of the automatic
phonebook transfer completion
message to “On” or “Off” .
For PBAP compatible models, touch
to set the display of the automatic
call history transfer completion mes-
sage to “On” or “Off” .
For PBAP compatible models, touch
to set the display of images during
calls to “On” or “Off” .
For PBAP compatible models, touch
to set the orientation of images dis-
played during calls. (See “ROTAT-
ING CONTACT IMAGES” on page
162.)
INFORMATION
●Depending on the phone, these func-
tions may not be available even if the
phone is PBAP compatible.
INCOMING CALL DISPLAY
The type of incoming call display can
be selected.
Screen buttonFunction
“Full Screen” mode
When a call is received,
the hands-free screen is
displayed and it can be
operated on the screen.
“Drop Down”
mode
The message is dis-
played on the upper side
of the screen and it can
only be operated via the
steering wheel switches.
Page 172 of 346
172
1. QUICK REFERENCE .................. 174
2. SOME BASICS ............................ 176
VOICE COMMAND SYSTEM .............. 176
AUDIO SPLIT SCREEN DISPLAY ....... 176
TURNING THE SYSTEM ON AND OFF..................................... 177
SWITCHING BETWEEN FUNCTIONS ...................................... 177
DSP CONTROL ................................... 177
TONE AND BALANCE ......................... 178
SELECTING SCREEN SIZE ................ 179
DVD PLAYER....................................... 179
AUX PORT ........................................... 180
USB PORT ........................................... 180
3. RADIO OPERATION ... ................ 181
LISTENING TO THE RADIO ................ 181
PRESETTING A STATION .................. 181
SELECTING A STATION ..................... 182
RADIO BROADCAST DATA
SYSTEM ............................................ 182
TRAFFIC ANNOUNCEMENT .............. 183
4. HD Radio™ TECHNOLOGY INFORMATION ......................... 184
USING HD Radio™ TECHNOLOGY.... 184
AVAILABLE HD Radio™
TECHNOLOGY.................................. 185
TROUBLESHOOTING GUIDE ............. 186
1AUDIO/VIDEO SYSTEM
OPERATION
5
AUDIO/VIDEO SYSTEM
Page 175 of 346
175
1. AUDIO/VIDEO SYSTEM OPERATION
5
AUDIO/VIDEO SYSTEM
“SEEK/TRACK”
buttonPress the “” or “” button to seek up or down
for a station, or to access a desired track, file or
chapter.
182
“PWR VOL” knobPress to turn the audio system on and off, and
turn to adjust the volume.177
“RADIO” buttonPress to display the radio control screen.177
“MEDIA” buttonPress to display the media control screen.177
No.NameFunctionPage