Page 11 of 346
11
1. NAVIGATION OPERATION
1
BASIC FUNCTION
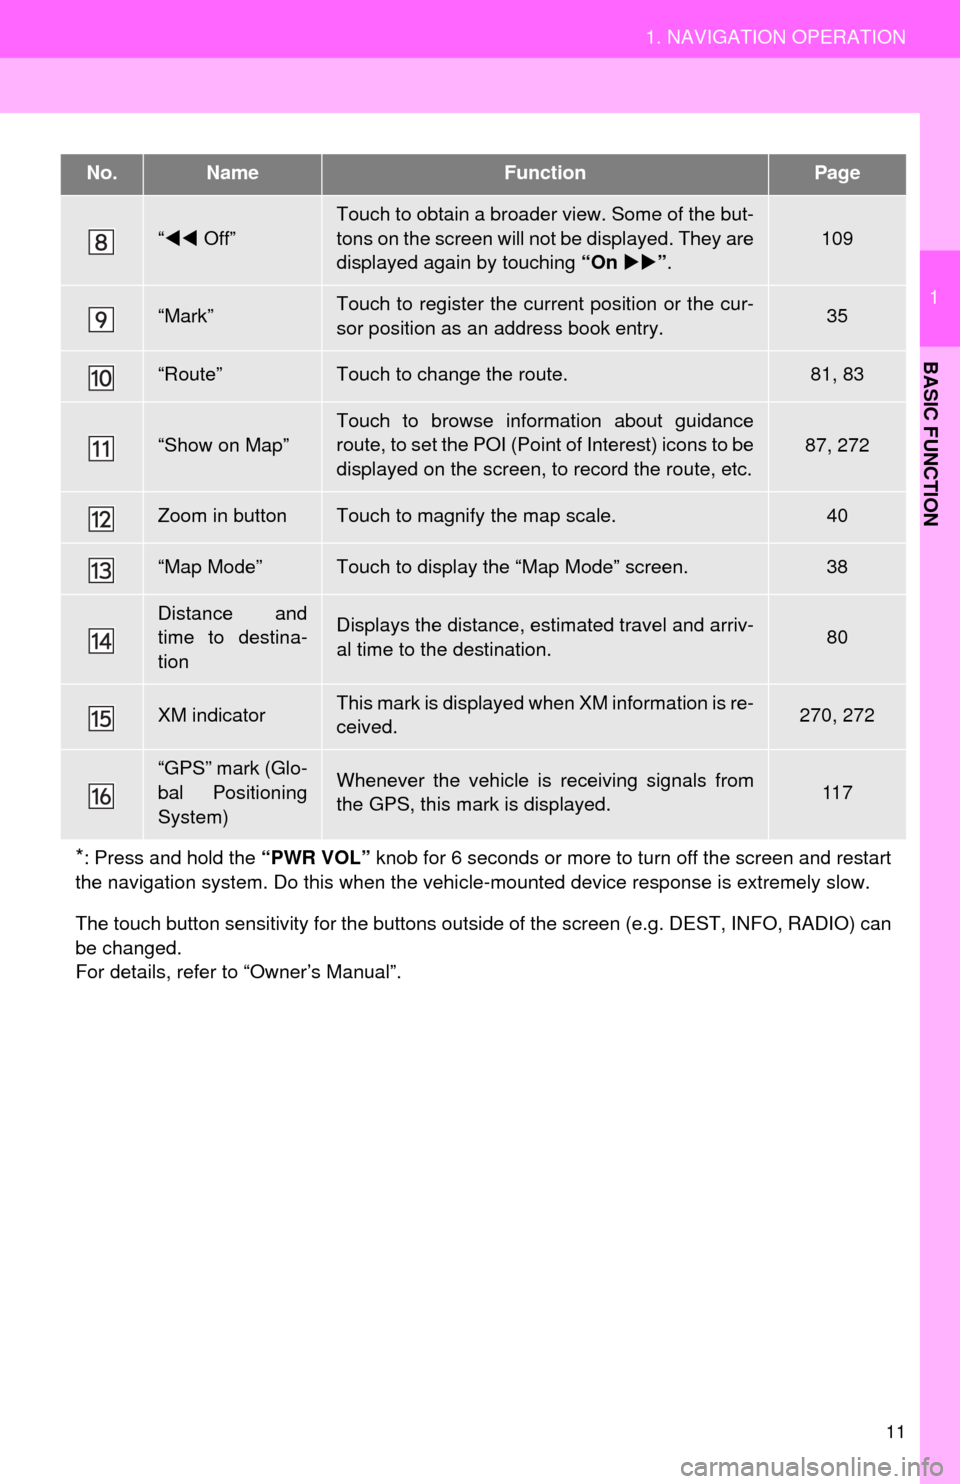
“ Off”
Touch to obtain a broader view. Some of the but-
tons on the screen will not be displayed. They are
displayed again by touching “On ”.
109
“Mark”Touch to register the current position or the cur-
sor position as an address book entry.35
“Route”Touch to change the route.81, 83
“Show on Map”Touch to browse information about guidance
route, to set the POI (Point of Interest) icons to be
displayed on the screen, to record the route, etc.87, 272
Zoom in buttonTouch to magnify the map scale.40
“Map Mode”Touch to display the “Map Mode” screen.38
Distance and
time to destina-
tionDisplays the distance, estimated travel and arriv-
al time to the destination.80
XM indicatorThis mark is displayed when XM information is re-
ceived.270, 272
“GPS” mark (Glo-
bal Positioning
System)Whenever the vehicle is receiving signals from
the GPS, this mark is displayed.11 7
*: Press and hold the “PWR VOL” knob for 6 seconds or more to turn off the screen and restart
the navigation system. Do this when the vehi cle-mounted device response is extremely slow.
The touch button sensitivity for the buttons outsi de of the screen (e.g. DEST, INFO, RADIO) can
be changed.
For details, refer to “Owner’s Manual”.
No.NameFunctionPage
Page 22 of 346
22
3. QUICK REFERENCE
2. “Setup” SCREEN
The items shown on the “Setup” screen can be set. Press the “SETUP” button to
display the “Setup” screen.
No.NameFunctionPage
“General”
Touch to change the selected language, opera-
tion sound settings, automatic screen change,
etc.
42
“Voice”Touch to set the voice guidance settings.51
“Navigation”Touch to set home, preset destinations, address
book, areas to avoid, etc. or to delete previous
destinations.91
“Display”Touch to adjust the contrast and brightness of the
screens, turn the display off, etc.32
“Vehicle”Touch to set vehicle information such as mainte-
nance information.11 2
Page 28 of 346
28
1. BASIC INFORMATION BEFORE OPERATION
1. INITIAL SCREEN
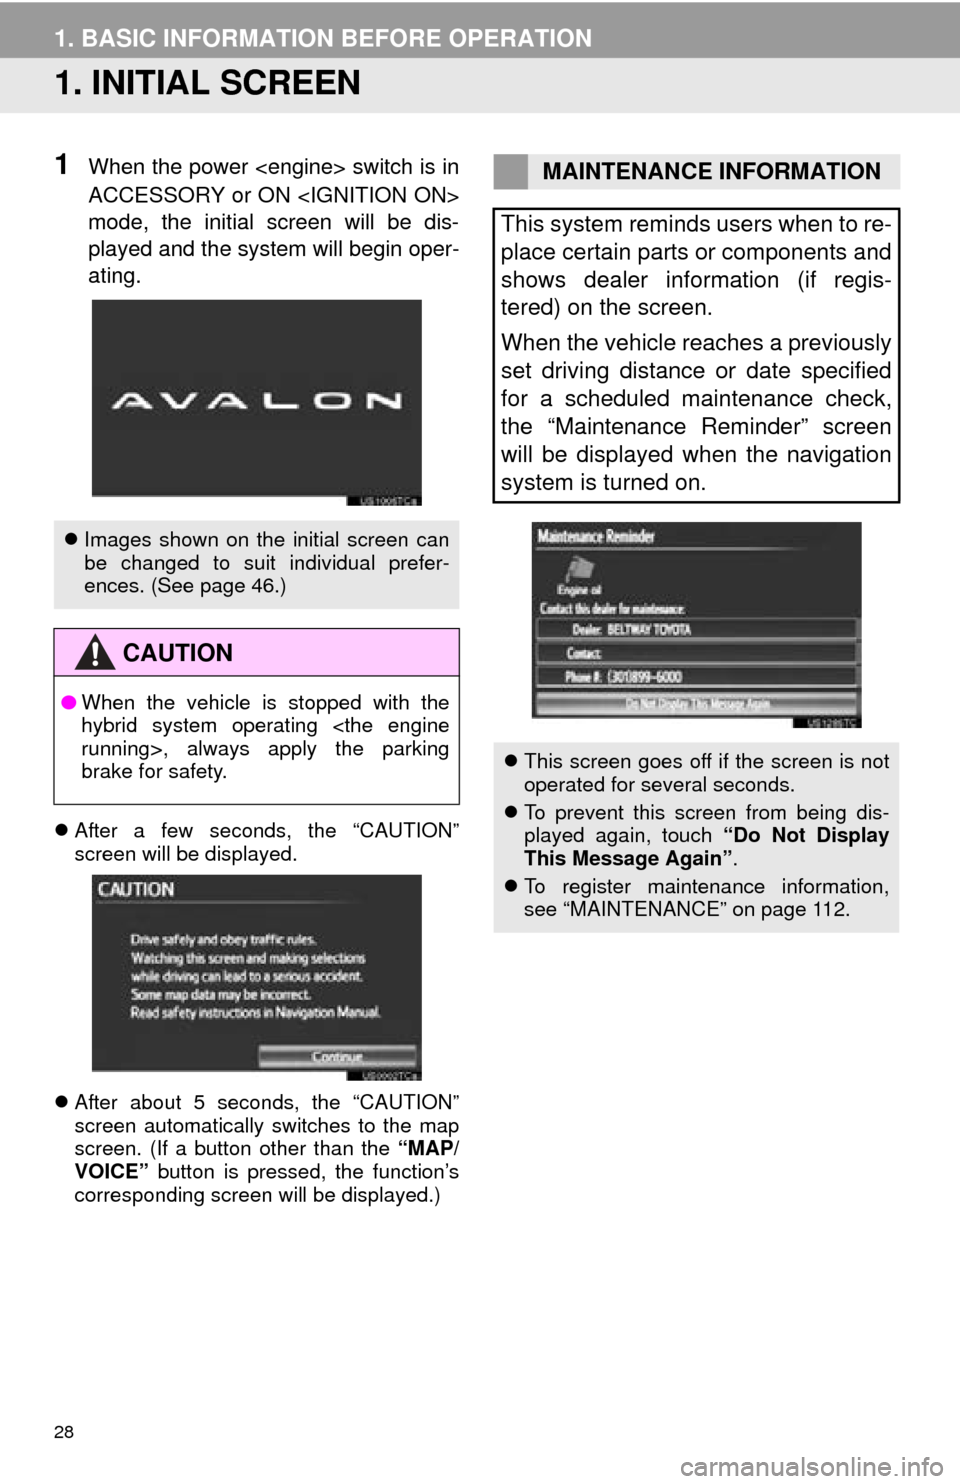
1When the power switch is in
ACCESSORY or ON
mode, the initial screen will be dis-
played and the system will begin oper-
ating.
After a few seconds, the “CAUTION”
screen will be displayed.
After about 5 seconds, the “CAUTION”
screen automatically switches to the map
screen. (If a button other than the “MAP/
VOICE” button is pressed, the function’s
corresponding screen will be displayed.)
Images shown on the initial screen can
be changed to suit individual prefer-
ences. (See page 46.)
CAUTION
●When the vehicle is stopped with the
hybrid system operating
running
>, always apply the parking
brake for safety.
MAINTENANCE INFORMATION
This system reminds users when to re-
place certain parts or components and
shows dealer information (if regis-
tered) on the screen.
When the vehicle reaches a previously
set driving distance or date specified
for a scheduled maintenance check,
the “Maintenance Reminder” screen
will be displayed when the navigation
system is turned on.
This screen goes off if the screen is not
operated for several seconds.
To prevent this screen from being dis-
played again, touch “Do Not Display
This Message Again” .
To register maintenance information,
see “MAINTENANCE” on page 112.
Page 29 of 346
29
1. BASIC INFORMATION BEFORE OPERATION
2
BASIC FUNCTION
2. TOUCH SCREEN OPERATION
This system is operated mainly by the
buttons on the screen. (Referred to as
screen buttons in this manual.)
When a screen button is touched, a
beep sounds. (To set the beep sound,
see page 42.)
NOTICE
● To prevent damaging the screen, lightly
touch the screen buttons with your fin-
ger.
● Do not use objects other than your finger
to touch the screen.
● Wipe off fingerprints using a glass clean-
ing cloth. Do not use chemical cleaners
to clean the screen, as they may dam-
age the touch screen.
INFORMATION
●If the system does not respond to touch-
ing a screen button, move your finger
away from the screen and then touch it
again.
● Dimmed screen buttons cannot be oper-
ated.
● The displayed image may become
darker and moving images may be
slightly distorted when the screen is
cold.
● In extremely cold conditions, the map
may not be displayed and the data input
by a user may be deleted. Also, the
screen buttons may be harder than
usual to depress.
● When you look at the screen through
polarized material such as polarized
sunglasses, the screen may be dark and
hard to see. If so, look at the screen
from different angles, adjust the screen
settings on the “Display” screen or take
off your sunglasses.
Page 32 of 346
32
1. BASIC INFORMATION BEFORE OPERATION
4. SCREEN ADJUSTMENT
1Press the “SETUP” button.
2Touch “Display” .
Adjusting the screen display
“Camera” : Touch to adjust the image the
camera displays.
Adjusting the image the camera displays
“Map·Menu”: Touch to return to the
screen display settings.
The contrast and brightness of the
screen display and the image the cam-
era displays can be adjusted. The dis-
play can also be turned off, and/or
changed to either day or night mode.
(For information regarding audio/video
screen adjustment, see “AUDIO
SCREEN ADJUSTMENT” on page
204.)
SCREEN SETTINGS
ADJUSTMENT
ADJUSTING SCREEN DISPLAY
AND CAMERA SETTINGS
Page 33 of 346
33
1. BASIC INFORMATION BEFORE OPERATION
2
BASIC FUNCTION
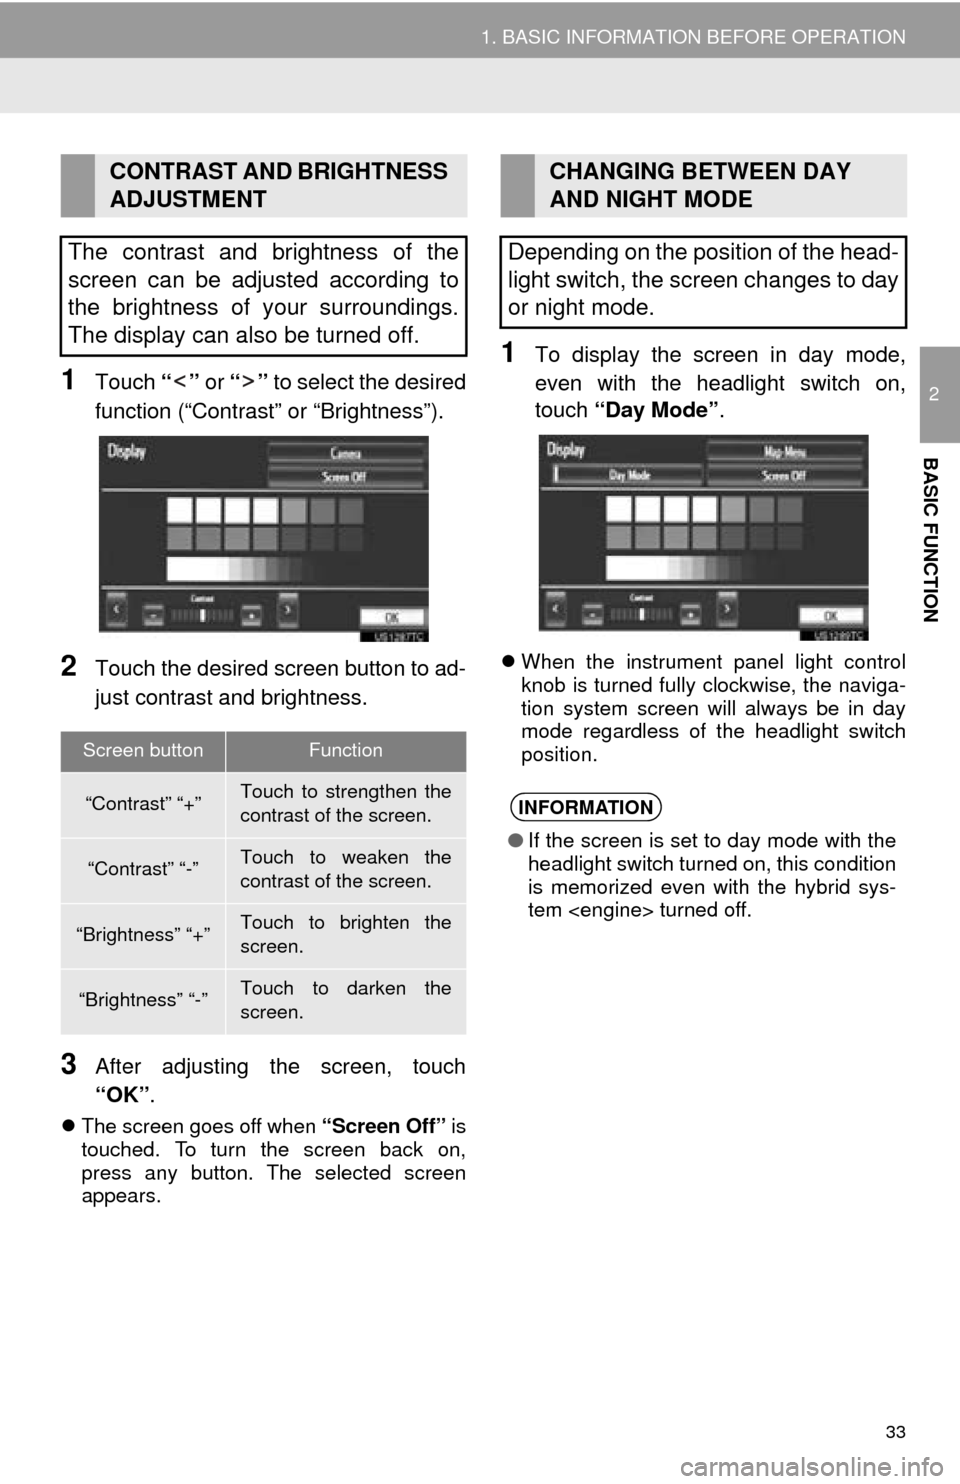
1Touch “” or “” to select the desired
function (“Contrast” or “Brightness”).
2Touch the desired screen button to ad-
just contrast and brightness.
3After adjusting t he screen, touch
“OK” .
The screen goes off when “Screen Off” is
touched. To turn the screen back on,
press any button. The selected screen
appears.
1To display the screen in day mode,
even with the headlight switch on,
touch “Day Mode” .
When the instrument panel light control
knob is turned fully clockwise, the naviga-
tion system screen will always be in day
mode regardless of the headlight switch
position.
CONTRAST AND BRIGHTNESS
ADJUSTMENT
The contrast and brightness of the
screen can be adjusted according to
the brightness of your surroundings.
The display can also be turned off.
Screen buttonFunction
“Contrast” “+”Touch to strengthen the
contrast of the screen.
“Contrast” “-”Touch to weaken the
contrast of the screen.
“Brightness” “+”Touch to brighten the
screen.
“Brightness” “-”Touch to darken the
screen.
CHANGING BETWEEN DAY
AND NIGHT MODE
Depending on the position of the head-
light switch, the screen changes to day
or night mode.
INFORMATION
● If the screen is set to day mode with the
headlight switch turned on, this condition
is memorized even with the hybrid sys-
tem turned off.
Page 34 of 346
34
1. BASIC INFORMATION BEFORE OPERATION
5. MAP SCREEN OPERATION
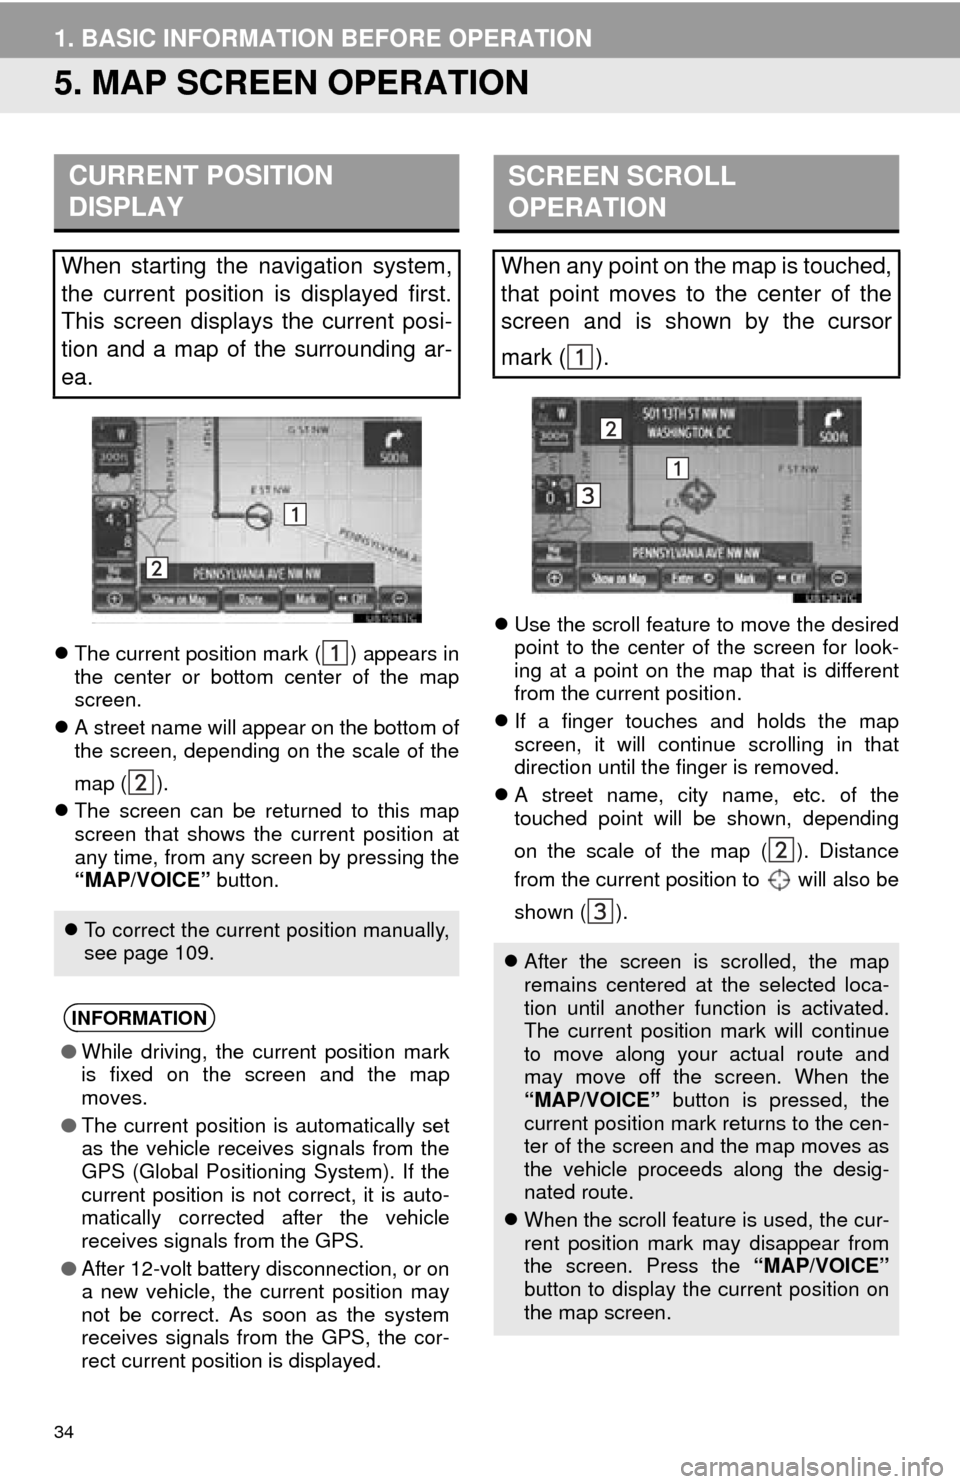
The current position mark ( ) appears in
the center or bottom center of the map
screen.
A street name will appear on the bottom of
the screen, depending on the scale of the
map ( ).
The screen can be returned to this map
screen that shows the current position at
any time, from any screen by pressing the
“MAP/VOICE” button.
Use the scroll feature to move the desired
point to the center of the screen for look-
ing at a point on the map that is different
from the current position.
If a finger touches and holds the map
screen, it will continue scrolling in that
direction until the finger is removed.
A street name, city name, etc. of the
touched point will be shown, depending
on the scale of the map ( ). Distance
from the current position to will also be
shown ( ).
CURRENT POSITION
DISPLAY
When starting the navigation system,
the current position is displayed first.
This screen displays the current posi-
tion and a map of the surrounding ar-
ea.
To correct the current position manually,
see page 109.
INFORMATION
●While driving, the current position mark
is fixed on the screen and the map
moves.
● The current position is automatically set
as the vehicle receives signals from the
GPS (Global Positioning System). If the
current position is not correct, it is auto-
matically corrected after the vehicle
receives signals from the GPS.
● After 12-volt battery disconnection, or on
a new vehicle, the current position may
not be correct. As soon as the system
receives signals from the GPS, the cor-
rect current position is displayed.
SCREEN SCROLL
OPERATION
When any point on the map is touched,
that point moves to the center of the
screen and is shown by the cursor
mark ( ).
After the screen is scrolled, the map
remains centered at the selected loca-
tion until another function is activated.
The current position mark will continue
to move along your actual route and
may move off the screen. When the
“MAP/VOICE” button is pressed, the
current position mark returns to the cen-
ter of the screen and the map moves as
the vehicle proceeds along the desig-
nated route.
When the scroll feature is used, the cur-
rent position mark may disappear from
the screen. Press the “MAP/VOICE”
button to display the current position on
the map screen.
Page 42 of 346
42
2. SETUP
1. GENERAL SETTINGS
1Press the “SETUP” button.
2Touch “General” .
3Touch the items to be set.
4Touch “Save” .
On this screen, the following functions can
be performed:
Used for language selection and the
on/off settings of operation sounds and
automatic screen change, etc.SCREENS FOR GENERAL
SETTINGS
No.Function
Touch to change the time zone and
select “On” or “Off” for daylight sav-
ing time. (See “SYSTEM TIME SET-
TINGS” on page 43.)
Touch to change the language. (See
“SELECTING A LANGUAGE” on
page 44.)
Touch to change the distance unit.
(See “UNIT OF MEASUREMENT” on
page 45.)
Touch to turn the sound beeps “On”
or “Off” .