Page 105 of 346
105
3
NAVIGATION SYSTEM
4. SETUP
1. DETAILED NAVIGATION SETTINGS
1Press the “SETUP” button.
2Touch “Navigation” .
3Touch “Detailed Navi. Settings” .
4Touch the items to be set.
5Touch “Save” .
On this screen, the following functions can
be performed:
Settings are available for driving
speeds, favorite POI categories, auto-
matic screen change, “
Off” func-
tion, etc.
SCREENS FOR NAVIGATION
SETTINGS
No.Function
Touch to set the average cruising
speed. (See “DRIVING SPEEDS”
on page 106.)
Touch to set the automatic input
function to “On” or “Off” .
Touch to set the voice guidance for
the next street name to “On” or
“Off” during route guidance.
Page 106 of 346
106
4. SETUP
To reset all setup items, touch “Default”
and touch “Save” .
1Press the “SETUP” button.
2Touch “Navigation” on the “Setup”
screen.
3Touch “Detailed Navi. Settings” on
the “Navigation Settings” screen.
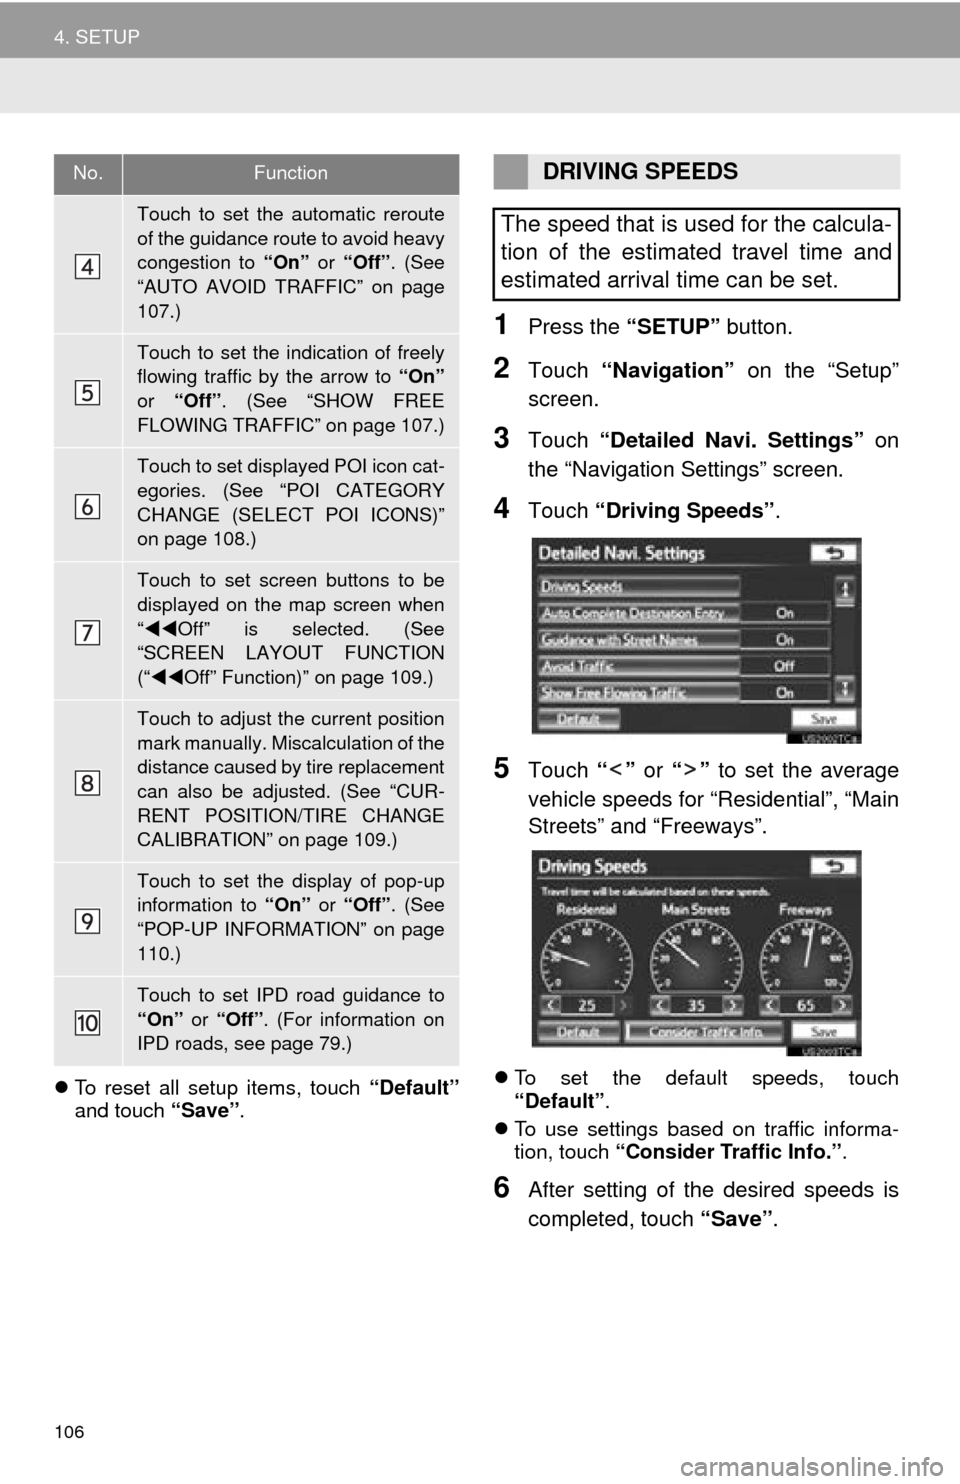
4Touch “Driving Speeds” .
5Touch “” or “” to set the average
vehicle speeds for “Residential”, “Main
Streets” and “Freeways”.
To set the default speeds, touch
“Default” .
To use settings based on traffic informa-
tion, touch “Consider Traffic Info.” .
6After setting of the desired speeds is
completed, touch “Save” .
Touch to set the automatic reroute
of the guidance route to avoid heavy
congestion to “On” or “Off” . (See
“AUTO AVOID TRAFFIC” on page
107.)
Touch to set the indication of freely
flowing traffic by the arrow to “On”
or “Off” . (See “SHOW FREE
FLOWING TRAFFIC” on page 107.)
Touch to set displayed POI icon cat-
egories. (See “POI CATEGORY
CHANGE (SELECT POI ICONS)”
on page 108.)
Touch to set screen buttons to be
displayed on the map screen when
“ Off” is selected. (See
“SCREEN LAYOUT FUNCTION
(“ Off” Function)” on page 109.)
Touch to adjust the current position
mark manually. Miscalculation of the
distance caused by tire replacement
can also be adjusted. (See “CUR-
RENT POSITION/TIRE CHANGE
CALIBRATION” on page 109.)
Touch to set the display of pop-up
information to “On” or “Off” . (See
“POP-UP INFORMATION” on page
110.)
Touch to set IPD road guidance to
“On” or “Off” . (For information on
IPD roads, see page 79.)
No.FunctionDRIVING SPEEDS
The speed that is used for the calcula-
tion of the estimated travel time and
estimated arrival time can be set.
Page 107 of 346
107
4. SETUP
3
NAVIGATION SYSTEM
1Press the “SETUP” button.
2Touch “Navigation” on the “Setup”
screen.
3Touch “Detailed Navi. Settings” on
the “Navigation Settings” screen.
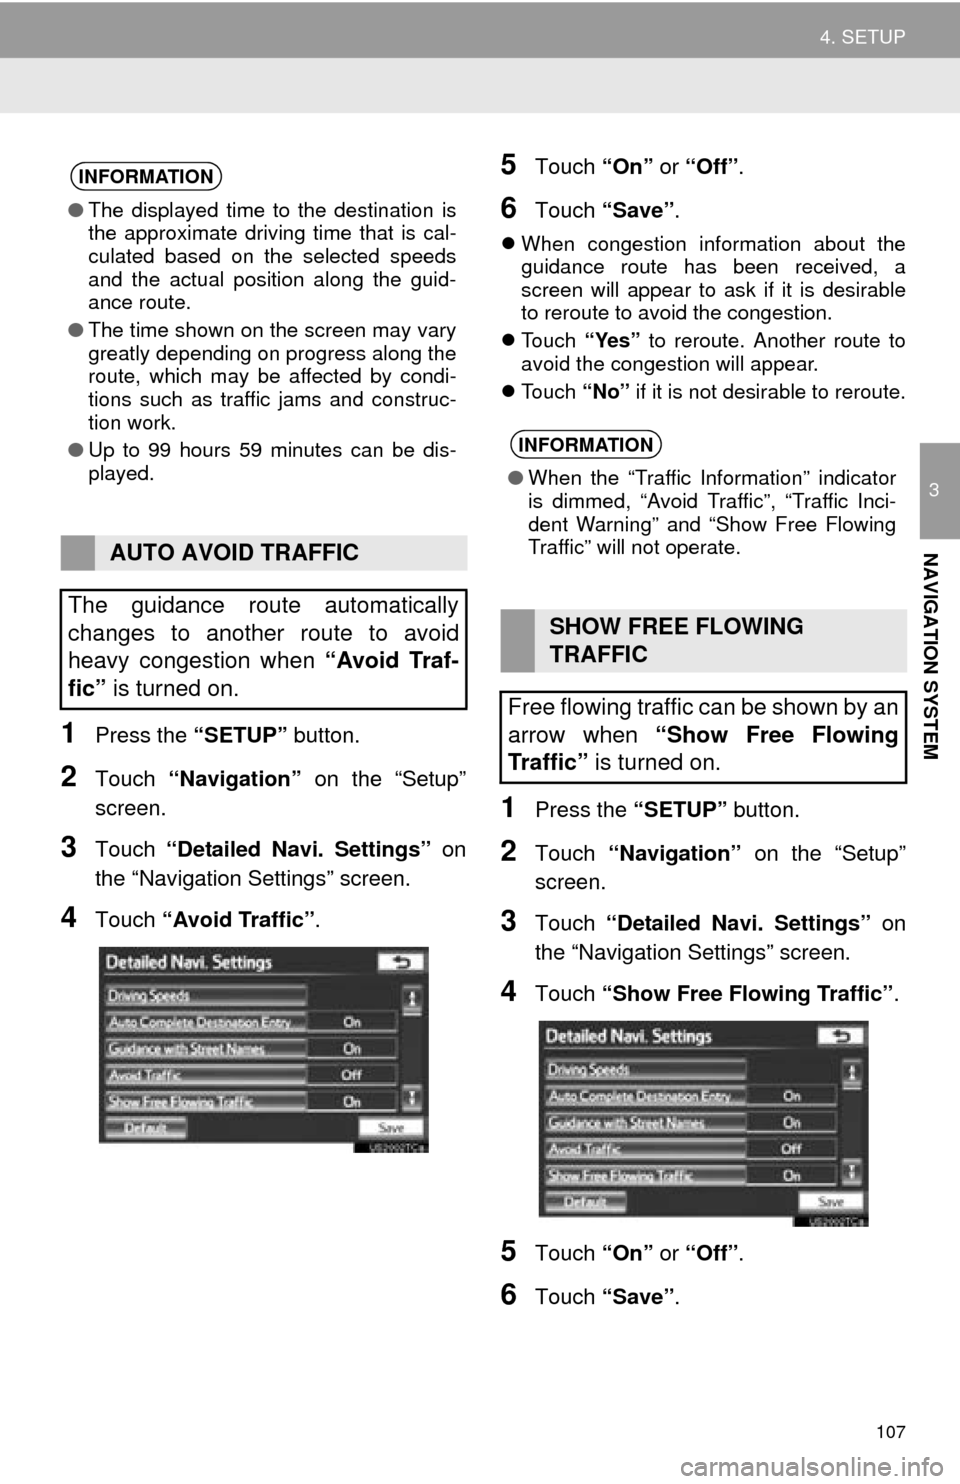
4Touch “Avoid Traffic” .
5Touch “On” or “Off” .
6Touch “Save” .
When congestion information about the
guidance route has been received, a
screen will appear to ask if it is desirable
to reroute to avoid the congestion.
Touch “Yes” to reroute. Another route to
avoid the congestion will appear.
Touch “No” if it is not desirable to reroute.
1Press the “SETUP” button.
2Touch “Navigation” on the “Setup”
screen.
3Touch “Detailed Navi. Settings” on
the “Navigation Settings” screen.
4Touch “Show Free Flowing Traffic” .
5Touch “On” or “Off” .
6Touch “Save” .
INFORMATION
●The displayed time to the destination is
the approximate driving time that is cal-
culated based on the selected speeds
and the actual position along the guid-
ance route.
● The time shown on the screen may vary
greatly depending on progress along the
route, which may be affected by condi-
tions such as traffic jams and construc-
tion work.
● Up to 99 hours 59 minutes can be dis-
played.
AUTO AVOID TRAFFIC
The guidance route automatically
changes to another route to avoid
heavy congestion when “Avoid Traf-
fic” is turned on.
INFORMATION
●When the “Traffic Information” indicator
is dimmed, “Avoid Traffic”, “Traffic Inci-
dent Warning” and “Show Free Flowing
Traffic” will not operate.
SHOW FREE FLOWING
TRAFFIC
Free flowing traffic can be shown by an
arrow when “Show Free Flowing
Traffic” is turned on.
Page 109 of 346
109
4. SETUP
3
NAVIGATION SYSTEM
1Press the “SETUP” button.
2Touch “Navigation” on the “Setup”
screen.
3Touch “Detailed Navi. Settings” on
the “Navigation Settings” screen.
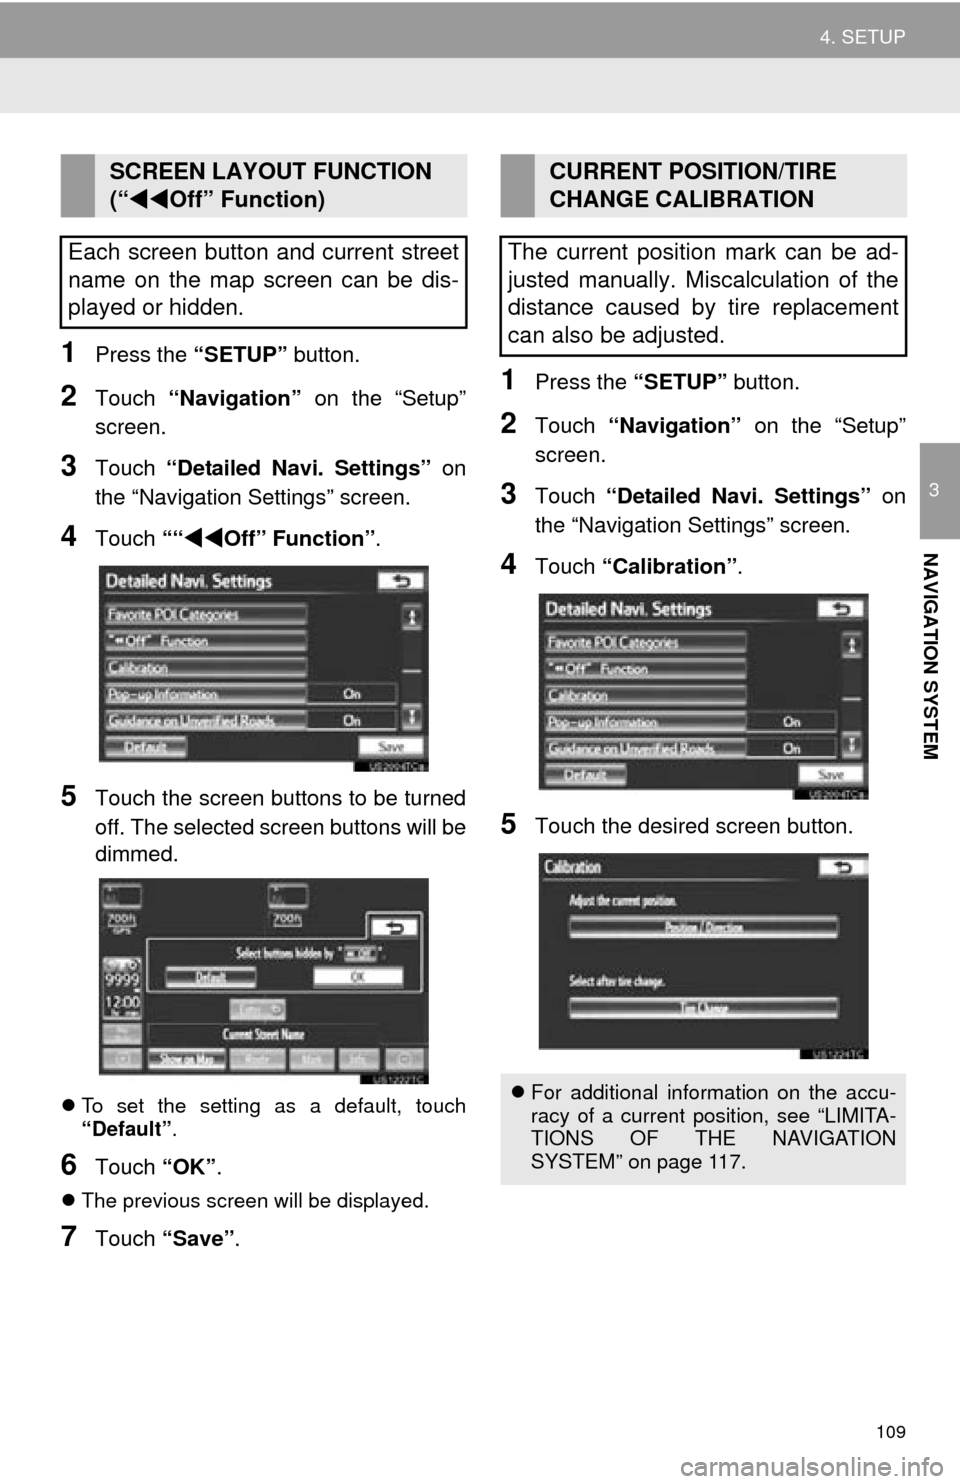
4Touch ““Off” Function” .
5Touch the screen buttons to be turned
off. The selected screen buttons will be
dimmed.
To set the setting as a default, touch
“Default” .
6Touch “OK”.
The previous screen will be displayed.
7Touch “Save” .
1Press the “SETUP” button.
2Touch “Navigation” on the “Setup”
screen.
3Touch “Detailed Navi. Settings” on
the “Navigation Settings” screen.
4Touch “Calibration”.
5Touch the desired screen button.
SCREEN LAYOUT FUNCTION
(“ Off” Function)
Each screen button and current street
name on the map screen can be dis-
played or hidden.CURRENT POSITION/TIRE
CHANGE CALIBRATION
The current position mark can be ad-
justed manually. Miscalculation of the
distance caused by tire replacement
can also be adjusted.
For additional information on the accu-
racy of a current position, see “LIMITA-
TIONS OF THE NAVIGATION
SYSTEM” on page 117.
Page 111 of 346
111
4. SETUP
3
NAVIGATION SYSTEM
4Touch “Pop-up Information”.
5Touch “On” or “Off”.
6Touch “Save” .
When “Pop-up Information” is turned
off, the following messages will not be dis-
played.
This message appears when the map
scale is over 0.5 miles (800 m).
This message appears when the map is
switched to dual map screen mode.
Page 129 of 346
129
1. PHONE OPERATION
4
TELEPHONE
When the power switch is in
ACCESSORY or ON
mode, the system searches for a nearby
registered cellular phone.
The system will connect with the phone
that was last connected, if it is nearby.
When “Display Phone Status” is set to
“On” , the connection status is displayed.
(See “Bluetooth
® DEVICE CONNEC-
TION STATUS DISPLAY SETTINGS” on
page 171.)
This screen appears when the Bluetooth
®
phone is first connected after the power
switch is in ACCESSORY or ON
mode.
1Press the button or the switch
on the steering wheel.
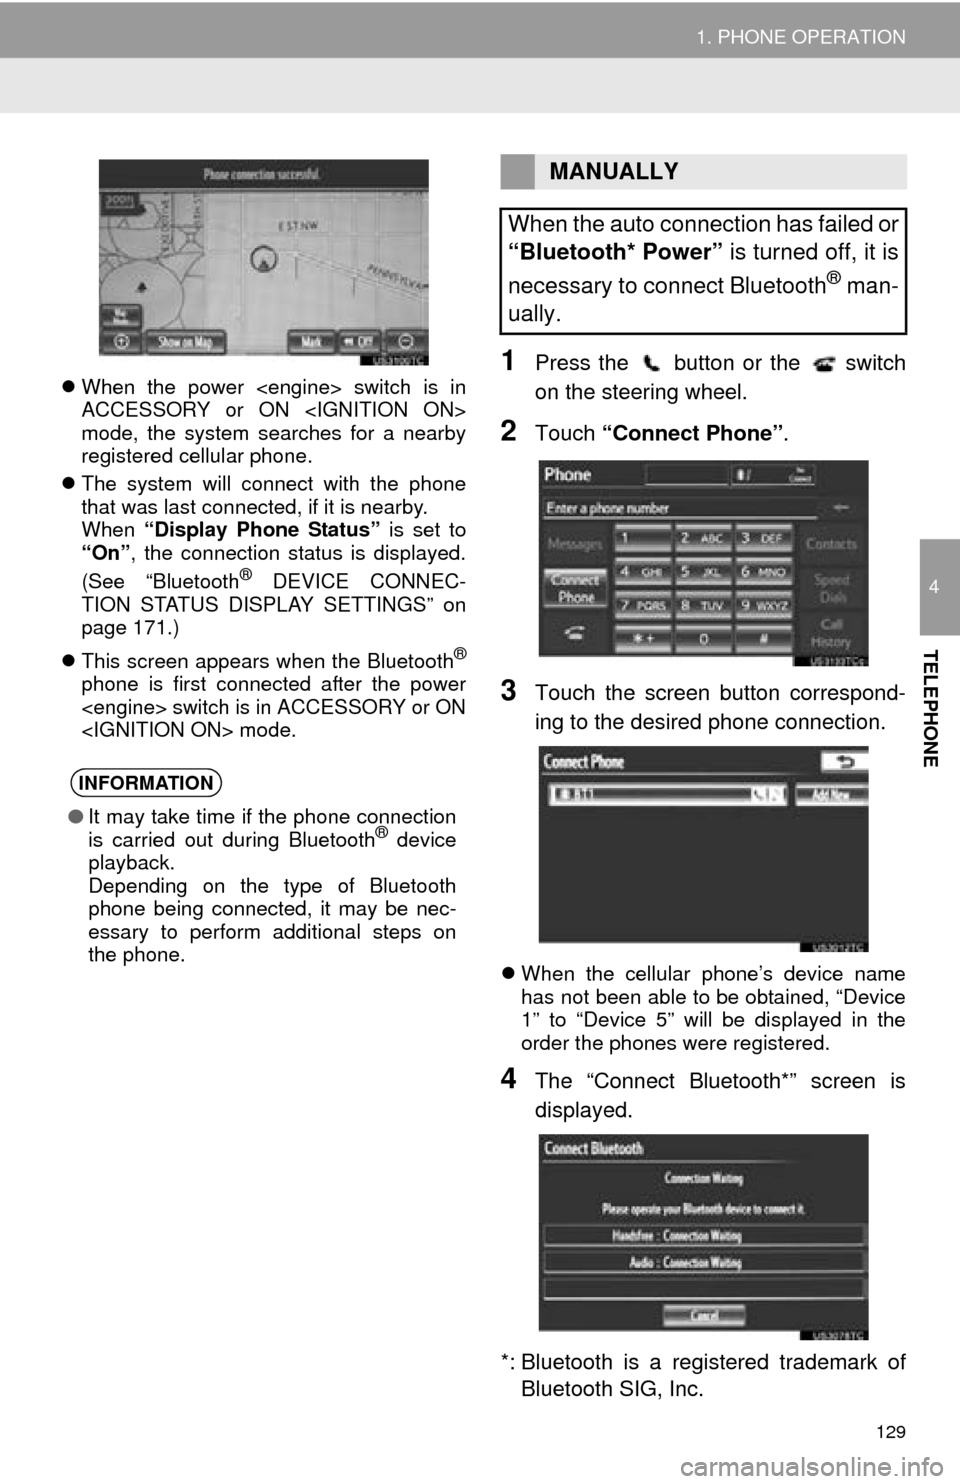
2Touch “Connect Phone” .
3Touch the screen button correspond-
ing to the desired phone connection.
When the cellular phone’s device name
has not been able to be obtained, “Device
1” to “Device 5” will be displayed in the
order the phones were registered.
4The “Connect Bluetooth*” screen is
displayed.
*: Bluetooth is a regi stered trademark of
Bluetooth SIG, Inc.
INFORMATION
● It may take time if the phone connection
is carried out during Bluetooth® device
playback.
Depending on the type of Bluetooth
phone being connected, it may be nec-
essary to perform additional steps on
the phone.
MANUALLY
When the auto connection has failed or
“Bluetooth* Power” is turned off, it is
necessary to connect Bluetooth
® man-
ually.
Page 130 of 346
130
1. PHONE OPERATION
5When the connection is completed,
this screen is displayed.
Now you can use the Bluetooth® phone.
When a phone is connected while
Bluetooth® audio is playing
This screen is displayed, and the
Bluetooth® audio will stop temporarily.
If a Bluetooth
® phone is disconnected on
purpose, such as turning it off, this does
not happen. Reconnect the Bluetooth
®
phone manually.
RECONNECTING THE
Bluetooth® PHONE
If a Bluetooth® phone is disconnected
due to poor reception from the
Bluetooth
® network when the power
switch is in ACCESSORY or
ON mode, the
system automatically reconnects the
Bluetooth
® phone. When “Display
Phone Status” is set to “On”, the
connection status is displayed.
Page 135 of 346
135
1. PHONE OPERATION
4
TELEPHONE
2Say the name, or the name and type of
phone, of a registered contact.
In the same manner as it is displayed on
the screen, “Call ”, after
saying “Call” say the name, or the name
and type of phone, of a contact.
For example: “Call”, “John Smith” or
“Call” , “Mary Davis”, “Mobile”
There are 4 types of phones: Home,
Mobile, Office and Other.
Short or abbreviated names in the phone-
book may not be recognized. Change
names in the phonebook to full names.
Sometimes a voice recognition result con-
firmation screen will be displayed. After
confirming the result, say “Yes” or “No” .
When the system recognizes multiple
names from the phonebook, a name can-
didate list will be displayed on the screen.
If the desired name is not displayed on the
top of the screen, say the number of the
name from the candidate list (number 1
and number 2) to select a name from the
candidate list.
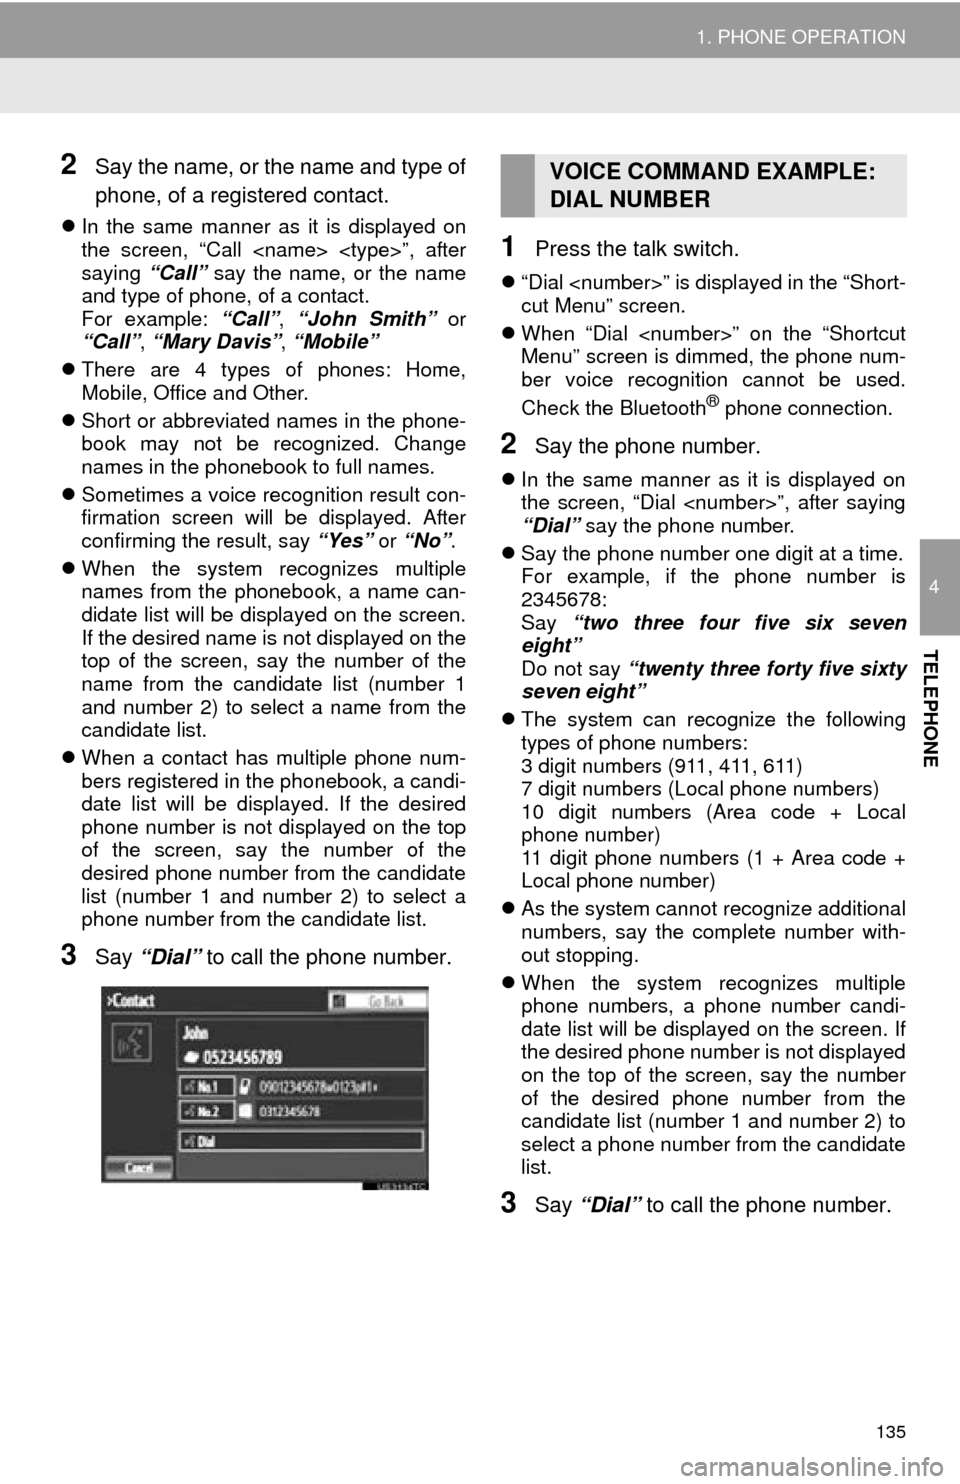
When a contact has multiple phone num-
bers registered in the phonebook, a candi-
date list will be displayed. If the desired
phone number is not displayed on the top
of the screen, say the number of the
desired phone number from the candidate
list (number 1 and number 2) to select a
phone number from the candidate list.
3Say “Dial” to call the phone number.
1Press the talk switch.
“Dial ” is displayed in the “Short-
cut Menu” screen.
When “Dial ” on the “Shortcut
Menu” screen is dimmed, the phone num-
ber voice recognition cannot be used.
Check the Bluetooth
® phone connection.
2Say the phone number.
In the same manner as it is displayed on
the screen, “Dial ”, after saying
“Dial” say the phone number.
Say the phone number one digit at a time.
For example, if the phone number is
2345678:
Say “two three four five six seven
eight”
Do not say “twenty three forty five sixty
seven eight”
The system can recognize the following
types of phone numbers:
3 digit numbers (911, 411, 611)
7 digit numbers (Local phone numbers)
10 digit numbers (Area code + Local
phone number)
11 digit phone numbers (1 + Area code +
Local phone number)
As the system cannot recognize additional
numbers, say the complete number with-
out stopping.
When the system recognizes multiple
phone numbers, a phone number candi-
date list will be displayed on the screen. If
the desired phone number is not displayed
on the top of the screen, say the number
of the desired phone number from the
candidate list (number 1 and number 2) to
select a phone number from the candidate
list.
3Say “Dial” to call the phone number.
VOICE COMMAND EXAMPLE:
DIAL NUMBER