2014 SUBARU TRIBECA oil level
[x] Cancel search: oil levelPage 334 of 426

Maintenance schedule....................................... 11-3
Maintenance precautions................................... 11-3Before checking or servicing in the enginecompartment.................................................... 11-4When you do checking or servicing in the enginecompartment while the engine is running.......... 11-4
Engine hood....................................................... 11-4
Engine compartment overview.......................... 11-6
Engine oil............................................................ 11-7Checking the oil level......................................... 11-7Changing the oil and oil filter.............................. 11-8Recommendedgrade and viscosity.................... 11-9Synthetic oil....................................................... 11-9
Cooling system................................................ 11-10Hose and connections...................................... 11-10Engine coolant................................................. 11-11
Air cleaner element.......................................... 11-12Replacing the air cleaner element..................... 11-12
Spark plugs...................................................... 11-13Recommended spark plugs.............................. 11-13
Drive belts........................................................ 11-13
Automatic transmission fluid.......................... 11-14Checking the fluid level.................................... 11-14Recommended fluid......................................... 11-15
Front differential gear oil................................. 11-15Checking the oil level....................................... 11-15Recommended grade and viscosity.................. 11-16
Rear differential gear oil.................................. 11-16Recommended grade and viscosity.................. 11-16
Power steering fluid........................................ 11-16Checking the fluid level.................................... 11-16Recommended fluid......................................... 11-17
Brake fluid........................................................ 11-17Checking the fluid level.................................... 11-17Recommended brake fluid............................... 11-18
Brakebooster.................................................. 11-18
Brake pedal...................................................... 11-19Checking the brake pedal free play.................. 11-19Checking the brake pedal reserve distance....... 11-19
Replacement of brake pad and lining............ 11-19Breaking-in of new brake pads and linings....... 11-20
Parking brake stroke....................................... 11-20
Tires and wheels.............................................. 11-21Types of tires................................................... 11-21Tire pressure monitoring system (TPMS).......... 11-21Tire inspection................................................. 11-22Tire pressuresand wear.................................. 11-23Wheel balance................................................. 11-25Wear indicators............................................... 11-25Tire rotation direction mark.............................. 11-25Tire rotation..................................................... 11-26Tire replacement.............................................. 11-26Wheel replacement.......................................... 11-27
Aluminum wheels............................................ 11-27
Windshield washer fluid.................................. 11-28
Replacement of wiper blades......................... 11-29Windshield wiper blade assembly..................... 11-30Windshield wiper blade rubber ......................... 11-30Rear window wiper blade assembly.................. 11-31
Maintenance and service
11
Page 339 of 426
11-6Maintenance and service
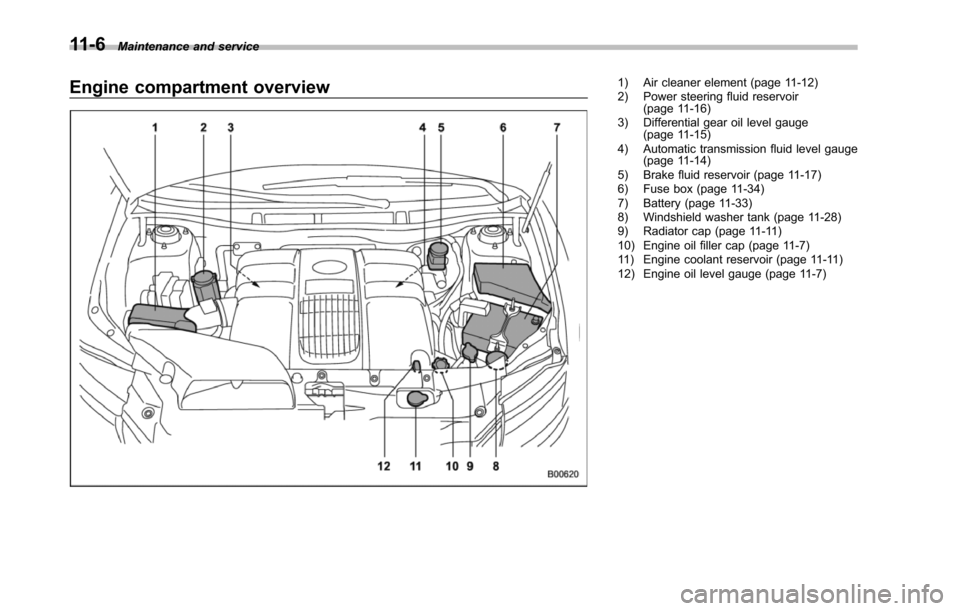
Engine compartment overview1) Air cleaner element (page 11-12)2) Power steering fluid reservoir(page 11-16)3) Differential gear oil level gauge(page 11-15)4) Automatic transmission fluid level gauge(page 11-14)5) Brake fluid reservoir (page 11-17)6) Fuse box (page 11-34)7) Battery (page 11-33)8) Windshield washer tank (page 11-28)9) Radiator cap (page 11-11)10) Engine oil filler cap (page 11-7)11) Engine coolant reservoir (page 11-11)12) Engineoil level gauge (page 11-7)
Page 340 of 426
Engine oil
NOTE
.The engine oil consumption rate isnot stabilized, and therefore cannot bedetermined until the vehicle has tra-veled at least several thousand miles(kilometers). Even after break-in, whenthe vehicle is used under severe driv-ing conditions such as those men-tioned in the“Warranty and Mainte-nance Booklet”,engineoiliscon-sumed or deteriorated more quicklythan under normal driving conditions.If you drive your vehicle under thesesevere conditions, you should checkthe oil level at least at every secondfuel fill-up time, and change the oilmore frequently. Please refer to the“Warranty and Maintenance Booklet”for more details..If the oil consumption rate seemsabnormally high after the break-inperiod, for example more than 1 quartper 1,200 miles or 1 liter per 2,000kilometers, we recommend that youcontact your SUBARU dealer.
&Checking the oil level
Check the engine oil level at each fuelstop.
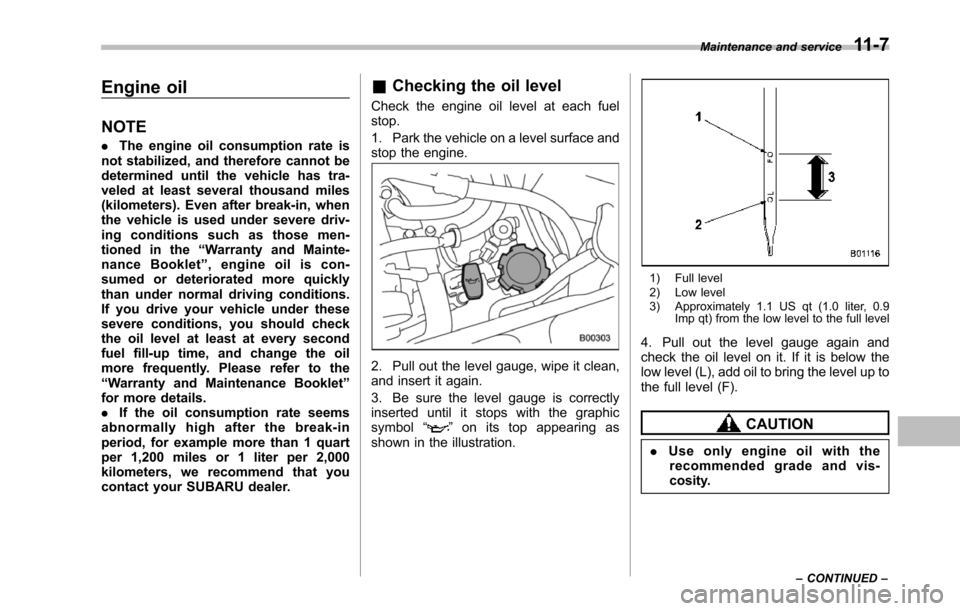
1. Park the vehicle on a level surface andstop the engine.
2. Pull out the level gauge, wipe it clean,and insert it again.
3. Be sure the level gauge is correctlyinserted until it stops with the graphicsymbol“”on its top appearing asshown in the illustration.
1) Full level2) Low level3) Approximately 1.1 US qt (1.0 liter, 0.9Imp qt) from the low level to the full level
4. Pull out the level gauge again andcheck the oil level on it. If it is below thelow level (L), add oil to bring the level up tothe fulllevel (F).
CAUTION
.Use only engine oil with therecommended grade and vis-cosity.
Maintenance and service11-7
–CONTINUED–
Page 341 of 426
11-8Maintenance and service
.Be careful not to spill engine oilwhen adding it. If oil touches theexhaust pipe, it may cause a badsmell, smoke, and/or a fire. Ifengine oil gets on the exhaustpipe, be sure to wipe it off.
If you check the oil level just after stoppingthe engine, wait a few minutes for the oil todrain back into the oil pan before checkingthe level.
To prevent overfilling the engine oil, do notadd any additional oil above the full levelwhen the engine is cold.
&Changing the oil and oil filter
CAUTION
.If you change your own oil, besure to drain all the oil from thefilter before disposal.
.Do not dispose of used engine oilby placing it in the trash, or bypouring it onto the ground, intosewers, or into any body of water.Check with your local govern-ment office for the proper dis-posal options available to you.
Change the oil and oil filter according tothe maintenance schedule in the“War-
ranty and Maintenance Booklet”.
The engine oil and oil filter must bechanged more frequently than listed inthe maintenance schedule when drivingon dusty roads, when short trips arefrequently made, or when driving inextremely cold weather.
1. Warm up the engine by letting theengine idle for approximately 10 minutesto ease draining the engine oil.
2. Park the vehicle on a level surface andstop the engine.
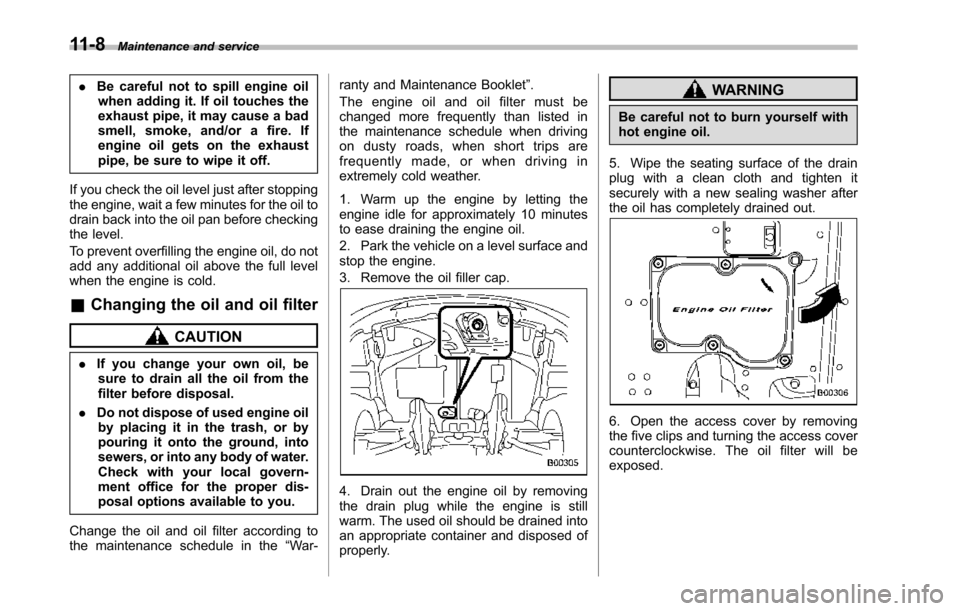
3. Remove the oil filler cap.
4. Drain out the engine oil by removingthe drain plug while the engine is stillwarm. The used oil should be drained intoan appropriate container and disposed ofproperly.
WARNING
Be careful not to burn yourself withhot engine oil.
5. Wipe the seating surface of the drainplug with a clean cloth and tighten itsecurely with a new sealing washer afterthe oil has completely drained out.
6. Open the access cover by removingthe five clips and turning the access covercounterclockwise. The oil filter will beexposed.
Page 342 of 426
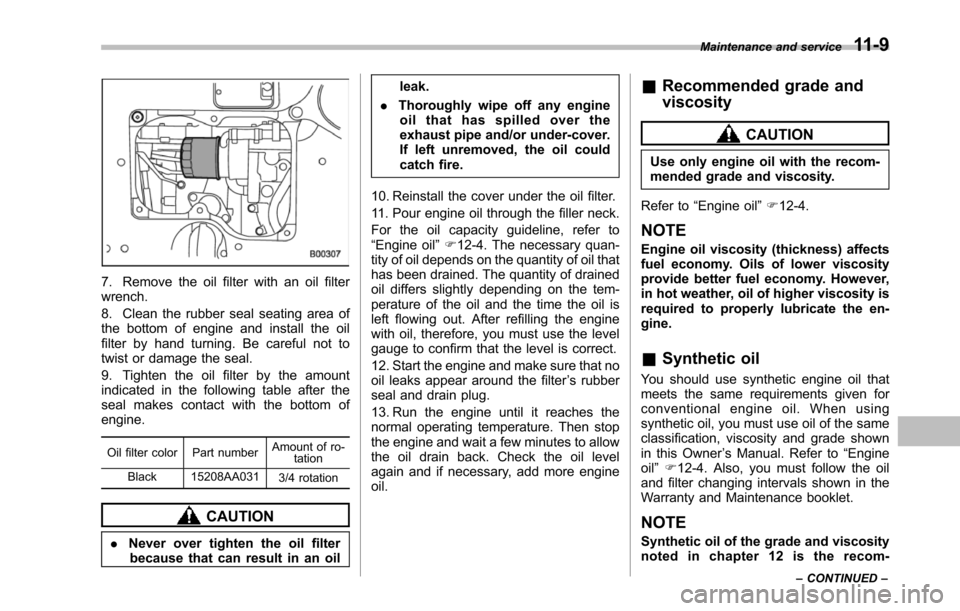
7. Remove the oil filter with an oil filterwrench.
8. Clean the rubber seal seating area ofthe bottom of engine and install the oilfilterby hand turning. Be careful not totwist or damage the seal.
9. Tighten the oil filter by the amountindicatedin the following table after theseal makes contact with the bottom ofengine.
Oil filter color Part numberAmount of ro-tation
Black 15208AA0313/4 rotation
CAUTION
.Never over tighten the oil filterbecause that can result in an oil
leak.
.Thoroughly wipe off any engineoil that has spilled over theexhaust pipe and/or under-cover.If left unremoved, the oil couldcatch fire.
10. Reinstall thecover under the oil filter.
11. Pour engine oil through the filler neck.
For the oil capacity guideline, refer to“Engine oil”F12-4. The necessary quan-tity of oil depends on the quantity of oil thathas been drained. The quantity of drainedoil differs slightly depending on the tem-perature of the oil and the time the oil isleft flowing out. After refilling the enginewith oil, therefore, you must use the levelgauge to confirm that the level is correct.
12.Start the engine and make sure that nooil leaks appear around the filter’s rubberseal and drain plug.
13. Run the engine until it reaches thenormal operating temperature. Then stopthe engine and wait a few minutes to allowthe oil drain back. Check the oil levelagain and if necessary, add more engineoil.
&Recommended grade and
viscosity
CAUTION
Use only engine oil with the recom-mended grade and viscosity.
Refer to“Engine oil”F12-4.
NOTE
Engine oil viscosity (thickness) affectsfuel economy. Oils of lower viscosityprovide better fuel economy. However,in hot weather, oil of higher viscosity isrequired to properly lubricate the en-gine.
&Synthetic oil
You should use synthetic engine oil thatmeets the samerequirements given forconventional engine oil. When usingsynthetic oil, you must use oil of the sameclassification,viscosity and grade shownin this Owner’s Manual. Refer to“Engineoil”F12-4. Also, you must follow the oiland filter changing intervals shown in theWarranty and Maintenance booklet.
NOTE
Synthetic oil of the grade and viscositynoted in chapter 12 is the recom-
Maintenance and service11-9
–CONTINUED–
Page 348 of 426
&Recommended fluid
Refer to“Fluids”F12-7.
NOTE
Using any non-specified type of auto-matic transmission fluid could result indamage inside the transmission. Whenreplacingthe automatic transmissionfluid, be sure to use the specified type.
Front differential gear oil
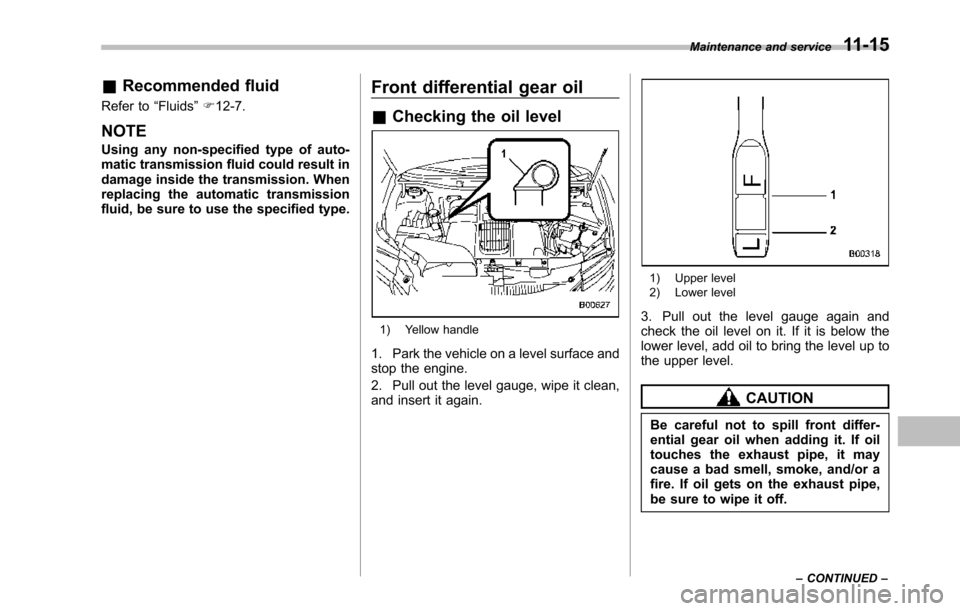
&Checking the oil level
1) Yellow handle
1. Park the vehicle on a level surface andstop the engine.
2. Pull out the level gauge, wipe it clean,and insert it again.
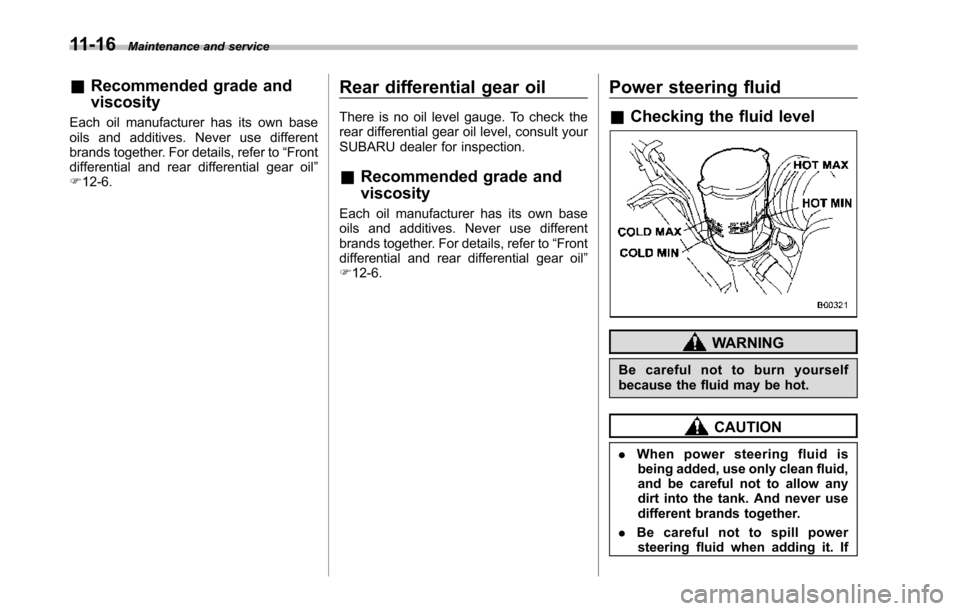
1) Upper level2) Lower level
3. Pull out the level gauge again andcheck theoil level on it. If it is below thelower level, add oil to bring the level up tothe upper level.
CAUTION
Be careful not to spill front differ-ential gear oil when adding it. If oiltouches the exhaust pipe, it maycause a bad smell, smoke, and/or afire. If oil gets on the exhaust pipe,be sure to wipe it off.
Maintenance and service11-15
–CONTINUED–
Page 349 of 426
11-16Maintenance and service
&Recommended grade and
viscosity
Each oil manufacturer has its own baseoils and additives. Never use differentbrands together. For details, refer to“Frontdifferential and rear differential gear oil”F12-6.
Rear differential gear oil
There is no oil level gauge. To check therear differential gear oil level, consult yourSUBARU dealer for inspection.
&Recommended grade and
viscosity
Each oil manufacturer has its own baseoils and additives. Never use differentbrands together. For details, refer to“Frontdifferential and rear differential gear oil”F12-6.
Power steering fluid
&Checking the fluid level
WARNING
Be careful not to burn yourselfbecause the fluid may be hot.
CAUTION
.When power steering fluid isbeing added, use only clean fluid,and be careful not to allow anydirt into the tank. And never usedifferent brands together.
.Be careful not to spill powersteering fluid when adding it. If
Page 350 of 426
power steering fluid touches theexhaust pipe, it may cause a badsmell, smoke, and/or a fire. Ifpower steering fluid gets on theexhaust pipe, be sure to wipe itoff.
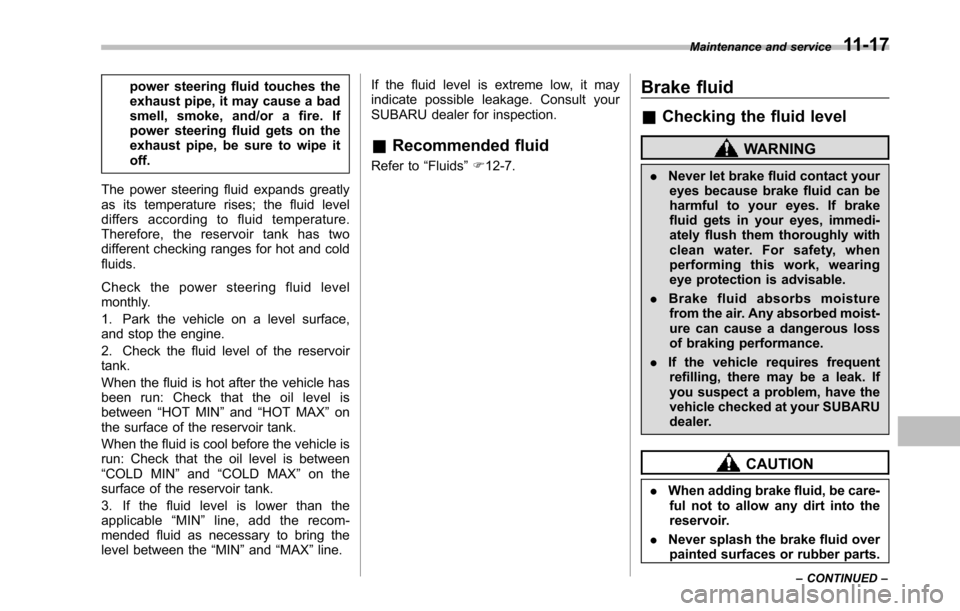
The power steering fluid expands greatlyas its temperature rises; the fluid leveldiffers according to fluid temperature.Therefore, the reservoir tank has twodifferent checking ranges for hot and coldfluids.
Check the power steering fluid levelmonthly.
1. Park the vehicle on a level surface,and stop the engine.
2. Check the fluid level of the reservoirtank.
When the fluid is hot after the vehicle hasbeen run: Check that the oil level isbetween“HOT MIN”and“HOT MAX”onthe surface of the reservoir tank.
When the fluid is cool before the vehicle isrun: Check that the oil level is between“COLD MIN”and“COLD MAX”on thesurface of the reservoir tank.
3. If the fluid level is lower than theapplicable“MIN”line, add the recom-mended fluid as necessary to bring thelevel between the“MIN”and“MAX”line.
If the fluid level is extreme low, it mayindicate possible leakage. Consult yourSUBARU dealer for inspection.
&Recommended fluid
Refer to“Fluids”F12-7.
Brake fluid
&Checking the fluid level
WARNING
.Never let brake fluid contact youreyes because brake fluid can beharmful to your eyes. If brakefluid gets in your eyes, immedi-ately flush them thoroughly withclean water. For safety, whenperforming this work, wearingeye protection is advisable.
.Brake fluid absorbs moisturefrom the air. Any absorbed moist-ure can cause a dangerous lossof braking performance.
.If the vehicle requires frequentrefilling, there may be a leak. Ifyou suspecta problem, have thevehicle checked at your SUBARUdealer.
CAUTION
.When adding brake fluid, be care-ful not to allow any dirt into thereservoir.
.Never splash the brake fluid overpainted surfaces or rubber parts.
Maintenance and service11-17
–CONTINUED–