Page 73 of 204

Head restraints - adjusting heightFig. 53
Head rests: move up / move down
Read and observe
on page 69 first.
Adjustment of the head rest heights is the same in the front and rear.
Best protection is achieved if the top edge of the head rest is at the same level as the upper part of your head.
Move upwards
›
Push the headrest in the direction of arrow
1
» Fig. 53 .
Move downwards
›
Press the locking button
A
in the direction of the arrow
2
and
hold » Fig. 53 .
›
Push the headrest in the direction of arrow
3
.
WARNINGWith seats occupied, the respective head rests must be correctly set (may
not be in the bottom position) - there is a risk of fatal injury!
Note
For the sports seats, the head restraints are integrated into the front seat
backrests. This headrest cannot be adjusted in height.Headrests - removing and installingFig. 54
Front head rests: removal / installation
Fig. 55
Rear headrests: removal / installation
Read and observe
on page 69 first.
Front restraint
›
Pull the restraint out of the seat backrest as far as the stop.
›
Press the locking button
A
in the direction of arrow
1,
and pull the support
in the direction of arrow
2.›
To re-insert the head restraint, push it far enough down in the direction of
arrow
3
into the seat backrest until the locking button clicks into place.
Rear restraint
›
Pull the restraint out of the seat backrest as far as the stop.
›
Press the locking button
B
in the direction of arrow
4
, while at the same
time using a flat screwdriver with a max. width of 5 mm to press the securing button in opening
C
in the direction of arrow
5
.
›
Remove the restraint in the direction of arrow
6
.
70Using the system
Page 74 of 204

›To re-insert the head restraint, push it far enough down in the direction of
arrow 7 into the seat backrest until the locking button clicks into place.WARNINGWith seats occupied, the respective head rests must be installed and adjus- ted correctly - there is a risk of fatal injury!
Note
For the sports seats, the head restraints are integrated into the front seat
backrests. These headrests cannot be removed.
Seat features
Introduction
This chapter contains information on the following subjects:
Front seat heating
71
Front armrest
72
Rear armrest
72
Seat backrests
72
Front seat heating
Fig. 56
Buttons for heating the front
seats
The seat backrests and seats can be heated electrically.
The seat heating can only be switched on when the engine is running.
Buttons for the seat heater » Fig. 56
Left seat heating
Right seat heating
Switching on›Press the corresponding symbol button or » Fig. 56 .
Pressing once switches the seat heating on at its maximum level - Level 2.
With repeated pressing of the switch, the intensity of the heating is reduced
until it is switched off.
The level of the seat heating is indicated by the number of illuminated warning
lights in the switch.WARNINGIf, as an occupant, you have a subdued pain and/or temperature sensitivity,
e.g. through medication, paralysis or because of chronic illness (e.g. diabe-
tes), we recommend you do not use seat heating on the driver or front pas-
senger seat. This can lead to burns on the back, the posterior and the legs
which are difficult to heal. If the seat heating is used, we recommend to
make regular breaks in your journey when driving long distances, so that
the body can recuperate from the stress of the journey. Please consult your
doctor, who can evaluate your specific condition.
CAUTION
■ Do not kneel on the seats or otherwise apply concentrated pressure to them.■The seat heating in the following cases will not turn on - there is a risk of
damaging the seat covers and seat heating. ■The seats are not occupied by people.
■ Items are fastened or stored items on the seats, such as a child seat, a bag
and the like.
■ Additional seat covers or protective covers are fixed to the seats.■
Clean the seat covers » page 138.
Note
■
If the seat heaters are set to their highest intensity - level 2, they are auto-
matically switched down to level 1 after 15 minutes.■
If the on-board voltage drops, the seat heater switches off automatically, in
order to provide sufficient electrical energy for the engine control » page 151,
Automatic load deactivation .
71Seats and head restraints
Page 75 of 204

Front armrestFig. 57
Adjusting armrest
Setting the height
›
Lift the armrest fully upwards in the direction of the arrow » Fig. 57 and then
move it back down completely.
›
Move the armrest into one of the 5 locking positions.
The armrest includes a storage compartment » page 78.
Rear armrest
Fig. 58
Fold the armrest forward
Folding forward
›
Pull on the loop
A
and fold the armrest forward in the direction of the ar-
row » Fig. 58 .
A cup holder may be located in the armrest » page 74.
Seat backrestsFig. 59
Fold seat backrest forwards / pull seat belt to the side panel and
ready position of the seat belt
The luggage compartment can be increased in size by folding the seat backr-
ests forward. The seat backrests can also be folded forward individually on ve-
hicles with divided rear seats.
Before folding the seat backrests forwards, adjust the position of the front
seats in such a way that they are not damaged by the folded seat backrests.
If the front seats are too far back, we recommend that you have the rear head
restraints removed before the seat backrests are folded forward »
.
Fold down split seat backrest
›
Insert the belt buckle latching element
C
of the seat belt into the opening in
the side panel - ready position » Fig. 59.
›
Press the release lever
A
in the direction of arrow
1
.
›
Remove the backrest in the direction of the arrow
2
.
Fold down undivided seat backrest
›
Insert the belt buckle latching elements
C
of the outer belts into the open-
ings in the side panel - ready position » Fig. 59.
›
Push the release handles
A
on both sides of the seat backrest in the direc-
tion of arrow
1
simultaneously.
›
Remove the backrest in the direction of the arrow
2
.
Fold back split seat backrest
›
If you removed the head restraint, you need to reinsert it with the backrest
tilted slightly forwards.
›
Pull the rear outer seat belt to the side panel in the direction of arrow
3
» Fig. 59 .
72Using the system
Page 76 of 204

›Then push the seat backrest back into the upright position until the securing
knob A clicks into place – check by pulling on the seat backrest » .›
Make sure that the red pin
B
is hidden.
Fold back undivided seat backrest
›
If you removed the head restraints, you need to reinsert them with the back-
rest tilted slightly forwards.
›
Insert the belt buckle latching elements
C
of the outer belts into the open-
ings in the side panel - ready position » Fig. 59.
›
Then push the seat backrest back into the upright position until the release
levers
A
on either side of the seat back click into place – check by pulling on
the seat backrest » .
›
Make sure that the red pins
B
on both sides of the seat back are not visible.
WARNING■
The seat belts and the belt locks must be in their original position after
folding back the seat backrests – they must be ready to use.■
The seat backrests must be securely locked in position so that no objects
in the luggage compartment can slide into the passenger compartment on
sudden braking – risk of injury.
■
In occupied rear seats make sure that the respective seat backrests are
properly engaged.
CAUTION
■ Ensure that the seat belts are not damaged when operating the seat backr-
ests. Under no circumstances must the seat belts be jammed by the folded
back seat backrests.■
Store the head restraints that were removed in such a way that they are not
damaged or soiled.
Transporting and practical equipment
Useful equipment
Introduction
This chapter contains information on the following subjects:
Car park ticket holder
74
stowage compartments in the doors
74
Storage compartment in the centre console
74
Cup holders
74
Cigarette lighter
75
Ashtray
76
12-Volt power outlet
76
Waste container
77
Multimedia holder
77
Storage compartment in the front arm rest
78
Glasses compartment
78
Storage compartment on the front passenger side
78
Clothes hook
79
Storage pockets on the front seats
79
Net pockets on the front seat rest
80WARNING■ Do not place anything on the dash panel. These objects might slide or fall
down when driving (when accelerating or cornering) and may distract you
from concentrating on the traffic – there is the risk of an accident!■
When driving, ensure that no objects from the centre console or from oth-
er storage compartments can get into the driver's footwell. You would not
be able to brake, operate the clutch pedal or accelerate - danger of causing
an accident!
■
No objects should be placed in the storage compartments nor in the
drinks holders; the vehicle occupants could be endangered if there is sud-
den braking or the vehicle collides with something.
■
Ash, cigarettes, cigars and the like. may only be placed in the ashtray!
73Transporting and practical equipment
Page 77 of 204

Car park ticket holderFig. 60
Parking ticket holder
Read and observe on page 73 first.
The parking permitted holder » Fig. 60 is designed e.g. for attaching car park-
ing tickets.
WARNINGThe attached note has to always be removed before starting off in order
not to restrict the driver's vision.
stowage compartments in the doors
Fig. 61
Storage compartment: in the front door / in the rear door
Read and observe
on page 73 first.
Storage compartments » Fig. 61
Storage compartment in the front doors
Bottle holder with a capacity of max. 1.5 litres in the front doors
Storage compartment in the rear doors
Bottle compartment, max. capacity 0.5 l in the rear doors
ABCDWARNINGDo not use the storage compartment A » Fig. 61 of the door pocket to
store projecting objects. These could impair the effectiveness of the side
airbag.
Storage compartment in the centre console
Fig. 62
Non-lockable compartment, front / rear
Read and observe
on page 73 first.
Non-lockable compartment » Fig. 62
In the front centre console
In the rear centre console
Cup holders
Fig. 63
Cup holder at the front/rear
AB74Using the system
Page 78 of 204

Fig. 64
Cup holder in rear armrest
Read and observe on page 73 first.
Two beverage containers can be placed into the cup holder.
Placement of the cup holders » Fig. 63 and » Fig. 64
In the front centre console
In the rear centre console
In the rear armrest
WARNING■ Do not use any cups or beakers which are made of brittle material (e.g.
glass, porcelain). This could lead to injuries in the event of an accident.■
Never put hot cups in the cup holder. If the vehicle moves, they may spill –
risk of scalding!
■
No objects should be placed in the holders that might endanger the vehi-
cle's occupants if the vehicle brakes suddenly or the vehicle is in collision.
CAUTION
Do not leave open beverage containers in the cup holder during the journey.
There is a risk of spilling e.g. when braking which may cause damage to the
electrical components or seat upholstery.ABCCigarette lighterFig. 65
Cigarette lighter
Read and observe on page 73 first.
Using the system
›
Press in the button in the cigarette lighter » Fig. 65.
›
Wait until the button pops forward.
›
Remove the cigarette lighter immediately and use.
›
Place the cigarette lighter back into the socket.
The cigarette lighter also operates if the ignition is switched off »
.
WARNING■
When leaving the vehicle, never leave persons who are not completely in-
dependent, such as children, unattended in the vehicle. These could oper-
ate the lighter and get burned, start a fire or damage the interior.■
Take care when using the cigarette lighter! Improper usage can cause
burns.
Note
The cigarette lighter socket can also be used as a 12- volt socket for electrical
appliances » page 76, 12-Volt power outlet .75Transporting and practical equipment
Page 79 of 204

AshtrayFig. 66
Remove front / rear ashtray
Read and observe
on page 73 first.
The ashtray can be used for discarding ash, cigarettes, cigars and the like » .
Removing
›
Pull out the ashtray in the direction of the arrow » Fig. 66.
Fitting
›
Push-in the ashtray against the direction of the arrow » Fig. 66.
WARNINGNever place flammable objects in the ashtray – risk of fire!
CAUTION
When removing, do not hold the ashtray at the cover – risk of breakage.
12-Volt power outlet
Fig. 67
12-Volt power socket
Read and observe on page 73 first.
Use
›
Remove the socket cover or the cigarette lighter » Fig. 67.
›
Connect the plug for the electrical appliance to the socket.
The socket also operates if the ignition is switched off . »
WARNING■
Improper use of the power sockets and the electrical accessories can
cause fires, burns and other serious injuries. Therefore, when leaving the
vehicle, never leave people who are not completely independent, such as
children, unattended in the vehicle.■
If the connected electric device becomes too hot, switch it off and discon-
nect it from the power supply immediately.
CAUTION
■ The power socket can only be used for connecting approved electrical acces-
sories with a total power uptake of up to 120 watt.■
Never exceed the maximum power consumption, otherwise the vehicle's
electrical system can be damaged.
■
Connecting appliances when the engine is not running will drain the battery
of the vehicle!
■
Only use matching plugs to avoid damaging the power socket.
■
Only use accessories that have been tested for electromagnetic compatibility
in accordance with the applicable directives.
■
Switch off the devices connected to the power sockets before you switch
the ignition on or off and before starting the engine, to avoid damage from
voltage fluctuations.
■
Observe the operating instructions for the connected devices!
76Using the system
Page 80 of 204

Waste containerFig. 68
Waste container: insert and move / open / replace bag
Read and observe
on page 73 first.
The waste container can be inserted into the slots in the doors » page 74.
Insert waste container
›
Position the waste container at the front edge of the slot.
›
Push the waste container to the back in the direction of the arrow
1
» Fig. 68 .
›
Push the waste container as required in the direction of arrow
2.
Remove the waste container
›
Remove the waste container in the opposite direction to the arrow
1
» Fig. 68 .
Open/close waste container
›
Open the waste container in the direction of the arrow
3
» Fig. 68 .
Closing takes place in reverse order.
Replace bags
›
Remove the waste container from the slot.
› Push the two catches of the inner frame out of the container body in the di-
rection of the arrow 4 » Fig. 68 .›
Pull the bag together with the inner frame down in the direction of arrow
5
.
›
Remove the bag from the inside frame.
›
Pull the new bag through the frame and pull it over the frame in the direction
of arrow
6
.
›
Insert the bag with the frame in the direction of arrow
7
into the container
body.
The two catches of the inner frame must click into place.
WARNINGNever use the waste container as an ashtray - risk of fire!
Note
We recommend that you use 20x30 cm bags.
Multimedia holder
Fig. 69
Multimedia holder
Read and observe on page 73 first.
You can use this multimedia holder » Fig. 69 to store e.g. a mobile phone, MP3
player or similar devices.
WARNINGNever use the multimedia holder as an ashtray - risk of fire!77Transporting and practical equipment
 1
1 2
2 3
3 4
4 5
5 6
6 7
7 8
8 9
9 10
10 11
11 12
12 13
13 14
14 15
15 16
16 17
17 18
18 19
19 20
20 21
21 22
22 23
23 24
24 25
25 26
26 27
27 28
28 29
29 30
30 31
31 32
32 33
33 34
34 35
35 36
36 37
37 38
38 39
39 40
40 41
41 42
42 43
43 44
44 45
45 46
46 47
47 48
48 49
49 50
50 51
51 52
52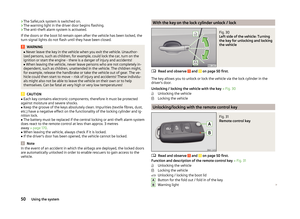 53
53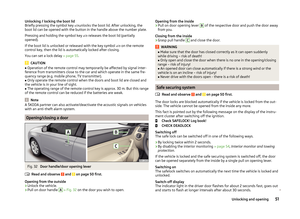 54
54 55
55 56
56 57
57 58
58 59
59 60
60 61
61 62
62 63
63 64
64 65
65 66
66 67
67 68
68 69
69 70
70 71
71 72
72 73
73 74
74 75
75 76
76 77
77 78
78 79
79 80
80 81
81 82
82 83
83 84
84 85
85 86
86 87
87 88
88 89
89 90
90 91
91 92
92 93
93 94
94 95
95 96
96 97
97 98
98 99
99 100
100 101
101 102
102 103
103 104
104 105
105 106
106 107
107 108
108 109
109 110
110 111
111 112
112 113
113 114
114 115
115 116
116 117
117 118
118 119
119 120
120 121
121 122
122 123
123 124
124 125
125 126
126 127
127 128
128 129
129 130
130 131
131 132
132 133
133 134
134 135
135 136
136 137
137 138
138 139
139 140
140 141
141 142
142 143
143 144
144 145
145 146
146 147
147 148
148 149
149 150
150 151
151 152
152 153
153 154
154 155
155 156
156 157
157 158
158 159
159 160
160 161
161 162
162 163
163 164
164 165
165 166
166 167
167 168
168 169
169 170
170 171
171 172
172 173
173 174
174 175
175 176
176 177
177 178
178 179
179 180
180 181
181 182
182 183
183 184
184 185
185 186
186 187
187 188
188 189
189 190
190 191
191 192
192 193
193 194
194 195
195 196
196 197
197 198
198 199
199 200
200 201
201 202
202 203
203