2014 SKODA OCTAVIA pressure
[x] Cancel search: pressurePage 192 of 280

›Remove the pump nozzle from the fuel filler tube and put it back in the
pump.›
Place the filler cap onto the fuel filler neck and turn it in the opposite direc-
tion to arrow
3
until it securely engages.
›
Close the fuel filler flap until it clicks into place.
Check that the fuel filler flap is closed properly.
Incorrect refuelling guard on vehicles with diesel engines
The fuel filler tube on vehicles with diesel engines has been fitted with a in-
correct refuelling guard » Fig. 181. This guard means it is only possible to refuel
with the diesel pump nozzle.
If the diesel pump nozzle does not sit directly in the fuel filler tube, move it to
and fro with slight pressure to insert it correctly.
WARNINGInstructions for filling the reserve canister■Never fill the reserve can inside the vehicle.■
Never place the reserve can on the vehicle.
■
Always place the reserve can on the floor.
■
The national legal requirements must be observed if carrying a spare can-
ister in the vehicle.
■
We do not recommend carrying any fuel canisters in your vehicle for safe-
ty reasons. in the event of an accident this can get damaged and fuel may
escape – risk of fire!
CAUTION
■ The fuel tank is full just as soon as the pump nozzle switches off for the first
time, provided the nozzle has been operated properly. Not continue refuelling.■
Be careful when filling diesel fuel from the spare canister and then do this
slowly and cautiously – danger of contaminating the body.
■
The diameter of the diesel pump nozzle can be identical to that of the petrol
pump nozzle in some countries. When driving in these countries, the incorrect
fuelling protection should be removed by a specialist company.
Note
The fuel tank has a capacity of about 50 litres, including a reserve of approx.
6 litres .Lead-free petrol
Read and observe
and on page 188 first.
The vehicle can only be operated with unleaded petrol that meets the EN 2281)
standard.
All petrol engines can be operated using petrol that contains at most 10% bio-
ethanol (E10).
Required fuel - unleaded petrol 95/91 or 92 or 93 RON
Use unleaded fuel with the octane rating 95 RON. Unleaded petrol with the
octane ratings 91, 92 or 93 RON can also be used, but may result in a slight
loss in performance and slightly increased fuel consumption »
.
Prescribed fuel – unleaded petrol min. 95 RON
Use unleaded fuel with the octane rating 95 RON or higher.
If unleaded gasoline is not available with the octane number 95 RON, in an
emergency petrol with the octane rating of 91, 92 and 93 RON can be used to
fill the tank, but this leads to a slight loss of performance and a slightly in-
creased fuel consumption »
.
Prescribed fuel – unleaded petrol 98/(95) RON
Use unleaded fuel with the octane rating 98 RON or higher. Unleaded petrol
95 RON can also be used but this results in a slight loss in performance and
slightly increased fuel consumption.
In case of an emergency, you can refuel with petrol with the octane ratings 91,
92 or 93 RON, if unleaded fuel with octane rating 98 RON or 95 RON is not
available »
.
Fuel additives
Unleaded petrol in accordance with the EN 228 standard 1)
meets all the condi-
tions for a smooth-running engine. We therefore recommend that no fuel ad-
ditives are used. This can result in considerable damage to parts of the engine
or the exhaust system.
1)
In Germany also DIN 51626-1 or E10 for unleaded petrol with octane number 91 or 95 or DIN 51626-2 or E5
for unleaded petrol with octane number 95 and 98.
189Inspecting and replenishing
Page 194 of 280

CAUTION■Just filling the tank once with diesel fuel that does not comply with the
standard, can cause severe damage to parts of the engine, the fuel and ex-
haust system!■
If a different fuel other than diesel fuel, which complies to the above men-
tioned standards (e.g. petrol) is used, do not start the engine or switch on the
ignition! Extensive damage to engine parts can occur!
■
Water which has collected in the fuel filter can cause engine faults.
CAUTION
■ The vehicle cannot be operated with bio fuel RME, therefore this fuel must
not be filled in the tank and used for driving the vehicle. The use of biofuel
RME can cause considerable damage to parts of the engine or fuel system.■
Do not mix any fuel additives, so-called “flow improvers” (petrol and similar
agents) into the diesel. This can result in considerable damage to parts of the
engine or the exhaust system.
Refuelling with CNG (compressed natural gas)
Fig. 182
Natural gas filler tubes
Read and observe
and on page 188 first.
Natural gas refuelling can be carried out if the following conditions are met. The vehicle is unlocked.
The engine and the ignition are switched off.
The auxiliary heating and ventilation is switched off » page 122.
The gas filler tube for refuelling with natural gas is located behind the fuel fill- er flap next to the petrol filler tube.
The filling couplings of the natural gas refuelling systems may differ in han-
dling. When refuelling with natural gas at unfamiliar refuelling systems, you
should seek help from trained fuel station staff. If unsure, have the refuelling done by trained fuel station staff.
Open fuel filler flap›
Open the fuel filler flap.
›
Remove cap
A
» Fig. 182 from gas filler tube
B
in direction of the arrow.
›
Plug the filling coupling of the refuelling system on the gas filler tube
B
.
The fuel tank is full when the compressor of the refuelling system automati-
cally switches off. To stop the refuelling operation prematurely, press the
“Stop ” button of the refuelling system.
Closing the filler cap
›
Check that sealing ring
C
» Fig. 182 has remained inserted in the gas filler
tube.
If sealing ring
C
has slipped onto the filling coupling, reinsert it into the gas
filler tube.
›
Plug the cap
A
onto the gas filler tube.
›
Close the bonnet.
The natural gas refuelling systems have an overfill protection relating to the
outdoor temperature. At very high outside temperatures, it may happen that
the gas tank may not be fully refuelled.
The natural gas system of your vehicle is suitable both for “slow fuelling” (fuel-
ling from small compressors) and for “quick fuelling” (fuelling from natural gas
stations with large compressors).
If the vehicle is parked for a longer period of time immediately after refuelling,
the situation may arise in which the pointer of the fuel tank gauge does not
indicate exactly the same level as was the case immediately after refuelling
when the engine is restarted. This is not due to any system leakages but a
drop in pressure in the natural gas fuel tank due to technical reasons after a
cooling phase directly after refuelling.
The maximum lifetime of the gas tank is 20 years.
The capacity of the natural gas fuel tank is approximately 15 kg.
The capacity of the gasoline fuel tank is about 50 litres, of which about 6
lighters are in reserve.
191Inspecting and replenishing
Page 195 of 280

WARNING■When refuelling, never get into the vehicle. If you have to get into your
vehicle in exceptional cases, touch a metal surface before you touch the
filling coupling again. This will avoid electrostatic discharges, which may
generate sparks. Sparks can cause a fire during refuelling.■
Natural gas is highly explosive and highly flammable.
Note
During the filling process sounds are heard which are harmless. If you are un-
sure which service station staff to use, ask the petrol station staff.
CNG
Fig. 183
Position of the CNG label(s).
Read and observe
and on page 188 first.
A G-TEC-vehicle may be operated with CNG and petrol.
In some countries, national legislation requires that vehicles with CNG opera-
tion be identified by one of the listed labels » Fig. 183.
Position of the CNG label » Fig. 183.
Natural gas quality and consumption
Depending on the natural gas supplier, the natural gas quality (heating value)
may vary. The engine control unit adjusts automatically to the natural gas
quality.
Automatically switching over from natural gas mode to petrol mode
The vehicle automatically switches from natural gas to petrol, for example, if
one of the following cases occurs.
› With an empty gas tank or not enough pressure in the tank.
› After refuelling with natural gas.
› At very low surrounding temperatures.
Gas smell
If you smell gas, proceed as follows.
› Stop the vehicle.
› Put out cigarettes.
› Switch off the ignition.
› Open the doors and the boot lid to ventilate the vehicle sufficiently.
› Remove any spark-producing or incendiary items from the vehicle and switch
off immediately.
› Do not continue to drive if the odour persists.
Seek help from a specialist garage to correct the gas system fault.
Regular gas system checks must be carried out at a specialist workshop on natural gas-powered vehicles.WARNINGWhen operating a CNG-powered vehicle, the national legal requirements
must be observed.WARNINGDo not underestimate the smell of gas in the car or when refuelling - risk of
fire, explosion and injury.
Engine compartment
Introduction
This chapter contains information on the following subjects:
Opening and closing the bonnet
194
Engine compartment overview
194
Radiator fan
195
Windscreen washer system
195
192General Maintenance
Page 207 of 280

Wheels
Tyres and wheel rims
Introduction
This chapter contains information on the following subjects:
Notes on using wheels
204
Tyre pressure
204
Tyre wear
205
Tyre wear indicator and wheel replacement
206
Tyre damage
206
Unidirectional tyres
206
Only use those tyres or wheel rims which have been approved by ŠKODA for
your model of vehicle.
WARNINGThe national legal requirements must be observed for the use of tyres.WARNINGFor safety reasons, do no replace tyres individually.
For the sake of the environment
Old and unserviceable tyres represent hazardous waste that is harmful to the environment. These must be disposed of in accordance with national legal reg-
ulations.
Note
■ We recommend that any work on the wheels or tyres be carried out by a spe-
cialist garage.■
We recommend that you use wheel rims, tyres, full wheel trims and snow
chains from ŠKODA Original Accessories.
Notes on using wheels
Read and observe
on page 204 first.
During the first 500 km, new tyres do not offer optimum grip and appropriate
care should therefore be taken when driving.
Always fit the tyres with the deeper tread depth to the front wheels.
Tyre storage
Mark them previously used tyres so that you are able to fit them on again to
run in the same direction.
Always store wheels or tyres in a cool, dry and, where possible, dark place.
Tyres which are not fixed to a wheel trim should be stored upright.
Tyre age
Tyres age losing their original characteristics, even if they are not used. The
service life of the tyres is 6 years. Therefore, we recommend not using tyres
that are more than 6 years old.
Wheel bolts
Wheels and wheel bolts are matched to each other in terms of design. We rec-
ommend that you use wheel rims and wheel bolts from ŠKODA Original Acces-
sories.WARNINGNever use tyres if you do not know anything about the condition and age.
Tyre pressure
Fig. 192
Label with a table of tyre sizes and tyre pressures/inflating the
tyres
Read and observe
on page 204 first.
The tyre pressure must always be adjusted to match the load. The specified
tyre pressures can be found on label
A
» Fig. 192 .
204General Maintenance
Page 208 of 280

Label with prescribed tyre inflation pressure values » Fig. 192
Position of the CNG label
Inflation pressure for half load
Inflation pressure for increased driving comfort at half load
Inflation pressure for full load
As a result of adjusting the pressure to the value C
for increased driving com-
fort, fuel consumption may slightly increase.
Checking the tyre pressures
Check the tyre pressure, including that of the spare wheel, at least once a
month and also before setting off on a long journey.
Always check the inflation pressure when the tyres are cold. Do not reduce the
higher pressure on warm tyres.
In vehicles with tyre pressure monitoring, tyre pressure values must be saved
each time the pressures are changed » page 167.
WARNING■
Having the correct tyre inflation pressure is always the driver's responsi-
bility.■
Too low or too high inflation pressure impairs handling.
■
If the inflation pressure is too low, the tyre must perform a greater rolling
resistance. At higher speeds the tyre will warm up as a result of this. This
can result in tread separation and a tyre blowout.
■
In the event of very fast pressure loss, e.g. in the event of sudden tyre
damage, an attempt should be made to bring the vehicle carefully to a stop
without sudden steering movements and without any hard braking.
For the sake of the environment
Tyres which are insufficiently inflated increase your fuel consumption.
Note
In some countries, the vehicles have a label without pictograms.
Tyre wear
Read and observe
on page 204 first.
The tyre wear depends on the tyre pressure, the driving style and other condi-
tions.
Attention to the following notes may affect tyre wear.
ABCDDriving style
Fast cornering, sharp acceleration and braking increase the wear of your tyres.
Wheel balance
The wheels of a new vehicle are balanced. When driving, there are a wide
range of influences which may result in an imbalance. This may become appa-
rent by a “vibration” in the steering. If this is the case, have the wheels
checked by a specialist garage.
Have the wheels rebalanced after replacing or repairing the tyres.
Setting the vehicle geometry
Incorrect wheel alignment at the front or rear leads to excess wear on the
tyres and impairs driving safety. In the event of prominent tyre wear, we rec-
ommend that you have the setting of the vehicle geometry checked at a spe-
cialist garage.WARNING■ An incorrect wheel alignment at the front or rear impairs handling.■Unusual vibrations or pulling of the vehicle to one side could be a sign of
tyre damage. If there is any doubt that a wheel is damaged, immediately re-
duce your speed and stop! If no external tyre damage is evident, drive slow-
ly and carefully to the nearest specialist garage to have the vehicle
checked.205Wheels
Page 209 of 280
Tyre wear indicator and wheel replacementFig. 193
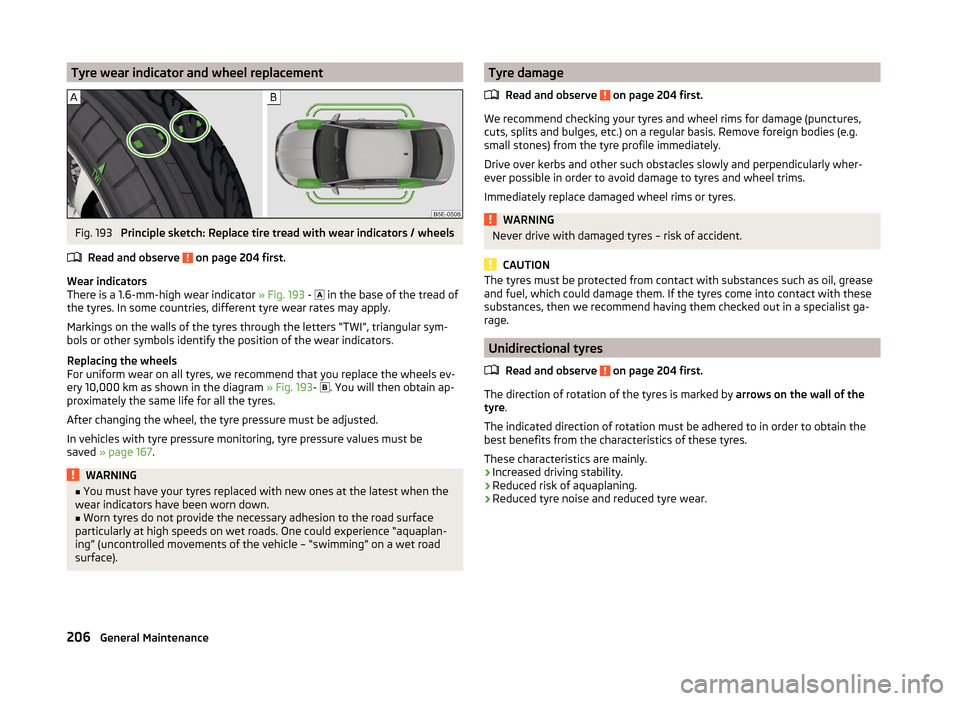
Principle sketch: Replace tire tread with wear indicators / wheels
Read and observe
on page 204 first.
Wear indicators
There is a 1.6-mm-high wear indicator » Fig. 193 -
in the base of the tread of
the tyres. In some countries, different tyre wear rates may apply.
Markings on the walls of the tyres through the letters “TWI”, triangular sym- bols or other symbols identify the position of the wear indicators.
Replacing the wheels
For uniform wear on all tyres, we recommend that you replace the wheels ev-
ery 10,000 km as shown in the diagram » Fig. 193-
. You will then obtain ap-
proximately the same life for all the tyres.
After changing the wheel, the tyre pressure must be adjusted.
In vehicles with tyre pressure monitoring, tyre pressure values must be
saved » page 167 .
WARNING■
You must have your tyres replaced with new ones at the latest when the
wear indicators have been worn down.■
Worn tyres do not provide the necessary adhesion to the road surface
particularly at high speeds on wet roads. One could experience “aquaplan-
ing” (uncontrolled movements of the vehicle – “swimming” on a wet road
surface).
Tyre damage
Read and observe
on page 204 first.
We recommend checking your tyres and wheel rims for damage (punctures,
cuts, splits and bulges, etc.) on a regular basis. Remove foreign bodies (e.g.
small stones) from the tyre profile immediately.
Drive over kerbs and other such obstacles slowly and perpendicularly wher-
ever possible in order to avoid damage to tyres and wheel trims.
Immediately replace damaged wheel rims or tyres.
WARNINGNever drive with damaged tyres – risk of accident.
CAUTION
The tyres must be protected from contact with substances such as oil, grease
and fuel, which could damage them. If the tyres come into contact with these
substances, then we recommend having them checked out in a specialist ga-
rage.
Unidirectional tyres
Read and observe
on page 204 first.
The direction of rotation of the tyres is marked by arrows on the wall of the
tyre .
The indicated direction of rotation must be adhered to in order to obtain the
best benefits from the characteristics of these tyres.
These characteristics are mainly.
› Increased driving stability.
› Reduced risk of aquaplaning.
› Reduced tyre noise and reduced tyre wear.
206General Maintenance
Page 216 of 280

CAUTION■Screw the jack back into the starting position before storing in the box with
the vehicle tool kit.■
Ensure that the vehicle tool kit is safely secured in the luggage compart-
ment.
■
Ensure that the box is always secured with the strap.
Note
The declaration of conformity is included with the jack or the log folder.
Reserve and temporary spare
Introduction
This chapter contains information on the following subjects:
Removing/storing the wheel
213
Spare wheel
213
When using an emergency or spare wheel make sure to fit a wheel with the
appropriate dimensions and design as soon as possible.
After changing the spare wheel, the tyre pressure must be adjusted. In vehi-
cles with tyre pressure monitoring, tyre pressure values must be
saved » page 167 .
WARNING■
If the spare tyre with a non-specific or opposite direction of rotation has
to be fitted in the event of a puncture, then drive carefully. The tyre no lon-
ger retains its optimal characteristics in this situation.■
If the dimensions or design of the spare wheel differ from the tyres fitted
to the vehicle (e.g. winter tyres or low-profile tyres), it must only be used
briefly in the event of a puncture and if an appropriately cautious style of
driving is adopted.
■
If the dimensions or design of the temporary spare wheel differ from the
fitted tyres, never drive faster than 80 km/h (or 50 mph).
■
Never use the temporary spare wheel if it is damaged.
Removing/storing the wheelFig. 198
Removing the wheel
Read and observe on page 213 first.
The wheel is located in a well under the floor covering in the boot and is fixed in place with special bolt
B
» Fig. 198 .
Take out wheel
›
Open the boot lid.
›
Raise the floor covering in the boot » page 106.
›
Remove the box with the tool kit.
›
Remove locking
A
in the direction of arrow
1
» Fig. 198 .
›
Unscrew nut
B
in the direction of arrow
2
.
›
Remove the wheel.
Store wheel away
›
Place the wheel into the spare wheel well with the wheel rim pointing down-
ward.
›
Screw in nut
B
in the opposite direction to arrow
2
» Fig. 198 .
›
Insert locking
A
in the opposite direction to which arrow
1
is pointing.
›
Place the box with the tool kit back into the spare wheel and secure it with
the tape.
›
Fold back the floor covering in the boot » page 110.
›
Shut the boot lid.
Spare wheel
Read and observe
on page 213 first.
A yellow warning label is displayed on the rim of the temporary spare wheel.
213Emergency equipment, and self-help
Page 217 of 280

Please note the following if you intend to use the temporary spare wheel.› The warning label must not be covered after installing the wheel.
› Be specially attentive when driving.
› The emergency spare is inflated to the maximum inflation pressure for the
vehicle » page 204 .
› The tyre inflation pressure of the spare wheel R 18 is 420 kPa.
› Only use this emergency spare wheel to reach the nearest specialist garage,
as it is not intended for permanent use.WARNING■ Never drive with more than one temporary spare wheel mounted!■Only use the temporary spare wheel when absolutely necessary.■
Avoid accelerating at full throttle, sharp braking and fast cornering.
■
The snow chains cannot be used on the temporary spare wheel.
■
Observe instructions on the warning sign of the emergency wheel.
Changing a wheel
Introduction
This chapter contains information on the following subjects:
Preparation
214
Full wheel trim
214
Wheel bolts
215
Changing a wheel
215
Follow-up tasks
215
Loosening/tightening wheel bolts
216
Raising the vehicle
216
Anti-theft wheel bolts
217
For your own safety and the safety of your passengers, the following instruc-
tions must be observed before carrying out a wheel change on the road.
Switch on the hazard warning light.
The warning triangle must be set up at the prescribed distance - observe
the national legal provisions when doing so.
Park the vehicle as far away as possible from the flow of traffic.
Choose a location with a flat, solid surface.
Have all the occupants get out of the vehicle. While changing a tyre, the
occupants of the vehicle should not stand on the road (they should in-
stead remain behind a crash barrier).
If the vehicle is subsequently fitted with tyres which are different from those it
was fitted with at the works, follow these guidelines » page 207, Explanation
of the tyre labelling .
The national legal requirements must be observed when changing a wheel.
Preparation
Before changing the wheel, the following work must be carried out.
›
Switch off the engine.
›
Engage first gear or place the selector lever of the automatic transmission
into the P position .
›
Firmly apply the handbrake.
›
Uncouple any trailers.
›
Remove the vehicle tool kit » page 212 and the spare wheel » page 213 from
the boot.
Full wheel trim
Before removing the wheel bolts, remove the full wheel trim.
Extracting
›
Hook the clamp found in the vehicle tool kit » page 212 into the reinforced
edge of the wheel trim.
›
Push the wheel wrench through the clamp, support on the tyre and pull off
the wheel trim.
Installing
›
Press the wheel trim onto the wheel rim at the designated valve open-
ing » .
›
Then press the trim into the wheel rim until its entire circumference locks
correctly in place.
CAUTION
Notes on wheel trims supplied at the factory or from ŠKODAOriginal Accesso-
ries.■
When using an anti-theft wheel bolt, make sure that this has been fitted ac-
cording to the position marked on the back of the wheel cover position.
■
On the back of the wheel cover, the position for the anti-theft wheel bolt is
marked by means of a symbol. If the wheel cover is set outside the position
marked for the anti-theft wheel bolt, there is a risk of damaging the wheel
cover.
214Do-it-yourself