Page 25 of 77
 Amundsen Infotainment Navigation System Manual Search available stations (Scan)Read and observe
on page 21 first.
This function plays all the available stations in succession for a few seconds
each.
Switching on
›
Press the menu knob
2
» F")
Search available stations (Scan)Read and observe
on page 21 first.
This function plays all the available stations in succession for a few seconds
each.
Switching on
›
Press the menu knob
2
» Fig. 1 on page 5 .
or
›
In the radio menu press the function key
→ Press Scan.
Switching off
›
Press the menu knob
2
.
or
›
press any function key in the device screen.
After switching off the function, the device plays the station at which the
function was cancelled.
Station logos
Read and observe
on page 21 first.
The preset buttons
B
» Fig. 13 on page 21 can be associated with logos (im-
ages) of the radio station.
Automatically save station logo (FM / DAB)
›
Before you store the radio station to a station button function key press in
the Radio menu the function key
→ Advanced setup confirm .
›
Activate the menu item
Auto-save station logos » page 24 , Advanced set-
tings (FM) and » page 25 , Advanced settings(DAB) .
When you save the station to a preset button, the station is also assigned a logo from the device memory if it has been saved.
Storing station logo manually
A logo can be assigned manually to the previously stored station.
›
The function key
→ Station logos
A menu with preset buttons for radio stations is displayed.
›
Press the preset button for the station to which you wish to assign a logo.
A media menu (CD, SD card, USB) is displayed.›
Select the image in the preferred storage medium.
Selecting the image assigns it to the respective preset button.
Note
■ The following image formats are supported: jpg, gif, png, bmp.■We recommend a resolution of up to 500x500 pixels.
Traffic information
Read and observe
on page 21 first.
Switching on/off
›
In the radio menu press the function key
.
›
Enable or disable the menu item
Traffic programme (TP).
Traffic reports
During a traffic announcement, the following menu is displayed.
›
Cancel - The current traffic report is cancelled. The TP function remains acti-
vated.
›
Deactivate - The current traffic report is cancelled and the TP function is
switched off.
Note
■ Some radio stations misleadingly identify themselves as TP stations. It is
therefore not a device error that with such radio stations, no traffic news ex-
ists.■
During playback in the Media menu the traffic report is received by the last
selected radio station.
■
Should this radio station not transmit traffic reports or the signal is not avail-
able, then the device automatically searches for a TP station.
23Radio
Page 26 of 77
 Amundsen Infotainment Navigation System Manual Station information (DAB)Fig. 15
Station information
Read and observe on page 21 first.
DAB allows the transmission of various additional information. The display op-
tions for this information on t")
Station information (DAB)Fig. 15
Station information
Read and observe on page 21 first.
DAB allows the transmission of various additional information. The display op-
tions for this information on the screen can be adjusted in the following menu.
›
Press the function key in the Radio menu DAB
.
■ Preset list - Display only saved DAB stations
■ Station info. - Displays DAB station information, accompanying text (radio
text) and images (e.g., artist name or programme and image type where
these are broadcast)
■ Radio text - Displays one radio text
■ Slide show - Displays one image; the image will switch to full-screen view
until you switch the screen back on by moving your hand towards it.
Note
If you touch the screen in the area where the accompanying text (radio text) is
displayed, the screen will only display this information. If you touch the screen
in the area of the displayed image, only images will be displayed on the screen.
Radio settings
Introduction
This chapter contains information on the following subjects:
Settings
24
Advanced settings (FM)
24
Advanced settings(DAB)
25First and foremost, pay attention to the safety instructions » page 4 , Impor-
tant notes .
The basic setting of the radio functions is the same for all broadcast areas. The
Advanced setup menu item is different for FM and DAB. The AM broadcast
area does not have this menu option.
Settings
›
In the radio menu press the function key
.
■ Sound - Sound settings » page 17, Sound settings
■ Scan - Auto-play all stations in the current frequency band of each station for
around 5 seconds.
■ Arrow buttons: - Set the station select function in the Radio menu
■ Preset list - only switch preset radio stations (Preset buttons)
■ Station list - Switch all stations currently in range for the selected frequen-
cy band
■ Traffic programme (TP) - Switches traffic programme on/off
■ Delete presets - Delete the stored stations (preset buttons)
■ - Delete a certain radio station (preset button)
■
Delete all - Deletes the stored stations (preset buttons)
■ Station logos - manual assignment of station logos » page 23
■ Radio text - Switch the radio text display (FM and DAB) on/off
■ Advanced setup - Another setting that is different depending on the selec-
ted waveband (FM and DAB)
Advanced settings (FM)
›
Select the FM band in the Radio menu, and press the function key
→ Ad-
vanced setup .
■ Alternative frequency (AF) - Switching on/off the search for alternative fre-
quencies of the station currently being played. AF off is displayed on the de-
vice screen when you switch off.
■ Radio Data System (RDS) - Switch the RDS function on/off
24Audio
Page 27 of 77
 Amundsen Infotainment Navigation System Manual ■RDS Regional: - Switch on/off the automatic tracking of related regional sta-
tions
■ Fixed - The selected regional station is retained indefinitely. When the sig-
nal is lost, another regional")
■RDS Regional: - Switch on/off the automatic tracking of related regional sta-
tions
■ Fixed - The selected regional station is retained indefinitely. When the sig-
nal is lost, another regional station must be set manually.
■ Automatic - Auto-selects the station with the best reception at the mo-
ment. If you lose reception the region, the unit will automatically set anoth-
er available region.
■ Auto-save station logos - Auto save the station logo according to the PI
code of the radio station » page 23
Advanced settings(DAB)
›
Select the DAB band in the Radio menu, and press the function key
→
Advanced setup .
■ DAB traffic announcements - Switch on/off DAB announcements
■ Other DAB announcements - Switch on/off other announcements (e.g., re-
ports, regional weather, sports reports, financial news)
■ DAB - DAB station tracking - Switch on/off automatic DAB station tracking in
other station groups
■ Automatic DAB - FM switching - Switch on/off auto-switching from DAB to
the FM frequency band if the DAB signal is lost
■ L-band - Switch on/off the automatic DAB station search in L-band
■ Auto-save station logos - Automatic association of the logo with station de-
tected » page 23
DAB programme tracking
If a DAB station is a member of several station groups, when the signal is poor,
the same station is searched in a different station group.
Auto-change DAB -FM
If the DAB signal is poor, the unit will try to find a corresponding FM station for
the DAB station you are currently listening to.
For auto-change to work, the DAB and FM stations must send a sender ID.
› While the station is received on the FM band, (
) is displayed after the sta-
tion name. When the relevant DAB station can be received again the marker
disappears ( ).
› If a DAB station is also not available in the FM frequency band due to poor
reception, the device will be switched to mute.
› If you do not want automatic station change (e.g. when driving through tun-
nels, when reception may be lost temporarily), you can deactivate this func-
tion .
L-band
Different frequency ranges are used for DAB radio reception in different coun-
tries. In some countries the DAB radio reception is only in the so-called L-band.
› If you have any problems with the DAB wireless reception check that DAB
Automatic search in L-band is on.
› If there is no DAB radio reception in that country in the L-band, then it is bet-
ter to leave it off this menu item. The channel scan is faster.25Radio
Page 28 of 77
 Amundsen Infotainment Navigation System Manual Media
Operation
Introduction
This chapter contains information on the following subjects:
Main menu
26
Title-/Folder list
26
Playback
27
Media settings
27
First and foremost, pay attention to the s")
Media
Operation
Introduction
This chapter contains information on the following subjects:
Main menu
26
Title-/Folder list
26
Playback
27
Media settings
27
First and foremost, pay attention to the safety instructions » page 4 , Impor-
tant notes .
The device allows you to play audio files in various formats » page 28 from
different data carriers and to connect different source types.
When the source has been connected, the device starts to automatically play
audio files in alphabetical order.
Types of device operation » page 7 .
› The device via the controls.
› Via the function keys in the device screen
› Via the Maxi DOT display.
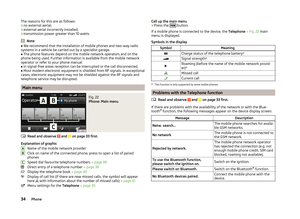
Main menu
Fig. 16
Media: Main menu
Call up the main menu
›
Press the
button.
Explanation of graphic
Information for the current track / file (e.g., artist, track title)
Selected audio source/display of cover art provided that this exists in the
file being played (ID3 tag)
Playback timeline (With details of the playing time and remaining playing
time of the track) A movement within the track is possible by moving the
slider or touching the desired location on the time axis.
Selection of the signal source
Track/folder list
Media settings » page 27
Select signal source
The function key menu D
» Fig. 16 .
CD - Changes to an inserted CD » page 29
SD card 1 - Changes to a memory card inserted in SD 1 » page 30
SD card 2 - Changes to a memory card inserted in SD 2 » page 30
USB - Switch to a disk connected to the USB input » page 30
AUX - changes over to an external audio source connected to the AUX in-
put » page 30
iPod - changes over to an Apple device connected to the MEDIA IN in-
put » page 31
BT audio - Changes to a Bluetooth ®
player » page 29
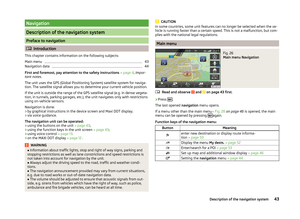
Title-/Folder list
Fig. 17
Track/folder list
Menu display
›
Press the function key in the menu Media
.
ABCD26Audio
Page 29 of 77
 Amundsen Infotainment Navigation System Manual Explanation of graphicDisplays the folder structure, function keys of higher-level folders
Function keys for playback from the audio source » table on page 27
Track currently playing
Note
In the ti")
Explanation of graphicDisplays the folder structure, function keys of higher-level folders
Function keys for playback from the audio source » table on page 27
Track currently playing
Note
In the title / folder list a maximum of 1000 files / folders are displayed alpha-
betically.
Playback
The unit plays the files in alphabetical order.
Description of the playback function keys
ButtonActionFunction /PressPlay / PausePress briefly a)Play the previous titlePress briefly b)Plays the current track from the startPress button for a
long period of time c)Fast-reverse of the trackPress brieflyPlay the next titlePress button for a
long period of time c)Fast-forward of the track
Press onceSwitch on track repeat
Press twiceTurn on the repetition of the entire folder /
source Press three timesSwitch off the repetitionPressTurn on / off the random playback of the
folder / signal source (mix mode)
Press onceAutomatic play from the folder / signal
sourcePress twiceSwitch function off. a)
Within 3 seconds after the start of the track playback.
b)
3 seconds after the start of playback of the track.
c)
The longer the button is pressed, the faster the fast forward/reverse.
ABCScan function
The scan function can be operated as follows.
› Pressing the function key
» table on page 27 on and off.
› Pressing the menu button 2
» Fig. 1 on page 5 on and off.
› By switching to a different file / signal source or by pressing one of the func-
tion keys for playback.
Note
The function keys listed in the table are different depending on the currently
selected menu screen.
Media settings
›
Press the function key in the menu Media
.
■ Sound - Sound settings » page 17, Sound settings
■ Mix/repeat/scan including subfolders - switching the song playback includ-
ing subfolders in the following modes Shuffle / Repeat / Automatic play
■ Bluetooth - Settings for the Bluetooth ®
function » page 19
■ Video (iPod) - Parameter settings for a video played by an Apple device
(brightness, colour, contrast, format, standard) » page 31
■ Traffic programme (TP) - Switches traffic programme on/off
■ External AUX device - Enables / disables the AUX input
■ Remove safely - safe removal of the connected data carrier
■ SD Card 1 - SD Memory Card 1
■ SD Card 2 - SD Memory Card 2
■ USB 1 - an input disk connected to the USB
Signal sources
Introduction
This chapter contains information on the following subjects:
Supported sources and file formats
28
Requirements and restrictions
28
Bluetooth ®
player
29
CD
29
SD memory card
30
USB-, AUX-inputs
30
MEDIA IN input
31
27Media
Page 30 of 77
 Amundsen Infotainment Navigation System Manual First and foremost, pay attention to the safety instructions » page 4 , Impor-
tant notes .WARNING■
Never place signal sources close to airbags. Loose objects could hit a de-
ployed airbag and inju")
First and foremost, pay attention to the safety instructions » page 4 , Impor-
tant notes .WARNING■
Never place signal sources close to airbags. Loose objects could hit a de-
ployed airbag and injure occupants – danger of death!■
Never place signal sources on the dashboard. Loose objects can be
thrown forward during a sudden manoeuvre or in case of an accident and
can injure the occupants.
■
Do not have signal sources in your hand or on your knees while driving.
Loose objects can be thrown forward during a sudden manoeuvre or in
case of an accident and can injure the occupants.
■
Always route the connection cable of the external signal source such that
does not restrict you when driving.
CAUTION
We recommend that you do not store any important data on CD media, Blue-
tooth ®
players, to an SD memory card or connected external devices. The
ŠKODA Partner is not responsible for losses resulting from the loss of data
stored on these media.
Note
For some external devices, the setting of the output volume can be changed.
Supported sources and file formats
Read and observe
and on page 28 first.
Supported audio signal sources
SD memory cardSD, SDHC, SDXCCD driveAudio CD (up to 80 min), CD-R and CD-RW (with a capacity
of up to 700 MB)USB devicesUSB stick, USB MP3 player, HDD (without special soft-
ware)Specifications for USB devices:USB 1.x and 2.x or higher, supported by USB 2.x (the
speed of data transmission then corresponds to the max-
imum speed of USB 2.x)
Max. speed of 480 Mb/sSpecification Bluetooth ®
-
playerBluetooth protocolsA2DPand AVRCP (1.0 - 1.3)Other external sourcesPortable player (e.g., iPod ®
, iPad ®
, iPhone ®
, MTP player
(MSC))
Formats of audio files
File system
SD memory card
FAT16, VFAT, FAT32
USB stick:CDISO9660, Joliet (Level 1,2,3), UDF 1.x, UDF
2.xCodec type
(File formats)MPEG-1/2 (Layer-3)Windows
Media Audio 7, 8 and 9MPEG-2/4WAVFile suffixmp3wmaasfaacwavPlaylistsm3u, pls, wpl, m3u8; asxFile
propertiesBitratemax. 320 kb/sSampling ratemax. 48 kHzPictures on thealbum coversImage resolution up to 500x500 pixels (200 kb) (jpg, jpeg,
png, bmp, gif), depending on the availability of album cov-
ers are displayed on the respective media
CAUTION
■ At the time of publication, the device has been tested with most products
and media available in the various markets up to a size of max. 32 GB. Howev-
er, it is possible that some external devices, media or files are unreadable or
unplayable.■
The GPT Standards (GUID Partition Table) method structured signal sources
are not supported by the device.
Requirements and restrictions
Read and observe
and on page 28 first.
The name of the artist, the album and the title of the file being played can be
displayed if the information is available as an ID3 tag. If no ID3 tag is available,
only the folder name is displayed.
28Audio
Page 31 of 77
 Amundsen Infotainment Navigation System Manual For a good playback, we recommend using MP3 compressed files at a bit rate
of at least 160 kb / s.
For audio files with variable bitrates, the indicated remaining playback time
does not correspond to")
For a good playback, we recommend using MP3 compressed files at a bit rate
of at least 160 kb / s.
For audio files with variable bitrates, the indicated remaining playback time
does not correspond to the actual remaining playback time.
Files that are protected by Digital Rights Management (DRM) technology can-
not be played back by the device.
Bluetooth ®
player
Read and observe
and on page 28 first.
The device makes a wireless connection (coupling) to the Bluetooth ®
player
possible.
›
For connecting follow the same instructions as for pairing the device with a
telephone » page 36.
Note
■
We recommend adjusting the volume on the portable player to the maximum
level.■
The volume can also be adjusted by setting the input sensitivity of the device
for the Bluetooth ®
player » page 17 , Sound settings .
■
The media functions supported depend on the Bluetooth ®
player concerned.
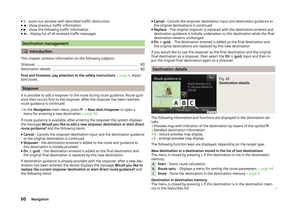
CD
Fig. 18
CD slot
Read and observe
and on page 28 first.
The CD slot is located in storage compartment on the passenger side external
unit » Fig. 18 .
Inserting/ejecting a CD›Insert a CD into the CD slot with the label facing up until it is automatically
drawn in. Playback starts automatically.›
Press the symbol button
– the CD is ejected.
If the ejected disc is not taken out within 10 seconds, it will be retracted again for safety reasons. However, the unit will not change to the CD source.
WARNING■ The CD/DVD player is a laser product.■On the manufacturing date, this unit was classified as a class 1 laser prod-
uct in accordance with the national/international standards
DIN EN 60825-1: 2008-05 and DHHS Rules 21 CFR, sub-chapter J The laser used in this class 1 laser product is so weak that there is no risk of danger
when operated correctly.■
This product is designed so that the laser is restricted to the inside of the
unit. However, the installed laser could be classified in a higher class were
the housing to be removed. For this reason, never remove the housing of
the unit.
CAUTION
■ Be sure to wait until the CD has been fully ejected before you try to insert a
new CD. Otherwise you can damage the drive inside the unit.■
Insert into the CD drive only original audio CDs or standard CD-R and CD-RW
discs.
■
Do not stick anything to the CD!
■
Outside temperatures that are either too high or too low might cause the
unit to be temporarily unavailable. The unit switches to the last active menu.
Note
■ After pressing the symbol button it takes a few seconds for the CD to be
ejected.■
Poor or unpaved road surfaces and severe vibrations may cause the CD to
jump.
■
The device may be affected by damp (condensation) in cold or humid condi-
tions. This can lead to playback jumps or impair the play function. Wait until
the moisture has evaporated if this happens.
■
If the CD is physically damaged, is not readable or is inserted incorrectly, the
following message is displayed: Error: CD. Check the CD and insert properly in-
to the drive.
29Media
Page 32 of 77
 Amundsen Infotainment Navigation System Manual ■It is possible under certain circumstances that copyright-protected CDs and
home-burnt CDs will not be played back at all or only in a limited way.■
The national copyright laws that apply in your")
■It is possible under certain circumstances that copyright-protected CDs and
home-burnt CDs will not be played back at all or only in a limited way.■
The national copyright laws that apply in your country must be observed.
SD memory card
Fig. 19
SD memory card slots
Read and observe
and on page 28 first.
The device makes it possible to play audio files from the SD memory card.
The SD memory card slots are in a storage compartment of the external device
on the passenger side.
Insert the SD memory card
›
Push the SD memory card into the relevant memory card slot with the slan-
ted edge to the right until it “locks into place”. Playback starts automatically.
Remove the SD memory card
›
Press the button
→
→ Remove SD card 1 safely or Remove SD card 2
safely .
›
Press the inserted SD memory card. The SD memory “card” is ejected to the
output position.
Unreadable SD memory card
If there are no readable files on the SDmemory card nothing will play.
Due to differing quality requirements from different card manufacturers, it is
not always possible to guarantee the playback from SD memory cards.
Some files on the SD memory card or SD memory cards cannot be reproduced
or their reproduction may be limited.
CAUTION■ Only use SD cards in standard size. When using smaller SD card with the
adapter the SD memory card can fall out while driving the vehicle due to vibra-
tions from the adapter.■
We recommend using class 4 SD memory cards and higher. This guarantees
the fastest possible access to the audio files.
■
Always store the SD cards in suitable cases to protect them from dirt, dust
and other forms of damage.
USB-, AUX-inputs
Fig. 20
USB and AUX inputs
Read and observe and on page 28 first.
The device allows you to play audio files from USB storage devices, as well as
external devices connected to the AUX input.
The USBand AUXinputs are located above the storage compartment at the front of the centre console » Fig. 20.
An external device can be connected to the USB/AUX input either directly or
via a connection cable from the ŠKODA range of original accessories.
AUX input
External devices connected to the AUX input cannot be operated from your
device.
The standard 3.5 mm jack plug is used for the AUXinput. If the external devices
do not have this jack plug, you must use an adapter.
Setting the volume control can be changed on the input sensitivity to the AUX
input » page 17 , Sound settings .
30Audio