2014 SKODA FABIA USB
[x] Cancel search: USBPage 5 of 60
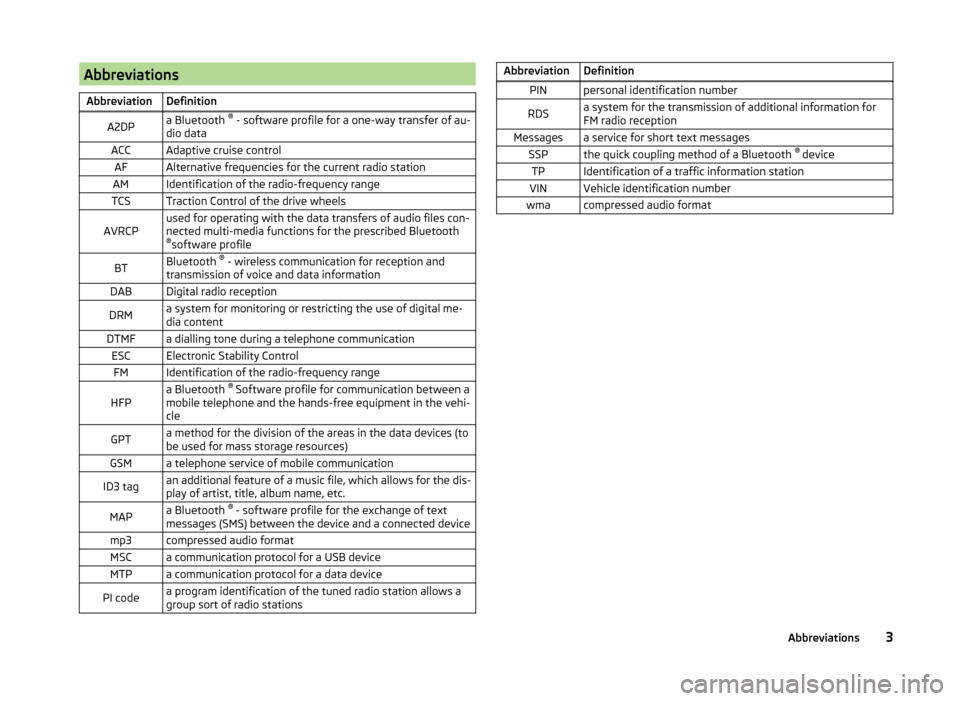
AbbreviationsAbbreviationDefinitionA2DPa Bluetooth ®
- software profile for a one-way transfer of au-
dio dataACCAdaptive cruise controlAFAlternative frequencies for the current radio stationAMIdentification of the radio-frequency rangeTCSTraction Control of the drive wheelsAVRCPused for operating with the data transfers of audio files con-
nected multi-media functions for the prescribed Bluetooth ® software profileBTBluetooth ®
- wireless communication for reception and
transmission of voice and data informationDABDigital radio receptionDRMa system for monitoring or restricting the use of digital me-
dia contentDTMFa dialling tone during a telephone communicationESCElectronic Stability ControlFMIdentification of the radio-frequency rangeHFPa Bluetooth ®
Software profile for communication between a
mobile telephone and the hands-free equipment in the vehi-
cleGPTa method for the division of the areas in the data devices (to
be used for mass storage resources)GSMa telephone service of mobile communicationID3 tagan additional feature of a music file, which allows for the dis-
play of artist, title, album name, etc.MAPa Bluetooth ®
- software profile for the exchange of text
messages (SMS) between the device and a connected devicemp3compressed audio formatMSCa communication protocol for a USB deviceMTPa communication protocol for a data devicePI codea program identification of the tuned radio station allows a
group sort of radio stationsAbbreviationDefinitionPINpersonal identification numberRDSa system for the transmission of additional information for
FM radio receptionMessagesa service for short text messagesSSPthe quick coupling method of a Bluetooth ®
deviceTPIdentification of a traffic information stationVINVehicle identification numberwmacompressed audio format3Abbreviations
Page 11 of 60

Operate with the control lever buttonsFig. 5
Buttons on the control lever
The separate menus and menu items displayed in the MAXI DOT display can beoperated as follows with the buttons on the control lever.
Functions of the buttons on the control leverBut- ton
» Fig. 5ActionOperation
APress and hold buttonDisplay main menuABriefly push up or downswitch between menu items and menusBPress brieflyConfirm menu item or menuOperating the audio menu (radio/media) using the buttons / dials on the multifunction steering wheel
Fig. 6
Multifunction steering wheel - Audio menu
›In the main menu of the MAXI DOT display select the menu item
Audio .
The information displayed in MAXI DOT display
■ Radio - Menu Radio
■ current radio station frequency band.
■ Name of the currently playing channel (if less than 5 are receivable).
■ List of receivable radio stations with choice (if more than 5 are receivable).
■ TP traffic announcements.
■ Media - Menu Media
■ Title.Buttons and wheels of the audio menu - Radio/MediaButton/
wheel » Fig. 6ActionOperationRadioMedia1Press brieflyChange source (change frequency bands and connected audio sources)1Press and hold buttonSwitch between the Radio and Media menus and open the last context status (e.g. the last radio station
or track to be played)2Press brieflySwitch off/on soundStart/stop playback2Turn upwardsIncrease volume2Turn downwardsDecrease volume 9Unit operation
Page 15 of 60
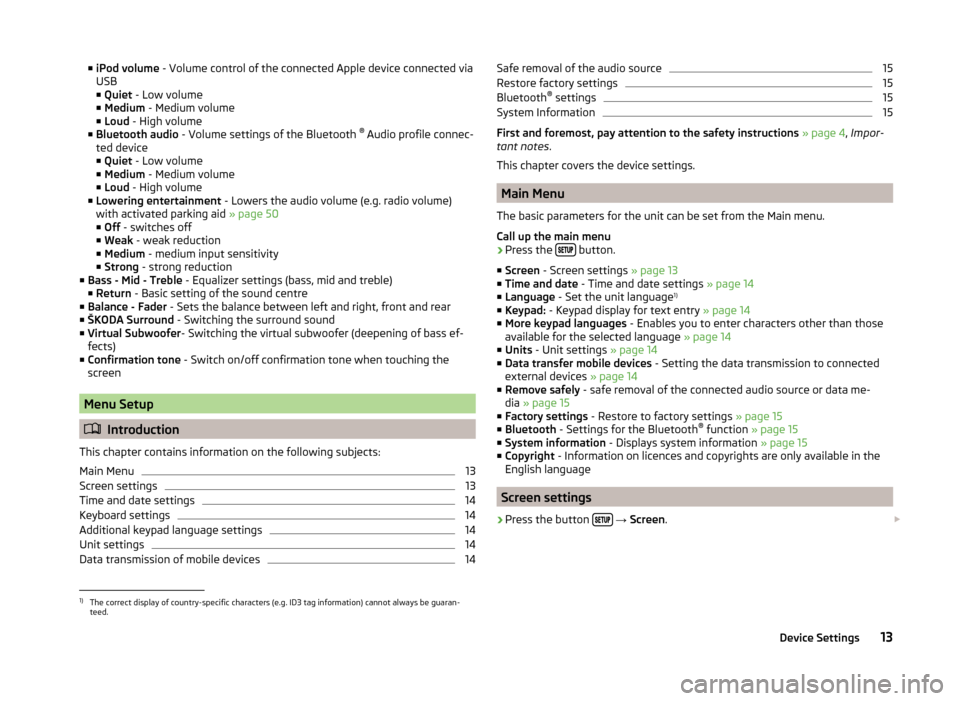
■iPod volume - Volume control of the connected Apple device connected via
USB
■ Quiet - Low volume
■ Medium - Medium volume
■ Loud - High volume
■ Bluetooth audio - Volume settings of the Bluetooth ®
Audio profile connec-
ted device ■ Quiet - Low volume
■ Medium - Medium volume
■ Loud - High volume
■ Lowering entertainment - Lowers the audio volume (e.g. radio volume)
with activated parking aid » page 50
■ Off - switches off
■ Weak - weak reduction
■ Medium - medium input sensitivity
■ Strong - strong reduction
■ Bass - Mid - Treble - Equalizer settings (bass, mid and treble)
■ Return - Basic setting of the sound centre
■ Balance - Fader - Sets the balance between left and right, front and rear
■ ŠKODA Surround - Switching the surround sound
■ Virtual Subwoofer - Switching the virtual subwoofer (deepening of bass ef-
fects)
■ Confirmation tone - Switch on/off confirmation tone when touching the
screen
Menu Setup
Introduction
This chapter contains information on the following subjects:
Main Menu
13
Screen settings
13
Time and date settings
14
Keyboard settings
14
Additional keypad language settings
14
Unit settings
14
Data transmission of mobile devices
14Safe removal of the audio source15Restore factory settings15
Bluetooth ®
settings
15
System Information
15
First and foremost, pay attention to the safety instructions » page 4 , Impor-
tant notes .
This chapter covers the device settings.
Main Menu
The basic parameters for the unit can be set from the Main menu.
Call up the main menu
›
Press the button.
■ Screen - Screen settings » page 13
■ Time and date - Time and date settings » page 14
■ Language - Set the unit language 1)
■ Keypad: - Keypad display for text entry » page 14
■ More keypad languages - Enables you to enter characters other than those
available for the selected language » page 14
■ Units - Unit settings » page 14
■ Data transfer mobile devices - Setting the data transmission to connected
external devices » page 14
■ Remove safely - safe removal of the connected audio source or data me-
dia » page 15
■ Factory settings - Restore to factory settings » page 15
■ Bluetooth - Settings for the Bluetooth ®
function » page 15
■ System information - Displays system information » page 15
■ Copyright - Information on licences and copyrights are only available in the
English language
Screen settings
›
Press the button
→ Screen .
1)
The correct display of country-specific characters (e.g. ID3 tag information) cannot always be guaran-
teed.
13Device Settings
Page 17 of 60
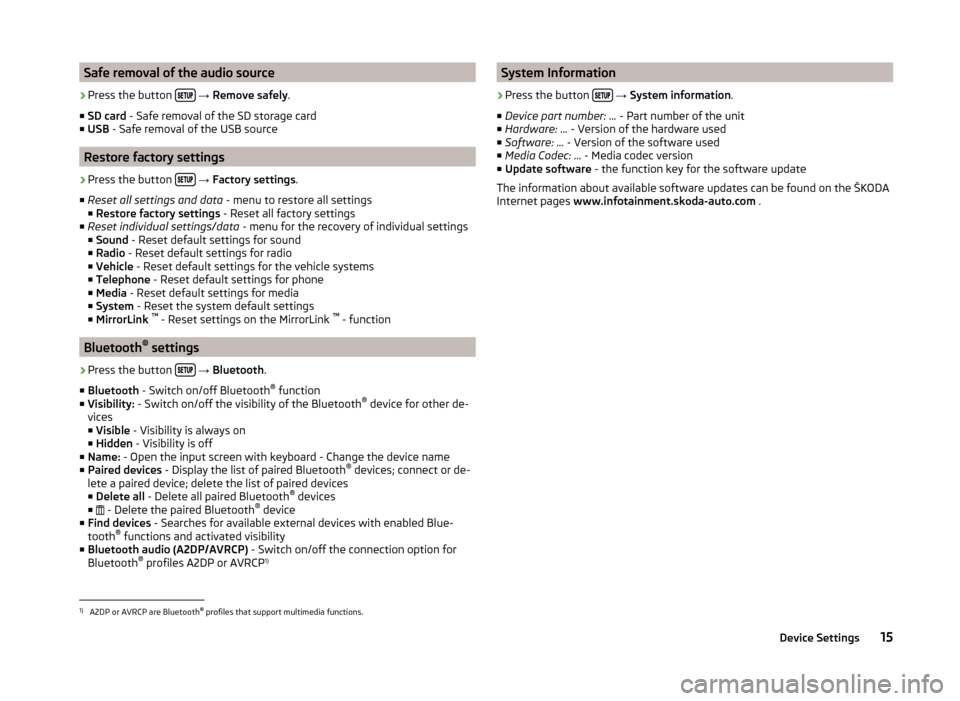
Safe removal of the audio source›
Press the button
→ Remove safely .
■ SD card - Safe removal of the SD storage card
■ USB - Safe removal of the USB source
Restore factory settings
›
Press the button
→ Factory settings .
■ Reset all settings and data - menu to restore all settings
■ Restore factory settings - Reset all factory settings
■ Reset individual settings/data - menu for the recovery of individual settings
■ Sound - Reset default settings for sound
■ Radio - Reset default settings for radio
■ Vehicle - Reset default settings for the vehicle systems
■ Telephone - Reset default settings for phone
■ Media - Reset default settings for media
■ System - Reset the system default settings
■ MirrorLink ™
- Reset settings on the MirrorLink ™
- function
Bluetooth ®
settings
›
Press the button
→ Bluetooth .
■ Bluetooth - Switch on/off Bluetooth ®
function
■ Visibility: - Switch on/off the visibility of the Bluetooth ®
device for other de-
vices
■ Visible - Visibility is always on
■ Hidden - Visibility is off
■ Name: - Open the input screen with keyboard - Change the device name
■ Paired devices - Display the list of paired Bluetooth ®
devices; connect or de-
lete a paired device; delete the list of paired devices ■ Delete all - Delete all paired Bluetooth ®
devices
■ - Delete the paired Bluetooth ®
device
■ Find devices - Searches for available external devices with enabled Blue-
tooth ®
functions and activated visibility
■ Bluetooth audio (A2DP/AVRCP) - Switch on/off the connection option for
Bluetooth ®
profiles A2DP or AVRCP 1)
System Information›
Press the button
→ System information .
■ Device part number: ... - Part number of the unit
■ Hardware: ... - Version of the hardware used
■ Software: ... - Version of the software used
■ Media Codec: ... - Media codec version
■ Update software - the function key for the software update
The information about available software updates can be found on the ŠKODA
Internet pages www.infotainment.skoda-auto.com .
1)
A2DP or AVRCP are Bluetooth®
profiles that support multimedia functions.
15Device Settings
Page 21 of 60
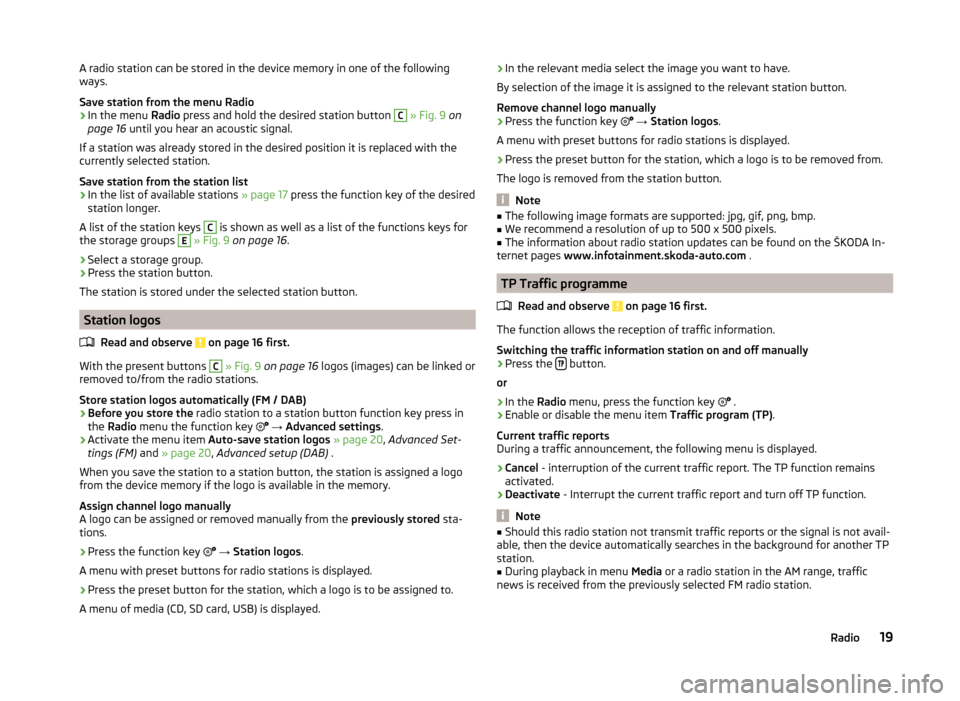
A radio station can be stored in the device memory in one of the following
ways.
Save station from the menu Radio›
In the menu Radio press and hold the desired station button
C
» Fig. 9 on
page 16 until you hear an acoustic signal.
If a station was already stored in the desired position it is replaced with the
currently selected station.
Save station from the station list
›
In the list of available stations » page 17 press the function key of the desired
station longer.
A list of the station keys
C
is shown as well as a list of the functions keys for
the storage groups
E
» Fig. 9 on page 16 .
›
Select a storage group.
›
Press the station button.
The station is stored under the selected station button.
Station logos
Read and observe
on page 16 first.
With the present buttons
C
» Fig. 9 on page 16 logos (images) can be linked or
removed to/from the radio stations.
Store station logos automatically (FM / DAB)
›
Before you store the radio station to a station button function key press in
the Radio menu the function key
→ Advanced settings .
›
Activate the menu item Auto-save station logos » page 20 , Advanced Set-
tings (FM) and » page 20 , Advanced setup (DAB) .
When you save the station to a station button, the station is assigned a logo
from the device memory if the logo is available in the memory.
Assign channel logo manually
A logo can be assigned or removed manually from the previously stored sta-
tions.
›
Press the function key
→ Station logos .
A menu with preset buttons for radio stations is displayed.
›
Press the preset button for the station, which a logo is to be assigned to.
A menu of media (CD, SD card, USB) is displayed.
› In the relevant media select the image you want to have.
By selection of the image it is assigned to the relevant station button.
Remove channel logo manually›
Press the function key
→ Station logos .
A menu with preset buttons for radio stations is displayed.
›
Press the preset button for the station, which a logo is to be removed from.
The logo is removed from the station button.
Note
■ The following image formats are supported: jpg, gif, png, bmp.■We recommend a resolution of up to 500 x 500 pixels.■
The information about radio station updates can be found on the ŠKODA In-
ternet pages www.infotainment.skoda-auto.com .
TP Traffic programme
Read and observe
on page 16 first.
The function allows the reception of traffic information.
Switching the traffic information station on and off manually
›
Press the button.
or
›
In the Radio menu, press the function key
.
›
Enable or disable the menu item
Traffic program (TP).
Current traffic reports
During a traffic announcement, the following menu is displayed.
›
Cancel - interruption of the current traffic report. The TP function remains
activated.
›
Deactivate - Interrupt the current traffic report and turn off TP function.
Note
■
Should this radio station not transmit traffic reports or the signal is not avail-
able, then the device automatically searches in the background for another TP
station.■
During playback in menu Media or a radio station in the AM range, traffic
news is received from the previously selected FM radio station.
19Radio
Page 26 of 60
In the multimedia database the title properties are sorted according to catego-
ries.
The display of the multimedia database is only available for some audio sour-
ces.
A connected Apple device displays only the multimedia database.
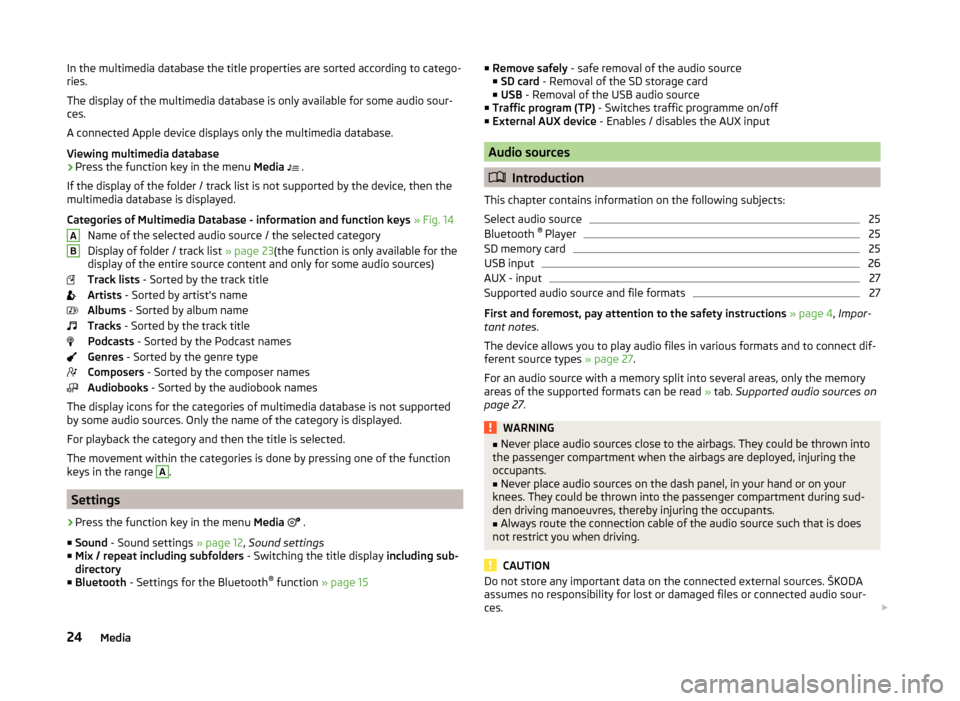
Viewing multimedia database›
Press the function key in the menu Media
.
If the display of the folder / track list is not supported by the device, then the
multimedia database is displayed.
Categories of Multimedia Database - information and function keys » Fig. 14
Name of the selected audio source / the selected category
Display of folder / track list » page 23(the function is only available for the
display of the entire source content and only for some audio sources)
Track lists - Sorted by the track title
Artists - Sorted by artist's name
Albums - Sorted by album name
Tracks - Sorted by the track title
Podcasts - Sorted by the Podcast names
Genres - Sorted by the genre type
Composers - Sorted by the composer names
Audiobooks - Sorted by the audiobook names
The display icons for the categories of multimedia database is not supported
by some audio sources. Only the name of the category is displayed.
For playback the category and then the title is selected.
The movement within the categories is done by pressing one of the function
keys in the range
A
.
Settings
›
Press the function key in the menu Media
.
■ Sound - Sound settings » page 12, Sound settings
■ Mix / repeat including subfolders - Switching the title display including sub-
directory
■ Bluetooth - Settings for the Bluetooth ®
function » page 15
AB■
Remove safely - safe removal of the audio source
■ SD card - Removal of the SD storage card
■ USB - Removal of the USB audio source
■ Traffic program (TP) - Switches traffic programme on/off
■ External AUX device - Enables / disables the AUX input
Audio sources
Introduction
This chapter contains information on the following subjects:
Select audio source
25
Bluetooth ®
Player
25
SD memory card
25
USB input
26
AUX - input
27
Supported audio source and file formats
27
First and foremost, pay attention to the safety instructions » page 4 , Impor-
tant notes .
The device allows you to play audio files in various formats and to connect dif-
ferent source types » page 27.
For an audio source with a memory split into several areas, only the memory
areas of the supported formats can be read » tab. Supported audio sources on
page 27 .
WARNING■
Never place audio sources close to the airbags. They could be thrown into
the passenger compartment when the airbags are deployed, injuring the
occupants.■
Never place audio sources on the dash panel, in your hand or on your
knees. They could be thrown into the passenger compartment during sud-
den driving manoeuvres, thereby injuring the occupants.
■
Always route the connection cable of the audio source such that is does
not restrict you when driving.
CAUTION
Do not store any important data on the connected external sources. ŠKODA
assumes no responsibility for lost or damaged files or connected audio sour-
ces. 24Media
Page 27 of 60
NoteSee the owner's manual of the specific manufacturer for operating the exter-
nal audio source.
Select audio source
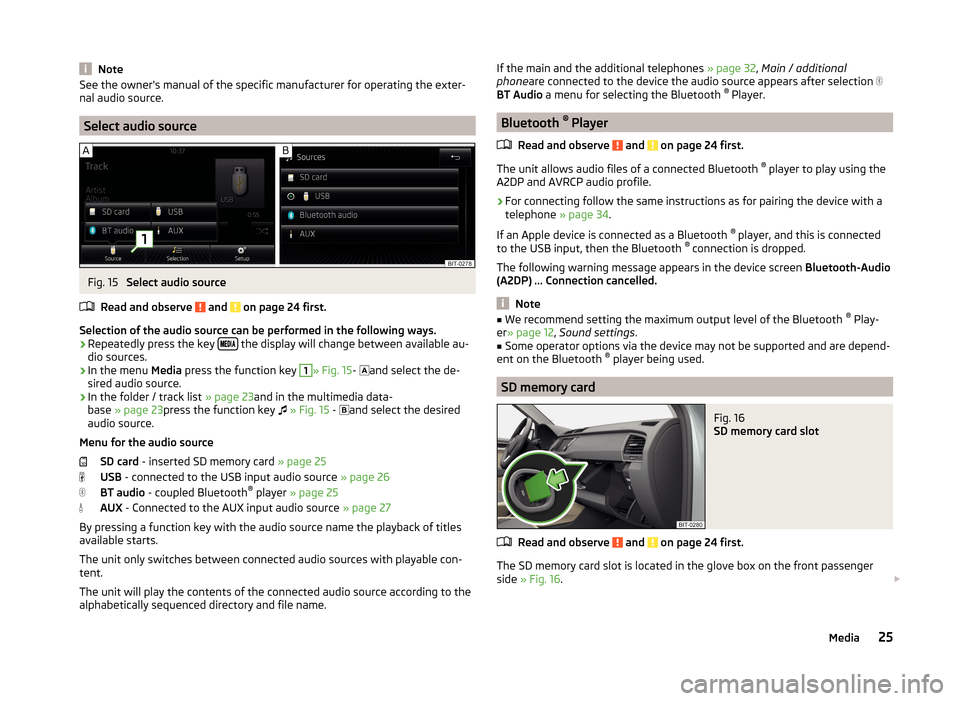
Fig. 15
Select audio source
Read and observe
and on page 24 first.
Selection of the audio source can be performed in the following ways.
› Repeatedly press the key
the display will change between available au-
dio sources.
› In the menu
Media press the function key
1
» Fig. 15 -
and select the de-
sired audio source.
› In the folder / track list
» page 23and in the multimedia data-
base » page 23 press the function key
» Fig. 15 -
and select the desired
audio source.
Menu for the audio source SD card - inserted SD memory card » page 25
USB - connected to the USB input audio source » page 26
BT audio - coupled Bluetooth ®
player » page 25
AUX - Connected to the AUX input audio source » page 27
By pressing a function key with the audio source name the playback of titles
available starts.
The unit only switches between connected audio sources with playable con-
tent.
The unit will play the contents of the connected audio source according to the
alphabetically sequenced directory and file name.
If the main and the additional telephones » page 32, Main / additional
phone are connected to the device the audio source appears after selection
BT Audio a menu for selecting the Bluetooth ®
Player.
Bluetooth ®
Player
Read and observe
and on page 24 first.
The unit allows audio files of a connected Bluetooth ®
player to play using the
A2DP and AVRCP audio profile.
›
For connecting follow the same instructions as for pairing the device with a
telephone » page 34.
If an Apple device is connected as a Bluetooth ®
player, and this is connected
to the USB input, then the Bluetooth ®
connection is dropped.
The following warning message appears in the device screen Bluetooth-Audio
(A2DP) ... Connection cancelled.
Note
■
We recommend setting the maximum output level of the Bluetooth ®
Play-
er » page 12 , Sound settings .■
Some operator options via the device may not be supported and are depend-
ent on the Bluetooth ®
player being used.
SD memory card
Fig. 16
SD memory card slot
Read and observe and on page 24 first.
The SD memory card slot is located in the glove box on the front passenger
side » Fig. 16 .
25Media
Page 28 of 60

Inserting an SD memory card›Push the SD memory card into the available slot with the cut edge down-
wards until it “locks into place”.
The play function will start automatically. The playlists are not played auto-
matically and must be manually started from the folders and title lists.
Removing an SD memory card›
Press the button
→ Remove safely SD card .
›
Press the inserted SD memory card. The SD memory card “jumps” into the
eject position.
After popping out the SD memory card, playback will start from the last played
audio source. If this source is not available, the device switches to the Radio
menu.
Unreadable SD memory card
If there are no readable files on the SD memory card nothing will play.
Due to differing quality requirements from different card manufacturers, it is
not always possible to guarantee the playback from SD memory cards.
It may not be possible to play some or all files on the SD memory card, or pos-
sibly their playback may be limited.
CAUTION
Use only SD memory cards with a standard size. When using smaller SD cards
with the adapter the SD memory card can fall out of the adapter while driving
due to vehicle vibrations.
USB input
Fig. 17
USB and AUX inputs
Read and observe and on page 24 first.
The USB input is above the storage compartment in the front center console and is identified with the symbol
» Fig. 17 .
The USB input audio source can be connected directly or via a connecting ca-
ble.
Some audio sources connected to the USB input can be operated from this de-
vice 1)
.
Connect the USB audio source
›
Plug the USB audio source into the corresponding well.
The play function will start automatically. The playlists are not played auto-
matically and must be manually started from the folders and title lists.
If an Apple device is connected as a Bluetooth ®
player, and this is connected
to the USB input, then the Bluetooth ®
connection is dropped.
The following warning message appears in the device screen Bluetooth-Audio
(A2DP) ... Connection cancelled.
Separate USB audio source
›
Press the button
→ Remove safely → USB .
›
Disconnect the USB audio source.
After disconnecting the USB audio source, playback will start from the last
played audio source. If this source is not available, the device switches to the
Radio menu.
Charge USB audio source
With the ignition on after connecting the USB audio source, the charging proc-
ess is automatically started (applies for audio sources where charging via the
USB connector is possible).
The charging efficiency can be different compared to the charging from the
usual mains power supply. Connected audio sources can be supplied / loaded
with a current of max. 1.5 A.
Some connected audio sources may not be recognised and cannot be charged.
The charging of the connected audio source is automatically stopped after
switching off the ignition.
1)
Some operating options from an audio source may not be supported.
26Media