Page 25 of 62

24Audio mode
Ejecting CDs
● Press the EJECT
unit button
⇒ Fig. 1.
● The CD in the drive will be ejected and must be removed within 10 sec-
onds.
If the CD is not removed within 10 seconds, it is retracted again for safety
reasons.
Error messages on the display
A reading error is indicated by ERROR in the title bar.
An error message in the bottom line of the screen indicates the possible
cause of the error.
MessageMeaning and consequencesNO CDNo compatible data medium.
It is not possible to switch to Media mode.
CD ROMData CD inserted.
CD will be ejected.
CHECK CDThe inserted CD cannot be read.
CD will be ejected.
Check for damage.
TEMPERATURECD drive is too hot.
CD playback is disabled.
Another audio source will be played.
SERVICEMechanical fault in the CD drive.
Contact a specialised workshop.
Note
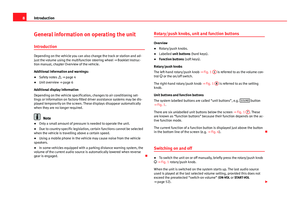
Uneven road surfaces and strong vibrations can cause playback to jump. Selecting the media source
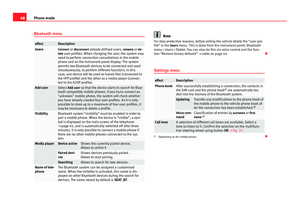
Fig. 16 Media selection menu: CD being played from the internal CD drive.
When you switch to Media mode, the available media sources are displayed
for roughly 5 seconds in the bottom line of the screen. The media source
currently playing is underlined on the display ⇒ Fig. 16.
Opening the Media selection menu manually and selecting a media source
● In Media mode, briefly press the MEDIA
⇒ Fig. 1 2 unit button to dis-
play the Media selection menu ⇒ Fig. 16 again.
● Select the desired media source by pressing its function button.
● ALTERNATIVELY: Press the MEDIA
unit button as often as required to
switch between the available media sources.
Function button: media sourceCD: audio or audio data CD in the internal CD drive ⇒ page 23.CD EXT.: External CD changer ⇒ page 34.AUX: external audio source connected to AUX-IN multimedia socket
⇒ page 28.
OR: MEDIA-IN: Data medium (MDI) connected to the MEDIA-IN multimedia
interface ⇒ page 30.
Page 26 of 62

25
Audio mode
Function button: media sourceBT-AUDIO: Bluetooth ®
audio source connected ⇒ page 28.When a media source that has already been played is selected again, play-
back is resumed from the point that was last played ( except: external audio
sources ⇒ page 28).
Track information display
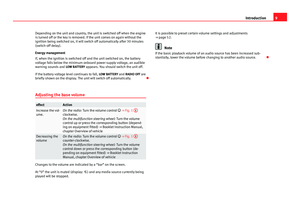
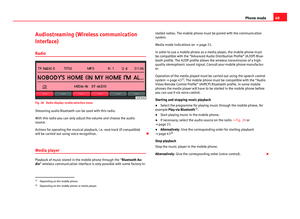
Fig. 17 Track information of a currently playing MP3 CD. When an audio CD without CD text is playing, only TRACK and the track num-
ber, corresponding to the playing order on the data medium, are displayed
in the centre line of the screen.
When playing audio files containing additional track information (CD text
, ID3 tag with MP3 files), various types of track information can be dis-
played.
Changing the display of track information
The type of track information selected is displayed on the left in the top line
of the screen (in Fig. 17: TITLE).
● Briefly press the INFO
function button to change the type of track infor-
mation displayed.
Display: Track information (title)TITLE: Track name (title).ARTIST: Artist.ALBUM: Album title.FILE: File name (audio data CDs only).FOLDER: Folder name (audio data CDs only).PLAYLIST: Playlist name (audio data CDs only).No display: Storage location corresponding to playing order ⇒ page 22.
If the selected track information is too long for the centre line of the screen,
the SCROLL function button also appears
⇒ Fig. 17.
● When you briefly press the SCROLL
function button, the displayed track
information (title) scrolls across the screen.
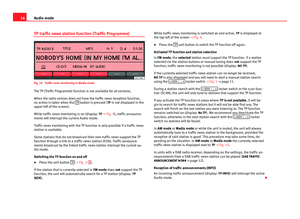
Changing track manually
Fig. 18 Display of the storage location when changing track in MP3 mode.
Start Media mode.
You can browse through the tracks of the CD that is currently playing.
Refer to the information on the playing order of audio data CDs ⇒ page 22.
Page 27 of 62

26Audio mode
Browsing tracks
Press the ... / TRACK
⇒ Fig. 1 rocker switch to the left or right.
ActioneffectBriefly pressing to the
left.Goes to the start of the current track.Briefly pressing to the right.Next track.Briefly pressing twice in quick suc-
cession to the left.Goes to the start of the previous track.
Pressing and holding to the left.Fast reverse.Pressing and holding to the right.Fast forward.
You can also change track by turning the setting knob ⇒ Fig. 1 8.
Changing folder in audio data CD mode
● Press the
FOLDER
or
... / FLDR ⇒ Fig. 1 9 rocker switch to the right
or left to switch to the first track of the next or previous folder respectively.
After changing folder or track, the storage location corresponding to the
playing order of the audio data CD is briefly displayed (in Fig. 18: folder 1
and track number 5). After roughly 5 seconds, the selected track informa-
tion is displayed again.
Playing playlists
Playlists on data media do not play automatically.
● Press the PLAYLIST
function button to start playing the playlists on data
media.
● Press the
FOLDER
or
... / FLDR rocker switch to the right or left to
switch to the first track of the next or previous playlist respectively.
The scan function (SCAN) and random playback (MIX) are only available for
the playlist you are listening to ⇒ page 26.
● Press the PLAYLIST
function button again to stop playing the playlists.
Note
● Selecting tracks and CDs from an external CD changer ⇒ page 34.
● Selecting tracks and CDs via MEDIA-IN multimedia interface
⇒ page 30.
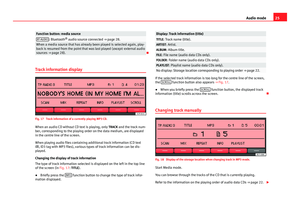
Changing playback mode (SCAN, MIX, REPEAT)
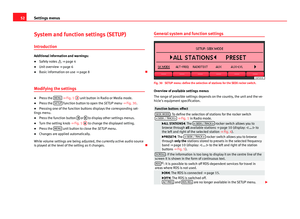
Fig. 19 MEDIA main menu: random play from the active folder (MIX FLDR).
Refer to the information on the playing order of files and folders ⇒ page 22.
Selecting play modes
The play modes that can be selected for the active data medium are shown
as function buttons on the bottom line of the screen.
● Press a function button to start the corresponding playback mode. The
function button is underlined.
SCAN
Automatic playback : All the tracks play once for approx. 10 seconds.
The scan function starts with the next track and ends automatically when all
tracks of the current audio source have been scanned.
MIX
Random playback: The tracks play in random order.
Page 28 of 62
,
only folders can be repeated, not the")
27
Audio mode
REPEAT
Repeat function : Playback is repeated once all the tracks have been
played once. In data media with compressed audio files (MP3 and WMA),
only folders can be repeated, not the full content of the media.
The repeat (Repeat) and random playback (Mix) functions remain active for
the corresponding media source until they are closed for that source.
● Press the SCAN
, MIX or RPT ... function button again to stop the current
playback mode at the track currently playing.
The scan function can also be started and stopped by pressing the setting
button ⇒ Fig. 1 8
.
Limiting the playback mode to the folders, playlists or tracks
Depending on the audio source that is being played, playback can be limi-
ted to the files, folders or playlists by pressing the playback mode function
button several times. The display of the function button changes according-
ly (for example in Fig. 19: MIX FLDR
).
Display on the function button: effect... CD or ... ALL: All the tracks on the active data medium are played in the
selected playback mode.
... FLD: Only the tracks in the active folder are played in the selected play-
back mode.
... PLS: Only the tracks of the active playlists are played in the selected
playback mode. Playing playlists ⇒ page 26.
... TRACK: Repeats the track (title) that is playing (only with REPEAT).
Displays on the function buttons may vary with equipment model.
Compatibility with all encoding/recording software, recording devices and
recording media cannot be guaranteed. Incompatible USB devices can
make noise, interrupt playback or not playback at all.
Page 29 of 62

Introduction
The external audio sources described here can only be played over the vehi-
cle speakers, but cannot be controlled via t")
28Audio mode
External audio sources (AUX and audio
Bluetooth ®
)
Introduction
The external audio sources described here can only be played over the vehi-
cle speakers, but cannot be controlled via the radio system.
Additional information and warnings:
● Safety notes ⇒ page 4
● Unit overview ⇒ page 6
● Media mode ⇒ page 21
● System and function settings (SETUP) ⇒ page 52
Note
Please read and observe the manufacturer's manual for the external audio
source.
External audio source connected to the AUX-IN multimedia
socket
Depending on the version of the vehicle, the multimedia socket AUX-IN may
be in a different location. Please refer to the vehicle Instruction Manual to
locate the position of the socket.
The AUX-IN multimedia socket can only be used with a 3.5 mm jack plug.
The external audio source connected is indicated by the AUX
function but-
ton in the Media selection menu . If the function button
AUX
is not displayed,
AUX must be activated in the
SETUP menu ⇒ page 52.
Connecting an external audio source to the AUX-IN multimedia socket
● Connect the external audio source to the AUX-IN multimedia socket.
● Lower the basic volume of the radio ⇒ page 8.
● Start playback on the external audio source.
● Open the Media selection menu and select the AUX
function button
⇒ page 24.
The output volume of a connected external audio source should be adjusted
to the volume of the other audio sources ⇒ page 53.
Vehicles with AUX-IN multimedia socket and MEDIA-IN multimedia interface
In vehicles also equipped with the MEDIA-IN multimedia interface the MEDIA-IN
function button is displayed instead of the AUX function button
⇒ page 30.
An external audio source connected to the AUX-IN multimedia socket can
only be played when no external data medium is connected to the MEDIA-IN
multimedia interface.
The audio source of the devices connected in the MEDIA-IN device (USB as
AUX-IN) takes priority over those connected in the RSE. Where both options
are available, make sure that there is nothing connected in the MEDIA-IN*
connections when you wish to listen to the audio source of the RSE
( ⇒ Booklet Rear Seat Entertainment) in the car.
Note
● When playback on the external audio source is stopped or the plug is
disconnected from the AUX-IN multimedia socket, the radio-navigation sys-
tem remains in the AUX menu.
● Interference may be heard if the external audio source is powered from
the vehicle’s 12-volt socket.
Page 30 of 62

29
Audio mode
Playback of external media connected by Bluetooth ®
Bluetooth Audio mode is only available if the vehicle is equipped with a fac-
tory-fitted mobile phone preparation that supports this function. Please re-
fer to the relevant vehicle operating manual for information on operating
the mobile phone preparation ⇒ page 37.
The external media player (e.g. a mobile phone) must be compatible with
the Bluetooth ®
A2DP or AVRCP profiles.
In Bluetooth audio mode, audio files from a media player that is connected
via Bluetooth ®
can be played over the vehicle speakers.
Bluetooth Audio mode is indicated by BT-AUDIO or BLUETOOTH-AUDIO on the
display.
Starting Bluetooth ®
audio transfer
● You will have to pair and connect the external media player with the
Bluetooth interface of the mobile phone preparation as described in the in-
structions for the Mobile phone preparation ⇒ page 39.
● Lower the basic volume of the radio ⇒ page 8.
● Start playback in the external media player.
Starting playback over the vehicle loudspeakers
After starting, the procedure to transfer audio files depends on whether the
BLUETOOTH-AUDIO option is ON or OFF in the SETUP menu ⇒ page 52.
SETUP: BLUETOOTH-AUDIO OFF (default):
● After starting the Bluetooth audio transfer, a query is displayed to play
Bluetooth audio.
● Confirm the query.
● Bluetooth audio will start to play and the SETUP menu now displays
BLUETOOTH-AUDIO ON .
SETUP: BLUETOOTH-AUDIO ON : ●
After starting the Bluetooth audio transfer, you must change manually to
BLUETOOTH-AUDIO ⇒ page 24.Note
● Do not connect an external media player at the same time to play music
via Bluetooth and via the MEDIA-IN multimedia interface as this could cause
playback limitations.
● When the external media has finished playing, the radio system remains
in the BLUETOOTH-AUDIO menu.
● Always switch off the warning and service tones on a connected Blue-
tooth audio source, e.g. key tones on a mobile telephone, to prevent inter-
ference noise and malfunctions.
Page 31 of 62

30Audio mode
MEDIA-IN multimedia interface
Introduction
Depending on the version of the vehicle, the MEDIA-IN multimedia interface
may be in a different location. Please refer to the vehicle Instruction Manual
to locate the position of the socket.
The supported file formats listed below are collectively referred to as “audio
files”.
Audio files on an external data medium connected to the MEDIA-IN multime-
dia interface can be played and controlled via the radio system.
Where this manual refers to external data media, this means USB mass stor-
age devices containing supported audio files, such as MP3 players, iPods™
and USB sticks. External data media are displayed as MDI (Media Device In-
terface) on the radio system.
The MEDIA-IN multimedia interface supplies the usual USB voltage of ap-
proximately 5 volts.
Additional information and warnings:
● Safety notes ⇒ page 4
● Unit overview ⇒ page 6
● Media mode ⇒ page 21
● System and function settings (SETUP) ⇒ page 52
Instructions for connecting data media
Adapter for connecting a data medium
This operation mode permits any of the following elements to be connec-
ted: ●
USB mode: A storage device with USB connection. The connection is di-
rectly done into the USB port.
● iPod mode ®
: To connect an iPod device, an adapter cable or device is
required (SEAT brand), depending on the vehicle.
The type of adaptor needed depends on the vehicle model and is not sup-
plied. These adapters can be purchased from a SEAT dealership.
Data medium requirements
Compatible data mediaFiles and formats supported by the ra-
dio system
Data media compliant with the
USB 2.0 specification.
Data media with the FAT16
(< 2 GB) or FAT32 (> 2 GB) file sys-
tem.
iPod™ and iPhone™ of various
generations a)
.
MTP players with the “PlaysFor-
Sure” or “ReadyForVista” logo.– Audio files in MP3, WMA, OGG-Vor-
bis and AAC format.
– Playlists in PLS, B4S, ASX and WPL
format.
Please read and observe the operating manual for the external data medi-
um.
a) iPod™ and iPhone™ are registered trademarks of Apple Inc.
MEDIA-IN multimedia interface and AUX-IN multimedia socket
The MEDIA-IN multimedia interface is often installed in combination with an
AUX-IN multimedia socket ⇒ page 28.
Notes and restrictions
Only audio files readable through the MEDIA-IN multimedia interface will be
displayed, played and managed in the radio system.
In the case of MTP players, it may take a few minutes before the device is
ready for playback – depending on the battery status and the quantity of
data.
Page 32 of 62
 it
may take some time to read the au")
31
Audio mode
● When playing large capacity hard discs with several files and a complex
data structure (several folders and subfolders, non-playable files, etc.) it
may take some time to read the audio files. The reaction time may also be
influenced by the connected device.
● WMA (Windows Media Audio) audio files can only be played if they are
not protected by authors' rights with the DRM (Digital Rights Management)
system.
● Generally, files with anti-copy protection cannot be played (e.g. M4P).
● It is not possible to play files in 3GP format or “WMA lossless” files.
Check there are no MP3 files stored in the playlist. A playlist only defines a
certain order of play. If a playlist cannot be played, check that the “relative
paths” are correct, i.e. that the MP3 files on the data medium are actually
stored at the locations referenced by the playlist.
If an external data medium is divided into several partitions, only the first
partition with compatible audio files will be played.
Please refer to further limitations and notes on the requirements placed on
media sources ⇒ page 21.
WARNING
● The connected audio devices must be protected from possible me-
chanical damage and other kind of wear.
● We do not hold responsible for any possible damage on the connec-
ted devices.
● The connection of USB devices is sensitive to interference from mo-
bile telephones. Mobile telephones should not be left next to the USB
when this is connected, to prevent distortion.
● The connected audio devices must be protected from possible me-
chanical damage and other kind of wear.
● Objects which are not secured in the vehicle compartment may inter-
fere with driving and could result in serious injury.
WARNING (Continued)
● The external data device should never be left on the dash panel. A
sharp manoeuvre can throw the device towards the compartment and in-
jure the vehicle passengers.
● The external data device should never be mounted in the vicinity of
the airbag. If an airbag is activated it can project the device towards the
compartment and injure the vehicle passengers.
● The external data device must not be held in hand or on the legs
while driving. A sharp manoeuvre can throw the device towards the com-
partment and injure the vehicle passengers.
● Place the external data device cables so that they are not in the way
while driving.
CAUTION
Make sure that the adapter lead is not pinched or severely bent. This can
damage the adapter lead and cause functional faults.
Note
● Some vehicles with the MEDIA-IN multimedia interface mounted on the
centre armrest are also equipped with an additional compartment. The rub-
ber insert of this compartment can be removed in order to extract small ob-
jects which may have fallen inside.
● Do not connect an external media player to the radio-navigation system
via Bluetooth and via the MEDIA-IN multimedia interface at the same time,
as this could lead to limitations in playback.
● The use of memory card adapters or USB hubs can cause problems in
reading files.