Page 114 of 252
Available Radio Soft-Key Voice Commands
Ty p e s o fVoiceCom-
mands
Available Steering
Wheel
Buttons to Press: (1)
Radio Mode (2)
Media Mode (3)
Climate
Controls (4)
Naviga- tion (5)
Phone Mode (6)
APPS
Uconnect®
Voice
Command (VR)
ButtonAM/FM
& Satel-
lite Band Control Media
Devices Control Tempera-
ture
Control Destina-
tion
Selection and View - Yelp
®
GENERAL
Uconnect®
Phone
Pick Up Button----
Call
Initiation, Call Man- agement, Pre-
defined
Voice Text Reply
-
ELECTRONICS
112
Page 115 of 252

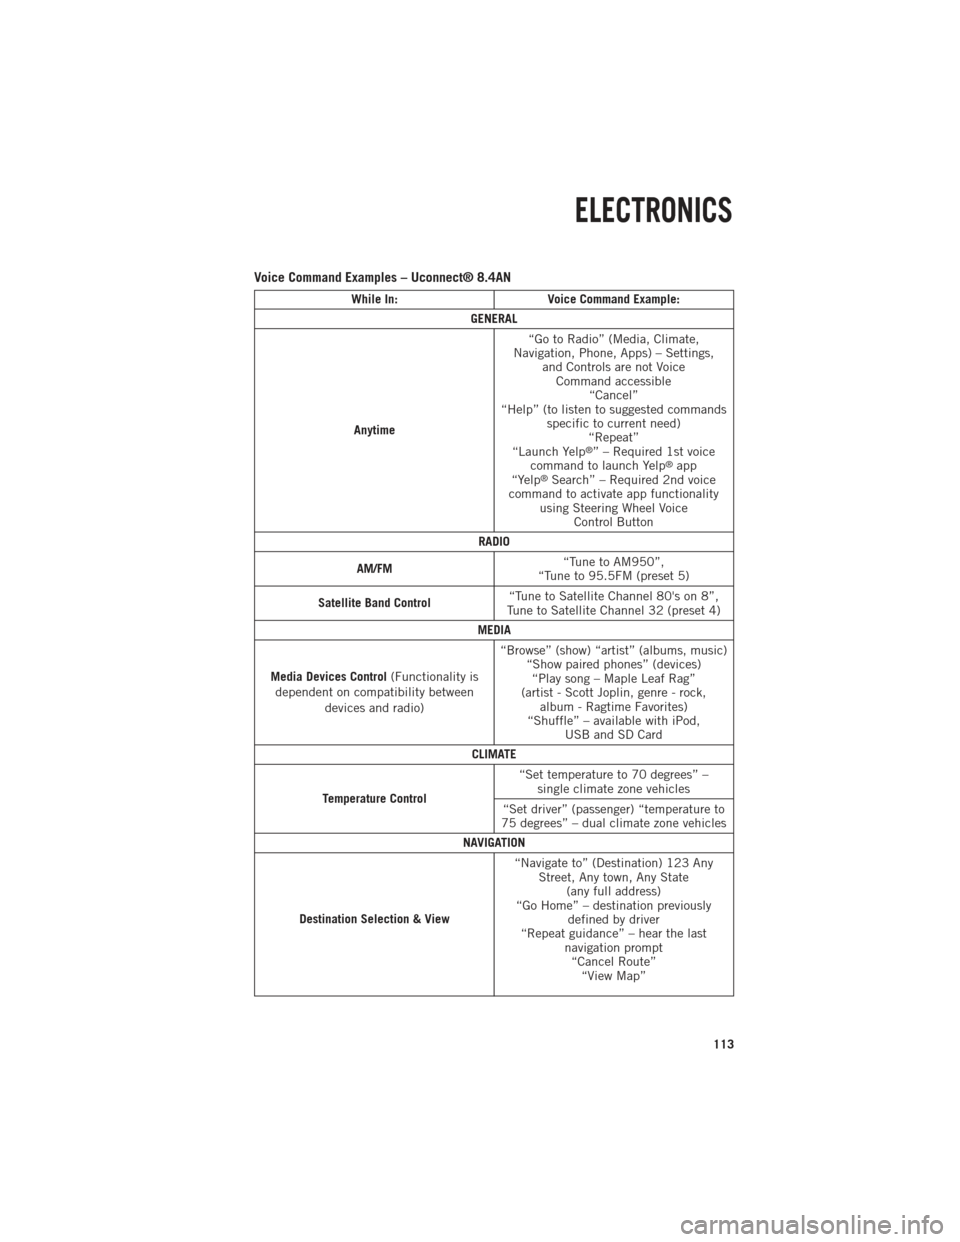
Voice Command Examples – Uconnect® 8.4AN
While In:Voice Command Example:
GENERAL
Anytime “Go to Radio” (Media, Climate,
Navigation, Phone, Apps) – Settings, and Controls are not VoiceCommand accessible “Cancel”
“Help” (to listen to suggested commands specific to current need)“Repeat”
“Launch Yelp
®” – Required 1st voice
command to launch Yelp®app
“Yelp®Search” – Required 2nd voice
command to activate app functionality using Steering Wheel Voice Control Button
RADIO
AM/FM “Tune to AM950”,
“Tune to 95.5FM (preset 5)
Satellite Band Control “Tune to Satellite Channel 80's on 8”,
Tune to Satellite Channel 32 (preset 4)
MEDIA
Media Devices Control (Functionality is
dependent on compatibility between devices and radio) “Browse” (show) “artist” (albums, music)
“Show paired phones” (devices)“Play song – Maple Leaf Rag”
(artist - Scott Joplin, genre - rock, album - Ragtime Favorites)
“Shuffle” – available with iPod, USB and SD Card
CLIMATE
Temperature Control “Set temperature to 70 degrees” –
single climate zone vehicles
“Set driver” (passenger) “temperature to
75 degrees” – dual climate zone vehicles
NAVIGATION
Destination Selection & View “Navigate to” (Destination) 123 Any
Street, Any town, Any State (any full address)
“Go Home” – destination previously defined by driver
“Repeat guidance” – hear the last navigation prompt“Cancel Route” “View Map”
ELECTRONICS
113
Page 117 of 252

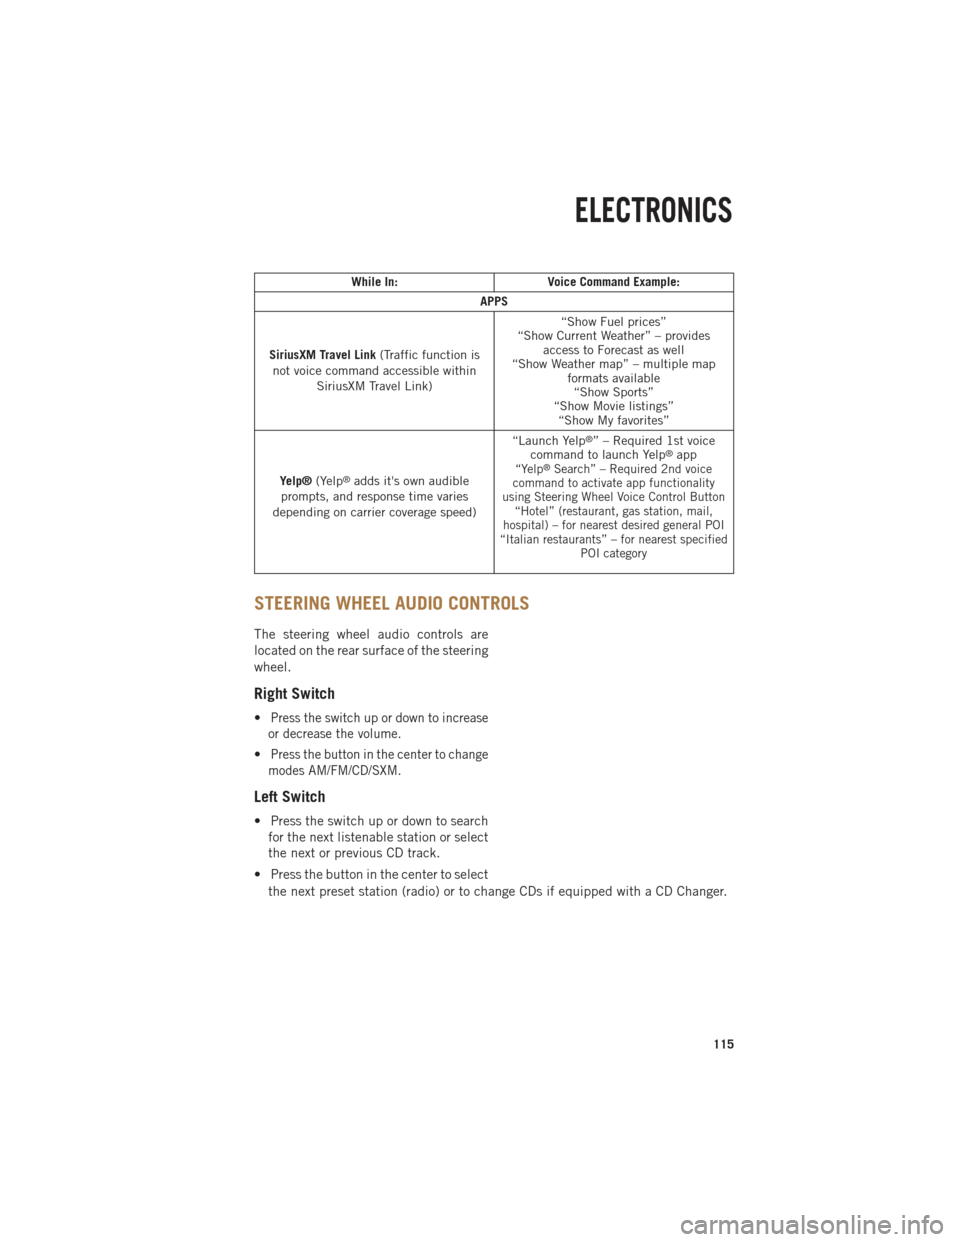
While In:Voice Command Example:
APPS
SiriusXM Travel Link (Traffic function is
not voice command accessible within SiriusXM Travel Link) “Show Fuel prices”
“Show Current Weather” – provides access to Forecast as well
“Show Weather map” – multiple map formats available“Show Sports”
“Show Movie listings” “Show My favorites”
Yelp® (Yelp
®adds it's own audible
prompts, and response time varies
depending on carrier coverage speed) “Launch Yelp
®” – Required 1st voice
command to launch Yelp®app“Yelp®Search” – Required 2nd voice
command to activate app functionality
using Steering Wheel Voice Control Button “Hotel” (restaurant, gas station, mail,
hospital) – for nearest desired general POI
“Italian restaurants” – for nearest specified POI category
STEERING WHEEL AUDIO CONTROLS
The steering wheel audio controls are
located on the rear surface of the steering
wheel.
Right Switch
•Press the switch up or down to increase
or decrease the volume.
•Press the button in the center to change
modes AM/FM/CD/SXM.
Left Switch
• Press the switch up or down to search for the next listenable station or select
the next or previous CD track.
• Press the button in the center to select the next preset station (radio) or to change CDs if equipped with a CD Changer.
ELECTRONICS
115
Page 118 of 252

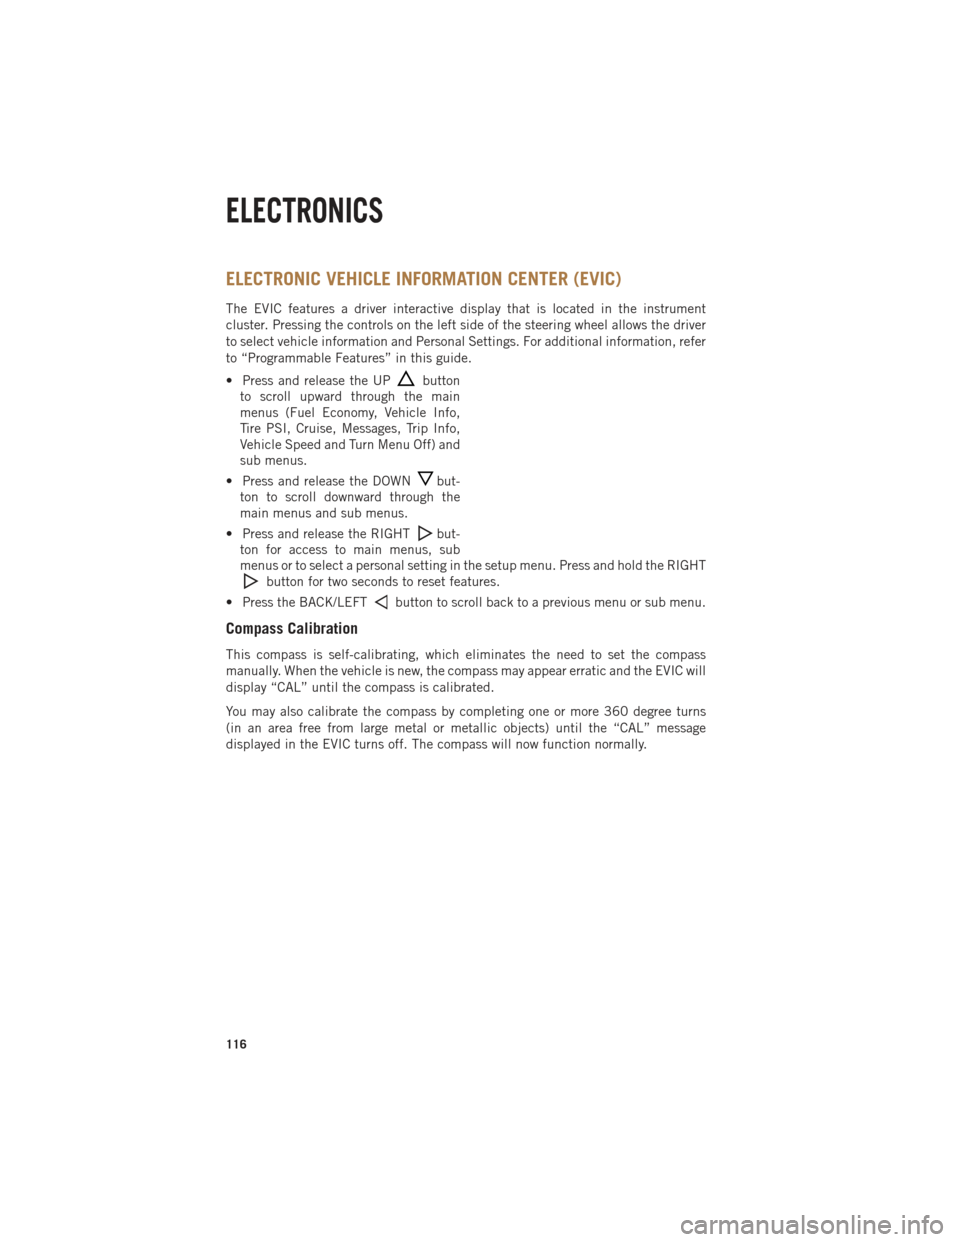
ELECTRONIC VEHICLE INFORMATION CENTER (EVIC)
The EVIC features a driver interactive display that is located in the instrument
cluster. Pressing the controls on the left side of the steering wheel allows the driver
to select vehicle information and Personal Settings. For additional information, refer
to “Programmable Features” in this guide.
• Press and release the UP
button
to scroll upward through the main
menus (Fuel Economy, Vehicle Info,
Tire PSI, Cruise, Messages, Trip Info,
Vehicle Speed and Turn Menu Off) and
sub menus.
• Press and release the DOWN
but-
ton to scroll downward through the
main menus and sub menus.
• Press and release the RIGHT
but-
ton for access to main menus, sub
menus or to select a personal setting in the setup menu. Press and hold the RIGHT
button for two seconds to reset features.
• Press the BACK/LEFT
button to scroll back to a previous menu or sub menu.
Compass Calibration
This compass is self-calibrating, which eliminates the need to set the compass
manually. When the vehicle is new, the compass may appear erratic and the EVIC will
display “CAL” until the compass is calibrated.
You may also calibrate the compass by completing one or more 360 degree turns
(in an area free from large metal or metallic objects) until the “CAL” message
displayed in the EVIC turns off. The compass will now function normally.
ELECTRONICS
116
Page 141 of 252

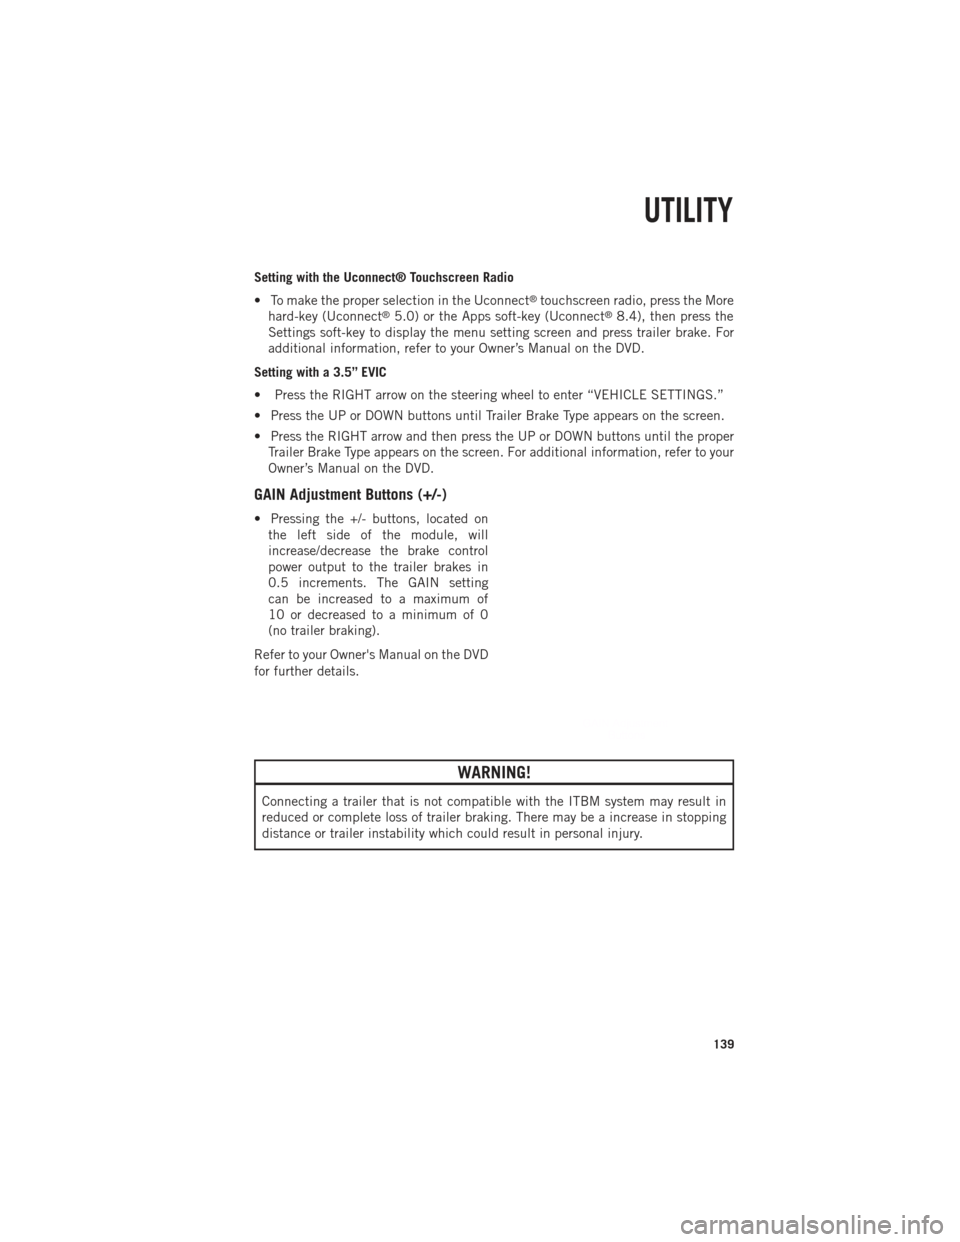
Setting with the Uconnect® Touchscreen Radio
• To make the proper selection in the Uconnect
®touchscreen radio, press the More
hard-key (Uconnect®5.0) or the Apps soft-key (Uconnect®8.4), then press the
Settings soft-key to display the menu setting screen and press trailer brake. For
additional information, refer to your Owner’s Manual on the DVD.
Setting with a 3.5” EVIC
• Press the RIGHT arrow on the steering wheel to enter “VEHICLE SETTINGS.”
• Press the UP or DOWN buttons until Trailer Brake Type appears on the screen.
• Press the RIGHT arrow and then press the UP or DOWN buttons until the proper Trailer Brake Type appears on the screen. For additional information, refer to your
Owner’s Manual on the DVD.
GAIN Adjustment Buttons (+/-)
• Pressing the +/- buttons, located onthe left side of the module, will
increase/decrease the brake control
power output to the trailer brakes in
0.5 increments. The GAIN setting
can be increased to a maximum of
10 or decreased to a minimum of 0
(no trailer braking).
Refer to your Owner's Manual on the DVD
for further details.
WARNING!
Connecting a trailer that is not compatible with the ITBM system may result in
reduced or complete loss of trailer braking. There may be a increase in stopping
distance or trailer instability which could result in personal injury.
UTILITY
139
Page 195 of 252
Column Shifter
1.Tilt the steering wheel to the full up
position and firmly set the parking
brake.
2.Turn the Key Fob to the ACC or ON/RUN
position without starting the engine.
3. Press and maintain firm pressure on the brake pedal.
4. Insert a screwdriver or similar tool, into the access port (ringed circle) on
the bottom of the steering column and
push and hold the override release
lever up.
5. Move the shift lever into the NEU- TRAL position and start the vehicle.
6. Release the parking brake.
Center Console Shifter
• Firmly set the parking brake.
•
Turn the Key Fob to the ACC or ON/RUN
position without starting the engine.
• Press and maintain firm pressure on the brake pedal.
• Using a screwdriver, press and hold the override tab through the access
port on the center console.
• Move the shift lever into the NEUTRAL position and start the vehicle.
• Release the parking brake.
WHAT TO DO IN EMERGENCIES
193
Page 196 of 252
MANUAL PARK RELEASE — EIGHT SPEED TRANSMISSION
• In order to push or tow the vehicle in cases where the transmission will not shiftout of PARK (such as a dead battery), a Manual Park Release is available.
• Follow these steps to use the Manual Park Release: • Firmly apply the parking brake.
• Using a small screwdriver or similar tool, remove the Manual Park Release
access cover, which is just above the parking brake release handle, below and
to the left of the steering column.
• Using the screwdriver or similar tool, push the Manual Park Release lever locking tab (just below the middle of the lever) to the right.
WHAT TO DO IN EMERGENCIES
194
Page 198 of 252

TOWING A DISABLED VEHICLE
Towing
Condition Wheels OFF the
Ground 2WD Models
4WD Models
Flat Tow NONE If transmission is operable:
• Transmission in NEUTRAL
• 30 mph (48 km/h) max
• 15 miles (24 km) max
distance • Auto Transmission
inPARK
• Manual Trans-
mission in gear
(NOT NEUTRAL)
• Transfer Case in
NEUTRAL
• Tow in FORWARD
direction
Wheel Lift or Dolly Tow Front
NOT ALLOWED
Rear OK
NOT ALLOWED
Flatbed ALL
BEST METHOD BEST METHOD
FREEING A STUCK VEHICLE
• If your vehicle becomes stuck in mud, sand or snow, it can often be moved using
a rocking motion. Turn your steering wheel right and left to clear the area around
the front wheels. Then shift back and forth between DRIVE and REVERSE (with
automatic transmission) or 2nd gear and REVERSE (with manual transmission)
while gently pressing the accelerator. Use the least amount of accelerator pedal
pressure that will maintain the rocking motion, without spinning the wheels or
racing the engine.
NOTE:
Press the "ESC Off" switch, to place the Electronic Stability Control (ESC) system in
"Partial Off" mode before rocking the vehicle. Once the vehicle has been freed, press
the "ESC Off" switch again to restore "ESC On" mode.
CAUTION!
• Racing the engine or spinning the wheels may lead to transmission overheating and failure. Allow the engine to idle with the shift lever in NEUTRAL for at least
one minute after every five rocking-motion cycles. This will minimize overheat-
ing and reduce the risk of transmission failure during prolonged efforts to free
a stuck vehicle.
• When “rocking” a stuck vehicle by moving between DRIVE/2nd and REVERSE,
do not spin the wheels faster than 15 mph (24 km/h), or drivetrain damage may
result.
• Revving the engine or spinning the wheels too fast may lead to transmission
overheating and failure. It can also damage the tires. Do not spin the wheels
above 30 mph (48 km/h) while in gear (no transmission shifting occurring).
WHAT TO DO IN EMERGENCIES
196