2014 Ram 1500 radio controls
[x] Cancel search: radio controlsPage 3 of 252

INTRODUCTION/WELCOME
WELCOME FROM CHRYSLER
GROUP LLC.................. 3
CONTROLS AT A GLANCE
DRIVER COCKPIT ............... 6
INSTRUMENT CLUSTER .......... 8
GETTING STARTED
KEYFOB ................... 10
KEYLESS ENTER-N-GO™ ......... 12
REMOTE START .............. 13
VEHICLE SECURITY ALARM ....... 14
SEATBELT .................. 15
SUPPLEMENTAL RESTRAINT
SYSTEM (SRS) — AIR BAGS ....... 16
CHILD RESTRAINTS ............ 17
HEAD RESTRAINTS ............. 24
FRONT SEATS ................ 25
HEATED/VENTILATED SEATS ....... 27
HEATED STEERING WHEEL ........ 30
TILT STEERING COLUMN ......... 31
OPERATING YOUR VEHICLE
ENGINE BREAK-IN
RECOMMENDATIONS........... 32
TURN SIGNALS/WIPER/WASHER/HIGH
BEAMS LEVER................ 33
HEADLIGHT SWITCH ............ 34
SPEED CONTROL .............. 35
EIGHT-SPEED AUTOMATIC
TRANSMISSION — IF EQUIPPED .... 37
ELECTRONIC RANGE SELECT (ERS)
OPERATION ................. 38
1500 AIR SUSPENSION SYSTEM .... 40
2500-3500 AIR SUSPENSION
SYSTEM .................... 42
MANUAL CLIMATE CONTROLS
WITHOUT TOUCHSCREEN ........ 43
MANUAL CLIMATE CONTROLS
WITH TOUCHSCREEN ........... 44
AUTOMATIC CLIMATE CONTROLS
WITH TOUCHSCREEN ........... 45
PARKSENSE
®FRONT AND REAR
PARK ASSIST ................ 46
PARKVIEW®REAR BACK-UP CAMERA.. 47
POWER SLIDING REAR WINDOW .... 47
POWER SUNROOF ............. 48
WIND BUFFETING ............. 49
ELECTRONICS
YOUR VEHICLE'S SOUND SYSTEM . . . 50
IDENTIFYING YOUR RADIO ........ 52
Uconnect
®ACCESS ............. 53
Uconnect®3.0 ................ 67
Uconnect®5.0 ................ 70 Uconnect
®8.4A ............... 78
Uconnect®8.4AN .............. 96
STEERING WHEEL AUDIO
CONTROLS ................. 115
ELECTRONIC VEHICLE INFORMATION
CENTER (EVIC) .............. 116
PROGRAMMABLE FEATURES ...... 117
UNIVERSAL GARAGE DOOR OPENER
(HomeLink
®) ................ 120
POWER INVERTER ............ 123
POWER OUTLETS ............ 124
OFF-ROAD CAPABILITIES
FOUR WHEEL DRIVE OPERATION . . . 126
UTILITY
TONNEAU COVER............. 129
EASY-OFF TAILGATE ........... 129
PICKUP BOX ................ 130
RAMBOX
®.................. 132
TOWING & PAYLOAD ........... 136
TOW/HAUL MODE ............ 138
INTEGRATED TRAILER BRAKE
MODULE .................. 138
RECREATIONAL TOWING
(BEHIND MOTORHOME, ETC.) ..... 140
1500 3.0L DIESEL
DIESEL ENGINE BREAK-IN
RECOMMENDATIONS........... 145
DIESEL ENGINE STARTING
PROCEDURES ............... 155
DIESEL FUEL FILTER/WATER
SEPARATOR ................ 147
EXHAUST REGENERATION ....... 148
COOL-DOWN IDLE CHART ........ 162
ADDING FUEL — DIESEL ENGINE
ONLY ..................... 163
DIESEL EXHAUST FLUID ........ 164
6.7L CUMMINS® DIESEL
DIESEL ENGINE BREAK-IN
RECOMMENDATIONS........... 155
DIESEL ENGINE STARTING
PROCEDURES ............... 155
DIESEL EXHAUST BRAKE
(ENGINE BRAKING) ........... 157
IDLE-UP FEATURE (AUTOMATIC
TRANSMISSION ONLY) ......... 158
ENGINE MOUNTED FUEL
FILTER/WATER SEPARATOR ....... 158
UNDERBODY MOUNTED FUEL
FILTER/WATER SEPARATOR ....... 160
EXHAUST REGENERATION ....... 161
COOL-DOWN IDLE CHART ........ 162
ADDING FUEL — DIESEL ENGINE
ONLY ..................... 163
DIESEL EXHAUST FLUID ........ 164
TABLE OF CONTENTS
Page 28 of 252

Memory Seat
The memory seat feature allows you to save the driver's seat position (excluding
lumbar position), driver's outside mirror position, adjustable brake and accelerator
pedals, Automatic Temperature Control (ATC) temperature setting and radio station
preset settings. The driver's memory buttons are located on the outboard side of the
driver's seat cushion.
•
Adjust all memory profile settings,
press the middle button S (SET), then
press 1 or 2 within five seconds.
• To program a Key Fob to the memory position, place the ignition switch in
the LOCK position and remove the Key
Fob, press and release the LOCK but-
ton on the Key Fob to be programmed
within five seconds of pressing button
1or2.
• Press 1 or 2 to recall the saved posi- tions, or press UNLOCK on the programmed Key Fob.
Refer to the Owner's Manual on the DVD for further details.
Manual Seats
Forward/Rearward
•Lift up on the adjusting bar located at
the front of the seat near the floor and
release it when the seat is at the desired
position. Then, using body pressure,
move forward and backward on the seat
to be sure that the seat adjusters have
latched.
Recliner
• Lift the recliner lever located on the
outboard side of the seat, lean back
and release at the desired position.
CAUTION!
Do not place any article under a power seat or impede its ability to move as it may
cause damage to the seat controls. Seat travel may become limited if movement
is stopped by an obstruction in the seat’s path.
GETTING STARTED
26
Page 48 of 252

Air Conditioning (A/C)
• If the air conditioning button is pressed while in AUTO mode, the system will exitAUTO mode and stay in A/C. The mode and blower will be set at the closest mode
and blower position that the system was operating in AUTO.
SYNC Temperature Soft-Key
• Touch the “SYNC” soft-key on the Uconnect®radio to control the driver and
passenger temperatures simultaneously. Touch the “SYNC” soft-key a second time
to control the temperatures individually.
Air Recirculation
• Use Recirculation for maximum A/C operation.
• For window defogging, turn the Recirculation button off.
• If the Recirculation button is pushed while in the AUTO mode, the indicator light may flash three times to indicate the cabin air is being controlled automatically.
Heated Mirrors
The mirrors are heated to melt frost or ice. This feature is activated whenever you turn
on the defroster.
PARKSENSE® FRONT AND REAR PARK ASSIST
ParkSense®can be enabled and disabled by pressing the ParkSense®switch located
below the climate controls, on the switch panel.
The four ParkSense
®sensors, located in the rear fascia/bumper, monitor the area
behind the vehicle that is within the sensors’ field of view. The sensors can detect
obstacles from approximately 12 in (30 cm) up to 79 in (200 cm) from the rear
fascia/bumper in the horizontal direction, depending on the location, type and
orientation of the obstacle.
The six ParkSense
®sensors, located in the front fascia/bumper, monitor the area in
front of the vehicle that is within the sensors’ field of view. The sensors can detect
obstacles from approximately 12 in (30 cm) up to 47 in (120 cm) from the front
fascia/bumper in the horizontal direction, depending on the location, type and
orientation of the obstacle.
When an object is detected within 6.5 ft (2 m) behind the rear bumper while the
vehicle is in REVERSE, a warning will display in the Electronic Vehicle Information
Center (EVIC) and a chime will sound (when Sound and Display is selected from the
Customer Programmable Features section of the Uconnect
®System screen). As the
vehicle moves closer to the object, the chime rate will change from single 1/2 second
tone (for rear only), to slow (for rear only), to fast, to continuous.
Refer to your Owner's Manual on the DVD for further details.
OPERATING YOUR VEHICLE
46
Page 65 of 252

7. Wait for the beep, and then dictate any message up to 140 characters. If youexceed 140 characters, you will hear the following prompt: “Message was too
long; your message will be truncated.”
8. Uconnect
®will then repeat the message back to you.
9. Uconnect
®will prompt you: “To add to your message, say “Continue”; To delete
the current message and start over, say “Start Over”; to send the current message,
say “Send”; to hear the message again, say “Repeat”.
10. If you are happy with your message and would like to send it, wait for the beep and say “Send”.
11. Uconnect
®will then say “Sending your message.”
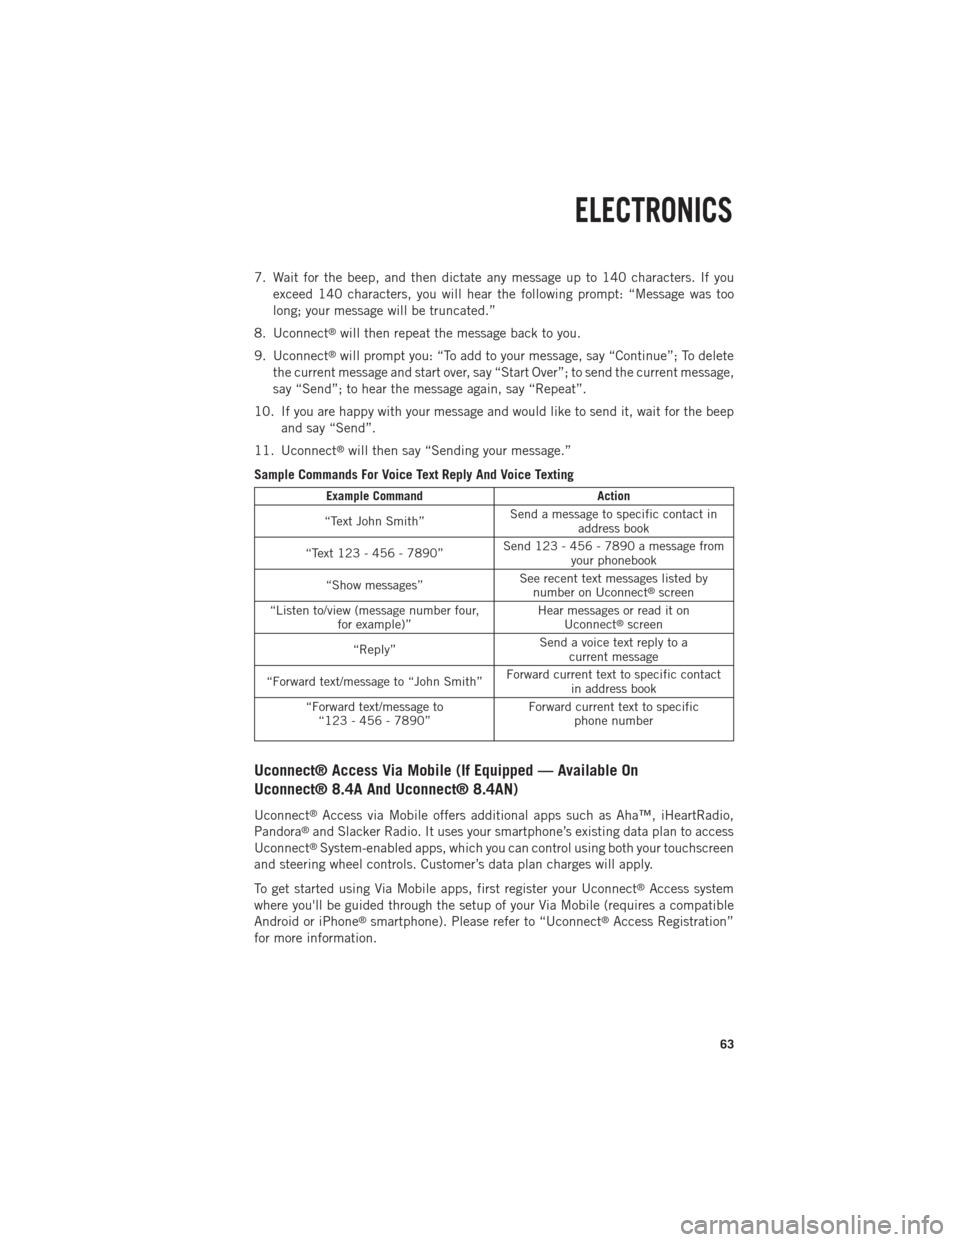
Sample Commands For Voice Text Reply And Voice Texting
Example Command Action
“Text John Smith” Send a message to specific contact in
address book
“Text 123 - 456 - 7890” Send 123 - 456 - 7890 a message from
your phonebook
“Show messages” See recent text messages listed by
number on Uconnect
®screen
“Listen to/view (message number four, for example)” Hear messages or read it on
Uconnect
®screen
“Reply” Send a voice text reply to a
current message
“Forward text/message to “John Smith” Forward current text to specific contact
in address book
“Forward text/message to “123 - 456 - 7890” Forward current text to specific
phone number
Uconnect® Access Via Mobile (If Equipped — Available On
Uconnect® 8.4A And Uconnect® 8.4AN)
Uconnect®Access via Mobile offers additional apps such as Aha™, iHeartRadio,
Pandora®and Slacker Radio. It uses your smartphone’s existing data plan to access
Uconnect®System-enabled apps, which you can control using both your touchscreen
and steering wheel controls. Customer’s data plan charges will apply.
To get started using Via Mobile apps, first register your Uconnect
®Access system
where you'll be guided through the setup of your Via Mobile (requires a compatible
Android or iPhone
®smartphone). Please refer to “Uconnect®Access Registration”
for more information.
ELECTRONICS
63
Page 80 of 252

Uconnect® 8.4A
Uconnect® 8.4A AT A GLANCE
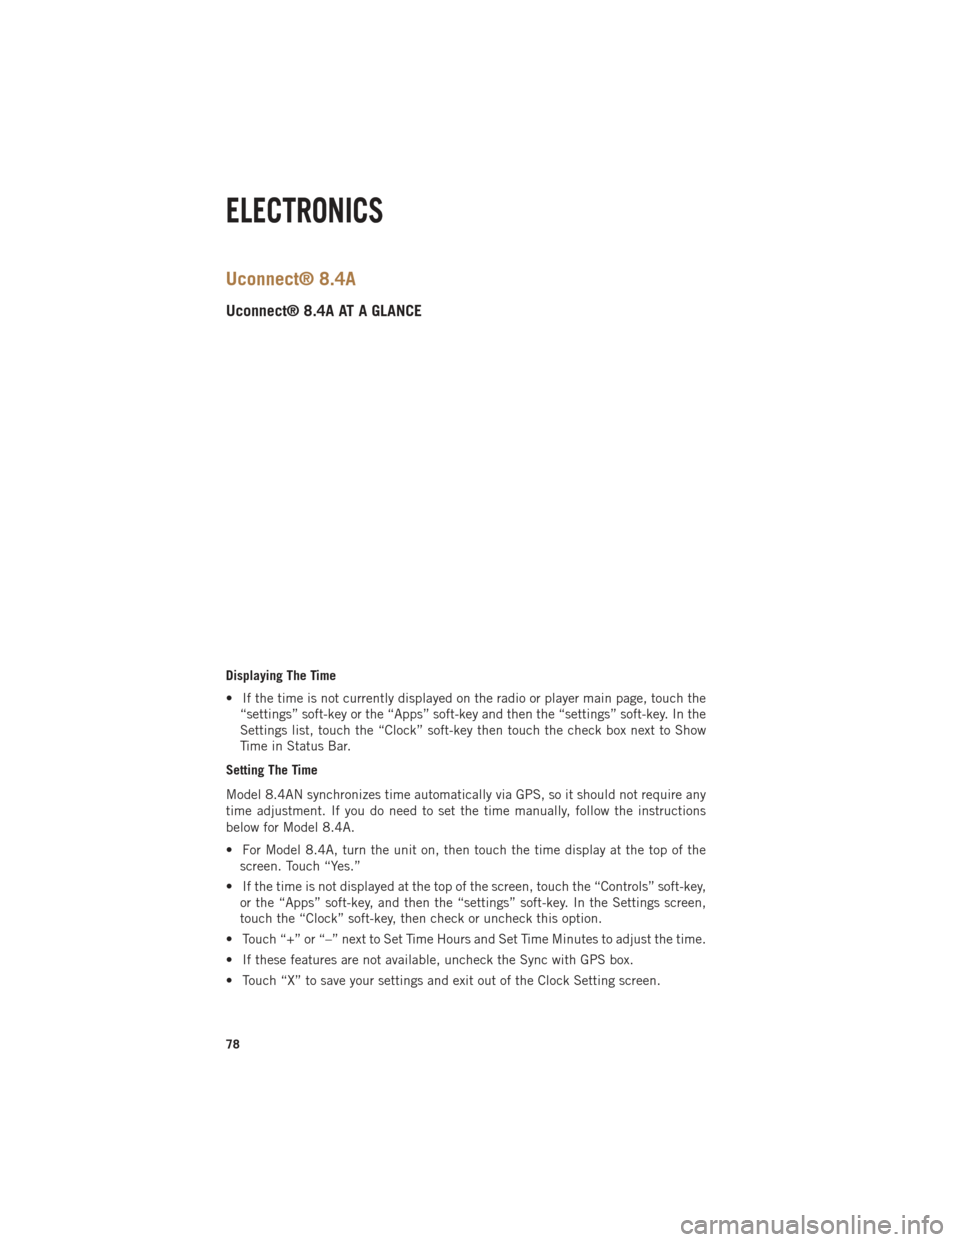
Displaying The Time
• If the time is not currently displayed on the radio or player main page, touch the“settings” soft-key or the “Apps” soft-key and then the “settings” soft-key. In the
Settings list, touch the “Clock” soft-key then touch the check box next to Show
Time in Status Bar.
Setting The Time
Model 8.4AN synchronizes time automatically via GPS, so it should not require any
time adjustment. If you do need to set the time manually, follow the instructions
below for Model 8.4A.
• For Model 8.4A, turn the unit on, then touch the time display at the top of the screen. Touch “Yes.”
• If the time is not displayed at the top of the screen, touch the “Controls” soft-key, or the “Apps” soft-key, and then the “settings” soft-key. In the Settings screen,
touch the “Clock” soft-key, then check or uncheck this option.
• Touch “+” or “–” next to Set Time Hours and Set Time Minutes to adjust the time.
• If these features are not available, uncheck the Sync with GPS box.
• Touch “X” to save your settings and exit out of the Clock Setting screen.
ELECTRONICS
78
Page 83 of 252

Direct Tune
• Tune directly to a SXM channel by pressing the “Tune” soft-key on the screen, andentering the desired station number.
Jump
• Automatically tells you when Traffic & Weather for a favorite city is available, and gives you the option to switch to that channel. Touch “Jump” to activate the
feature. After listening to Traffic and Weather, touch “Jump” again to return to the
previous channel.
Fav
• Activates the favorites menu. You can add up to 50 favorite artists or songs. Just touch “Add Fav Artist” or “Add Fav Song” while the song is playing. You will then
be alerted any time one of these songs, or works by these artists, is playing on other
SiriusXM channels.
SiriusXM Parental Controls
• You can skip or hide certain channels from view if you do not want access to them. Touch the “More” soft-key, then the “settings” soft-key, next touch the” Sirius
Setup” soft-key, then select Channel Skip. Touch the box check-mark next to the
channel you want skipped. They will not show up in normal usage.
•
SiriusXM also offers the option to permanently block selected channels. Call
(1-888-601-6297 for U.S. customers, 1-877-438-9677 for Canadian customers)
and request the Family-Friendly Package.
Browse
Lets you browse the SiriusXM channel listing or Genre listing. Favorites, Game Zone,
Weather and Jump settings also provide a way to browse the SiriusXM channel list.
Browse
Sub-Menu Sub-Menu Description
All Shows the channel listing.
Genre Provides a list of all genres, and lets you jump to a channel within the selected genre.
Presets Lets you scroll the list of Preset satellite channels. Touch the channel, or press Enter on the Tune knob, to go to that channel. Touch the trash can
icon to delete a preset. Your presets are also shown at the top of the main
Satellite Radio screen.
Favorites Lets you manage artists and songs in the Favorites list and configure Alert Settings to let you know when favorite songs or artists are playing on other
channels. Also, view a list of channels airing any of your Favorites.
Game Zone
Provides alerts when your favorite sports teams are starting a game which is
being aired on other SiriusXM channels, or when their game score is
announced. You can select and manage your Teams list here, and configure
alerts.
Jump Lets you select your favorite cities for Traffic & Weather information, which is used by the Jump feature on the main satellite radio screen.
ELECTRONICS
81
Page 85 of 252

MEDIA HUB — PLAYING iPod®/USB/MP3 DEVICES
There are many ways to play music from iPod®/MP3 players or USB devices through
your vehicle's sound system. Touch your “Media” soft-key to begin.
Audio Jack (AUX)
The AUX allows a portable device, such as an MP3 player or an iPod
®, to be plugged
into the radio and utilize the vehicle’s sound system, using a 3.5 mm audio cable, to
amplify the source and play through the vehicle speakers.
Touching the “AUX” soft-key will change the mode to auxiliary device if the audio
jack is connected, allowing the music from your portable device to be heard through
the vehicle's speakers. In order to activate the AUX, plug in the audio jack.
The functions of the portable device are controlled using the device buttons. The
volume may be controlled using the radio or portable device.
To route the audio cable out of the center console, use the access cut out in the front
of the console.
USB Port
Connect your iPod
®or compatible device using a USB cable into the USB Port. USB
Memory sticks with audio files can also be used. Audio from the device can be played
on the vehicles sound system while providing metadata (artist, track title, album,
etc.) information on the radio display.
When connected, the iPod
®/compatible USB device can be controlled using the
radio or Steering Wheel Audio Controls to play, skip to the next or previous track,
browse, and list the contents.
The iPod®battery charges when plugged into the USB port (if supported by the specific
device).
To route the USB/iPod®cable out of the center console, use the access cut out.
ELECTRONICS
83
Page 86 of 252

NOTE:
When connecting your iPod®device for the first time, the system may take several
minutes to read your music, depending on the number of files. For example, the
system will take approximately five minutes for every 1000 songs loaded on the
device. Also during the reading process, the Shuffle and Browse functions will be
disabled. This process is needed to ensure the full use of your iPod
®features and
only happens the first time it is connected. After the first time, the reading process
of your iPod
®will take considerably less time unless changes are made or new songs
are added to the playlist.
The USB port supports certain Mini, Classic, Nano, Touch, and iPhone
®devices. The
USB port also supports playing music from compatible external USB Mass Storage
Class memory devices. Some iPod
®software versions may not fully support the USB
port features. Please visit Apple’s website for iPod®software updates.
SD Card
Play songs stored on an SD card inserted into the SD card slot.
Song playback can be controlled using the radio or Steering Wheel Audio Controls to
play, skip to the next or previous track, browse, and list the contents.
Bluetooth® Streaming Audio
If equipped with Uconnect
®Voice Command, your Bluetooth-equipped iPod®
devices, cell phones or other media players, may also be able to stream music to your
vehicle's sound system. Your connected device must be Bluetooth-compatible, and
paired with your system (see Uconnect
®Phone for pairing instructions). You can
access the music from your connected Bluetooth®device by touching the Bluetooth®
soft-key while in Media mode.
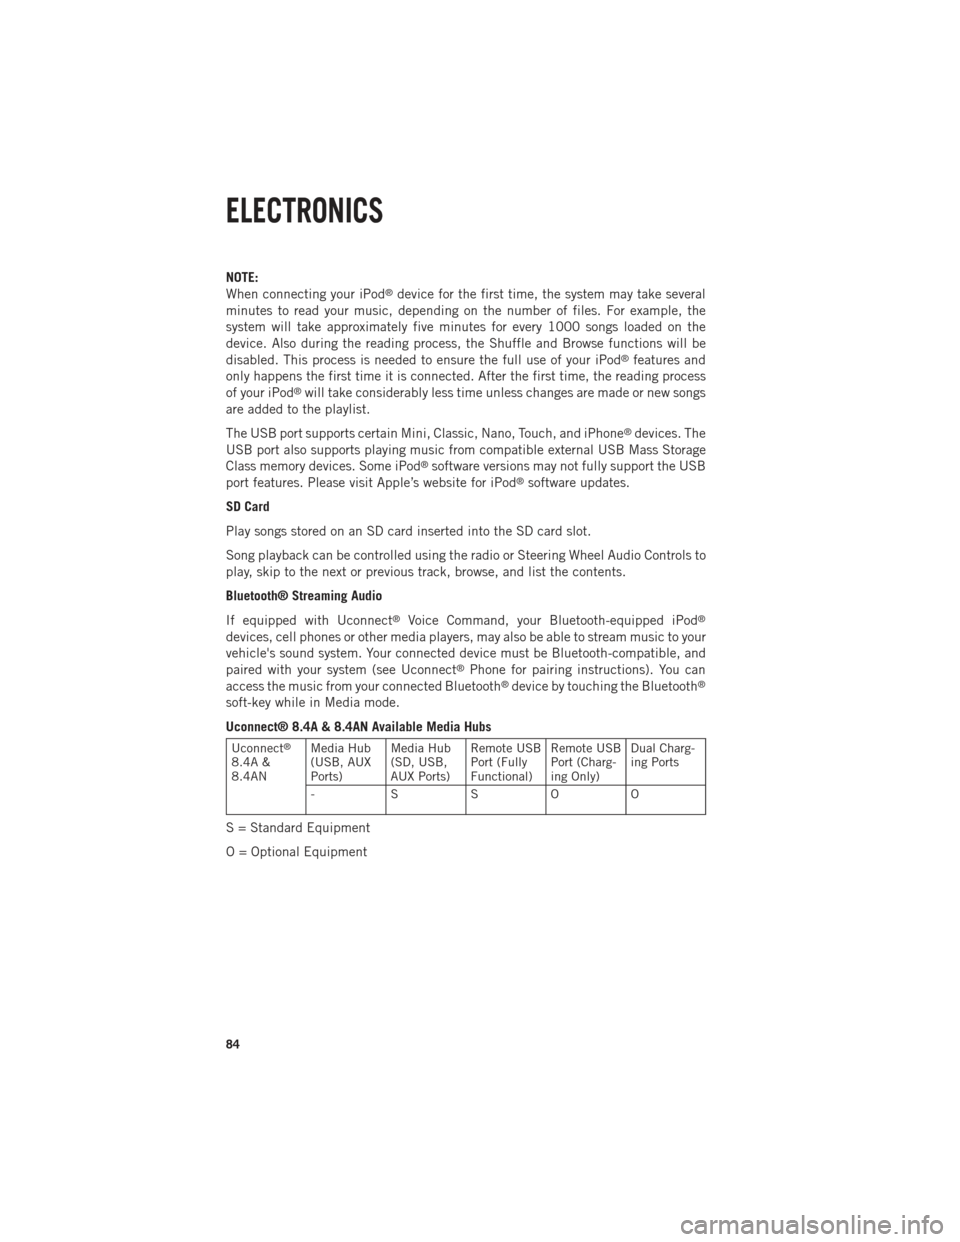
Uconnect® 8.4A & 8.4AN Available Media Hubs
Uconnect®
8.4A &
8.4AN Media Hub
(USB, AUX
Ports) Media Hub
(SD, USB,
AUX Ports)Remote USB
Port (Fully
Functional)Remote USB
Port (Charg-
ing Only)Dual Charg-
ing Ports
- SSOO
S = Standard Equipment
O = Optional Equipment
ELECTRONICS
84