2014 Ram 1500 brakes
[x] Cancel search: brakesPage 39 of 252

Resume
• To resume a previously selected set speed in memory, push the RESUME/ACCELswitch and release.
Cancel
• Push the CANCEL switch or apply the brakes to cancel the set speed and maintainthe set speed memory.
• Push the ON/OFF switch to turn the system off and erase the set speed memory.
WARNING!
• Leaving the Electronic Speed Control system on when not in use is dangerous. You could accidentally set the system or cause it to go faster than you want. You
could lose control and have a collision. Always leave the Electronic Speed
Control system off when you are not using it.
•
Electronic Speed Control can be dangerous where the system cannot maintain a
constant speed. Your vehicle could go too fast for the conditions, and you could
lose control. A collision could be the result. Do not use Electronic Speed Control
in heavy traffic or on roads that are winding, icy, snow-covered or slippery.
EIGHT-SPEED AUTOMATIC TRANSMISSION — IF EQUIPPED
• Your vehicle may be equipped with a fuel efficient eight-speed trans-
mission. The electronic Transmission
Shifter is located on the instrument
panel. The transmission gear (PRND)
is displayed both above the shifter con-
trol and in the Electronic Vehicle Infor-
mation Center (EVIC).
• To select a gear range, simply rotate the shifter control.
NOTE:
You must press the brake pedal to shift
the transmission out of PARK or from
NEUTRAL into DRIVE or REVERSE.
• To shift past multiple gear ranges at once (such as Park to Drive), simply rotate the switch to the appropriate detent.
• Select the DRIVE range for normal driving.
OPERATING YOUR VEHICLE
37
Page 140 of 252

TOW/HAUL MODE
• When driving in hilly areas, towing a trailer, carrying a heavy load, etc., andfrequent transmission shifting occurs, press the TOW/HAUL switch to select
TOW/HAUL mode. This will improve performance and reduce the potential for
transmission overheating or failure due to excessive shifting. When operating in
TOW/HAUL mode, transmission upshifts are delayed, and the transmission will
automatically downshift (for engine braking) during steady braking maneuvers.
• The “TOW/HAUL Indicator Light” will illuminate in the instrument cluster to
indicate that TOW/HAUL mode has
been activated. Pressing the switch a
second time restores normal operation.
If the TOW/HAUL mode is desired, the
switch must be pressed each time the
engine is started.
INTEGRATED TRAILER BRAKE MODULE
The Integrated Trailer Brake Controller allows you to automatically or manually
activate the Electric Trailer Brakes and Electric Over Hydraulic Trailer Brakes for a
better braking performance when towing a trailer.
NOTE:
The Integrated Trailer Brake Controller is located in the center stack below the
climate controls.
This module will have four different options depending on the type of trailer you want
to tow and can be selected through the 3.5” Electronic Vehicle Information Center
(EVIC) or touchscreen radio.
• Light Electric
• Heavy Electric
• Light EOH (Electric Over Hydraulic)
• Heavy EOH (Electric Over Hydraulic)
UTILITY
138
Page 141 of 252

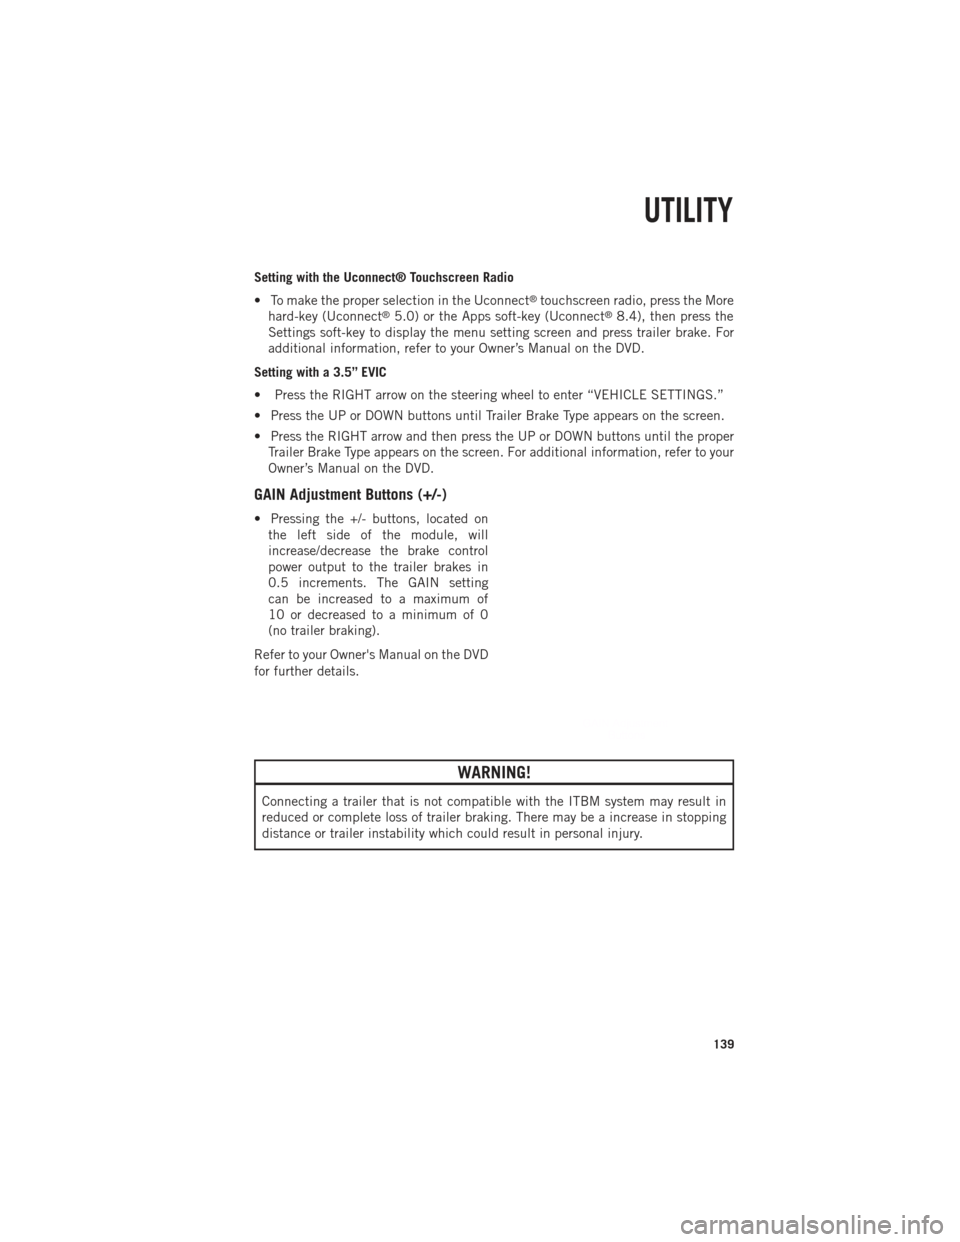
Setting with the Uconnect® Touchscreen Radio
• To make the proper selection in the Uconnect
®touchscreen radio, press the More
hard-key (Uconnect®5.0) or the Apps soft-key (Uconnect®8.4), then press the
Settings soft-key to display the menu setting screen and press trailer brake. For
additional information, refer to your Owner’s Manual on the DVD.
Setting with a 3.5” EVIC
• Press the RIGHT arrow on the steering wheel to enter “VEHICLE SETTINGS.”
• Press the UP or DOWN buttons until Trailer Brake Type appears on the screen.
• Press the RIGHT arrow and then press the UP or DOWN buttons until the proper Trailer Brake Type appears on the screen. For additional information, refer to your
Owner’s Manual on the DVD.
GAIN Adjustment Buttons (+/-)
• Pressing the +/- buttons, located onthe left side of the module, will
increase/decrease the brake control
power output to the trailer brakes in
0.5 increments. The GAIN setting
can be increased to a maximum of
10 or decreased to a minimum of 0
(no trailer braking).
Refer to your Owner's Manual on the DVD
for further details.
WARNING!
Connecting a trailer that is not compatible with the ITBM system may result in
reduced or complete loss of trailer braking. There may be a increase in stopping
distance or trailer instability which could result in personal injury.
UTILITY
139
Page 159 of 252

DIESEL EXHAUST BRAKE (ENGINE BRAKING)
The Exhaust Brake switch is located on the switch bank below the audio system. This
switch is used to enable exhaust brake modes.
• Pressing the exhaust brake switch once will enable full strength exhaust brakemode, indicated by a yellow icon in the EVIC. This mode applies full exhaust
braking when the accelerator pedal is released. This is most useful for slowing the
vehicle.
• Pressing the exhaust brake switch again will enable the Smart Brake feature, indicated by a green icon in the EVIC. This feature is intended to maintain the
vehicle speed present when the accelerator pedal is released. However, when the
brakes are applied, full exhaust braking is still enabled to slow the vehicle.
• A third press of the brake switch will turn the exhaust brake off, and will extinguish the exhaust brake icon in the EVIC.
NOTE:
In general, higher engine speeds result in higher exhaust braking force. For optimum
braking power, it is recommended to use the exhaust brake while in TOW/HAUL
mode.
CAUTION!
Use of aftermarket exhaust brakes is not recommended and could lead to engine
damage.
WARNING!
Do not use the exhaust brake feature when driving in icy or slippery conditions as
the increased engine braking can cause the rear wheels to slide and the vehicle to
swing around with the possible loss of vehicle control, which may cause a collision
possibly resulting in personal injury or death.
6.7L CUMMINS® DIESEL
157
Page 175 of 252

- Anti-Lock Brake (ABS) Light
This light monitors the Anti-Lock Brake System (ABS). The light will turn on when the
ignition switch is turned to the ON/RUN position and may stay on for as long as four
seconds.
If the ABS light remains on or turns on while driving, it indicates that the Anti-Lock
portion of the brake system is not functioning and that service is required. However, the
conventional brake system will continue to operate normally if the BRAKE warning light
is not on.
If the ABS light is on, the brake system should be serviced as soon as possible to
restore the benefits of Anti-Lock brakes. If the ABS light does not turn on when the
ignition switch is turned to the ON/RUN position, have the light inspected by an
authorized dealer.
- Electronic Throttle Control (ETC) Light
This light informs you of a problem with the Electronic Throttle Control (ETC) system.
If a problem is detected, the light will come on while the engine is running. Cycle the
ignition when the vehicle has completely stopped and the shift lever is placed in the
PARK position; the light should turn off.
If the light remains lit with the engine running, your vehicle will usually be drivable;
however, see an authorized service center immediately. If the light is flashing when the
engine is running, immediate service is required and you may experience reduced
performance, an elevated/rough idle or engine stall and your vehicle may require towing.
- Air Bag Warning Light
This light will turn on for four to eight seconds as a bulb check when the ignition
switch is first turned to the ON/RUN position. If the light is either not on during
starting, stays on, or turns on while driving, have the system inspected at an
authorized dealer as soon as possible. Refer to “Occupant Restraints” in “Things To
Know Before Starting Your Vehicle” of your Owner’s Manual for further information.
NOTE:
The Air Bag System is designed to be maintenance free.
- SERV (Service) 4WD Indicator Light
The SERV 4WD light monitors the electric shift four-wheel drive system. If the SERV
4WD light stays on or comes on during driving, it means that the four-wheel drive
system is not functioning properly and that service is required.
For vehicles equipped with a premium cluster this indicator will display in the
Electronic Vehicle Information Center (EVIC).
WHAT TO DO IN EMERGENCIES
173
Page 232 of 252

FUSES
POWER DISTRIBUTION CENTER (FUSES)
The Power Distribution Center is located in
the engine compartment near the battery.
This center contains cartridge fuses and
mini fuses. A description of each fuse and
component may be stamped on the inside
cover, otherwise the cavity number of each
fuse is stamped on the inside cover that
corresponds to the following chart.
Cavity Cartridge Fuse Micro FuseDescription
F01 80 Amp Red Rad Fan Control Module –
If Equipped
F03 60 Amp Yellow Rad Fan – If Equipped
F05 40 Amp Green Compressor for Air Suspension –
If Equipped
F06 40 Amp Green Antilock Brakes/Electronic
Stability Control Pump
F07 40 Amp Green Starter Solenoid
F08 20 Amp Yellow Emissions Diesel – If Equipped
F09 40 Amp Green (Cummins Diesel)30 Amp Pink
(1500 LD Diesel) Diesel Fuel Heater – If Equipped
F10 40 Amp Green Body Controller/Exterior
Lighting #2
F10 50 Amp Red
Body Controller/Exterior
Lighting #2 – If Equipped with Stop/Start
F11 30 Amp Pink Integrated Trailer Brake
Module – If Equipped
F12 40 Amp Green Body Controller #3/Interior Lights
F13 40 Amp Green Blower Motor
F14 40 Amp Green Body Controller #4/Power Locks
F15 30 Amp Pink Electric Park Brake Right Side –
If Equipped
F19 30 Amp Pink SCR – If Equipped
F20 30 Amp Pink Passenger Door Module
F21 30 Amp Pink Drive Train Control Module
F22 20 Amp Yellow Engine Control Module
MAINTAINING YOUR VEHICLE
230
Page 233 of 252

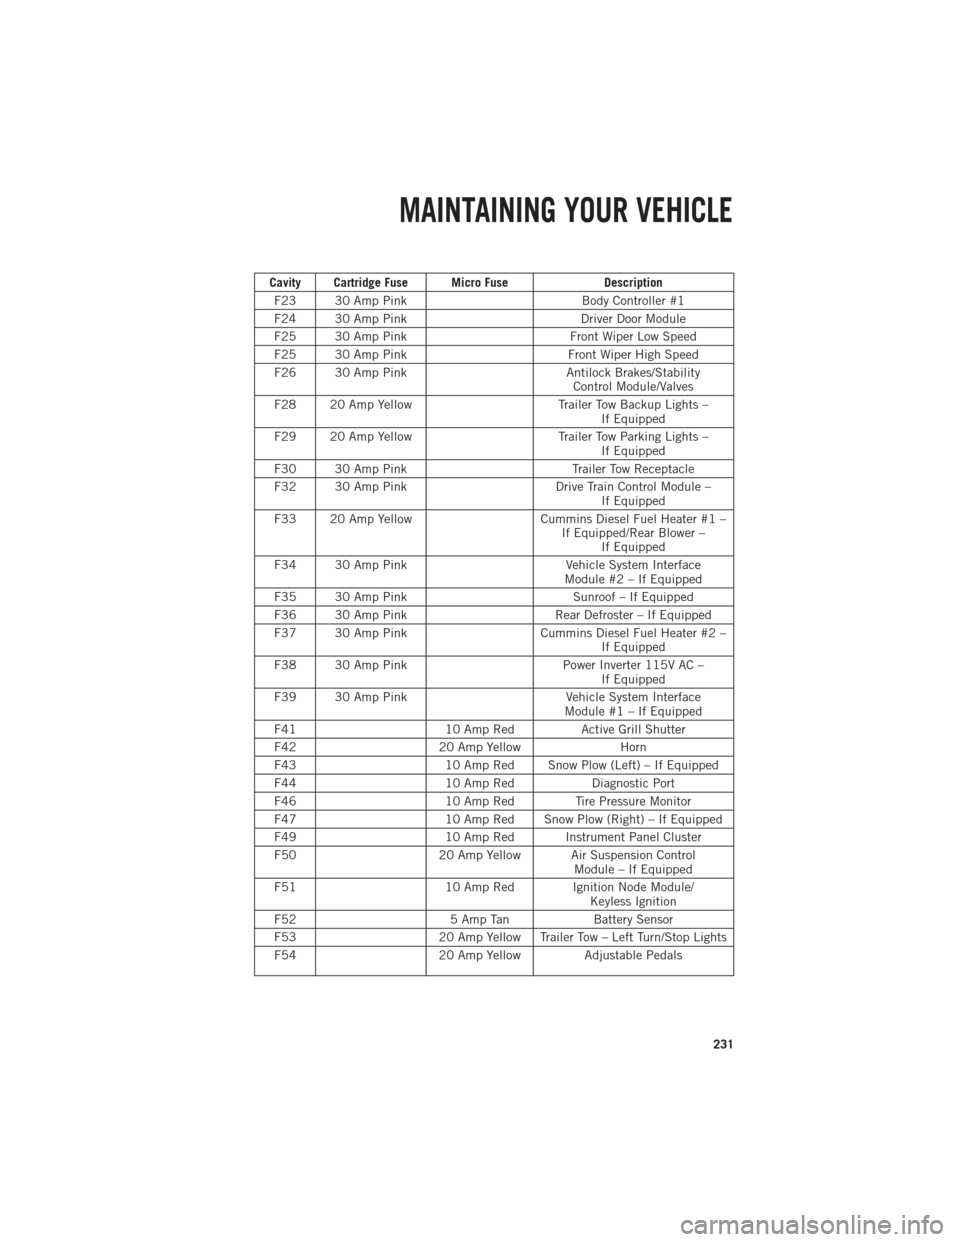
Cavity Cartridge Fuse Micro FuseDescription
F23 30 Amp Pink Body Controller #1
F24 30 Amp Pink Driver Door Module
F25 30 Amp Pink Front Wiper Low Speed
F25 30 Amp Pink Front Wiper High Speed
F26 30 Amp Pink Antilock Brakes/Stability
Control Module/Valves
F28 20 Amp Yellow Trailer Tow Backup Lights –
If Equipped
F29 20 Amp Yellow Trailer Tow Parking Lights –
If Equipped
F30 30 Amp Pink Trailer Tow Receptacle
F32 30 Amp Pink Drive Train Control Module –
If Equipped
F33 20 Amp Yellow Cummins Diesel Fuel Heater #1 –
If Equipped/Rear Blower – If Equipped
F34 30 Amp Pink Vehicle System Interface
Module #2 – If Equipped
F35 30 Amp Pink Sunroof – If Equipped
F36 30 Amp Pink Rear Defroster – If Equipped
F37 30 Amp Pink Cummins Diesel Fuel Heater #2 –
If Equipped
F38 30 Amp Pink Power Inverter 115V AC –
If Equipped
F39 30 Amp Pink Vehicle System Interface
Module #1 – If Equipped
F41 10 Amp RedActive Grill Shutter
F42 20 Amp Yellow Horn
F43 10 Amp Red Snow Plow (Left) – If Equipped
F44 10 Amp RedDiagnostic Port
F46 10 Amp Red Tire Pressure Monitor
F47 10 Amp Red Snow Plow (Right) – If Equipped
F49 10 Amp Red Instrument Panel Cluster
F50 20 Amp Yellow Air Suspension Control
Module – If Equipped
F51 10 Amp Red Ignition Node Module/
Keyless Ignition
F52 5 Amp TanBattery Sensor
F53 20 Amp Yellow Trailer Tow – Left Turn/Stop Lights
F54 20 Amp YellowAdjustable Pedals
MAINTAINING YOUR VEHICLE
231
Page 234 of 252

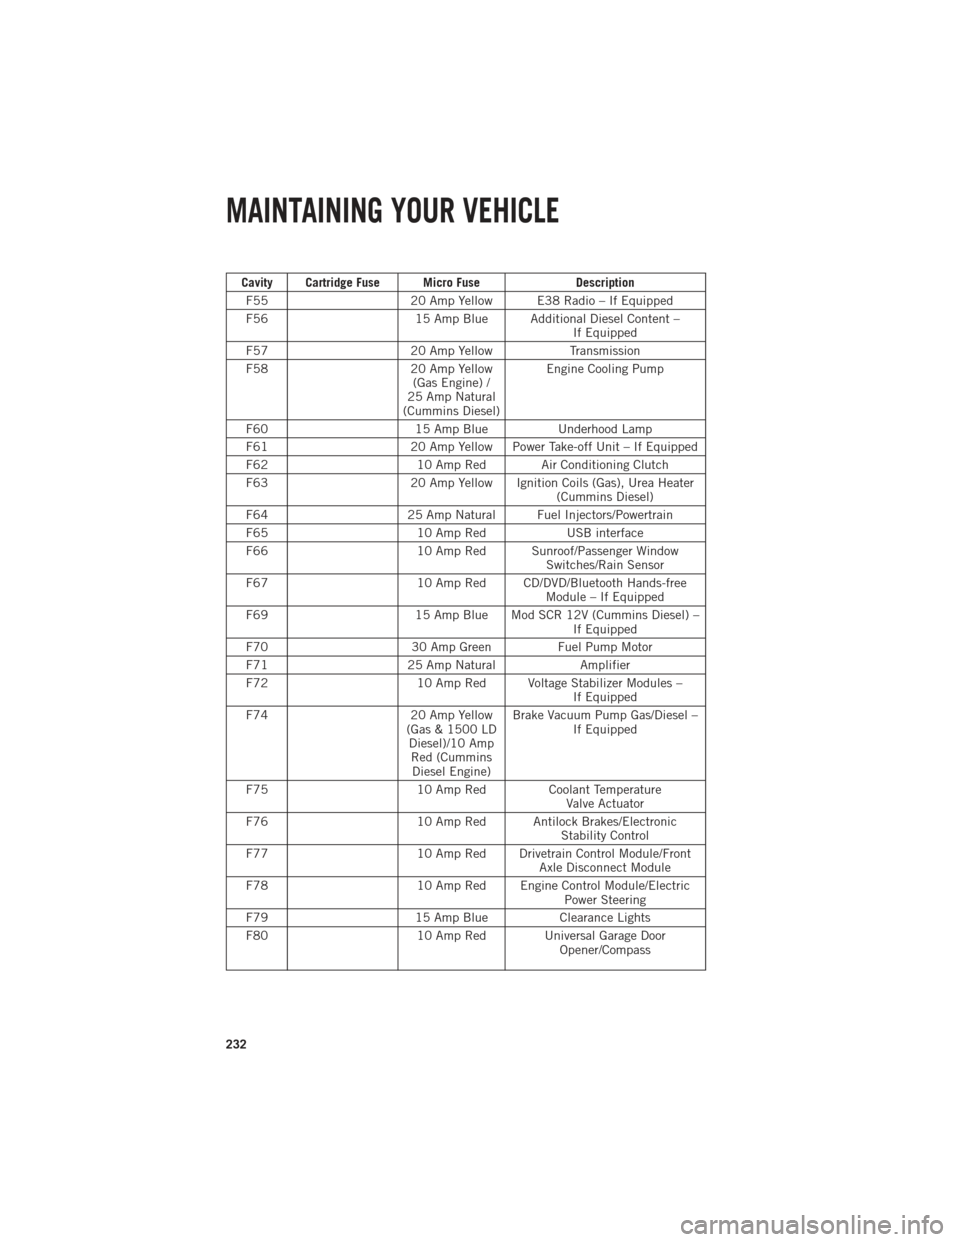
Cavity Cartridge Fuse Micro FuseDescription
F55 20 Amp Yellow E38 Radio – If Equipped
F56 15 Amp Blue Additional Diesel Content –
If Equipped
F57 20 Amp YellowTransmission
F58 20 Amp Yellow
(Gas Engine) /
25 Amp Natural
(Cummins Diesel) Engine Cooling Pump
F60 15 Amp BlueUnderhood Lamp
F61 20 Amp Yellow Power Take-off Unit – If Equipped
F62 10 Amp Red Air Conditioning Clutch
F63 20 Amp Yellow Ignition Coils (Gas), Urea Heater
(Cummins Diesel)
F64 25 Amp Natural Fuel Injectors/Powertrain
F65 10 Amp RedUSB interface
F66 10 Amp Red Sunroof/Passenger Window
Switches/Rain Sensor
F67 10 Amp Red CD/DVD/Bluetooth Hands-free
Module – If Equipped
F69 15 Amp Blue Mod SCR 12V (Cummins Diesel) –
If Equipped
F70 30 Amp GreenFuel Pump Motor
F71 25 Amp Natural Amplifier
F72 10 Amp Red Voltage Stabilizer Modules –
If Equipped
F74 20 Amp Yellow
(Gas & 1500 LD Diesel)/10 AmpRed (CumminsDiesel Engine) Brake Vacuum Pump Gas/Diesel –
If Equipped
F75 10 Amp Red Coolant Temperature
Valve Actuator
F76 10 Amp Red Antilock Brakes/Electronic
Stability Control
F77 10 Amp Red Drivetrain Control Module/Front
Axle Disconnect Module
F78 10 Amp Red Engine Control Module/Electric
Power Steering
F79 15 Amp BlueClearance Lights
F80 10 Amp Red Universal Garage Door
Opener/Compass
MAINTAINING YOUR VEHICLE
232