2014 Peugeot 508 tow
[x] Cancel search: towPage 5 of 352
.
.
Contents
Child seats 153
ISOFIX child seats 160
Child lock 164
Child safety
Direction indicators 165
Emergency or assistance call 166
Horn 166
Tyre under-infl ation detection 167
ESC system 169
Seat belts 172
Airbags 175
Safety
Temporary puncture repair kit 179
Changing a wheel 185
Changing a bulb 192
Changing a fuse 201
12 V battery 205
Energy economy mode 208
Changing a wiper blade 209
Towing the vehicle 210
Towing a trailer 212
Fitting roof bars 214
Accessories 215
Practical information
Opening the bonnet 218
Running out of fuel (Diesel) 219
Petrol engines 221
Diesel engines 222
Blue HDi Diesel engines 224
Checking levels 225
Checks 228
AdBlue® additive for ® additive for ®
HDi Blue Diesel engines 230
Checks
Petrol engines 235
Petrol weights 236
Diesel engines 238
Diesel weights 242
Dimensions 246
Identifi cation markings 247
Technical data
Emergency or assistance 249
JBL equipment 251
PEUGEOT Connect Navigation (RT6) 253
Audio system 307
Audio equipment and telematics
Alphabetical indexVisual search
Page 16 of 352
14
Familiarisation
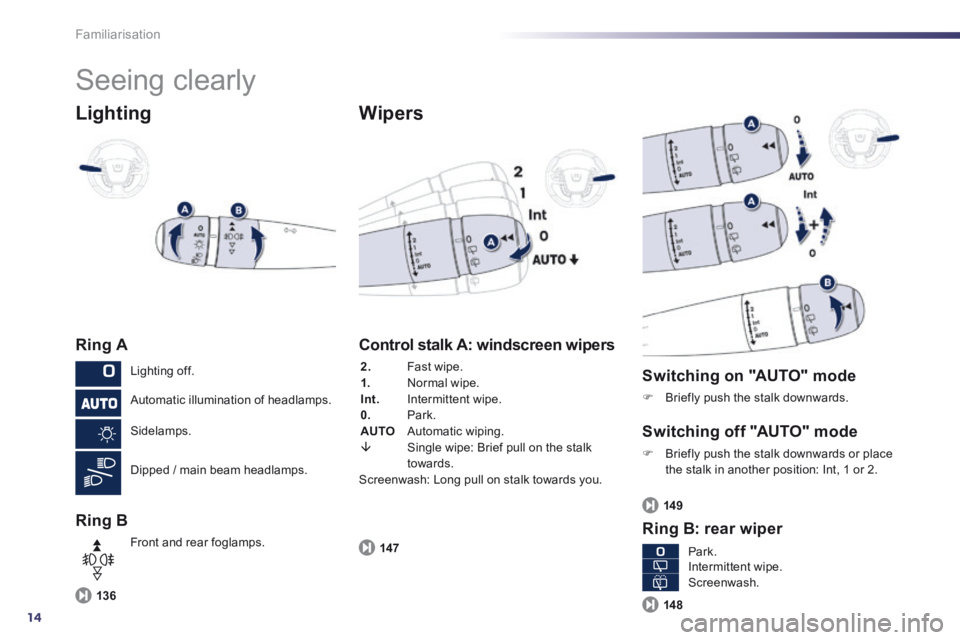
Seeing clearly
Lighting
Ring A
Ring B
Wipers
136
Control stalk A: windscreen wipers
2. Fast wipe. 1. Normal wipe. Int. Intermittent wipe. 0. Park. AUTO Automatic wiping.
Single wipe: Brief pull on the stalk towards. Screenwash: Long pull on stalk towards you.
147
Switching on "AUTO" mode
Briefly push the stalk downwards.
Switching off "AUTO" mode
Briefly push the stalk downwards or place the stalk in another position: Int, 1 or 2.
Ring B: rear wiper
14 9
14 8
Lighting off.
Automatic illumination of headlamps.
Sidelamps.
Dipped / main beam headlamps.
Front and rear foglamps. Park. Intermittent wipe. Screenwash.
Page 22 of 352
20
Optimise the use of your
gearbox
With a manual gearbox, move off gently, change up without waiting and drive by changing up quite soon. If your vehicle has
the system, the gear shift indicator invites you to change up; it is displayed in the instrument panel, follow its instructions.
With an automatic or electronic gearbox, stay in Drive "D" or Auto "A" , according to the type of gearbox, without pressing the accelerator pedal heavily or suddenly.
Drive smoothly
Maintain a safe distance between vehicles, use engine braking rather than the brake pedal, and press the accelerator progressively. These practices contribute towards a reduction in
fuel consumption and CO2 emissions and also helps reduce the background traffic noise.
If your vehicle has cruise control, make use of the system at speeds above 25 mph (40 km/h) when the traffic is flowing well.
Control the use of your electrical equipment
Before moving off, if the passenger compartment is too warm, ventilate it by opening the windows and air vents before using the air conditioning. Above 30 mph (50 km/h), close the windows and leave the air vents open.
Remember to make use of equipment that can help keep the temperature in the passenger compartment down (sunroof and window blinds...). Switch off the air conditioning, unless it has automatic digital regulation, as soon as the desired temperature is attained. Switch off the demisting and defrosting controls, if not automatic. Switch off the heated seat as soon as possible.
Switch off the headlamps and front foglamps when the level of light does not require their use.
Avoid running the engine before moving off, particularly in winter; your vehicle will warm up much faster while driving.
As a passenger, if you avoid connecting your multimedia devices (film, music, video game...), you will contribute towards limiting the consumption of electrical energy, and so of fuel. Disconnect your portable devices before leaving the vehicle.
Eco-driving Eco-driving is a range of everyday practices that allow the motorist to optimise their fuel consumption and CO2 emissions.
Page 26 of 352
24
Monitoring
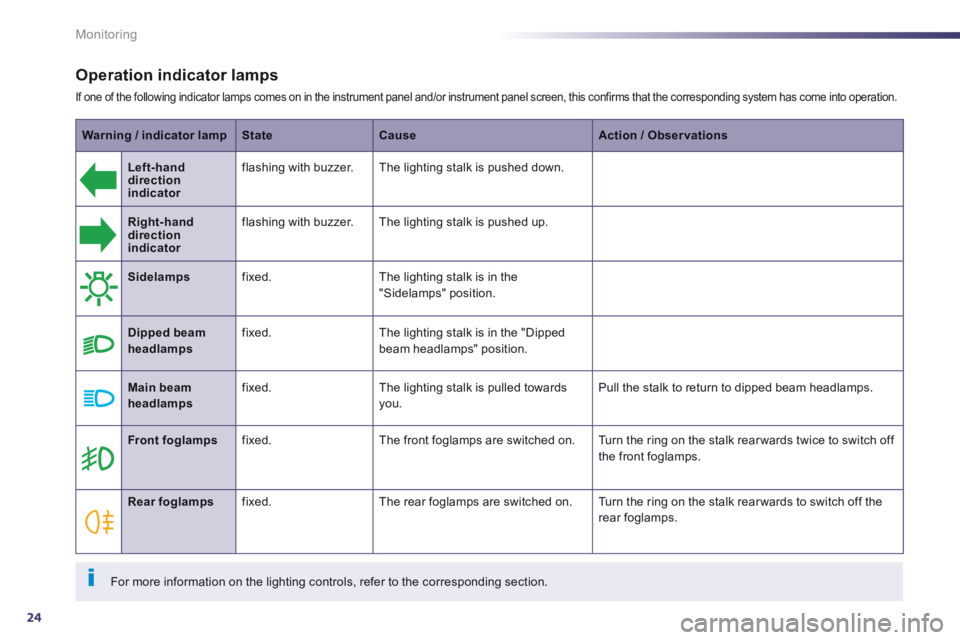
Operation indicator lamps
If one of the following indicator lamps comes on in the instrument panel and/or instrument panel screen, this confirms that the corresponding system has come into operation.
Warning / indicator lampStateCauseAction / Observations
Left-handdirection indicator
flashing with buzzer. The lighting stalk is pushed down.
Right-hand direction indicator
flashing with buzzer. The lighting stalk is pushed up.
Sidelamps fixed. The lighting stalk is in the "Sidelamps" position.
Dipped beam headlamps fixed. The lighting stalk is in the "Dipped beam headlamps" position.
Main beam headlamps fixed. The lighting stalk is pulled towards you. Pull the stalk to return to dipped beam headlamps.
Front foglamps fixed. The front foglamps are switched on. Turn the ring on the stalk rear wards twice to switch off the front foglamps.
Rear foglamps fixed. The rear foglamps are switched on. Turn the ring on the stalk rear wards to switch off the rear foglamps.
For more information on the lighting controls, refer to the corresponding section.
Page 49 of 352
2
47
Access
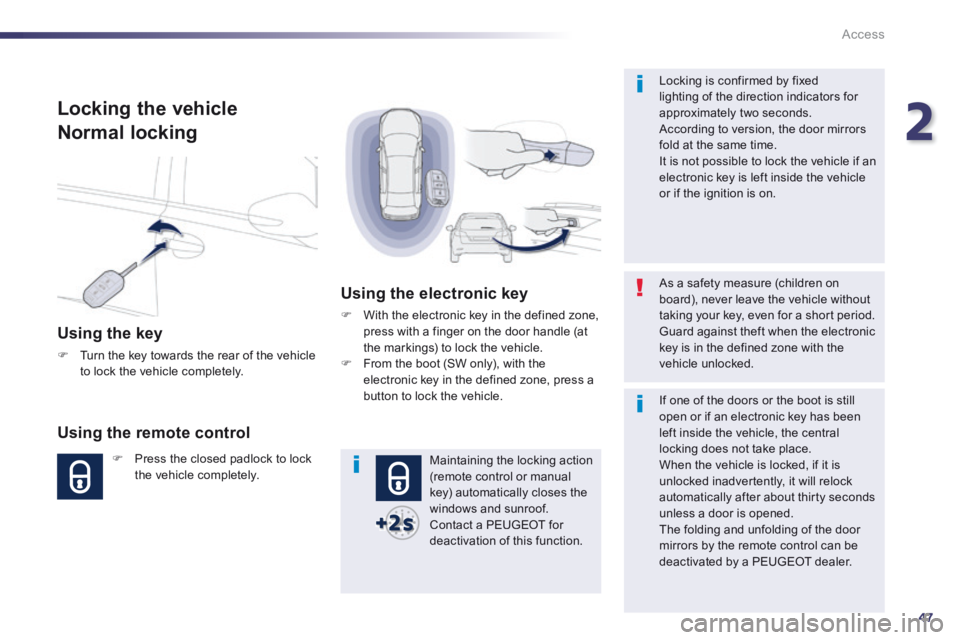
Locking the vehicle
Normal locking
Using the key
Turn the key towards the rear of the vehicle to lock the vehicle completely.
Using the remote control
Press the closed padlock to lock the vehicle completely.
Using the electronic key
With the electronic key in the defined zone, press with a finger on the door handle (at the markings) to lock the vehicle. From the boot (SW only), with the electronic key in the defined zone, press a button to lock the vehicle.
Maintaining the locking action (remote control or manual key) automatically closes the windows and sunroof. Contact a PEUGEOT for deactivation of this function.
As a safety measure (children on board), never leave the vehicle without taking your key, even for a short period. Guard against theft when the electronic key is in the defined zone with the vehicle unlocked.
Locking is confirmed by fixed lighting of the direction indicators for approximately two seconds. According to version, the door mirrors fold at the same time. It is not possible to lock the vehicle if an electronic key is left inside the vehicle or if the ignition is on.
If one of the doors or the boot is still open or if an electronic key has been
left inside the vehicle, the central locking does not take place. When the vehicle is locked, if it is unlocked inadvertently, it will relock automatically after about thirty seconds unless a door is opened. The folding and unfolding of the door mirrors by the remote control can be deactivated by a PEUGEOT dealer.
Page 52 of 352
50
Access
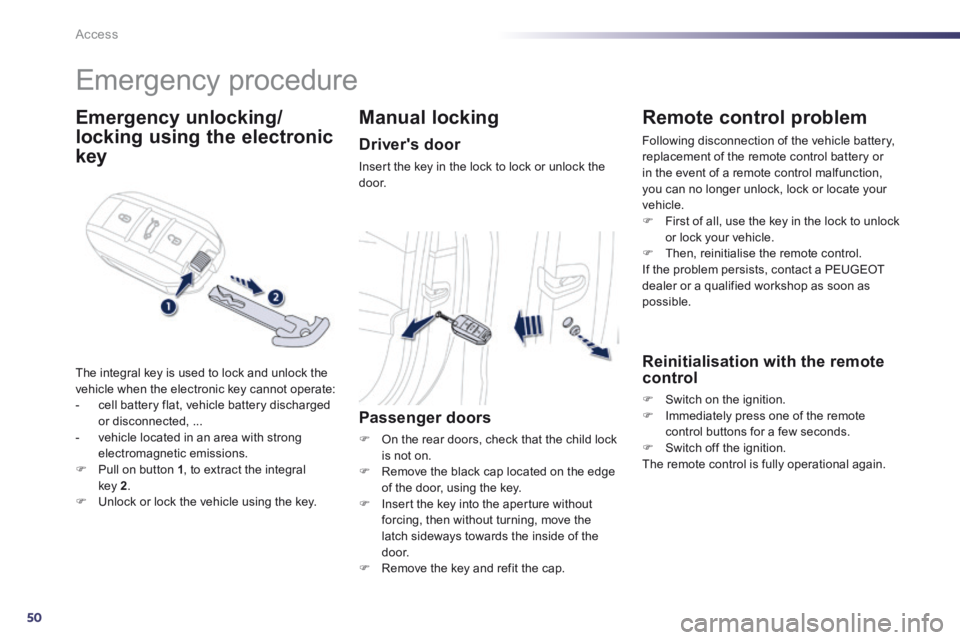
Emergency procedure
Emergency unlocking/
locking using the electronic
key
The integral key is used to lock and unlock the vehicle when the electronic key cannot operate: - cell battery flat, vehicle battery discharged or disconnected, ... - vehicle located in an area with strong electromagnetic emissions. Pull on button 1 , to extract the integral key 2 . Unlock or lock the vehicle using the key.
Manual locking
Driver's door
Insert the key in the lock to lock or unlock the d o o r.
Passenger doors
On the rear doors, check that the child lock is not on. Remove the black cap located on the edge of the door, using the key. Insert the key into the aperture without forcing, then without turning, move the
latch sideways towards the inside of the d o o r. Remove the key and refit the cap.
Remote control problem
Following disconnection of the vehicle battery, replacement of the remote control battery or in the event of a remote control malfunction, you can no longer unlock, lock or locate your vehicle. First of all, use the key in the lock to unlock
or lock your vehicle. Then, reinitialise the remote control. If the problem persists, contact a PEUGEOT dealer or a qualified workshop as soon as possible.
Reinitialisation with the remote control
Switch on the ignition. Immediately press one of the remote control buttons for a few seconds. Switch off the ignition. The remote control is fully operational again.
Page 56 of 352
54
Access
Locking the vehicle
with exterior perimeter
monitoring only
Deactivate the interior volumetric and anti-lift monitoring to avoid unwanted triggering of the alarm in certain cases such as: - leaving a window partially open, - washing your vehicle, - changing a wheel, - having your vehicle towed, - transportation by sea.
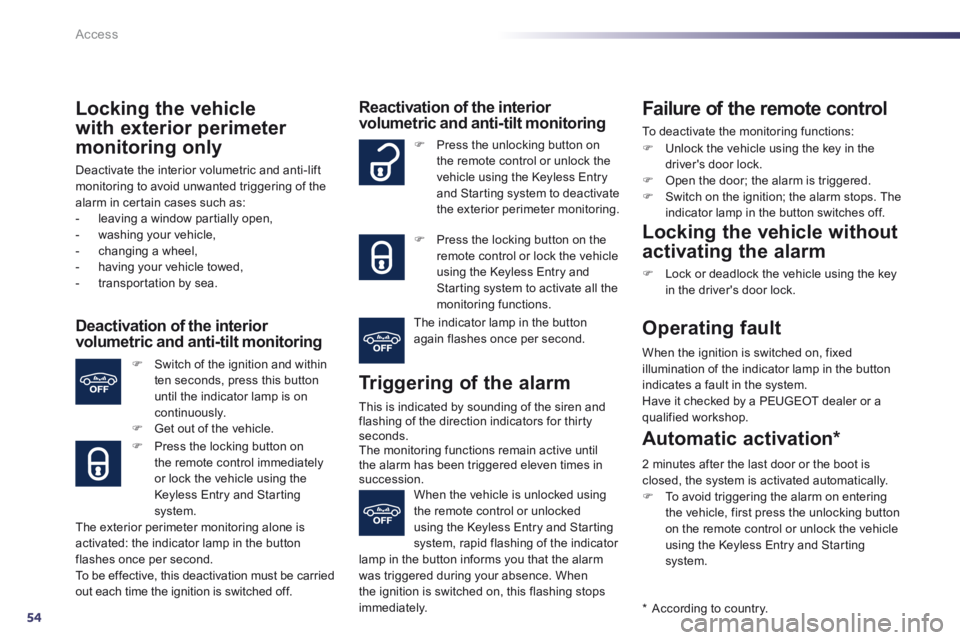
Deactivation of the interior volumetric and anti-tilt monitoring
Switch of the ignition and within ten seconds, press this button until the indicator lamp is on continuously. Get out of the vehicle.
Press the locking button on the remote control immediately or lock the vehicle using the Keyless Entry and Starting system.
The exterior perimeter monitoring alone is activated: the indicator lamp in the button flashes once per second. To be effective, this deactivation must be carried out each time the ignition is switched off.
Reactivation of the interior volumetric and anti-tilt monitoring
Triggering of the alarm
This is indicated by sounding of the siren and flashing of the direction indicators for thirty seconds. The monitoring functions remain active until the alarm has been triggered eleven times in succession.
Press the unlocking button on the remote control or unlock the vehicle using the Keyless Entry and Starting system to deactivate the exterior perimeter monitoring.
Press the locking button on the remote control or lock the vehicle using the Keyless Entry and Starting system to activate all the monitoring functions.
The indicator lamp in the button again flashes once per second.
When the vehicle is unlocked using the remote control or unlocked using the Keyless Entry and Starting system, rapid flashing of the indicator lamp in the button informs you that the alarm was triggered during your absence. When the ignition is switched on, this flashing stops immediately.
Failure of the remote control
To deactivate the monitoring functions:
Unlock the vehicle using the key in the driver's door lock. Open the door; the alarm is triggered. Switch on the ignition; the alarm stops. The indicator lamp in the button switches off.
Locking the vehicle without
activating the alarm
Lock or deadlock the vehicle using the key in the driver's door lock.
Operating fault
When the ignition is switched on, fixed illumination of the indicator lamp in the button indicates a fault in the system. Have it checked by a PEUGEOT dealer or a qualified workshop.
* According to country.
Automatic activation *
2 minutes after the last door or the boot is closed, the system is activated automatically. To avoid triggering the alarm on entering the vehicle, first press the unlocking button on the remote control or unlock the vehicle
using the Keyless Entry and Starting system.
Page 82 of 352
80
Comfort
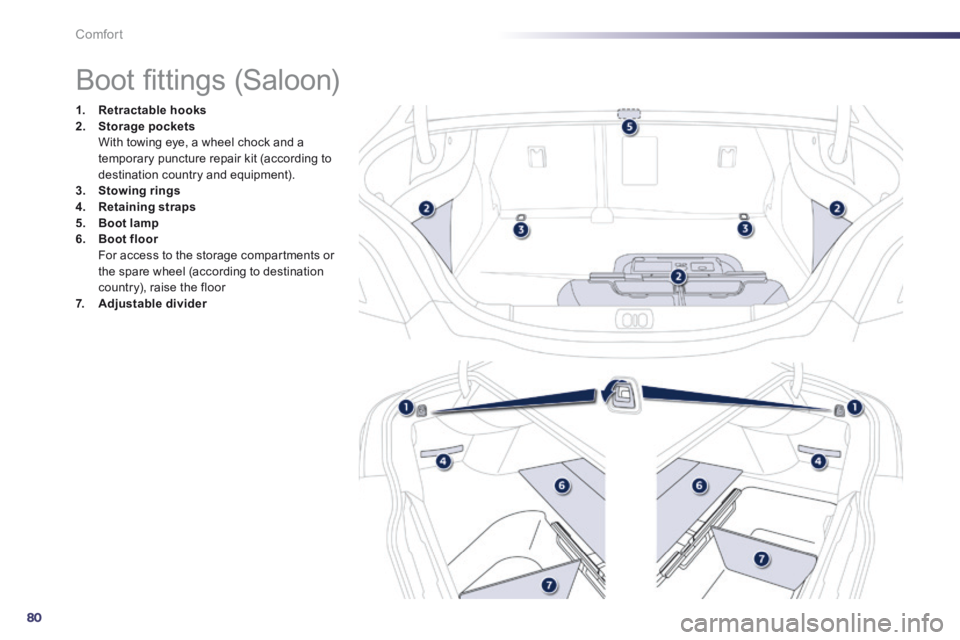
Boot fi ttings (Saloon)
1. Retractable hooks2. Storage pockets With towing eye, a wheel chock and a temporary puncture repair kit (according to destination country and equipment). 3. Stowing rings4. Retaining straps5. Boot lamp6. Boot floor Boot floor Boot floor For access to the storage compartments or the spare wheel (according to destination country), raise the floor 7. Adjustable divider