2014 NISSAN TEANA SEC
[x] Cancel search: SECPage 2595 of 4801
FRONT DOOR GLASSGW-15
< REMOVAL AND INSTALLATION >
C
D E
F
G H
I
J
L
M A
B
GW
N
O P
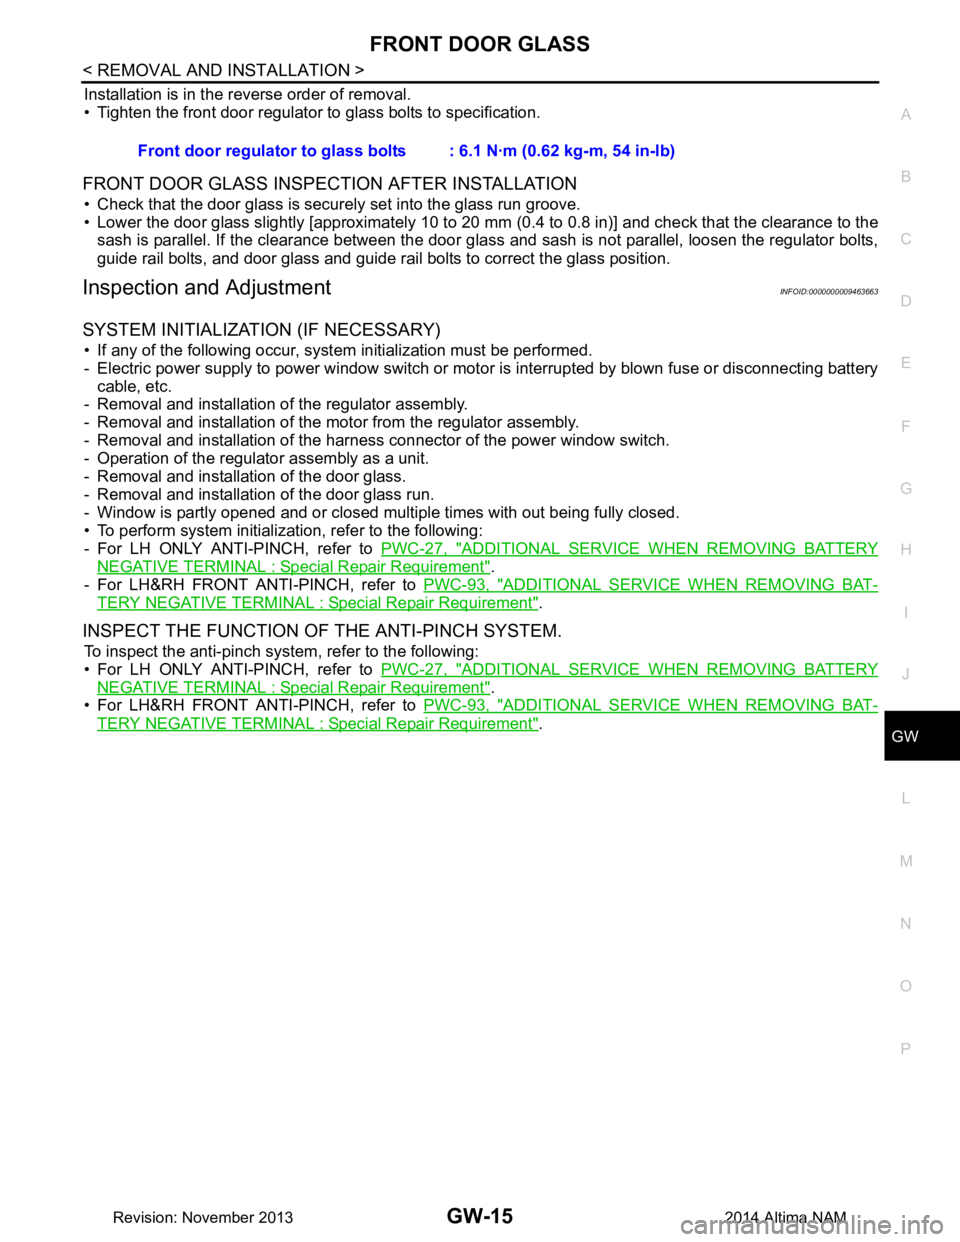
Installation is in the reverse order of removal.
• Tighten the front door regulator to glass bolts to specification.
FRONT DOOR GLASS INSPECTION AFTER INSTALLATION
• Check that the door glass is securely set into the glass run groove.
• Lower the door glass slightly [approximately 10 to 20 mm (0.4 to 0.8 in)] and check that the clearance to the
sash is parallel. If the clearance between the door gla ss and sash is not parallel, loosen the regulator bolts,
guide rail bolts, and door glass and guide rail bolts to correct the glass position.
Inspection and AdjustmentINFOID:0000000009463663
SYSTEM INITIALIZATION (IF NECESSARY)
• If any of the following occur, syst em initialization must be performed.
- Electric power supply to power window switch or motor is interrupted by blown fuse or disconnecting battery cable, etc.
- Removal and installation of the regulator assembly.
- Removal and installation of the motor from the regulator assembly.
- Removal and installation of the harness connector of the power window switch.
- Operation of the regulator assembly as a unit.
- Removal and installation of the door glass.
- Removal and installation of the door glass run.
- Window is partly opened and or closed multiple times with out being fully closed.
• To perform system initialization, refer to the following:
- For LH ONLY ANTI-PINCH, refer to PWC-27, "ADDITIONAL SERVICE WHEN REMOVING BATTERY
NEGATIVE TERMINAL : Special Repair Requirement".
- For LH&RH FRONT ANTI-PINCH, refer to PWC-93, "ADDITIONAL SERVICE WHEN REMOVING BAT-
TERY NEGATIVE TERMINAL : Special Repair Requirement".
INSPECT THE FUNCTION OF THE ANTI-PINCH SYSTEM.
To inspect the anti-pinch system, refer to the following:
• For LH ONLY ANTI-PINCH, refer to PWC-27, "ADDITIONAL SERVICE WHEN REMOVING BATTERY
NEGATIVE TERMINAL : Special Repair Requirement".
• For LH&RH FRONT ANTI-PINCH, refer to PWC-93, "ADDITIONAL SERVICE WHEN REMOVING BAT-
TERY NEGATIVE TERMINAL : Special Repair Requirement".
Front door regulator to glass bol
ts : 6.1 N·m (0.62 kg-m, 54 in-lb)
Revision: November 20132014 Altima NAM
Page 2597 of 4801
FRONT REGULATORGW-17
< REMOVAL AND INSTALLATION >
C
D E
F
G H
I
J
L
M A
B
GW
N
O P
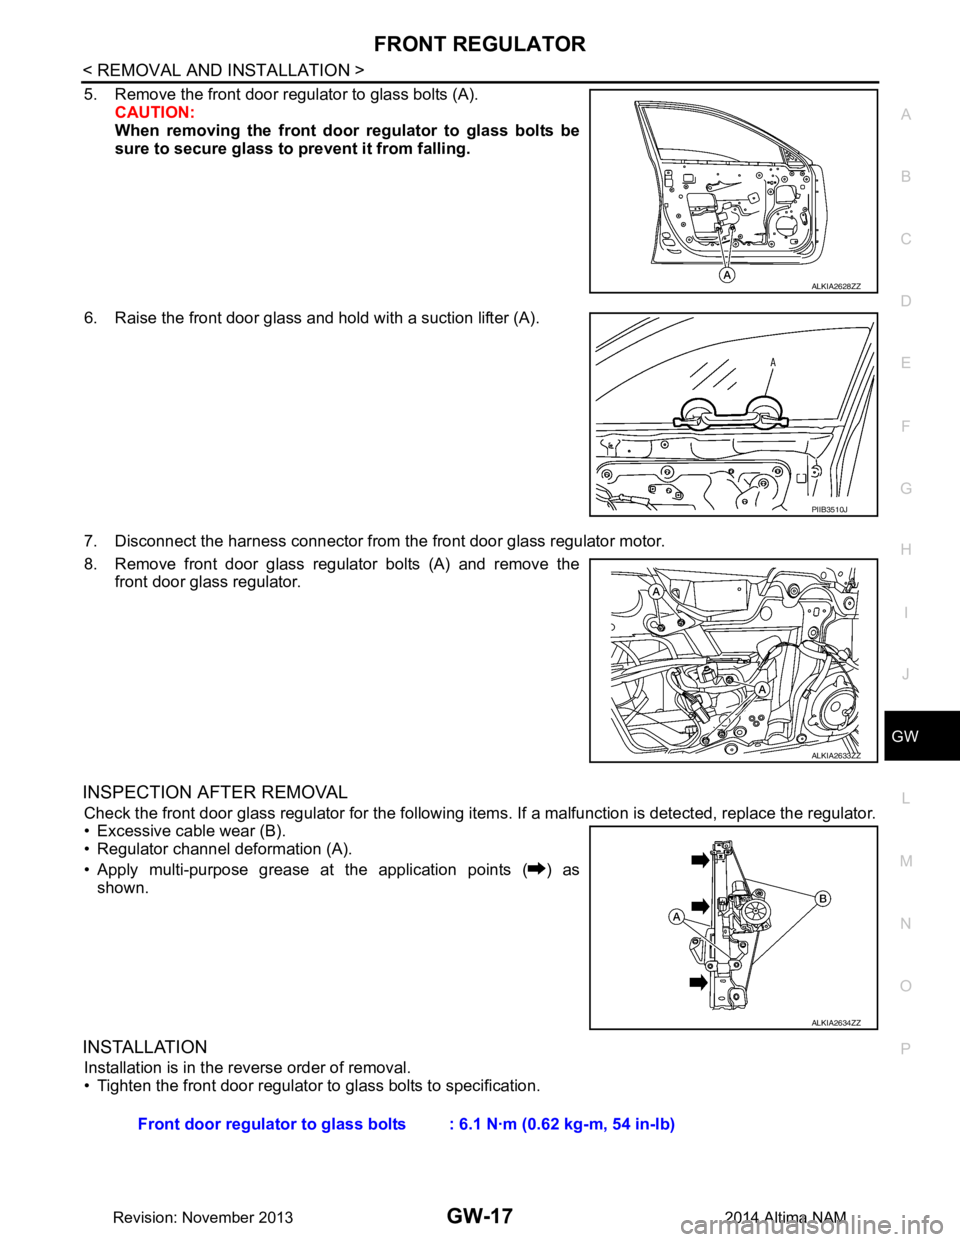
5. Remove the front door regulator to glass bolts (A). CAUTION:
When removing the front door regulator to glass bolts be
sure to secure glass to prevent it from falling.
6. Raise the front door glass and hold with a suction lifter (A).
7. Disconnect the harness connector from the front door glass regulator motor.
8. Remove front door glass regulator bolts (A) and remove the front door glass regulator.
INSPECTION AFTER REMOVAL
Check the front door glass regulator for the following item s. If a malfunction is detected, replace the regulator.
• Excessive cable wear (B).
• Regulator channel deformation (A).
• Apply multi-purpose grease at the application points ( ) as shown.
INSTALLATION
Installation is in the reverse order of removal.
• Tighten the front door regulator to glass bolts to specification.
ALKIA2628ZZ
PIIB3510J
ALKIA2633ZZ
ALKIA2634ZZ
Front door regulator to glass bol ts : 6.1 N·m (0.62 kg-m, 54 in-lb)
Revision: November 20132014 Altima NAM
Page 2599 of 4801
REAR DOOR GLASSGW-19
< REMOVAL AND INSTALLATION >
C
D E
F
G H
I
J
L
M A
B
GW
N
O P
REAR DOOR GLASS
Removal and InstallationINFOID:0000000009463668
REMOVAL
1. Remove the rear door finisher. Refer to INT-18, "Removal and Installation".
2. Remove the vapor barrier. CAUTION:
Use care to not damage or tear vapor barrier during removal.
3. Remove the rear door window inside seal.
4. Remove the rear door window run rubber.
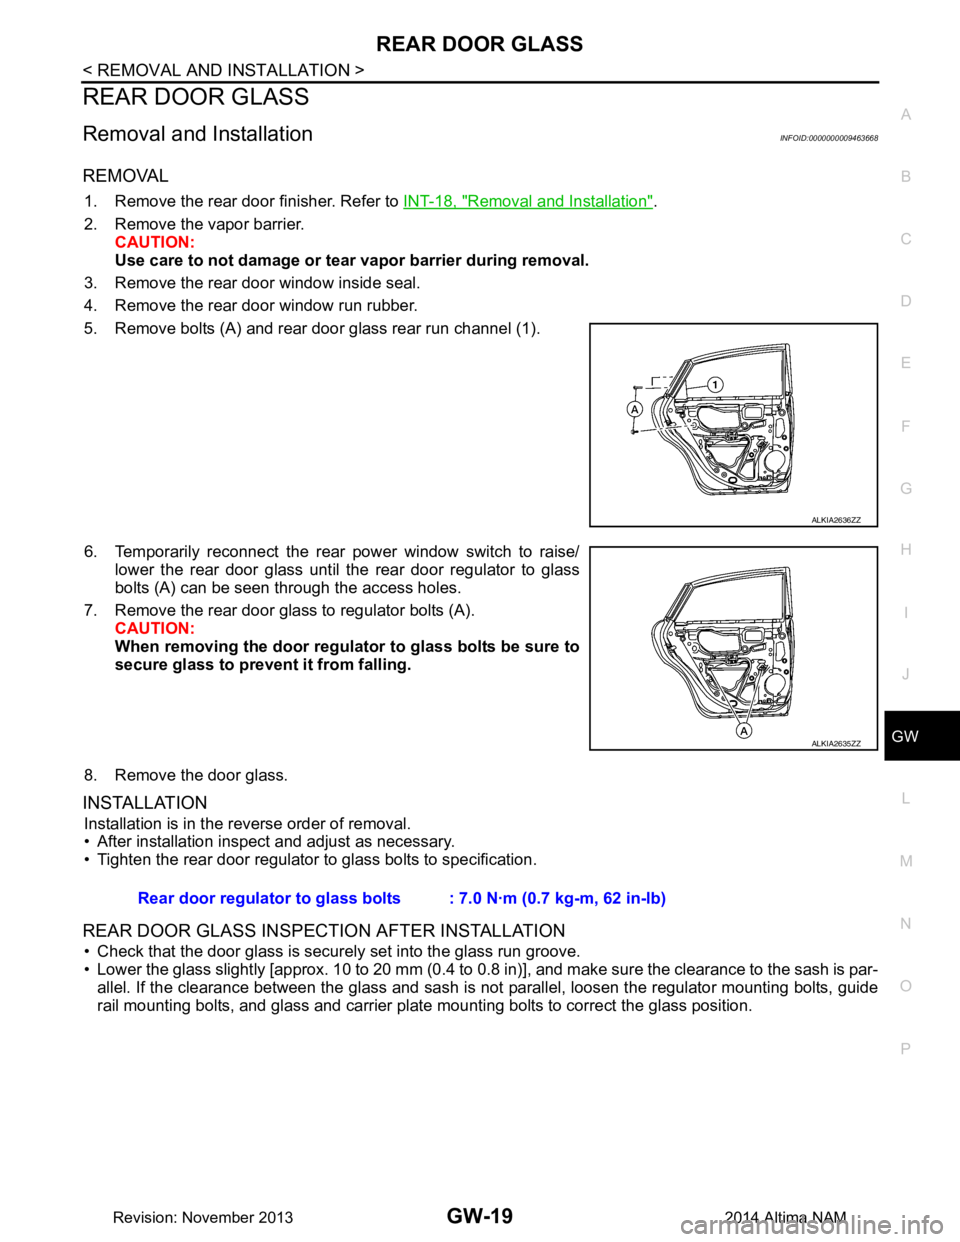
5. Remove bolts (A) and rear door glass rear run channel (1).
6. Temporarily reconnect the rear power window switch to raise/ lower the rear door glass until the rear door regulator to glass
bolts (A) can be seen through the access holes.
7. Remove the rear door glass to regulator bolts (A). CAUTION:
When removing the door regula tor to glass bolts be sure to
secure glass to prevent it from falling.
8. Remove the door glass.
INSTALLATION
Installation is in the reverse order of removal.
• After installation inspect and adjust as necessary.
• Tighten the rear door regulator to glass bolts to specification.
REAR DOOR GLASS INSPECTION AFTER INSTALLATION
• Check that the door glass is securely set into the glass run groove.
• Lower the glass slightly [approx. 10 to 20 mm (0.4 to 0.8 in)], and make sure the clearance to the sash is par-
allel. If the clearance between the glass and sash is not parallel, loosen the regulator mounting bolts, guide
rail mounting bolts, and glass and carrier plate mounting bolts to correct the glass position.
ALKIA2636ZZ
ALKIA2635ZZ
Rear door regulator to glass bolts : 7.0 N·m (0.7 kg-m, 62 in-lb)
Revision: November 20132014 Altima NAM
Page 2601 of 4801
REAR REGULATORGW-21
< REMOVAL AND INSTALLATION >
C
D E
F
G H
I
J
L
M A
B
GW
N
O P
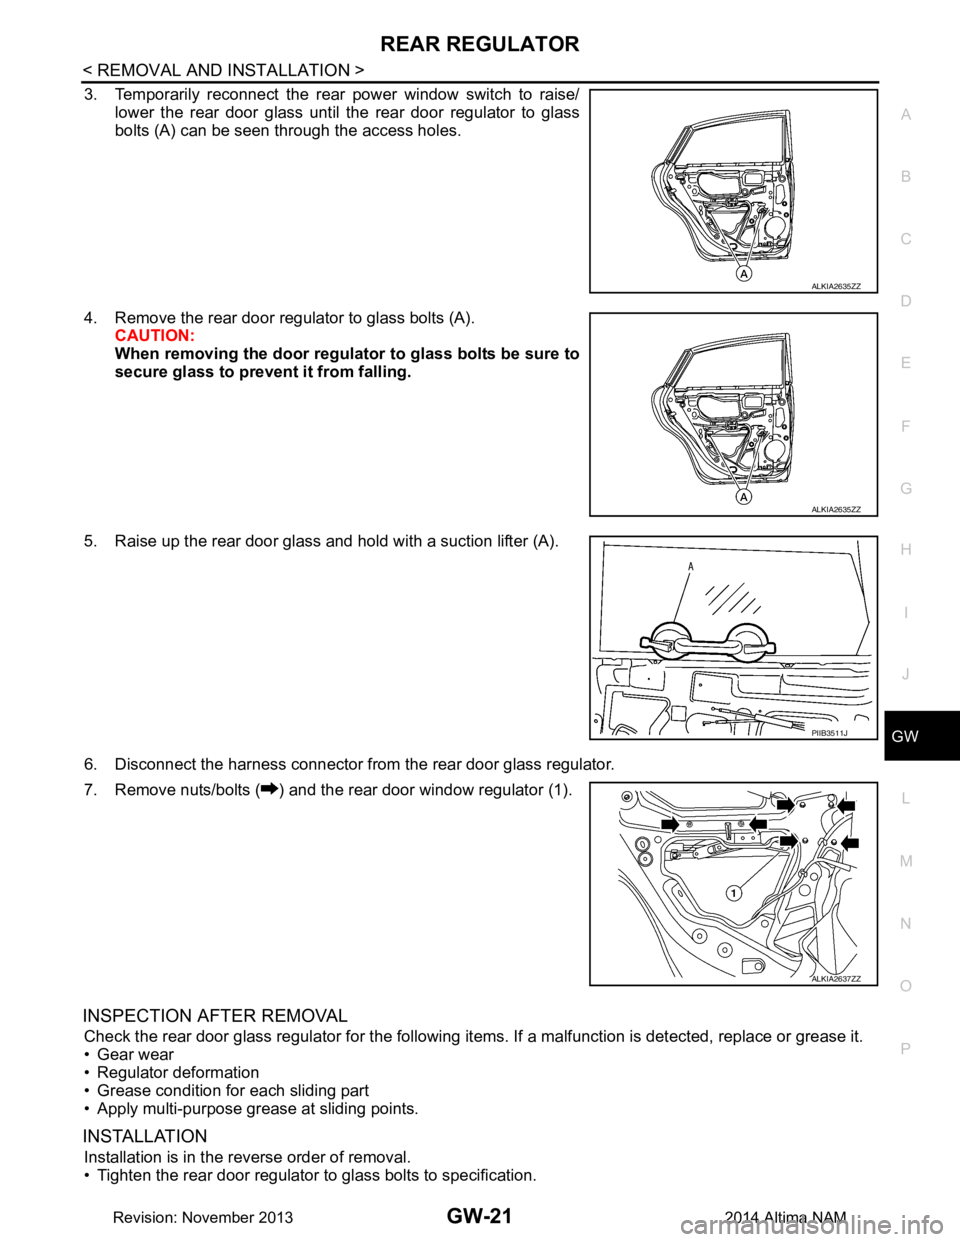
3. Temporarily reconnect the rear power window switch to raise/ lower the rear door glass until the rear door regulator to glass
bolts (A) can be seen through the access holes.
4. Remove the rear door regulator to glass bolts (A). CAUTION:
When removing the door regula tor to glass bolts be sure to
secure glass to prevent it from falling.
5. Raise up the rear door glass and hold with a suction lifter (A).
6. Disconnect the harness connector from the rear door glass regulator.
7. Remove nuts/bolts ( ) and the rear door window regulator (1).
INSPECTION AFTER REMOVAL
Check the rear door glass regul ator for the following items. If a malf unction is detected, replace or grease it.
• Gear wear
• Regulator deformation
• Grease condition for each sliding part
• Apply multi-purpose grease at sliding points.
INSTALLATION
Installation is in the reverse order of removal.
• Tighten the rear door regulator to glass bolts to specification.
ALKIA2635ZZ
ALKIA2635ZZ
PIIB3511J
ALKIA2637ZZ
Revision: November 20132014 Altima NAM
Page 2606 of 4801
GW-26
< REMOVAL AND INSTALLATION >
REAR WINDOW GLASS
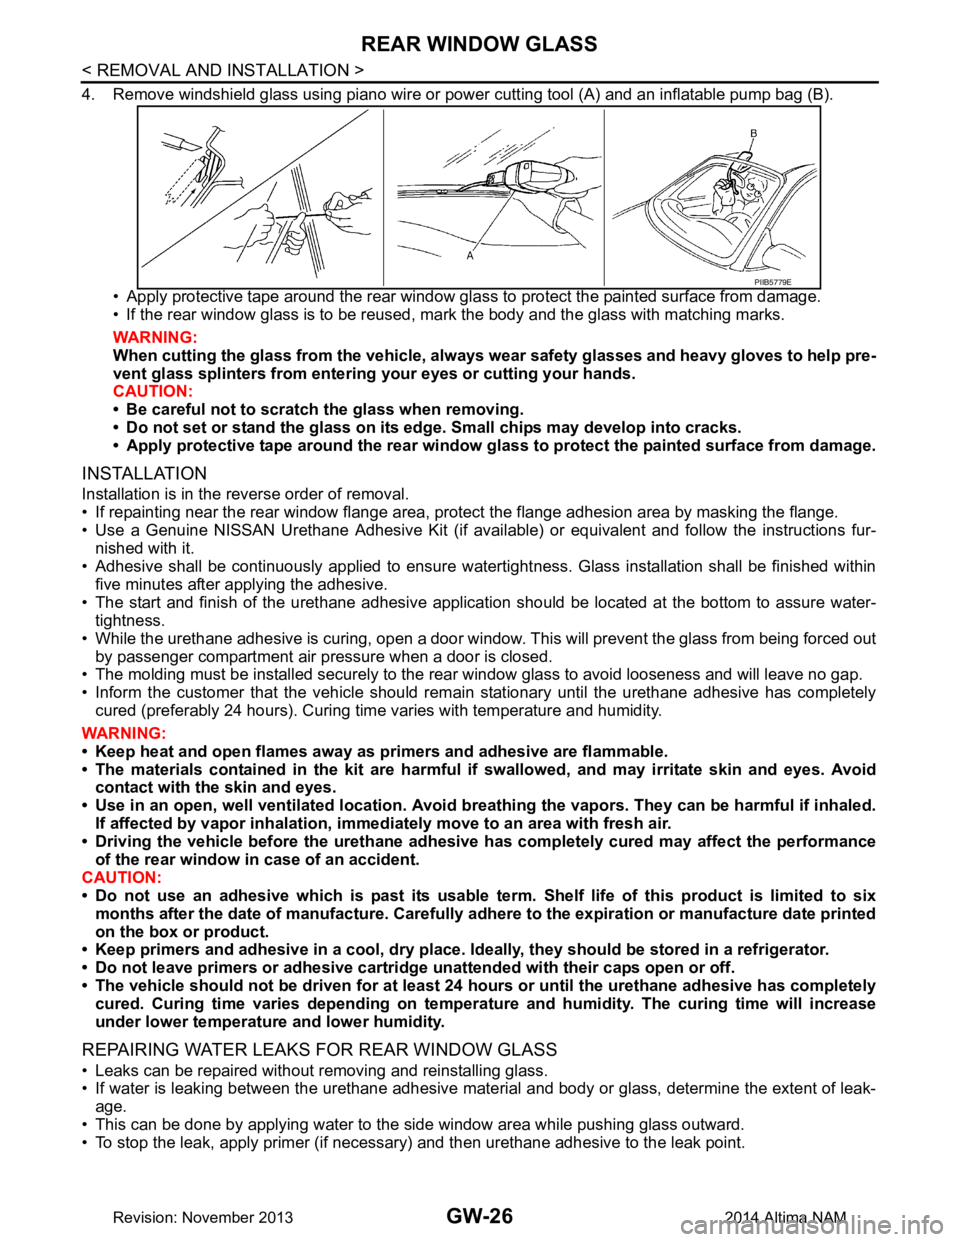
4. Remove windshield glass using piano wire or power cutting tool (A) and an inflatable pump bag (B).
• Apply protective tape around the rear window gla ss to protect the painted surface from damage.
• If the rear window glass is to be reused, mark the body and the glass with matching marks.
WARNING:
When cutting the glass from the vehicle, always wear safety glasses and heavy gloves to help pre-
vent glass splinters from entering your eyes or cutting your hands.
CAUTION:
• Be careful not to scratch the glass when removing.
• Do not set or stand the glass on its ed ge. Small chips may develop into cracks.
• Apply protective tape around th e rear window glass to protect the painted surface from damage.
INSTALLATION
Installation is in the reverse order of removal.
• If repainting near the rear window flange area, protect the flange adhesion area by masking the flange.
• Use a Genuine NISSAN Urethane Adhesive Kit (if availabl e) or equivalent and follow the instructions fur-
nished with it.
• Adhesive shall be continuously applied to ensure watert ightness. Glass installation shall be finished within
five minutes after applying the adhesive.
• The start and finish of the urethane adhesive application should be located at the bottom to assure water-
tightness.
• While the urethane adhesive is curing, open a door window . This will prevent the glass from being forced out
by passenger compartment air pressure when a door is closed.
• The molding must be installed securely to the rear window glass to avoid looseness and will leave no gap.
• Inform the customer that the vehicle should rema in stationary until the urethane adhesive has completely
cured (preferably 24 hours). Curing time varies with temperature and humidity.
WARNING:
• Keep heat and open flames away as primers and adhesive are flammable.
• The materials contained in the kit are harmful if swallowed, and may irritate skin and eyes. Avoid
contact with the skin and eyes.
• Use in an open, well ventilated location. Avoid br eathing the vapors. They can be harmful if inhaled.
If affected by vapor inhalation, imme diately move to an area with fresh air.
• Driving the vehicle before the urethane adhesive has completely cured may affect the performance
of the rear window in case of an accident.
CAUTION:
• Do not use an adhesive which is past its usable te rm. Shelf life of this product is limited to six
months after the date of manufacture. Carefully a dhere to the expiration or manufacture date printed
on the box or product.
• Keep primers and adhesive in a c ool, dry place. Ideally, they should be stored in a refrigerator.
• Do not leave primers or adhesive cartridge unattended with their caps open or off.
• The vehicle should not be driven for at least 24 hours or until the urethane adhesive has completely
cured. Curing time varies depe nding on temperature and humidity . The curing time will increase
under lower temperature and lower humidity.
REPAIRING WATER LEAKS FOR REAR WINDOW GLASS
• Leaks can be repaired without removing and reinstalling glass.
• If water is leaking between the urethane adhesive material and body or glass, determine the extent of leak-
age.
• This can be done by applying water to the side window area while pushing glass outward.
• To stop the leak, apply primer (if necessary) and then urethane adhesive to the leak point.
PIIB5779E
Revision: November 20132014 Altima NAM
Page 2607 of 4801

HA-1
VENTILATION, HEATER & AIR CONDITIONER
C
D E
F
G H
J
K L
M
SECTION HA
A
B
HA
N
O P
CONTENTS
HEATER & AIR CONDITIONING SYSTEM
PRECAUTION ................ ...............................3
PRECAUTIONS .............................................. .....3
Precaution for Supplemental Restraint System
(SRS) "AIR BAG" and "SEAT BELT PRE-TEN-
SIONER" ............................................................. ......
3
Precaution for Work ..................................................3
Precaution for Working with HFC-134a (R-134a) ......3
Contaminated Refrigerant .........................................4
Precaution for Leak Detection Dye ...........................4
Precaution for Refrigerant Connection ......................4
Precaution for Service Equipment ....................... ......7
PREPARATION ............................................9
PREPARATION .............................................. .....9
Special Service Tool ........................................... ......9
HFC-134a (R-134a) Service Tool and Equipment ......9
Commercial Service Tool ........................................11
SYSTEM DESCRIPTION .............................13
REFRIGERATION SYSTEM .......................... ....13
Refrigerant Cycle ................................................ ....13
Refrigerant System Protection ................................13
Component Part Location ................................... ....14
BASIC INSPECTION ...................................15
DIAGNOSIS AND REPAIR WORKFLOW ..... ....15
Workflow ............................................................. ....15
SYMPTOM DIAGNOSIS ..............................17
HEATER AND AIR CONDITIONING SYSTEM
SYMPTOMS ................................................... ....
17
Symptom Table ................................................... ....17
REFRIGERATION SYSTEM SYMPTOMS .........18
Trouble Diagnosis For Unusual Pressure ........... ....18
Symptom Table .......................................................18
NOISE .................................................................20
Symptom Table ................................................... ....20
PERIODIC MAINTENANCE ........................21
REFRIGERANT ................................ .................21
Description ........................................................... ....21
Leak Test .................................................................21
Recycle Refrigerant .................................................23
Charge Refrigerant ..................................................23
OIL .....................................................................25
Description ...............................................................25
Inspection ................................................................25
Perform Oil Return Operation ..................................25
Oil Adjusting Procedure for Components Replace-
ment Except Compressor ........................................
25
Oil Adjusting Procedure for Compressor Replace-
ment ..................................................................... ....
26
PERFORMANCE TEST ....................................28
Inspection ................................................................28
REMOVAL AND INSTALLATION ...............30
COMPRESSOR .................................................30
COMPRESSOR ........ ..................................................30
COMPRESSOR : Exploded Vi ew ............................30
COMPRESSOR : Removal an d Installation ............30
MAGNET CLUTCH ................................................ ....31
MAGNET CLUTCH : Removal and Installation .......31
COOLER PIPE AND HOSE ..............................34
Exploded View .........................................................34
LOW-PRESSURE FLEXIBLE HOSE ..................... ....34
LOW-PRESSURE FLEXIBLE HOSE : Removal
and Installation .................................................... ....
34
HIGH-PRESSURE FLEXIBLE HOSE ........................35
HIGH-PRESSURE FLEXIBLE HOSE : Removal
and Installation .................................................... ....
35
Revision: November 20132014 Altima NAM
Page 2609 of 4801
PRECAUTIONSHA-3
< PRECAUTION >
C
D E
F
G H
J
K L
M A
B
HA
N
O P
PRECAUTION
PRECAUTIONS
Precaution for Supplemental Restraint System (SRS) "AIR BAG" and "SEAT BELT
PRE-TENSIONER"
INFOID:0000000009951784
The Supplemental Restraint System such as “A IR BAG” and “SEAT BELT PRE-TENSIONER”, used along
with a front seat belt, helps to reduce the risk or severi ty of injury to the driver and front passenger for certain
types of collision. Information necessary to service t he system safely is included in the SR and SB section of
this Service Manual.
WARNING:
• To avoid rendering the SRS inoper ative, which could increase the risk of personal injury or death in
the event of a collision which would result in air bag inflation, all maintenance must be performed by
an authorized NISSAN/INFINITI dealer.
• Improper maintenance, including in correct removal and installation of the SRS, can lead to personal
injury caused by unintentional act ivation of the system. For removal of Spiral Cable and Air Bag
Module, see the SR section.
• Do not use electrical test equipm ent on any circuit related to the SRS unless instructed to in this
Service Manual. SRS wiring harnesses can be identi fied by yellow and/or orange harnesses or har-
ness connectors.
PRECAUTIONS WHEN USING POWER TOOLS (AIR OR ELECTRIC) AND HAMMERS
WARNING:
• When working near the Airbag Diagnosis Sensor Un it or other Airbag System sensors with the Igni-
tion ON or engine running, DO NOT use air or el ectric power tools or strike near the sensor(s) with a
hammer. Heavy vibration could activate the sensor( s) and deploy the air bag(s), possibly causing
serious injury.
• When using air or electric power tools or hammers , always switch the Ignition OFF, disconnect the
battery and wait at least three mi nutes before performing any service.
Precaution for WorkINFOID:0000000009463909
• When removing or disassembling each component, be ca reful not to damage or deform it. If a component
may be subject to interference, be sure to protect it with a shop cloth.
• When removing (disengaging) components with a screwdriver or similar tool, be sure to wrap the component with a shop cloth or vinyl tape to protect it.
• Protect the removed parts with a shop cloth and prevent them from being dropped.
• Replace a deformed or damaged clip.
• If a part is specified as a non-reusabl e part, always replace it with a new one.
• Be sure to tighten bolts and nuts securely to the specified torque.
• After installation is complete, be sure to check that each part works properly.
• Follow the steps below to clean components:
- Water soluble dirt:
• Dip a soft cloth into lukewarm water, wring the water out of the cloth and wipe the dirty area.
• Then rub with a soft, dry cloth.
-Oily dirt:
• Dip a soft cloth into lukewarm water with mild detergent (concentration: within 2 to 3%) and wipe the dirty area.
• Then dip a cloth into fresh water, wring the water out of the cloth and wipe the detergent off.
• Then rub with a soft, dry cloth.
- Do not use organic solvent such as thinner, benzene, alcohol or gasoline.
- For genuine leather seats, use a genuine leather seat cleaner.
Precaution for Workin g with HFC-134a (R-134a)INFOID:0000000009463910
WARNING:
• CFC-12 (R-12) refrigerant and HFC-134a (R-134a) refr igerant are not compatible. If the refrigerants
are mixed compressor failure is likely to occur. Refer to HA-21, "Leak Test"
. To determine the purity
of HFC-134a (R-134a) in the vehicle and recovery tank, use Refrigerant Recovery/Recycling Recharg-
ing equipment and Refrigerant Identifier.
Revision: November 20132014 Altima NAM
Page 2650 of 4801

HAC-1
VENTILATION, HEATER & AIR CONDITIONER
C
D E
F
G H
J
K L
M
SECTION HAC
A
B
HAC
N
O P
CONTENTS
HEATER & AIR CONDITIONING CONTROL SYSTEM
AUTOMATIC AIR CONDITIONER
PRECAUTION ................ ...............................
5
PRECAUTIONS .............................................. .....5
Precaution for Supplemental Restraint System
(SRS) "AIR BAG" and "SEAT BELT PRE-TEN-
SIONER" ............................................................. ......
5
Precaution for Work ..................................................5
Working with HFC-134a (R-134a) .............................5
Precaution for Service Equipment .............................6
PREPARATION ............................................8
PREPARATION .............................................. .....8
Special Service Tool ........................................... ......8
Commercial Service Tool ..........................................8
SYSTEM DESCRIPTION ..............................9
COMPONENT PARTS ................................... .....9
Component Part Location ................................... ......9
Component Description ...........................................10
SYSTEM .............................................................13
System Diagram .................................................. ....13
System Description .................................................13
Air Flow Control .......................................................14
Air Inlet Control .......................................................15
Air Outlet Control .....................................................16
Compressor Control ................................................16
Door Control ............................................................17
Temperature Control ...............................................20
Fail-safe ..................................................................20
OPERATION .......................................................21
Switch Name and Function ................................. ....21
DIAGNOSIS SYSTEM (A/C AUTO AMP.) .........24
CONSULT Function (HVAC) ............................... ....24
ECU DIAGNOSIS INFORMATION ..............28
A/C AUTO AMP. ...............................................28
Reference Value .................................................. ....28
DTC Inspection Priority Chart ...............................30
DTC Index ...............................................................31
ECM, IPDM E/R, BCM .......................................33
List of ECU Reference .............................................33
WIRING DIAGRAM ......................................34
AIR CONDITIONER CONTROL ........................34
Wiring Diagram .................................................... ....34
BASIC INSPECTION ...................................46
DIAGNOSIS AND REPAIR WORKFLOW ........46
Work Flow ............................................................ ....46
OPERATION INSPECTION ..............................48
Work Procedure .......................................................48
SYSTEM SETTING ...........................................50
Temperature Setting Trimmer ............................. ....50
Foot Position Setting Trimmer .................................50
Inlet Port Memory Function (FRE) ...........................50
Inlet Port Memory Function (REC) ..........................51
Target Evaporator Temp Upper Limit ......................51
ADDITIONAL SERVICE WHEN REPLACING
CONTROL UNIT (A/C AUTO AMP.) .................
52
Description ........................................................... ....52
Work Procedure .......................................................52
CONFIGURATION (HVAC) ...............................53
Description ...............................................................53
Work Procedure .......................................................53
Configuration List .....................................................54
DTC/CIRCUIT DIAGNOSIS .........................55
U1000 CAN COMM CIRCUIT ...........................55
Description ........................................................... ....55
DTC Logic ................................................................55
Revision: November 20132014 Altima NAMRevision: November 20132014 Altima NAM