Page 3764 of 4801
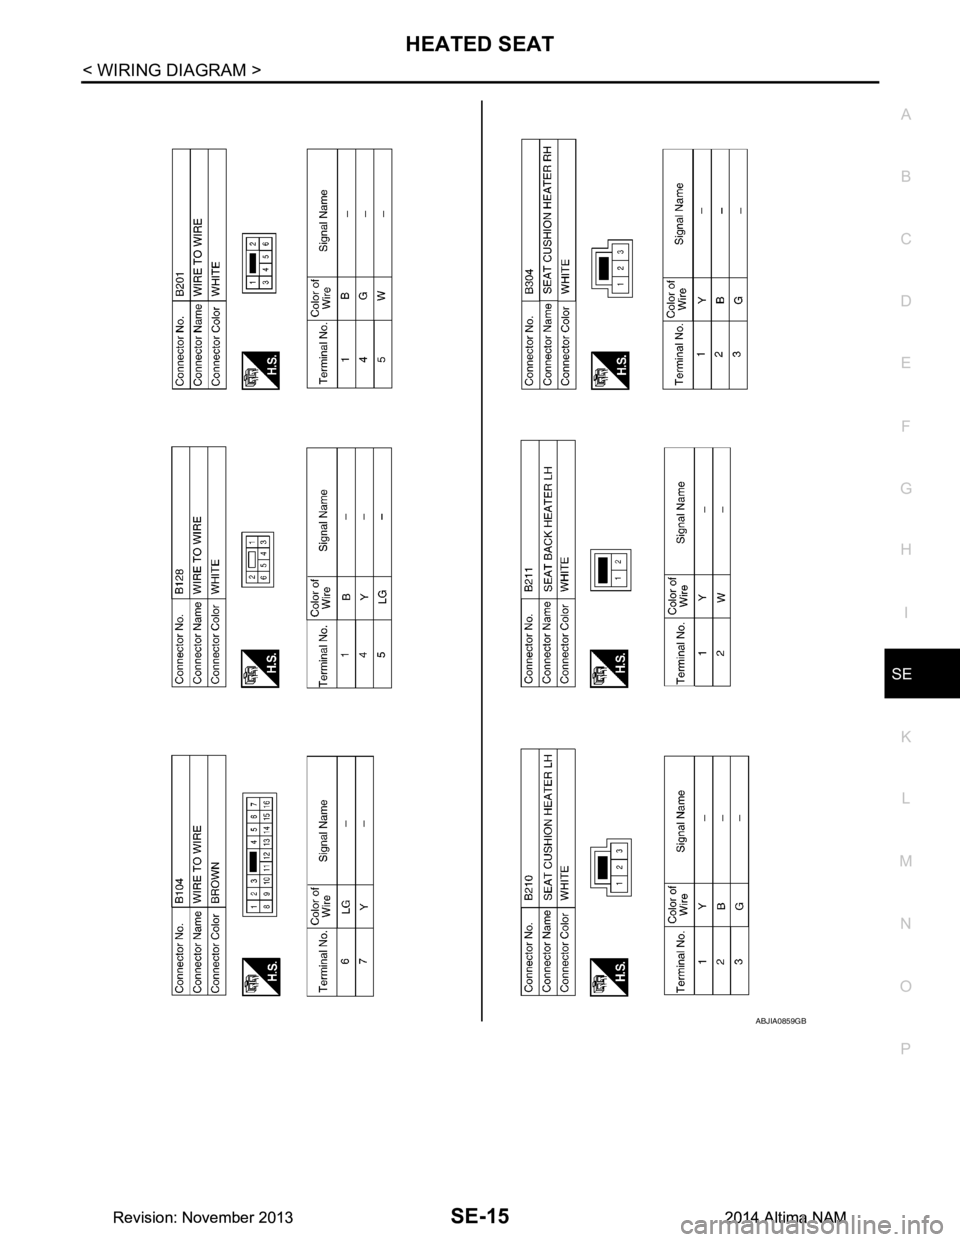
HEATED SEATSE-15
< WIRING DIAGRAM >
C
D E
F
G H
I
K L
M A
B
SE
N
O P
ABJIA0859GB
Revision: November 20132014 Altima NAMRevision: November 20132014 Altima NAM
Page 3769 of 4801

SE-20
< SYMPTOM DIAGNOSIS >
SQUEAK AND RATTLE TROUBLE DIAGNOSES
1. Loose harness or harness connectors.
2. Front console map/reading lamp lens loose.
3. Loose screws at console attachment points.
SEATS
When isolating seat noise it's important to note the pos ition the seat is in and the load placed on the seat when
the noise is present. These conditions should be dupl icated when verifying and isolating the cause of the
noise.
Cause of seat noise include:
1. Headrest rods and holder
2. A squeak between the seat pad cushion and frame
3. The rear seatback lock and bracket
These noises can be isolated by moving or pressing on the suspected components while duplicating the con-
ditions under which the noise occurs. Most of thes e incidents can be repaired by repositioning the component
or applying urethane tape to the contact area.
UNDERHOOD
Some interior noise may be caused by components under the hood or on the engine wall. The noise is then
transmitted into the passenger compartment.
Causes of transmitted underhood noise include:
1. Any component installed to the engine wall
2. Components that pass through the engine wall
3. Engine wall mounts and connectors
4. Loose radiator installation pins
5. Hood bumpers out of adjustment
6. Hood striker out of adjustment
These noises can be difficult to isolate since they cannot be reached from the interior of the vehicle. The best
method is to secure, move or insulate one component at a time and test drive the vehicle. Also, engine rpm or
load can be changed to isolate the noise. Repairs can usually be made by moving, adjusting, securing, or
insulating the component causing the noise.
Revision: November 20132014 Altima NAMRevision: November 20132014 Altima NAM
Page 3772 of 4801
FRONT SEATSE-23
< REMOVAL AND INSTALLATION >
C
D E
F
G H
I
K L
M A
B
SE
N
O P
REMOVAL AND INSTALLATION
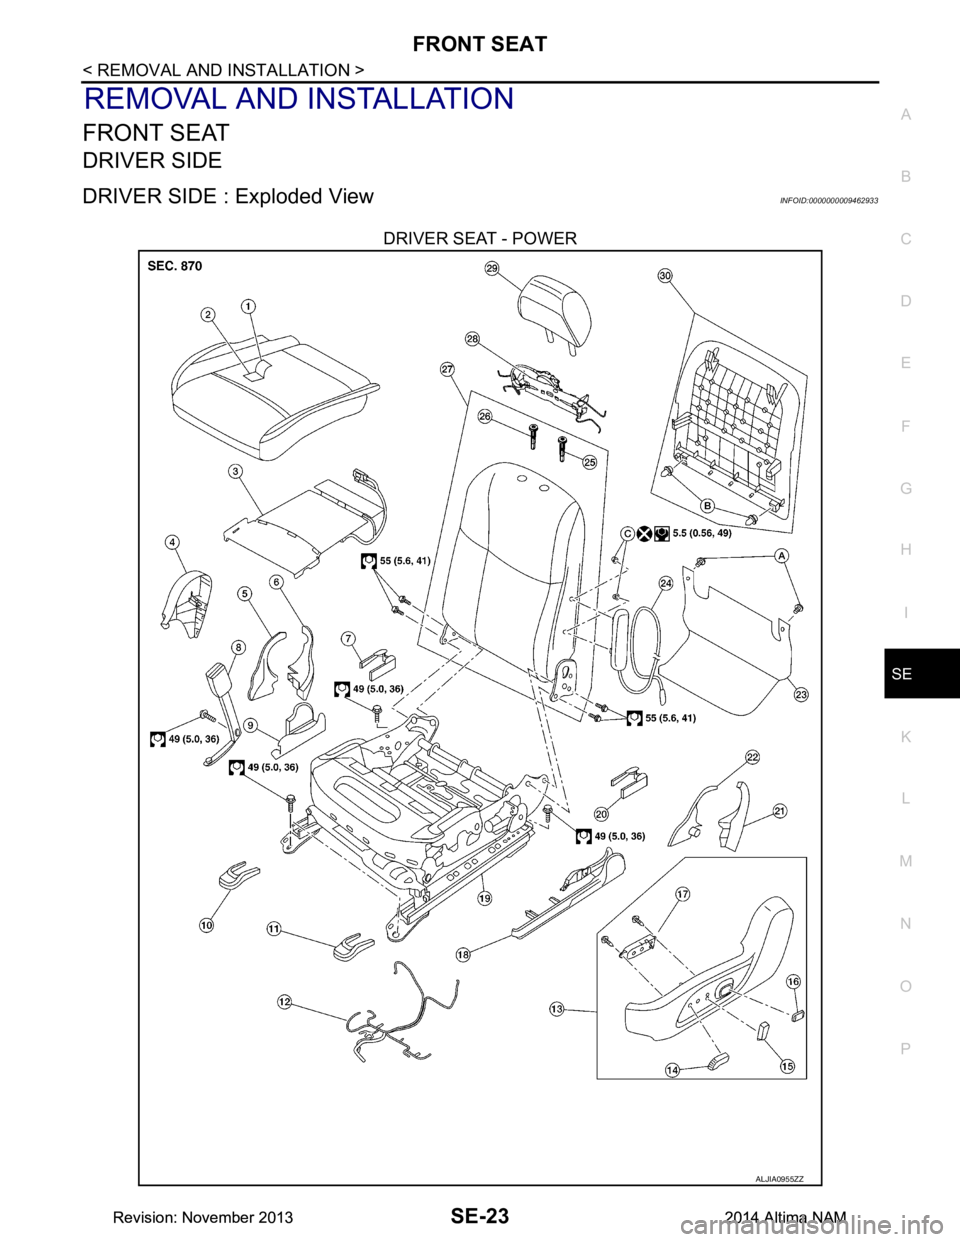
FRONT SEAT
DRIVER SIDE
DRIVER SIDE : Exploded ViewINFOID:0000000009462933
DRIVER SEAT - POWER
ALJIA0955ZZ
Revision: November 20132014 Altima NAMRevision: November 20132014 Altima NAM
Page 3774 of 4801
FRONT SEATSE-25
< REMOVAL AND INSTALLATION >
C
D E
F
G H
I
K L
M A
B
SE
N
O P
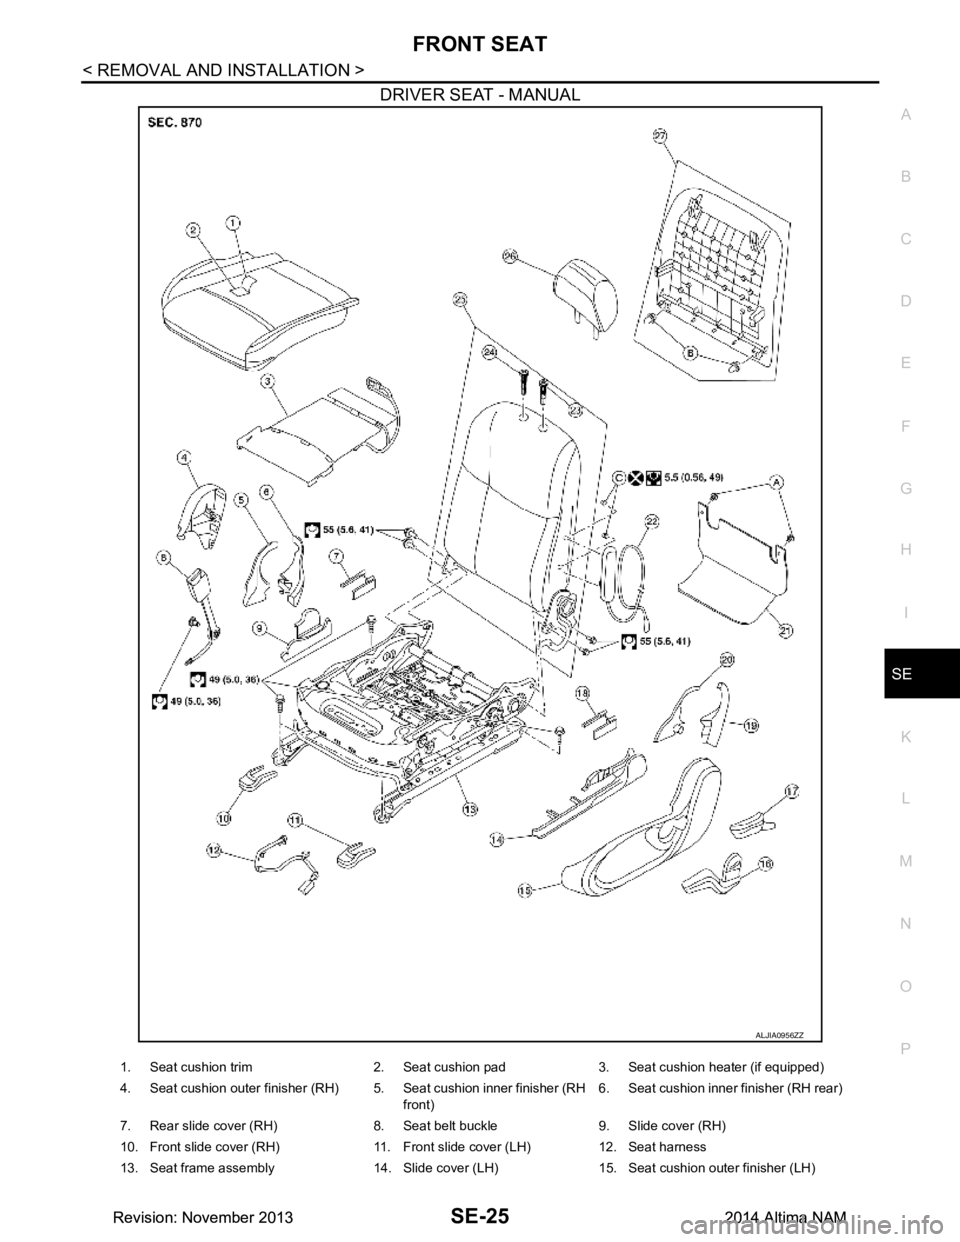
DRIVER SEAT - MANUAL
ALJIA0956ZZ
1. Seat cushion trim 2. Seat cushion pad 3. Seat cushion heater (if equipped)
4. Seat cushion outer finisher (RH) 5. Seat cushion inner finisher (RH front)6. Seat cushion inner finisher (RH rear)
7. Rear slide cover (RH) 8. Seat belt buckle 9. Slide cover (RH)
10. Front slide cover (RH) 11. Front slide cover (LH) 12. Seat harness
13. Seat frame assembly 14. Slide cover (LH) 15. Seat cushion outer finisher (LH)
Revision: November 20132014 Altima NAMRevision: November 20132014 Altima NAM
Page 3776 of 4801
FRONT SEATSE-27
< REMOVAL AND INSTALLATION >
C
D E
F
G H
I
K L
M A
B
SE
N
O P
CAUTION:
Make sure that the seat harness or the floor trim is not damaged during installation.
DRIVER SIDE : Removal and Installation - Seatback BoardINFOID:0000000009462935
REMOVAL
CAUTION:
• Before servicing, turn ignition swit ch OFF, disconnect both battery terminals and wait at least three
minutes.
• Always work from the side or back of the seat back assembly, do not work in front of seat.
1. Slide the seat to the full forward position.
2. Disconnect the negative and positive battery terminal s and wait at least three minutes. Refer to PG-73,
"Removal and Installation (Battery)".
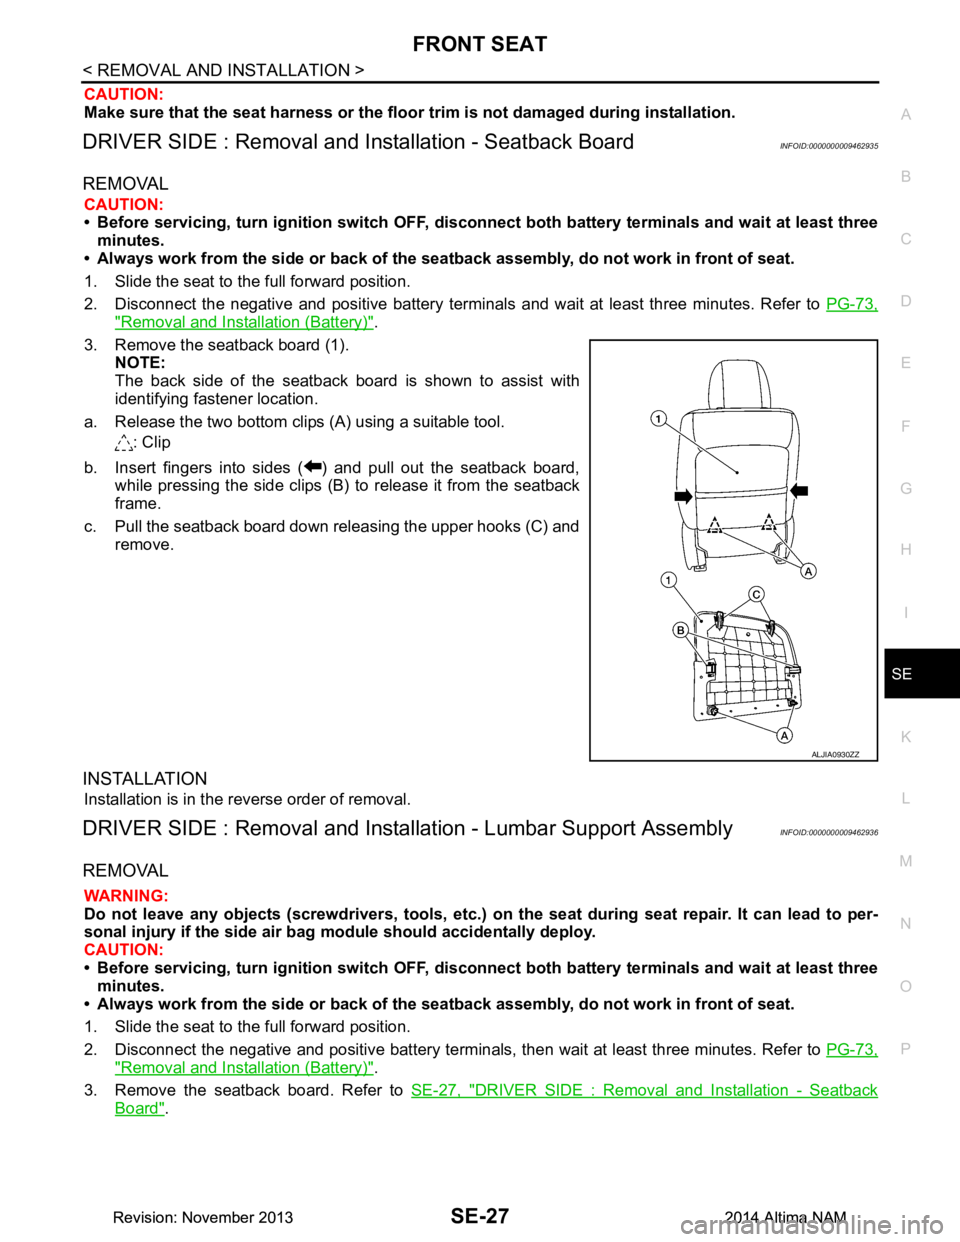
3. Remove the seatback board (1). NOTE:
The back side of the seatback boar d is shown to assist with
identifying fastener location.
a. Release the two bottom clips (A) using a suitable tool. : Clip
b. Insert fingers into sides ( ) and pull out the seatback board, while pressing the side clips (B) to release it from the seatback
frame.
c. Pull the seatback board down releasing the upper hooks (C) and remove.
INSTALLATION
Installation is in the reverse order of removal.
DRIVER SIDE : Removal and Installation - Lumbar Support AssemblyINFOID:0000000009462936
REMOVAL
WARNING:
Do not leave any objects (screwdriver s, tools, etc.) on the seat during seat repair. It can lead to per-
sonal injury if the side air bag module should accidentally deploy.
CAUTION:
• Before servicing, turn ignition swit ch OFF, disconnect both battery terminals and wait at least three
minutes.
• Always work from the side or back of the seat back assembly, do not work in front of seat.
1. Slide the seat to the full forward position.
2. Disconnect the negative and positive bat tery terminals, then wait at least three minutes. Refer to PG-73,
"Removal and Installation (Battery)".
3. Remove the seatback board. Refer to SE-27, "DRIVER SIDE : Removal and Installation - Seatback
Board".
ALJIA0930ZZ
Revision: November 20132014 Altima NAMRevision: November 20132014 Altima NAM
Page 3778 of 4801
FRONT SEATSE-29
< REMOVAL AND INSTALLATION >
C
D E
F
G H
I
K L
M A
B
SE
N
O P
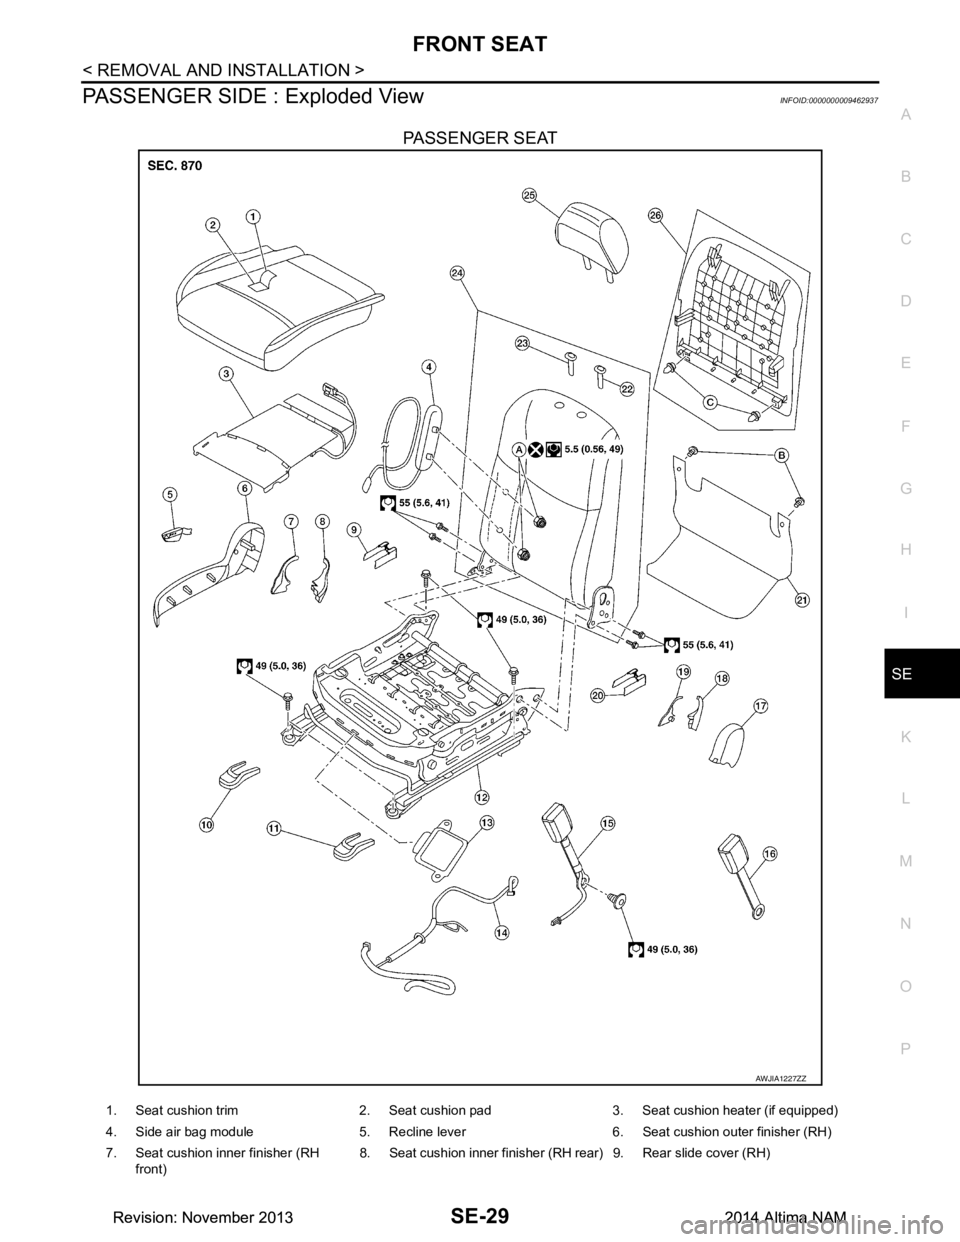
PASSENGER SIDE : Exploded ViewINFOID:0000000009462937
PASSENGER SEAT
AWJIA1227ZZ
1. Seat cushion trim 2. Seat cushion pad 3. Seat cushion heater (if equipped)
4. Side air bag module 5. Recline lever 6. Seat cushion outer finisher (RH)
7. Seat cushion inner finisher (RH front) 8. Seat cushion inner finisher
(RH rear) 9. Rear slide cover (RH)
Revision: November 20132014 Altima NAMRevision: November 20132014 Altima NAM
Page 3780 of 4801
FRONT SEATSE-31
< REMOVAL AND INSTALLATION >
C
D E
F
G H
I
K L
M A
B
SE
N
O P
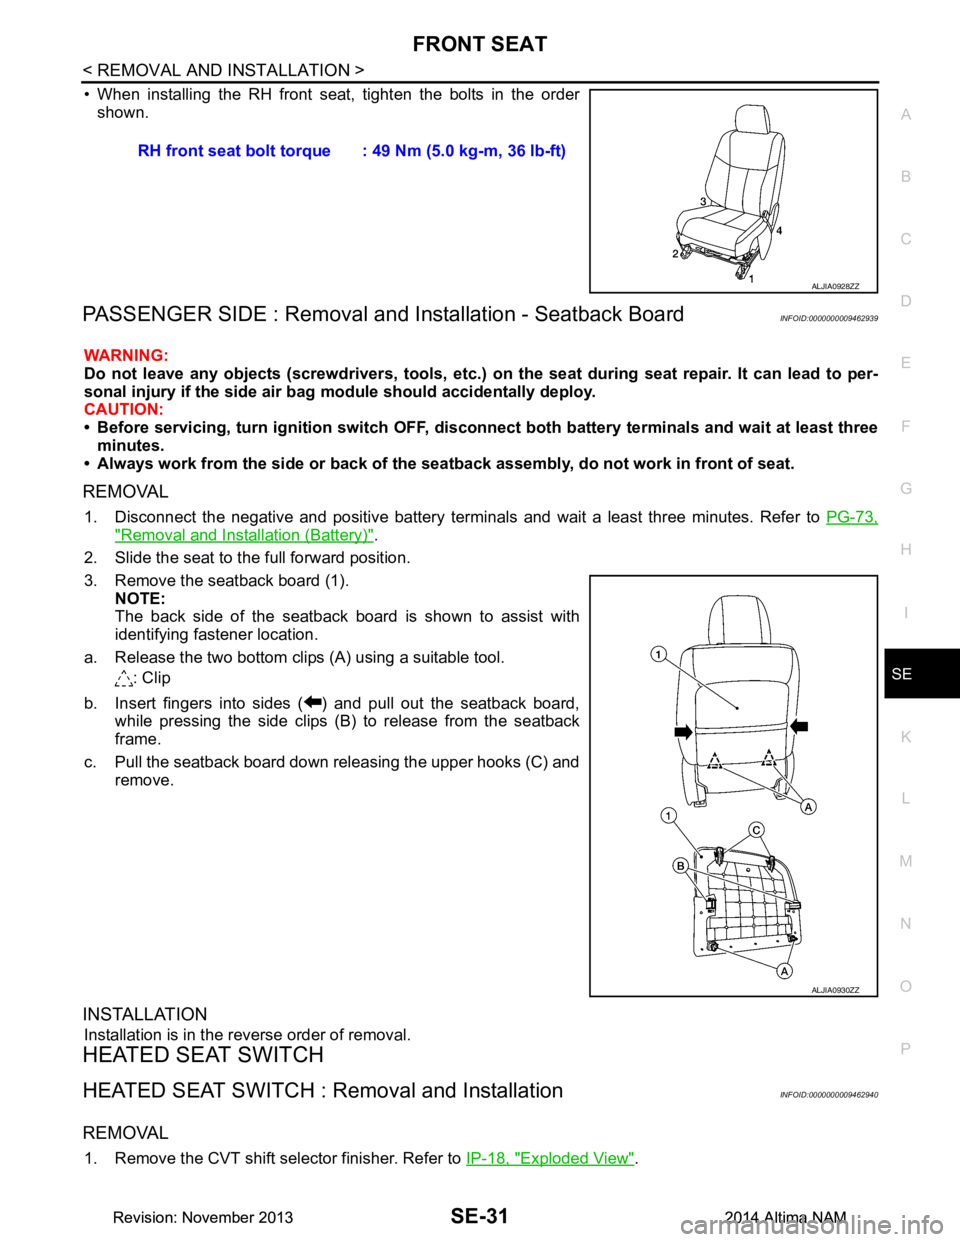
• When installing the RH front seat, tighten the bolts in the order shown.
PASSENGER SIDE : Removal and In stallation - Seatback BoardINFOID:0000000009462939
WARNING:
Do not leave any objects (screwdriver s, tools, etc.) on the seat during seat repair. It can lead to per-
sonal injury if the side air bag module should accidentally deploy.
CAUTION:
• Before servicing, turn ignition swit ch OFF, disconnect both battery terminals and wait at least three
minutes.
• Always work from the side or back of the seat back assembly, do not work in front of seat.
REMOVAL
1. Disconnect the negative and positive battery terminals and wait a least three minutes. Refer to PG-73,
"Removal and Installation (Battery)".
2. Slide the seat to the full forward position.
3. Remove the seatback board (1). NOTE:
The back side of the seatback boar d is shown to assist with
identifying fastener location.
a. Release the two bottom clips (A) using a suitable tool. : Clip
b. Insert fingers into sides ( ) and pull out the seatback board, while pressing the side clips (B) to release from the seatback
frame.
c. Pull the seatback board down releasing the upper hooks (C) and remove.
INSTALLATION
Installation is in the reverse order of removal.
HEATED SEAT SWITCH
HEATED SEAT SWITCH : Removal and InstallationINFOID:0000000009462940
REMOVAL
1. Remove the CVT shift selector finisher. Refer to IP-18, "Exploded View".
RH front seat bolt torque : 49 Nm (5.0 kg-m, 36 lb-ft)
ALJIA0928ZZ
ALJIA0930ZZ
Revision: November 20132014 Altima NAMRevision: November 20132014 Altima NAM
Page 3782 of 4801
REAR SEATSE-33
< REMOVAL AND INSTALLATION >
C
D E
F
G H
I
K L
M A
B
SE
N
O P
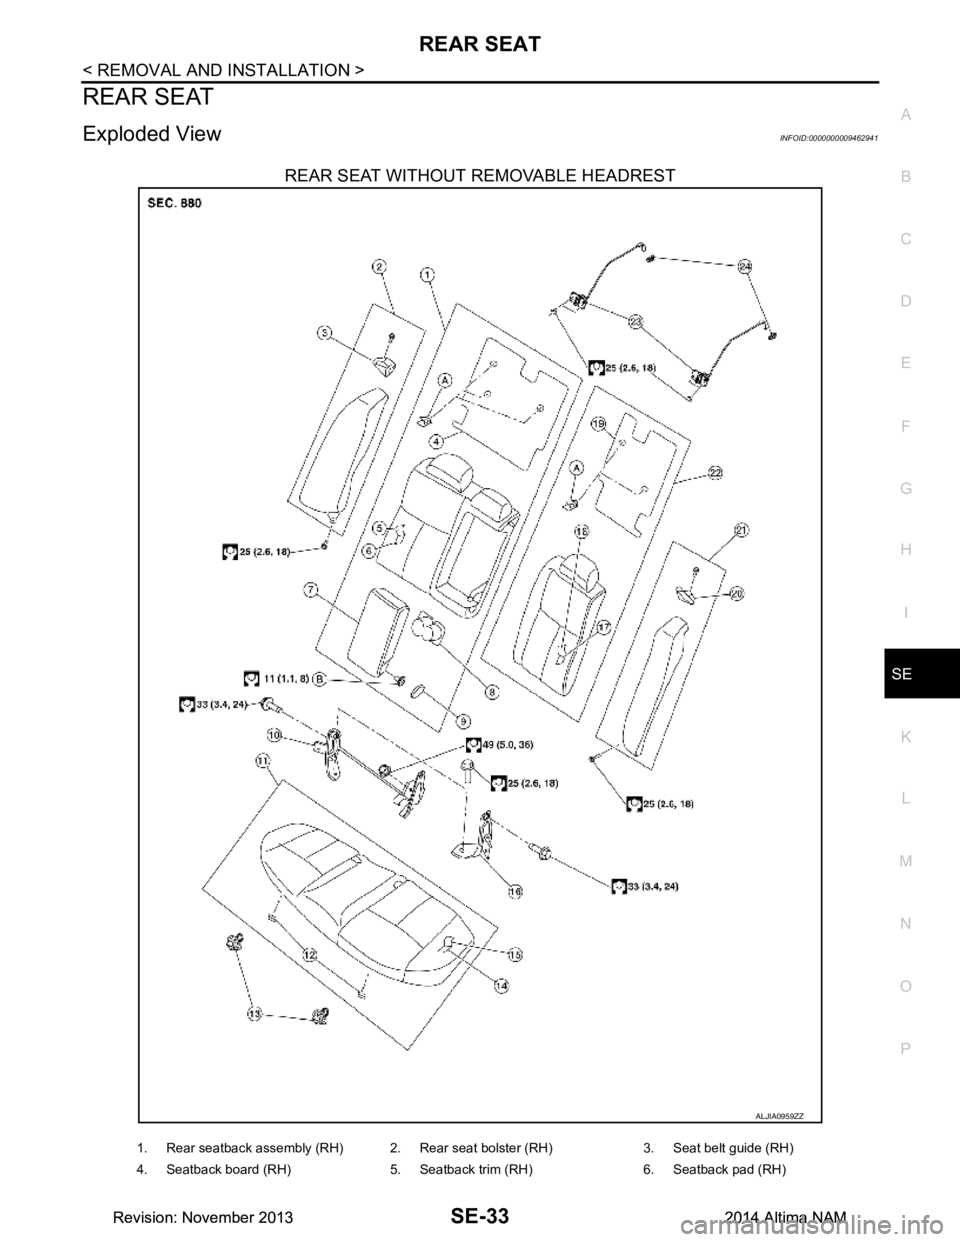
REAR SEAT
Exploded ViewINFOID:0000000009462941
REAR SEAT WITHOUT REMOVABLE HEADREST
ALJIA0959ZZ
1. Rear seatback assembly (RH) 2. Rear seat bolster (RH) 3. Seat belt guide (RH)
4. Seatback board (RH) 5. Seatback trim (RH) 6. Seatback pad (RH)
Revision: November 20132014 Altima NAMRevision: November 20132014 Altima NAM