2014 NISSAN TEANA ECU
[x] Cancel search: ECUPage 2586 of 4801
GW-6
< SYMPTOM DIAGNOSIS >
SQUEAK AND RATTLE TROUBLE DIAGNOSES
If possible, drive the vehicle with the customer until the noise is duplicated. Note any additional information on
the Diagnostic Worksheet regarding the conditions or lo cation of the noise. This information can be used to
duplicate the same conditions when you confirm the repair.
If the noise can be duplicated easily during the test drive, to help identify the source of the noise, try to dupli-
cate the noise with the vehicle stopped by doing one or all of the following:
1) Close a door.
2) Tap or push/pull around the area where the noise appears to be coming from.
3) Rev the engine.
4) Use a floor jack to recreate vehicle “twist”.
5) At idle, apply engine load (electrical load, half-clutch on M/T model, drive position on CVT and A/T models).
6) Raise the vehicle on a hoist and hit a tire with a rubber hammer.
• Drive the vehicle and attempt to duplicate the conditions the customer states exist when the noise occurs.
• If it is difficult to duplicate the noise, drive the v ehicle slowly on an undulating or rough road to stress the
vehicle body.
CHECK RELATED SERVICE BULLETINS
After verifying the customer concern or symptom, chec k ASIST for Technical Service Bulletins (TSBs) related
to that concern or symptom.
If a TSB relates to the symptom, follo w the procedure to repair the noise.
LOCATE THE NOISE AND IDENTIFY THE ROOT CAUSE
1. Narrow down the noise to a general area. To help pi npoint the source of the noise, use a listening tool
(Chassis Ear: J-39570, Engine Ear: J-39565 and mechanic's stethoscope).
2. Narrow down the noise to a more specific area and identify the cause of the noise by:
• removing the components in the area that you suspect the noise is coming from. Do not use too much force when removing clips and fasteners, otherwise clips and fasteners can be
broken or lost during the repair, resulting in the creation of new noise.
• tapping or pushing/pulling the component that you suspect is causing the noise.
Do not tap or push/pull the component with excessive force, otherwise the noise will be eliminated only
temporarily.
• feeling for a vibration with your hand by touching the component(s) that you suspect is (are) causing the
noise.
• placing a piece of paper between components that you suspect are causing the noise.
• looking for loose components and contact marks. Refer to GW-6, "Generic Squeak and Rattle Troubleshooting"
.
REPAIR THE CAUSE
• If the cause is a loose component, tighten the component securely.
• If the cause is insufficient clearance between components:
- separate components by repositioning or loos ening and retightening the component, if possible.
- insulate components with a suitable insulator such as urethane pads, foam blocks, felt cloth tape or urethane
tape. A NISSAN Squeak and Rattle Kit (J-50397) is av ailable through your authorized NISSAN Parts Depart-
ment.
CAUTION:
Do not use excessive force as many components are constructed of plastic and may be damaged.
NOTE:
• Always check with the Parts Department for the latest parts information.
• The materials contained in the NISSAN Squeak and Rattle Kit (J-50397) are listed on the inside cover of the
kit; and can each be ordered separately as needed.
• The following materials not found in the kit can also be used to repair squeaks and rattles.
- SILICONE GREASE: Use instead of UHMW tape that will be visible or does not fit. The silicone grease will
only last a few months.
- SILICONE SPRAY: Use when grease cannot be applied.
- DUCT TAPE: Use to eliminate movement.
CONFIRM THE REPAIR
Confirm that the cause of a noise is repaired by test driving the vehicle. Operate the vehicle under the same
conditions as when the noise originally occurred. Refer to the notes on the Diagnostic Worksheet.
Generic Squeak and Rattle TroubleshootingINFOID:0000000009463658
Refer to Table of Contents for specific component removal and installation information.
Revision: November 20132014 Altima NAM
Page 2588 of 4801

GW-8
< SYMPTOM DIAGNOSIS >
SQUEAK AND RATTLE TROUBLE DIAGNOSES
1. Loose harness or harness connectors.
2. Front console map/reading lamp lens loose.
3. Loose screws at console attachment points.
SEATS
When isolating seat noise it's important to note the pos ition the seat is in and the load placed on the seat when
the noise is present. These conditions should be dupl icated when verifying and isolating the cause of the
noise.
Cause of seat noise include:
1. Headrest rods and holder
2. A squeak between the seat pad cushion and frame
3. The rear seatback lock and bracket
These noises can be isolated by moving or pressing on the suspected components while duplicating the con-
ditions under which the noise occurs. Most of thes e incidents can be repaired by repositioning the component
or applying urethane tape to the contact area.
UNDERHOOD
Some interior noise may be caused by components under the hood or on the engine wall. The noise is then
transmitted into the passenger compartment.
Causes of transmitted underhood noise include:
1. Any component installed to the engine wall
2. Components that pass through the engine wall
3. Engine wall mounts and connectors
4. Loose radiator installation pins
5. Hood bumpers out of adjustment
6. Hood striker out of adjustment
These noises can be difficult to isolate since they cannot be reached from the interior of the vehicle. The best
method is to secure, move or insulate one component at a time and test drive the vehicle. Also, engine rpm or
load can be changed to isolate the noise. Repairs can usually be made by moving, adjusting, securing, or
insulating the component causing the noise.
Revision: November 20132014 Altima NAM
Page 2592 of 4801
GW-12
< REMOVAL AND INSTALLATION >
WINDSHIELD GLASS
Removal and Installation
INFOID:0000000009463661
REMOVAL
1. Partially remove the headlining (front edge). Refer to INT-30, "Removal and Installation".
2. Remove inside mirror. Refer to MIR-19, "Removal and Installation"
.
3. Remove the cowl top cover. Refer to EXT-24, "Removal and Installation"
.
4. Remove roof side moldings (LH/RH). Refer to EXT-36, "Removal and Installation"
.
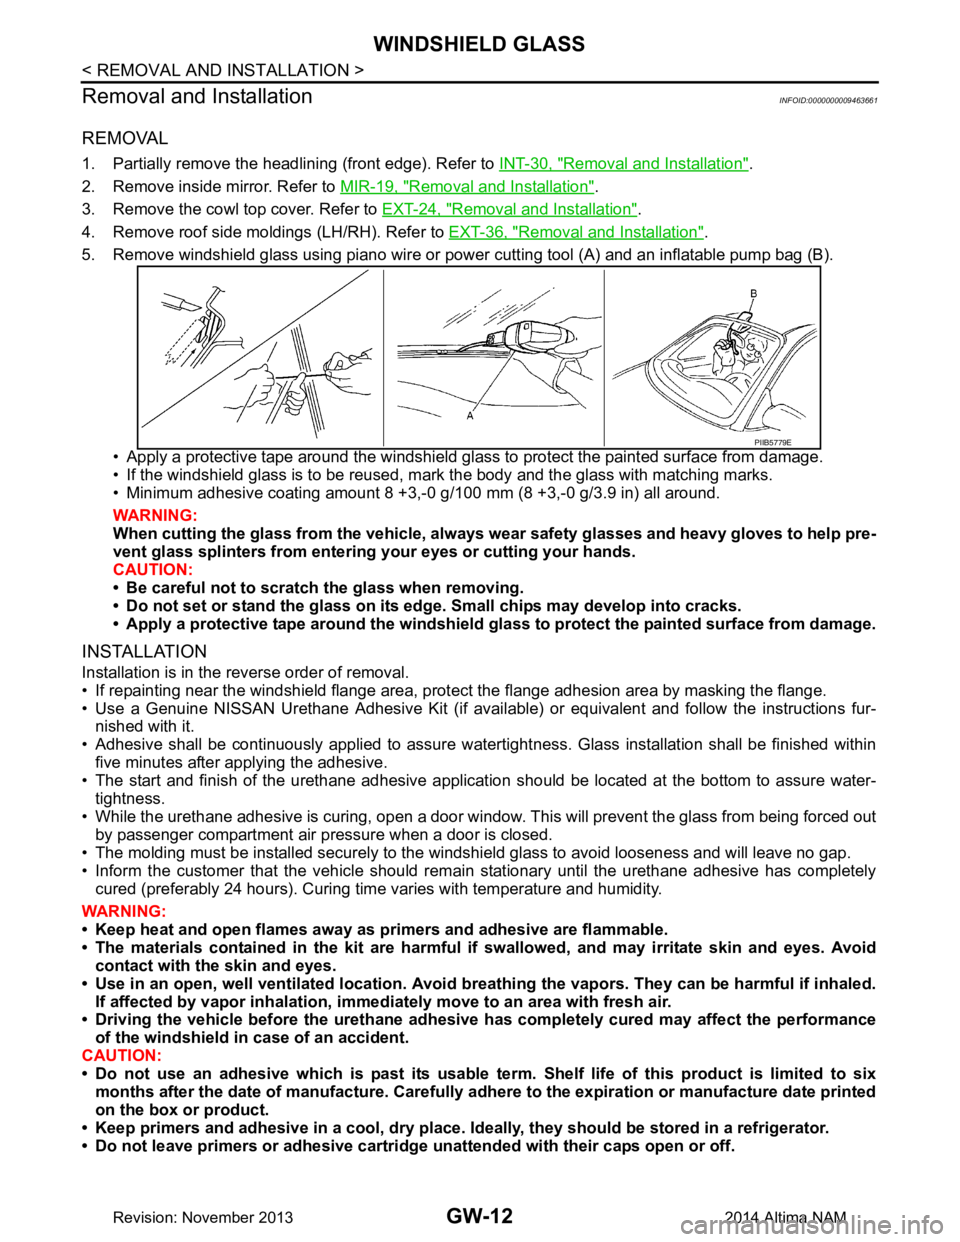
5. Remove windshield glass using piano wire or pow er cutting tool (A) and an inflatable pump bag (B).
• Apply a protective tape around the windshield gla ss to protect the painted surface from damage.
• If the windshield glass is to be reused, mark the body and the glass with matching marks.
• Minimum adhesive coating amount 8 +3,- 0 g/100 mm (8 +3,-0 g/3.9 in) all around.
WARNING:
When cutting the glass from the vehicle, always wear safety glasses and heavy gloves to help pre-
vent glass splinters from entering your eyes or cutting your hands.
CAUTION:
• Be careful not to scratch the glass when removing.
• Do not set or stand the glass on its ed ge. Small chips may develop into cracks.
• Apply a protective tape around the windshield glass to protect the painted surface from damage.
INSTALLATION
Installation is in the reverse order of removal.
• If repainting near the windshield flange area, pr otect the flange adhesion area by masking the flange.
• Use a Genuine NISSAN Urethane Adhesive Kit (if availabl e) or equivalent and follow the instructions fur-
nished with it.
• Adhesive shall be continuously applied to assure watert ightness. Glass installation shall be finished within
five minutes after applying the adhesive.
• The start and finish of the urethane adhesive application should be located at the bottom to assure water-
tightness.
• While the urethane adhesive is curing, open a door window . This will prevent the glass from being forced out
by passenger compartment air pressure when a door is closed.
• The molding must be installed securely to the windshield glass to avoid looseness and will leave no gap.
• Inform the customer that the vehicle should rema in stationary until the urethane adhesive has completely
cured (preferably 24 hours). Curing time varies with temperature and humidity.
WARNING:
• Keep heat and open flames away as primers and adhesive are flammable.
• The materials contained in the kit are harmful if swallowed, and may irritate skin and eyes. Avoid
contact with the skin and eyes.
• Use in an open, well ventilated location. Avoid br eathing the vapors. They can be harmful if inhaled.
If affected by vapor inhalation, imme diately move to an area with fresh air.
• Driving the vehicle before the urethane adhesive has completely cured may affect the performance
of the windshield in case of an accident.
CAUTION:
• Do not use an adhesive which is past its usable te rm. Shelf life of this product is limited to six
months after the date of manufacture. Carefully a dhere to the expiration or manufacture date printed
on the box or product.
• Keep primers and adhesive in a c ool, dry place. Ideally, they should be stored in a refrigerator.
• Do not leave primers or adhesive cartridge unattended with their caps open or off.
PIIB5779E
Revision: November 20132014 Altima NAM
Page 2594 of 4801
GW-14
< REMOVAL AND INSTALLATION >
FRONT DOOR GLASS
FRONT DOOR GLASS
Removal and InstallationINFOID:0000000009463662
WARNING:
• Before servicing, turn ignition sw itch OFF, disconnect both battery terminals and wait at least three
minutes.
• Do not use air tools or el ectric tools for servicing.
REMOVAL
NOTE:
LH side shown; RH side similar
1. Disconnect the battery positive and negative terminal. Refer to PG-73, "Removal and Installation (Bat-
tery)".
2. Remove the front door finisher. Refer to INT-15, "Removal and Installation"
.
3. Remove the vapor barrier. CAUTION:
Use care to not damage or tear vapor barrier during removal.
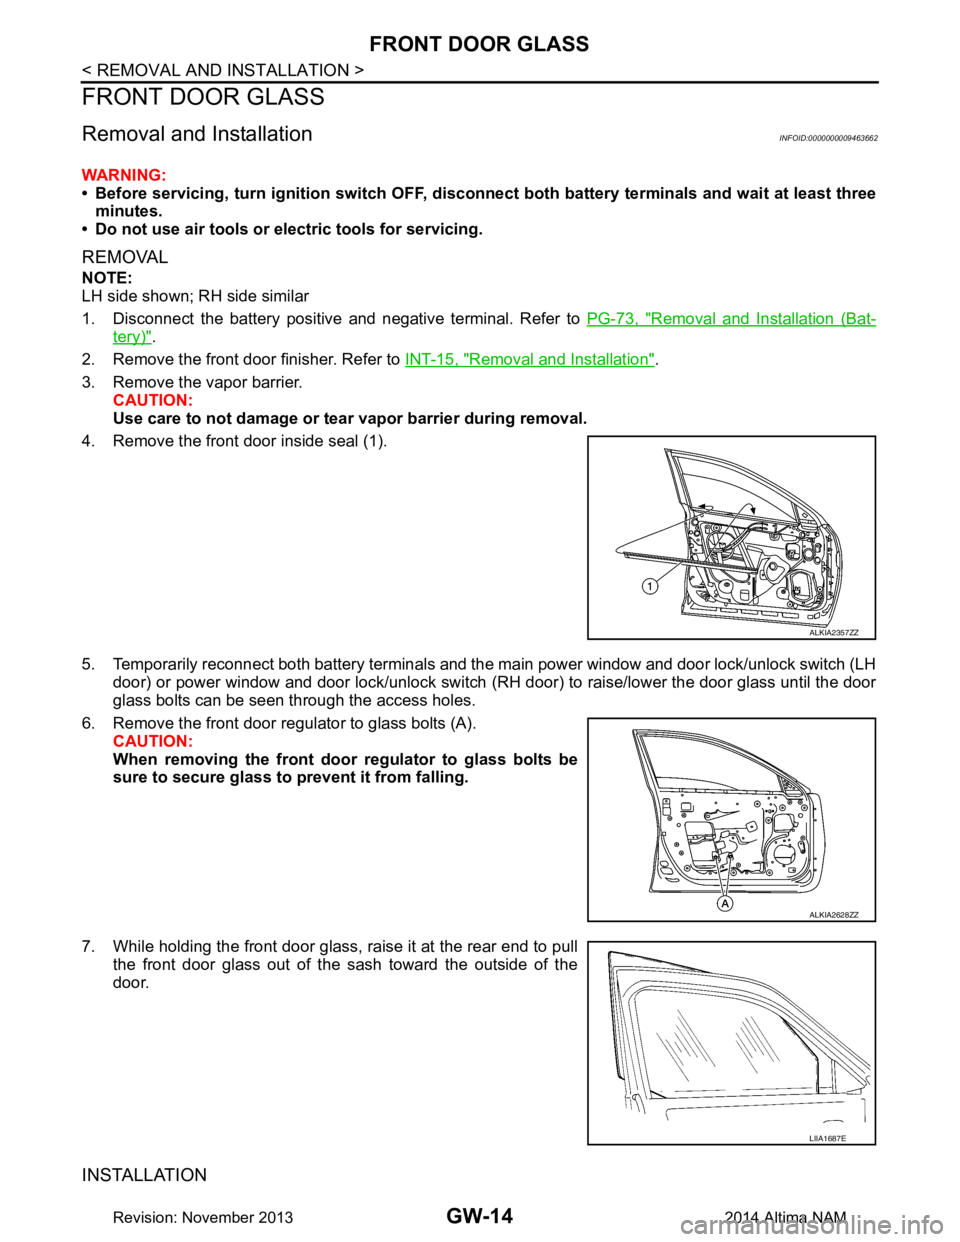
4. Remove the front door inside seal (1).
5. Temporarily reconnect both battery terminals and the main power window and door lock/unlock switch (LH door) or power window and door lock/unlock switch ( RH door) to raise/lower the door glass until the door
glass bolts can be seen through the access holes.
6. Remove the front door regul ator to glass bolts (A).
CAUTION:
When removing the front door regulator to glass bolts be
sure to secure glass to prevent it from falling.
7. While holding the front door glass, raise it at the rear end to pull the front door glass out of the sash toward the outside of the
door.
INSTALLATION
ALKIA2357ZZ
ALKIA2628ZZ
LIIA1687E
Revision: November 20132014 Altima NAM
Page 2595 of 4801
FRONT DOOR GLASSGW-15
< REMOVAL AND INSTALLATION >
C
D E
F
G H
I
J
L
M A
B
GW
N
O P
Installation is in the reverse order of removal.
• Tighten the front door regulator to glass bolts to specification.
FRONT DOOR GLASS INSPECTION AFTER INSTALLATION
• Check that the door glass is securely set into the glass run groove.
• Lower the door glass slightly [approximately 10 to 20 mm (0.4 to 0.8 in)] and check that the clearance to the
sash is parallel. If the clearance between the door gla ss and sash is not parallel, loosen the regulator bolts,
guide rail bolts, and door glass and guide rail bolts to correct the glass position.
Inspection and AdjustmentINFOID:0000000009463663
SYSTEM INITIALIZATION (IF NECESSARY)
• If any of the following occur, syst em initialization must be performed.
- Electric power supply to power window switch or motor is interrupted by blown fuse or disconnecting battery cable, etc.
- Removal and installation of the regulator assembly.
- Removal and installation of the motor from the regulator assembly.
- Removal and installation of the harness connector of the power window switch.
- Operation of the regulator assembly as a unit.
- Removal and installation of the door glass.
- Removal and installation of the door glass run.
- Window is partly opened and or closed multiple times with out being fully closed.
• To perform system initialization, refer to the following:
- For LH ONLY ANTI-PINCH, refer to PWC-27, "ADDITIONAL SERVICE WHEN REMOVING BATTERY
NEGATIVE TERMINAL : Special Repair Requirement".
- For LH&RH FRONT ANTI-PINCH, refer to PWC-93, "ADDITIONAL SERVICE WHEN REMOVING BAT-
TERY NEGATIVE TERMINAL : Special Repair Requirement".
INSPECT THE FUNCTION OF THE ANTI-PINCH SYSTEM.
To inspect the anti-pinch system, refer to the following:
• For LH ONLY ANTI-PINCH, refer to PWC-27, "ADDITIONAL SERVICE WHEN REMOVING BATTERY
NEGATIVE TERMINAL : Special Repair Requirement".
• For LH&RH FRONT ANTI-PINCH, refer to PWC-93, "ADDITIONAL SERVICE WHEN REMOVING BAT-
TERY NEGATIVE TERMINAL : Special Repair Requirement".
Front door regulator to glass bol
ts : 6.1 N·m (0.62 kg-m, 54 in-lb)
Revision: November 20132014 Altima NAM
Page 2597 of 4801
FRONT REGULATORGW-17
< REMOVAL AND INSTALLATION >
C
D E
F
G H
I
J
L
M A
B
GW
N
O P
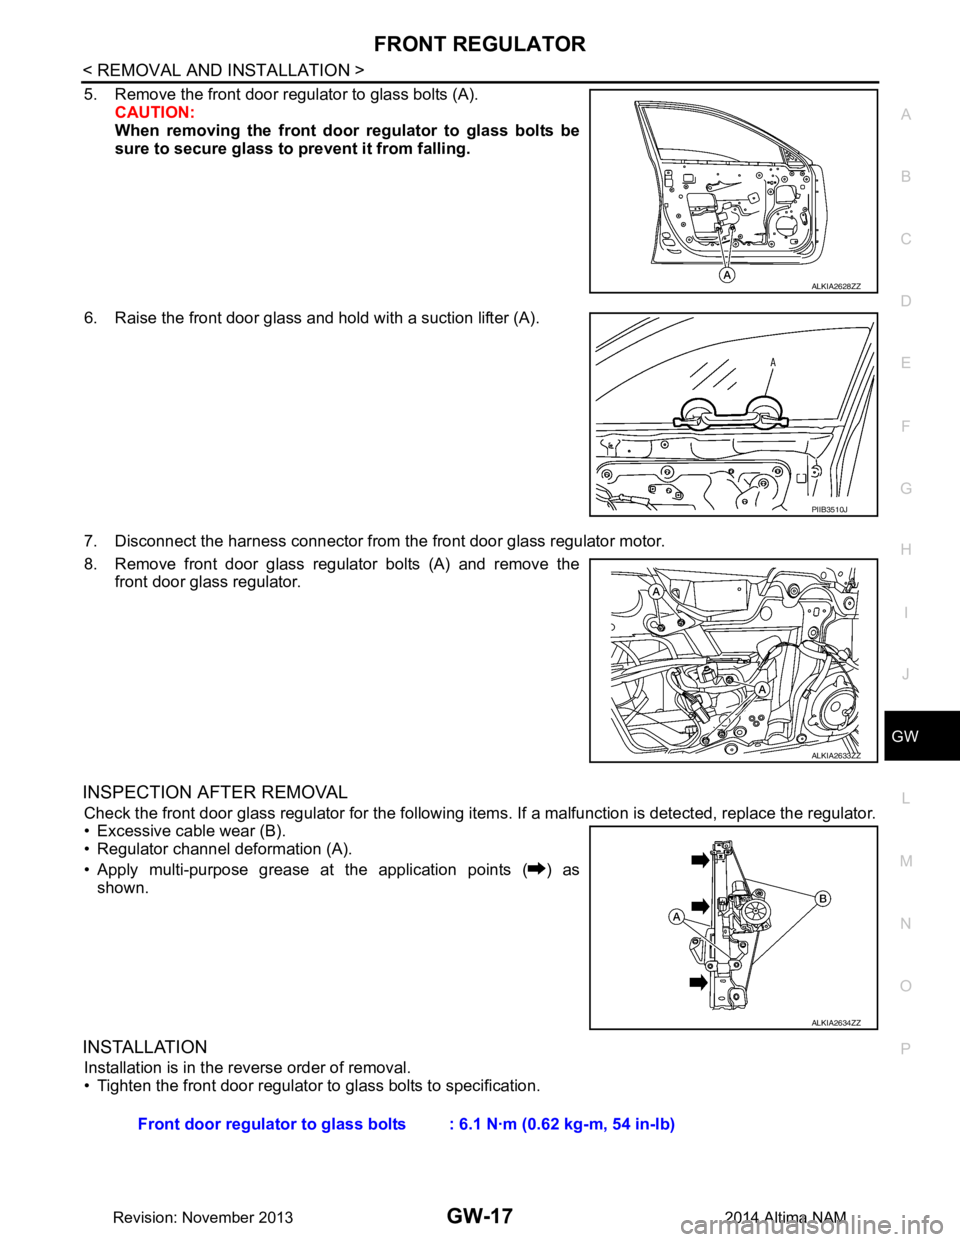
5. Remove the front door regulator to glass bolts (A). CAUTION:
When removing the front door regulator to glass bolts be
sure to secure glass to prevent it from falling.
6. Raise the front door glass and hold with a suction lifter (A).
7. Disconnect the harness connector from the front door glass regulator motor.
8. Remove front door glass regulator bolts (A) and remove the front door glass regulator.
INSPECTION AFTER REMOVAL
Check the front door glass regulator for the following item s. If a malfunction is detected, replace the regulator.
• Excessive cable wear (B).
• Regulator channel deformation (A).
• Apply multi-purpose grease at the application points ( ) as shown.
INSTALLATION
Installation is in the reverse order of removal.
• Tighten the front door regulator to glass bolts to specification.
ALKIA2628ZZ
PIIB3510J
ALKIA2633ZZ
ALKIA2634ZZ
Front door regulator to glass bol ts : 6.1 N·m (0.62 kg-m, 54 in-lb)
Revision: November 20132014 Altima NAM
Page 2599 of 4801
REAR DOOR GLASSGW-19
< REMOVAL AND INSTALLATION >
C
D E
F
G H
I
J
L
M A
B
GW
N
O P
REAR DOOR GLASS
Removal and InstallationINFOID:0000000009463668
REMOVAL
1. Remove the rear door finisher. Refer to INT-18, "Removal and Installation".
2. Remove the vapor barrier. CAUTION:
Use care to not damage or tear vapor barrier during removal.
3. Remove the rear door window inside seal.
4. Remove the rear door window run rubber.
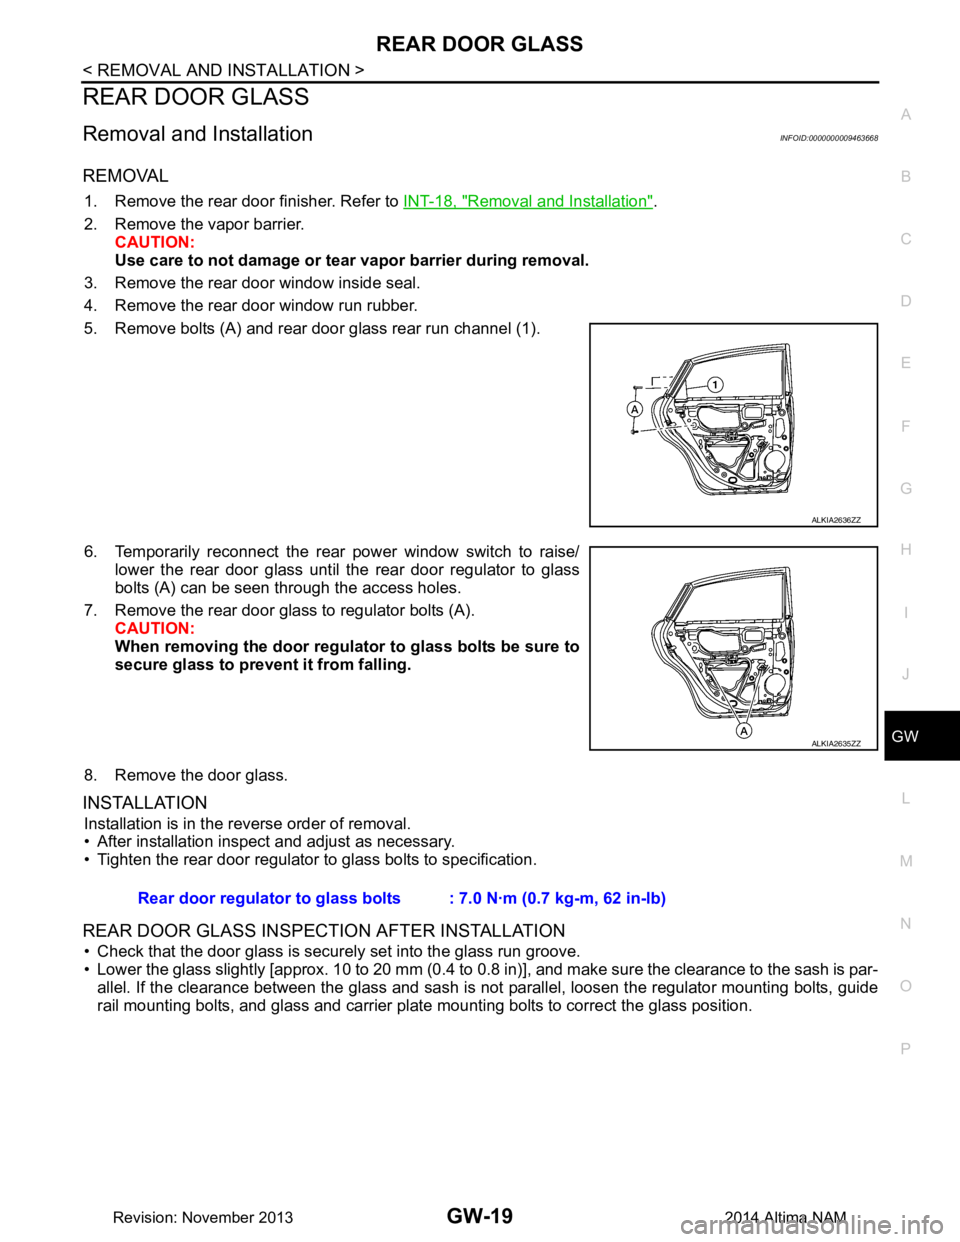
5. Remove bolts (A) and rear door glass rear run channel (1).
6. Temporarily reconnect the rear power window switch to raise/ lower the rear door glass until the rear door regulator to glass
bolts (A) can be seen through the access holes.
7. Remove the rear door glass to regulator bolts (A). CAUTION:
When removing the door regula tor to glass bolts be sure to
secure glass to prevent it from falling.
8. Remove the door glass.
INSTALLATION
Installation is in the reverse order of removal.
• After installation inspect and adjust as necessary.
• Tighten the rear door regulator to glass bolts to specification.
REAR DOOR GLASS INSPECTION AFTER INSTALLATION
• Check that the door glass is securely set into the glass run groove.
• Lower the glass slightly [approx. 10 to 20 mm (0.4 to 0.8 in)], and make sure the clearance to the sash is par-
allel. If the clearance between the glass and sash is not parallel, loosen the regulator mounting bolts, guide
rail mounting bolts, and glass and carrier plate mounting bolts to correct the glass position.
ALKIA2636ZZ
ALKIA2635ZZ
Rear door regulator to glass bolts : 7.0 N·m (0.7 kg-m, 62 in-lb)
Revision: November 20132014 Altima NAM
Page 2601 of 4801
REAR REGULATORGW-21
< REMOVAL AND INSTALLATION >
C
D E
F
G H
I
J
L
M A
B
GW
N
O P
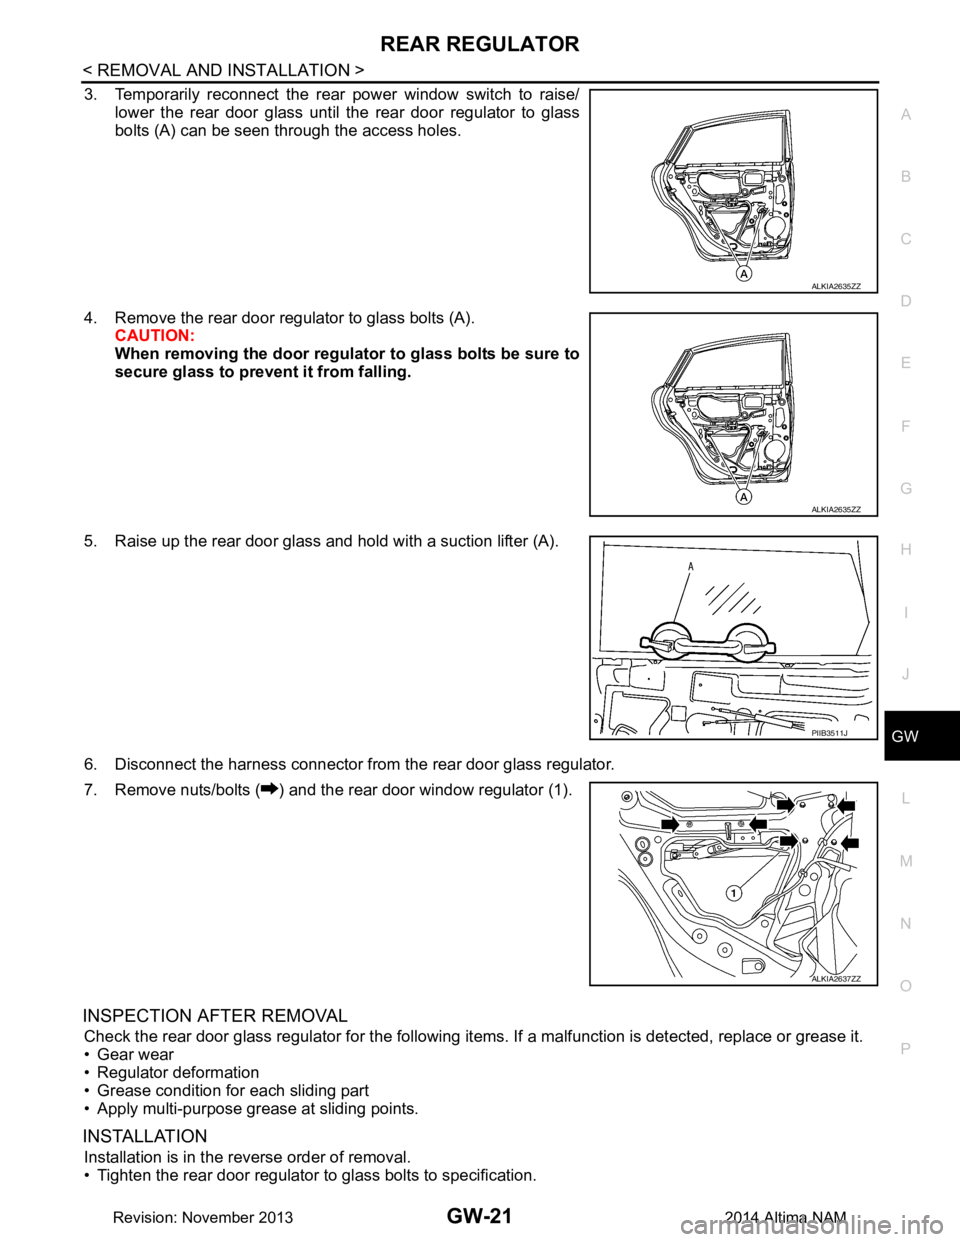
3. Temporarily reconnect the rear power window switch to raise/ lower the rear door glass until the rear door regulator to glass
bolts (A) can be seen through the access holes.
4. Remove the rear door regulator to glass bolts (A). CAUTION:
When removing the door regula tor to glass bolts be sure to
secure glass to prevent it from falling.
5. Raise up the rear door glass and hold with a suction lifter (A).
6. Disconnect the harness connector from the rear door glass regulator.
7. Remove nuts/bolts ( ) and the rear door window regulator (1).
INSPECTION AFTER REMOVAL
Check the rear door glass regul ator for the following items. If a malf unction is detected, replace or grease it.
• Gear wear
• Regulator deformation
• Grease condition for each sliding part
• Apply multi-purpose grease at sliding points.
INSTALLATION
Installation is in the reverse order of removal.
• Tighten the rear door regulator to glass bolts to specification.
ALKIA2635ZZ
ALKIA2635ZZ
PIIB3511J
ALKIA2637ZZ
Revision: November 20132014 Altima NAM